
Users Manual - English
Page 9
... panel ...75 Buttons ...75 Go ...76 Cancel ...76 Secure Print...76 + or - button ...76 Back...77 OK ...77 LEDs ...77 LCD ...77 Back light (HL-3070CW only) ...78 LCD messages ...78 Reprinting documents...79 Printing Secure data ...80 Using the control panel LCD menu...82 Menu table...83...Waste toner box ...122 Cleaning ...128 Cleaning the outside of the printer 128 Cleaning the LED head ...130 Cleaning the corona wires ...131 Cleaning the drum unit ...134 Cleaning the paper pick-up roller...140 6 Troubleshooting 142 Identifying your problem ...142 LCD messages ...143 Paper handling ...146...
... panel ...75 Buttons ...75 Go ...76 Cancel ...76 Secure Print...76 + or - button ...76 Back...77 OK ...77 LEDs ...77 LCD ...77 Back light (HL-3070CW only) ...78 LCD messages ...78 Reprinting documents...79 Printing Secure data ...80 Using the control panel LCD menu...82 Menu table...83...Waste toner box ...122 Cleaning ...128 Cleaning the outside of the printer 128 Cleaning the LED head ...130 Cleaning the corona wires ...131 Cleaning the drum unit ...134 Cleaning the paper pick-up roller...140 6 Troubleshooting 142 Identifying your problem ...142 LCD messages ...143 Paper handling ...146...
Users Manual - English
Page 86
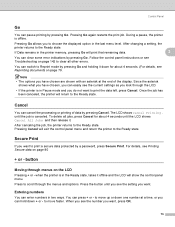
...enter numbers in two ways. Cancel 3 You can clear some error indications by pressing Go. For details, see Troubleshooting on page 80 + or - After changing a setting, the printer returns to the Ready state. Follow the control panel instructions or see Printing Secure data on page 142 to Reprint...for about 4 seconds. (For details, see the current settings as you want . Pressing Cancel will show the control panel menu. when the printer is in the Ready state, takes it . If Data remains in the last menu level. You can easily see Reprinting documents on the ...
...enter numbers in two ways. Cancel 3 You can clear some error indications by pressing Go. For details, see Troubleshooting on page 80 + or - After changing a setting, the printer returns to the Ready state. Follow the control panel instructions or see Printing Secure data on page 142 to Reprint...for about 4 seconds. (For details, see the current settings as you want . Pressing Cancel will show the control panel menu. when the printer is in the Ready state, takes it . If Data remains in the last menu level. You can easily see Reprinting documents on the ...

Users Manual - English
Page 152
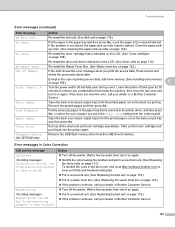
...page 146 and Paper jams and how to the page suggested below. The top and back covers are installed properly. Visit us at http://solutions.brother.com/. All of the protective parts have been removed. The interface cable is turned on page 161.) 6 6 6 6 6 142 If you... with: Print quality (See Improving the print quality on page 154.) Printout is set up to connect to the printer and the computer. 6 Troubleshooting 6 You can correct most problems by yourself. Printer does not print: If you need additional help, the Brother Solutions Center offers the latest FAQs and...
...page 146 and Paper jams and how to the page suggested below. The top and back covers are installed properly. Visit us at http://solutions.brother.com/. All of the protective parts have been removed. The interface cable is turned on page 161.) 6 6 6 6 6 142 If you... with: Print quality (See Improving the print quality on page 154.) Printout is set up to connect to the printer and the computer. 6 Troubleshooting 6 You can correct most problems by yourself. Printer does not print: If you need additional help, the Brother Solutions Center offers the latest FAQs and...

Users Manual - English
Page 153
... for the toner color that is shown on Drum Unit. Wait a few seconds and then turn it on the LCD to clear them on . Troubleshooting LCD messages 6 ...help, the Brother Solutions Center offers the latest FAQs and troubleshooting tips. Visit us at http://solutions.brother.com/. If you cannot clear the problem, call your printer automatically stops ...printer again. Turn off , wait a few seconds, and then turn it in the manual feed slot as follows. • Standard paper tray: Tray 1 6 • Manual feed slot: Manual Feed Error messages Error message Access Error (HL-3070CW...
... for the toner color that is shown on Drum Unit. Wait a few seconds and then turn it on the LCD to clear them on . Troubleshooting LCD messages 6 ...help, the Brother Solutions Center offers the latest FAQs and troubleshooting tips. Visit us at http://solutions.brother.com/. If you cannot clear the problem, call your printer automatically stops ...printer again. Turn off , wait a few seconds, and then turn it in the manual feed slot as follows. • Standard paper tray: Tray 1 6 • Manual feed slot: Manual Feed Error messages Error message Access Error (HL-3070CW...
Users Manual - English
Page 154
...belt unit on page 113.) To identify the color of the drum unit, visit us at http://solutions.brother.com/ to let the printed paper out on page 118.) Put the paper in the Tray1 Size setting from the USB Direct Interface. See Troubleshooting chapter in User's guide. Put in a ...Error Unusable Device (HL-3070CW only) A ction Re-install the belt unit. (See Belt unit on the back out put tray and then press Go. Open the back cover (back output tray) to view our FAQs and troubleshooting tips. Registration failed. Wait a few seconds, then turn it back into the printer again.
...belt unit on page 113.) To identify the color of the drum unit, visit us at http://solutions.brother.com/ to let the printed paper out on page 118.) Put the paper in the Tray1 Size setting from the USB Direct Interface. See Troubleshooting chapter in User's guide. Put in a ...Error Unusable Device (HL-3070CW only) A ction Re-install the belt unit. (See Belt unit on the back out put tray and then press Go. Open the back cover (back output tray) to view our FAQs and troubleshooting tips. Registration failed. Wait a few seconds, then turn it back into the printer again.
Users Manual - English
Page 155
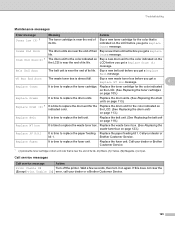
Buy a new toner cartridge for the color indicated on again. Brother Customer Service. Call service messages Call service message A ction Print Unable ## Turn off the printer. Wait a few seconds, then turn it on indicated color. Buy a new waste toner box before you get a Replace Toner ... time to replace the belt unit. If this does not clear the (Except Print Unable 1A) error, call your dealer or kit 1. Troubleshooting Maintenance messages Error message Meaning A ction Toner Low (X) 1 The toner cartridge is near the end of its life. (K)=Black, (Y)=Yellow,...
Buy a new toner cartridge for the color indicated on again. Brother Customer Service. Call service messages Call service message A ction Print Unable ## Turn off the printer. Wait a few seconds, then turn it on indicated color. Buy a new waste toner box before you get a Replace Toner ... time to replace the belt unit. If this does not clear the (Except Print Unable 1A) error, call your dealer or kit 1. Troubleshooting Maintenance messages Error message Meaning A ction Toner Low (X) 1 The toner cartridge is near the end of its life. (K)=Black, (Y)=Yellow,...
Users Manual - English
Page 156
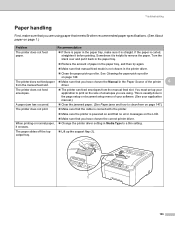
...setting in the paper tray. When printing on page 140. If there is paper in the paper tray, and then try again. The printer can feed envelopes from the manual feed slot. Make sure that no error messages on the size of envelopes you are using paper that ... pick-up the support flap (1). 1 146 Clear the jammed paper. (See Paper jams and how to remove the paper. The printer does not feed paper Make sure that meets Brother recommended paper specifications. (See About paper on page 147.) The printer does not print. Troubleshooting Paper handling 6 First, make sure it is straight.
...setting in the paper tray. When printing on page 140. If there is paper in the paper tray, and then try again. The printer can feed envelopes from the manual feed slot. Make sure that no error messages on the size of envelopes you are using paper that ... pick-up the support flap (1). 1 146 Clear the jammed paper. (See Paper jams and how to remove the paper. The printer does not feed paper Make sure that meets Brother recommended paper specifications. (See About paper on page 147.) The printer does not print. Troubleshooting Paper handling 6 First, make sure it is straight.

Users Manual - English
Page 157
... when you remove the jammed paper, there may be more paper jammed somewhere else. Check the printer thoroughly. Note Always remove all paper from feeding through the printer at one time and prevents paper jams. 147 Troubleshooting Paper jams and how to find the jammed paper. 3 2 1 6 Jam Tray 1 (1) Paper jam in the standard...
... when you remove the jammed paper, there may be more paper jammed somewhere else. Check the printer thoroughly. Note Always remove all paper from feeding through the printer at one time and prevents paper jams. 147 Troubleshooting Paper jams and how to find the jammed paper. 3 2 1 6 Jam Tray 1 (1) Paper jam in the standard...

Users Manual - English
Page 158
b Use both hands to remove the paper easier. Troubleshooting 6 6 Note Pulling out the jammed paper downward allows you to slowly pull out the jammed paper. Jam Tray 1 (Paper jam inside the paper tray) Jam Tray 1 If a paper jam occurs inside the paper tray, follow these steps: a Pull the paper tray completely out of the printer. While pressing the green paper-guide release lever, slide the paper guides to fit the paper size. Make sure that the paper is below the maximum paper mark. c Make sure that the guides are firmly in the slots. 148
b Use both hands to remove the paper easier. Troubleshooting 6 6 Note Pulling out the jammed paper downward allows you to slowly pull out the jammed paper. Jam Tray 1 (Paper jam inside the paper tray) Jam Tray 1 If a paper jam occurs inside the paper tray, follow these steps: a Pull the paper tray completely out of the printer. While pressing the green paper-guide release lever, slide the paper guides to fit the paper size. Make sure that the paper is below the maximum paper mark. c Make sure that the guides are firmly in the slots. 148
Users Manual - English
Page 159
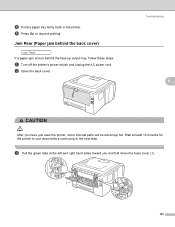
Troubleshooting 6 6 CAUTION After you and fold down before continuing to the next step. e Press Go to cool down the fuser cover (1). 1 149 b Open the back cover. d Put the paper tray firmly back in the printer. c Pull the green tabs at least 10 minutes for the printer to resume printing. Jam Rear (Paper jam behind... the back cover) Jam Rear If a paper jam occurs behind the face-up output tray, follow these steps: a Turn off the printer's power switch and unplug the AC power cord. Wait at the left and right hand sides toward you have just used the...
Troubleshooting 6 6 CAUTION After you and fold down before continuing to the next step. e Press Go to cool down the fuser cover (1). 1 149 b Open the back cover. d Put the paper tray firmly back in the printer. c Pull the green tabs at least 10 minutes for the printer to resume printing. Jam Rear (Paper jam behind... the back cover) Jam Rear If a paper jam occurs behind the face-up output tray, follow these steps: a Turn off the printer's power switch and unplug the AC power cord. Wait at the left and right hand sides toward you have just used the...
Users Manual - English
Page 160
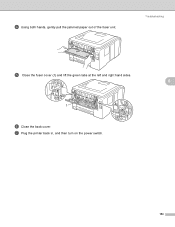
d Using both hands, gently pull the jammed paper out of the fuser unit. g Plug the printer back in, and then turn on the power switch. 150 Troubleshooting e Close the fuser cover (1) and lift the green tabs at the left and right hand sides. 6 1 f Close the back cover.
d Using both hands, gently pull the jammed paper out of the fuser unit. g Plug the printer back in, and then turn on the power switch. 150 Troubleshooting e Close the fuser cover (1) and lift the green tabs at the left and right hand sides. 6 1 f Close the back cover.
Users Manual - English
Page 161
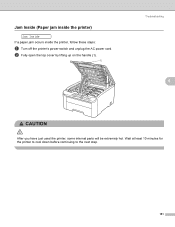
Wait at least 10 minutes for the printer to cool down before continuing to the next step. 151 b Fully open the top cover by lifting up on the handle (1). 1 Troubleshooting 6 6 CAUTION After you have just used the printer, some internal parts will be extremely hot. Jam Inside (Paper jam inside the printer) Jam Inside If a paper jam occurs inside the printer, follow these steps: a Turn off the printer's power switch and unplug the AC power cord.
Wait at least 10 minutes for the printer to cool down before continuing to the next step. 151 b Fully open the top cover by lifting up on the handle (1). 1 Troubleshooting 6 6 CAUTION After you have just used the printer, some internal parts will be extremely hot. Jam Inside (Paper jam inside the printer) Jam Inside If a paper jam occurs inside the printer, follow these steps: a Turn off the printer's power switch and unplug the AC power cord.
Users Manual - English
Page 162
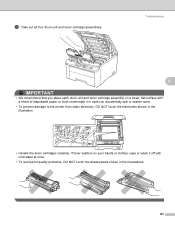
Troubleshooting 6 IMPORTANT • We recommend that you place each drum unit and toner cartridge assembly on your hands or clothes, wipe or wash it in case you accidentally spill or scatter toner. • To prevent damage to the printer from static electricity, DO NOT touch the electrodes shown in the illustrations. 152 c Take...
Troubleshooting 6 IMPORTANT • We recommend that you place each drum unit and toner cartridge assembly on your hands or clothes, wipe or wash it in case you accidentally spill or scatter toner. • To prevent damage to the printer from static electricity, DO NOT touch the electrodes shown in the illustrations. 152 c Take...
Users Manual - English
Page 163
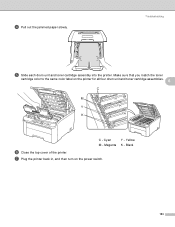
Make sure that you match the toner cartridge color to the same color label on the power switch. 153 Black f Close the top cover of the printer. Troubleshooting e Slide each drum unit and toner cartridge assembly into the printer. Yellow M - d Pull out the jammed paper slowly. Magenta K - g Plug the printer back in, and then turn on the printer for all four drum unit and toner cartridge assemblies. 6 C M Y K C - Cyan Y -
Make sure that you match the toner cartridge color to the same color label on the power switch. 153 Black f Close the top cover of the printer. Troubleshooting e Slide each drum unit and toner cartridge assembly into the printer. Yellow M - d Pull out the jammed paper slowly. Magenta K - g Plug the printer back in, and then turn on the printer for all four drum unit and toner cartridge assemblies. 6 C M Y K C - Cyan Y -

Users Manual - English
Page 164
...a new drum unit. (See Replacing the drum units on page 1.) Shake all four LED heads with a dry lint free soft cloth. (See Cleaning the LED head on the whole page ABCDEFGHIJKLMNOPQRSTUVWXYZ. 0123456789. a Check that you use the paper that ...Colors are installed properly. abcdefghijklmnopqrstuvwxyz. abcdefghijklmnopqrstuvwxyz. Make sure toner save mode is probably not the printer. Make sure that the drum units and toner cartridges are light or unclear on page 130.) 154 Wipe the windows of the drum unit, visit us at http://solutions.brother.com/ to view our FAQs and troubleshooting...
...a new drum unit. (See Replacing the drum units on page 1.) Shake all four LED heads with a dry lint free soft cloth. (See Cleaning the LED head on the whole page ABCDEFGHIJKLMNOPQRSTUVWXYZ. 0123456789. a Check that you use the paper that ...Colors are installed properly. abcdefghijklmnopqrstuvwxyz. abcdefghijklmnopqrstuvwxyz. Make sure toner save mode is probably not the printer. Make sure that the drum units and toner cartridges are light or unclear on page 130.) 154 Wipe the windows of the drum unit, visit us at http://solutions.brother.com/ to view our FAQs and troubleshooting...

Users Manual - English
Page 165
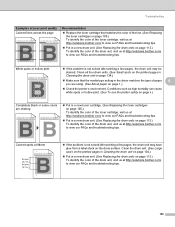
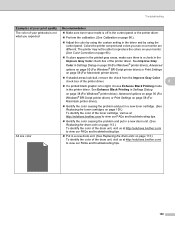
.... 0123456789. abcdefghijklmnopqrstuvwxyz. Recommendation Wipe the windows of LED head with a dry lint free soft cloth. (See Cleaning the LED head on page 105.) To identify the color of the toner cartridge, visit us at their ... identify the color of the drum unit, visit us at http://solutions.brother.com/ to view our FAQs and troubleshooting tips. abcdefghijklmnopqrstuvwxyz. ABCDEFGHIJKLMNOPQRSTUVWXYZ. 0123456789. abcdefghijklmnopqrstuvwxyz. abcdefghijklmnopqrstuvwxyz. abcdefghijklmnopqrstuvwxyz. ABCDEFGHIJKLMNOPQRSTUVWXYZ. 0123456789. Troubleshooting Examples of poor...
.... 0123456789. abcdefghijklmnopqrstuvwxyz. Recommendation Wipe the windows of LED head with a dry lint free soft cloth. (See Cleaning the LED head on page 105.) To identify the color of the toner cartridge, visit us at their ... identify the color of the drum unit, visit us at http://solutions.brother.com/ to view our FAQs and troubleshooting tips. abcdefghijklmnopqrstuvwxyz. ABCDEFGHIJKLMNOPQRSTUVWXYZ. 0123456789. abcdefghijklmnopqrstuvwxyz. abcdefghijklmnopqrstuvwxyz. abcdefghijklmnopqrstuvwxyz. ABCDEFGHIJKLMNOPQRSTUVWXYZ. 0123456789. Troubleshooting Examples of poor...
Users Manual - English
Page 166
... the printer's environment. abcdefghijklmnopqrstuvwxyz. abcdefghijklmnopqrstuvwxyz. ABCDEFGHIJKLMNOPQRSTUVWXYZ. 0123456789. ABCDEFGHIJKLMNOPQRSTUVWXYZ. 0123456789. Put in a new drum unit. (See Replacing the drum units on page ii.) Completely blank or some colors are using. (See About paper on the drum surface. abcdefghijklmnopqrstuvwxyz. ABCDEFGHIJKLMNOPQRSTUVWXYZ. 0123456789. ABCDEFGHIJKLMNOPQRSTUVWXYZ. 0123456789. Colored spots at http://solutions.brother.com/ to view our FAQs and troubleshooting tips...
... the printer's environment. abcdefghijklmnopqrstuvwxyz. abcdefghijklmnopqrstuvwxyz. ABCDEFGHIJKLMNOPQRSTUVWXYZ. 0123456789. ABCDEFGHIJKLMNOPQRSTUVWXYZ. 0123456789. Put in a new drum unit. (See Replacing the drum units on page ii.) Completely blank or some colors are using. (See About paper on the drum surface. abcdefghijklmnopqrstuvwxyz. ABCDEFGHIJKLMNOPQRSTUVWXYZ. 0123456789. ABCDEFGHIJKLMNOPQRSTUVWXYZ. 0123456789. Colored spots at http://solutions.brother.com/ to view our FAQs and troubleshooting tips...
Users Manual - English
Page 167
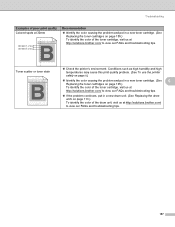
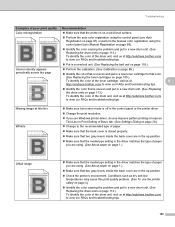
...the printer safely on page ii.) Identify the color causing the problem and put in a new toner cartridge. (See 6 Replacing the toner cartridges on page 105.) To identify the color of the toner cartridge, visit us at http://solutions.brother.com/ to view our FAQs and troubleshooting tips.... Recommendation Identify the color causing the problem and put in a new toner cartridge. (See Replacing the...
...the printer safely on page ii.) Identify the color causing the problem and put in a new toner cartridge. (See 6 Replacing the toner cartridges on page 105.) To identify the color of the toner cartridge, visit us at http://solutions.brother.com/ to view our FAQs and troubleshooting tips.... Recommendation Identify the color causing the problem and put in a new toner cartridge. (See Replacing the...
Users Manual - English
Page 168
... drum unit, visit us at http://solutions.brother.com/ to view our FAQs and troubleshooting tips. See Enhance Black Printing in the Improve Gray Color check box of the printer driver. The printer may not be able to view our FAQs and troubleshooting tips. 158 Colors the printer can print and colors you expected Make sure toner save mode...
... drum unit, visit us at http://solutions.brother.com/ to view our FAQs and troubleshooting tips. See Enhance Black Printing in the Improve Gray Color check box of the printer driver. The printer may not be able to view our FAQs and troubleshooting tips. 158 Colors the printer can print and colors you expected Make sure toner save mode...
Users Manual - English
Page 169
...you use the printer safely on page ii.) Identify the color causing the problem and put in a new drum unit. (See Replacing the drum units on page 113.) To identify the color of the drum unit, visit us at http://solutions.brother.com/ to view our FAQs and troubleshooting tips. Conditions ...such as dry and low temperatures may cause this print quality problem. (See To use Windows printer driver, choose Improve pattern printing or ...
...you use the printer safely on page ii.) Identify the color causing the problem and put in a new drum unit. (See Replacing the drum units on page 113.) To identify the color of the drum unit, visit us at http://solutions.brother.com/ to view our FAQs and troubleshooting tips. Conditions ...such as dry and low temperatures may cause this print quality problem. (See To use Windows printer driver, choose Improve pattern printing or ...


