
Users Manual - English
Page 9
button ...76 Back...77 OK ...77 LEDs ...77 LCD ...77 Back light (HL-3070CW only) ...78 LCD messages ...78 Reprinting documents...79 Printing Secure data ...80 Using the control panel LCD menu...82 Menu table...83 Default settings...94 ... SO-DI M M ...99 Installing extra memory ...100 5 Routine Maintenance 102 Replacing the consumable items...102 Toner cartridges ...104 Drum units ...112 Belt unit...118 Waste toner box ...122 Cleaning ...128 Cleaning the outside of the printer 128 Cleaning the LED head ...130 Cleaning the corona wires ...131 Cleaning the drum unit ...134 Cleaning the paper...
button ...76 Back...77 OK ...77 LEDs ...77 LCD ...77 Back light (HL-3070CW only) ...78 LCD messages ...78 Reprinting documents...79 Printing Secure data ...80 Using the control panel LCD menu...82 Menu table...83 Default settings...94 ... SO-DI M M ...99 Installing extra memory ...100 5 Routine Maintenance 102 Replacing the consumable items...102 Toner cartridges ...104 Drum units ...112 Belt unit...118 Waste toner box ...122 Cleaning ...128 Cleaning the outside of the printer 128 Cleaning the LED head ...130 Cleaning the corona wires ...131 Cleaning the drum unit ...134 Cleaning the paper...
Users Manual - English
Page 95
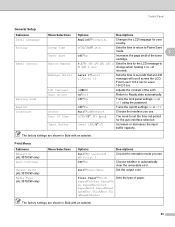
...or Off. Changes the LCD language for the auto interface selection. LCD Contrast -nnonn+ Adjusts the contrast of the toner cartridge. Auto Online On*/Off Return to Level 10=2.0 sec. Select Auto*/USB/Network Choose the interface you use . ...Color (HL-3070CW only) Media Type (HL-3070CW only) Menu Selections Options Auto*/HP LaserJet/ BR-Script 3 Off*/On Auto*/Color/Mono Descriptions Choose the emulation mode you use . The factory settings are shown in Paper/Recycled Paper/Bond Paper/Envel opes/Env.Thick/Env.Thi n/Hagaki/Label Sets the type of paper. Sleep Time Toner...
...or Off. Changes the LCD language for the auto interface selection. LCD Contrast -nnonn+ Adjusts the contrast of the toner cartridge. Auto Online On*/Off Return to Level 10=2.0 sec. Select Auto*/USB/Network Choose the interface you use . ...Color (HL-3070CW only) Media Type (HL-3070CW only) Menu Selections Options Auto*/HP LaserJet/ BR-Script 3 Off*/On Auto*/Color/Mono Descriptions Choose the emulation mode you use . The factory settings are shown in Paper/Recycled Paper/Bond Paper/Envel opes/Env.Thick/Env.Thi n/Hagaki/Label Sets the type of paper. Sleep Time Toner...
Users Manual - English
Page 112
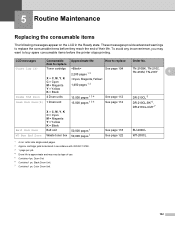
Toner Low (X) Toner cartridge X = C, M, Y, K C = Cyan M = Magenta Y = Yellow K = Black See page 104 2,200 pages 1 2 1,400 pages 1 2 TN-210BK, TN-210C, TN.... 6 Contains 1 pc. Black Drum Unit. 7 Contains 1 pc. cartridge yield is declared in the Ready state. LCD messages Consumable Approximate life item to replace How to replace the consumable items before the printer stops printing. 5 Routine Maintenance 5 Replacing the consumable items 5 The following... to replace Order No. To avoid any inconvenience, you may vary by type of their life. Color Drum Unit. 102
Toner Low (X) Toner cartridge X = C, M, Y, K C = Cyan M = Magenta Y = Yellow K = Black See page 104 2,200 pages 1 2 1,400 pages 1 2 TN-210BK, TN-210C, TN.... 6 Contains 1 pc. Black Drum Unit. 7 Contains 1 pc. cartridge yield is declared in the Ready state. LCD messages Consumable Approximate life item to replace How to replace the consumable items before the printer stops printing. 5 Routine Maintenance 5 Replacing the consumable items 5 The following... to replace Order No. To avoid any inconvenience, you may vary by type of their life. Color Drum Unit. 102
Users Manual - English
Page 113
...50,000 pages 1 Call your dealer or Brother Customer Service for a replacement paper feeding kit 1. 1 A4 or Letter size single-sided pages. 2 Approx. Color Drum Unit. 8 The Drum Error message ... page per job. 4 Drum life is approximate and may vary by type of use. 5 Contains 4 pc. Replace Toner Toner cartridge 2,200 pages 1 2 See page 104 TN-210BK, TN-210C, TN-210M, TN-210Y 1,400 pages 1 2 ...messages Consumable Approximate life item to replace How to replace certain parts and clean the printer regularly. Replace Belt Belt unit 15,000 pages 1 3 4 50,000 pages 1 See page...
...50,000 pages 1 Call your dealer or Brother Customer Service for a replacement paper feeding kit 1. 1 A4 or Letter size single-sided pages. 2 Approx. Color Drum Unit. 8 The Drum Error message ... page per job. 4 Drum life is approximate and may vary by type of use. 5 Contains 4 pc. Replace Toner Toner cartridge 2,200 pages 1 2 See page 104 TN-210BK, TN-210C, TN-210M, TN-210Y 1,400 pages 1 2 ...messages Consumable Approximate life item to replace How to replace certain parts and clean the printer regularly. Replace Belt Belt unit 15,000 pages 1 3 4 50,000 pages 1 See page...
Users Manual - English
Page 114
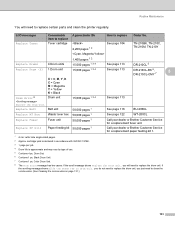
... toner cartridge, see Replacing the toner cartridges on the LCD indicates which color you need to replace the toner cartridge: Replace Toner The scrolling message on page 105. Approx. Note • The toner cartridges that come supplied with ISO/IEC 19798. cartridge yield is based on ISO/IEC 19798. The Toner ...print job. Routine Maintenance Note • Go to http://www.brother-usa.com/environment/ for instructions on how to return the used toner cartridge according to local regulations, keeping it into the printer. 1 A4 or Letter size single-sided pages. Frequency of ...
... toner cartridge, see Replacing the toner cartridges on the LCD indicates which color you need to replace the toner cartridge: Replace Toner The scrolling message on page 105. Approx. Note • The toner cartridges that come supplied with ISO/IEC 19798. cartridge yield is based on ISO/IEC 19798. The Toner ...print job. Routine Maintenance Note • Go to http://www.brother-usa.com/environment/ for instructions on how to return the used toner cartridge according to local regulations, keeping it into the printer. 1 A4 or Letter size single-sided pages. Frequency of ...
Users Manual - English
Page 115
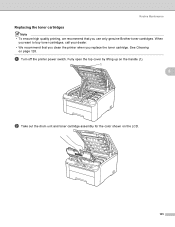
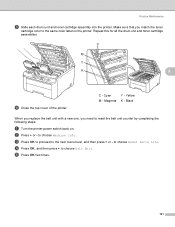
When you want to buy toner cartridges, call your dealer. • We recommend that you replace the toner cartridge. See Cleaning on the LCD. 105 Fully open the top cover by lifting up on the handle (1). 1 5 b Take out the drum unit and toner cartridge assembly for the color shown on page 128. Routine Maintenance Replacing the toner cartridges 5 Note • To ensure high quality printing, we recommend that you clean the printer when you use only genuine Brother toner cartridges. a Turn off the printer power switch.
When you want to buy toner cartridges, call your dealer. • We recommend that you replace the toner cartridge. See Cleaning on the LCD. 105 Fully open the top cover by lifting up on the handle (1). 1 5 b Take out the drum unit and toner cartridge assembly for the color shown on page 128. Routine Maintenance Replacing the toner cartridges 5 Note • To ensure high quality printing, we recommend that you clean the printer when you use only genuine Brother toner cartridges. a Turn off the printer power switch.
Users Manual - English
Page 116
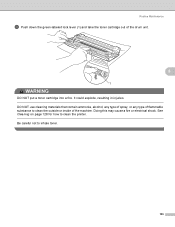
It could explode, resulting in injuries. DO NOT use cleaning materials that contain ammonia, alcohol, any type of spray, or any type of flammable substance to clean the printer. See Cleaning on page 128 for how to clean the outside or inside of the drum unit. 5 1 WARNING DO NOT put a toner cartridge into a fire. Be careful not to inhale toner. 106 Doing this may cause a fire or electrical shock. Routine Maintenance c Push down the green-labeled lock lever (1) and take the toner cartridge out of the machine.
It could explode, resulting in injuries. DO NOT use cleaning materials that contain ammonia, alcohol, any type of spray, or any type of flammable substance to clean the printer. See Cleaning on page 128 for how to clean the outside or inside of the drum unit. 5 1 WARNING DO NOT put a toner cartridge into a fire. Be careful not to inhale toner. 106 Doing this may cause a fire or electrical shock. Routine Maintenance c Push down the green-labeled lock lever (1) and take the toner cartridge out of the machine.

Users Manual - English
Page 117
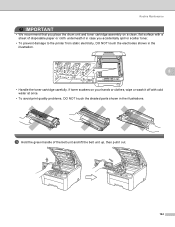
... used toner cartridge to the brother collection program. Note • Be sure to seal up the toner cartridge tightly in the illustrations. Routine Maintenance IMPORTANT • We recommend that toner powder does not spill out of disposable paper or cloth underneath it in case you accidentally spill or scatter toner. • To prevent damage to the printer from...
... used toner cartridge to the brother collection program. Note • Be sure to seal up the toner cartridge tightly in the illustrations. Routine Maintenance IMPORTANT • We recommend that toner powder does not spill out of disposable paper or cloth underneath it in case you accidentally spill or scatter toner. • To prevent damage to the printer from...
Users Manual - English
Page 118
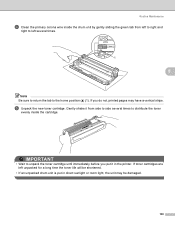
... corona wire inside the cartridge. e Unpack the new toner cartridge. IMPORTANT • Wait to unpack the toner cartridge until immediately before you do not, printed pages may be shortened. • If an unpacked drum unit is put it from left to right and right to distribute the toner evenly inside the drum... tab to the home position (a) (1). Gently shake it in direct sunlight or room light, the unit may have a vertical stripe. If toner cartridges are left several times to left unpacked for a long time the toner life will be damaged. 108 If you put in the printer.
... corona wire inside the cartridge. e Unpack the new toner cartridge. IMPORTANT • Wait to unpack the toner cartridge until immediately before you do not, printed pages may be shortened. • If an unpacked drum unit is put it from left to right and right to distribute the toner evenly inside the drum... tab to the home position (a) (1). Gently shake it in direct sunlight or room light, the unit may have a vertical stripe. If toner cartridges are left several times to left unpacked for a long time the toner life will be damaged. 108 If you put in the printer.

Users Manual - English
Page 119
... optimum performance when used . IMPORTANT For UK and other specifications are designed to work with genuine Brother branded toner cartridges. If damage is caused by the warranty. 109 Inside the printer (Top View) 5 Inside the printer (Back View) IMPORTANT For USA and Canada Brother strongly recommends that you have removed the protective cover. To protect your...
... optimum performance when used . IMPORTANT For UK and other specifications are designed to work with genuine Brother branded toner cartridges. If damage is caused by the warranty. 109 Inside the printer (Top View) 5 Inside the printer (Back View) IMPORTANT For USA and Canada Brother strongly recommends that you have removed the protective cover. To protect your...
Users Manual - English
Page 120
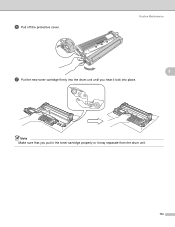
Routine Maintenance 5 g Put the new toner cartridge firmly into place. f Pull off the protective cover. Note Make sure that you hear it lock into the drum unit until you put in the toner cartridge properly or it may separate from the drum unit. 110
Routine Maintenance 5 g Put the new toner cartridge firmly into place. f Pull off the protective cover. Note Make sure that you hear it lock into the drum unit until you put in the toner cartridge properly or it may separate from the drum unit. 110

Users Manual - English
Page 121
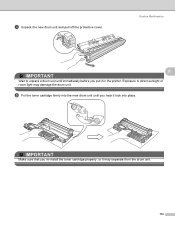
Black j Turn the printer power switch back on the printer. Note DO NOT turn off the printer power switch or open the top cover until the LCD shows Ready. 111 Magenta Y - Routine Maintenance h Slide the drum unit and toner cartridge assembly into the printer. Cyan M - Make sure that you match the toner cartridge color to the same color label on . C M Y K 5 i Close the top cover of the printer. C - Yellow K -
Black j Turn the printer power switch back on the printer. Note DO NOT turn off the printer power switch or open the top cover until the LCD shows Ready. 111 Magenta Y - Routine Maintenance h Slide the drum unit and toner cartridge assembly into the printer. Cyan M - Make sure that you match the toner cartridge color to the same color label on . C M Y K 5 i Close the top cover of the printer. C - Yellow K -

Users Manual - English
Page 124
... (1) and take the toner cartridge out of flammable substance to clean the printer. DO NOT use cleaning materials that contain ammonia, alcohol, any type of spray, or any type of the drum unit. 1 WARNING DO NOT put a toner cartridge into a fire. Routine Maintenance b Take out the drum unit and toner cartridge assembly for the color shown on page...
... (1) and take the toner cartridge out of flammable substance to clean the printer. DO NOT use cleaning materials that contain ammonia, alcohol, any type of spray, or any type of the drum unit. 1 WARNING DO NOT put a toner cartridge into a fire. Routine Maintenance b Take out the drum unit and toner cartridge assembly for the color shown on page...

Users Manual - English
Page 125
...in the illustration. 5 • Handle the toner cartridge carefully. Routine Maintenance IMPORTANT • We recommend that toner powder does not spill out of disposable paper or cloth underneath it off with a sheet of the cartridge. • Go to http://www.brother-usa.com/environment/ for instructions on your ...hands or clothes, wipe or wash it in case you accidentally spill or scatter toner. • To prevent damage to the printer from domestic waste. If you have ...
...in the illustration. 5 • Handle the toner cartridge carefully. Routine Maintenance IMPORTANT • We recommend that toner powder does not spill out of disposable paper or cloth underneath it off with a sheet of the cartridge. • Go to http://www.brother-usa.com/environment/ for instructions on your ...hands or clothes, wipe or wash it in case you accidentally spill or scatter toner. • To prevent damage to the printer from domestic waste. If you have ...
Users Manual - English
Page 126
Routine Maintenance 5 IMPORTANT Wait to direct sunlight or room light may separate from the drum unit. 116 IMPORTANT Make sure that you put it lock into the new drum unit until immediately before you re-install the toner cartridge properly, or it may damage the drum unit. Exposure to unpack a drum unit until you hear it in the printer. d Unpack the new drum unit and pull off the protective cover. e Put the toner cartridge firmly into place.
Routine Maintenance 5 IMPORTANT Wait to direct sunlight or room light may separate from the drum unit. 116 IMPORTANT Make sure that you put it lock into the new drum unit until immediately before you re-install the toner cartridge properly, or it may damage the drum unit. Exposure to unpack a drum unit until you hear it in the printer. d Unpack the new drum unit and pull off the protective cover. e Put the toner cartridge firmly into place.
Users Manual - English
Page 127
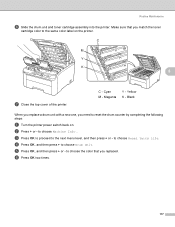
... press + to choose Machine Info.. Routine Maintenance f Slide the drum unit and toner cartridge assembly into the printer. Cyan M - C M Y K 5 g Close the top cover of the printer. Yellow K - e Press OK, and then press + or - b Press + or - to choose the color that you match the toner cartridge color to reset the drum counter by completing the following steps: a Turn the...
... press + to choose Machine Info.. Routine Maintenance f Slide the drum unit and toner cartridge assembly into the printer. Cyan M - C M Y K 5 g Close the top cover of the printer. Yellow K - e Press OK, and then press + or - b Press + or - to choose the color that you match the toner cartridge color to reset the drum counter by completing the following steps: a Turn the...
Users Manual - English
Page 129
... in the illustration. • Handle the toner cartridge carefully. Routine Maintenance 5 IMPORTANT • We recommend that you place the drum unit and toner cartridge assembly on your hands or clothes, wipe or wash it in case you accidentally spill or scatter toner. • To prevent damage to the printer from static electricity, DO NOT touch the...
... in the illustration. • Handle the toner cartridge carefully. Routine Maintenance 5 IMPORTANT • We recommend that you place the drum unit and toner cartridge assembly on your hands or clothes, wipe or wash it in case you accidentally spill or scatter toner. • To prevent damage to the printer from static electricity, DO NOT touch the...
Users Manual - English
Page 131
... Machine Info.. C M Y K 5 f Close the top cover of the printer. C - to the same color label on . Cyan Y - to reset the belt unit counter by completing the following steps: a Turn the printer power switch back on the printer. Routine Maintenance e Slide each drum unit and toner cartridge assembly into the printer. Black When you replace the belt unit with...
... Machine Info.. C M Y K 5 f Close the top cover of the printer. C - to the same color label on . Cyan Y - to reset the belt unit counter by completing the following steps: a Turn the printer power switch back on the printer. Routine Maintenance e Slide each drum unit and toner cartridge assembly into the printer. Black When you replace the belt unit with...
Users Manual - English
Page 133
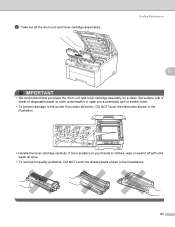
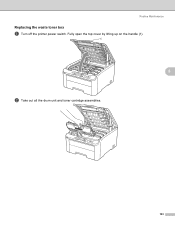
Routine Maintenance Replacing the waste toner box 5 a Turn off the printer power switch. Fully open the top cover by lifting up on the handle (1). 1 5 b Take out all the drum unit and toner cartridge assemblies. 123
Routine Maintenance Replacing the waste toner box 5 a Turn off the printer power switch. Fully open the top cover by lifting up on the handle (1). 1 5 b Take out all the drum unit and toner cartridge assemblies. 123
Users Manual - English
Page 134
If toner scatters on a clean, flat surface with a sheet of the belt unit and lift the belt unit up, then pull it off with cold water at ... underneath it in case you place the drum unit and toner cartridge assembly on your hands or clothes, wipe or wash it out. 124 Routine Maintenance IMPORTANT • We recommend that you accidentally spill or scatter toner. • To prevent damage to the printer from static electricity, DO NOT touch the electrodes shown in...
If toner scatters on a clean, flat surface with a sheet of the belt unit and lift the belt unit up, then pull it off with cold water at ... underneath it in case you place the drum unit and toner cartridge assembly on your hands or clothes, wipe or wash it out. 124 Routine Maintenance IMPORTANT • We recommend that you accidentally spill or scatter toner. • To prevent damage to the printer from static electricity, DO NOT touch the electrodes shown in...


