Users Manual - English
Page 9
CHAPTER 5 MAINTENANCE REPLACING THE CONSUMABLES Toner Cartridges Oil Bottle Fuser Cleaner Waste Toner Pack OPC Belt Cartridge Ozone Filter Fusing Unit 120K Kit CLEANING THE PRINTER REPACKING AND RELOCATING THE PRINTER OPTIONS Lower Tray Unit (LT-26CL) Duplex Unit (DX-2600) CompactFlash Card / HDD Card (HD-6G/HD-EX) RAM Expansion CHAPTER 6 TROUBLESHOOTING TROUBLESHOOTING Error...
CHAPTER 5 MAINTENANCE REPLACING THE CONSUMABLES Toner Cartridges Oil Bottle Fuser Cleaner Waste Toner Pack OPC Belt Cartridge Ozone Filter Fusing Unit 120K Kit CLEANING THE PRINTER REPACKING AND RELOCATING THE PRINTER OPTIONS Lower Tray Unit (LT-26CL) Duplex Unit (DX-2600) CompactFlash Card / HDD Card (HD-6G/HD-EX) RAM Expansion CHAPTER 6 TROUBLESHOOTING TROUBLESHOOTING Error...
Users Manual - English
Page 102
to the settings you have previously made using the control panel. Resets the printer and restores all printer settings - FUSER UNIT Resets the Fixing Unit parts life. 120K KIT Resets the 120K Kit parts life. PF KIT1 Resets the PF Kit1 parts life. including command settings. See "List of Factory ... RESET PRINTER FACTORY RESET PARTS LIFE DDeessccrriippttiioonn Resets the printer and restores all printer default settings - including command settings - Submenu Description FC ROLLER Resets the Fuser Cleaner parts life.
to the settings you have previously made using the control panel. Resets the printer and restores all printer settings - FUSER UNIT Resets the Fixing Unit parts life. 120K KIT Resets the 120K Kit parts life. PF KIT1 Resets the PF Kit1 parts life. including command settings. See "List of Factory ... RESET PRINTER FACTORY RESET PARTS LIFE DDeessccrriippttiioonn Resets the printer and restores all printer default settings - including command settings - Submenu Description FC ROLLER Resets the Fuser Cleaner parts life.
Users Manual - English
Page 115
... See 5-23 See 5-27 *3 See 5-16 See 5-9 FO-2CL Note The Ozone Filter does not have an LCD message indicator. READY Fusing unit Drum Cleaner, Paper Discharger, Transfer Roller, Paper Pickup Roller Separator Pad, Transfer Drum Waste Toner Pack Oil Bottle Approximate Life 12,000 pages *1 60...,000 images (Continuously printed) *4 60,000 pages *1 120,000 pages 18,000 Images 12,000 pages How to Replace Fuser Cleaner OPC Belt Cartridge REPLACE FUSER !" READY REPLACE OPC BELT !" READY NEAR WASTE TONER !" These messages advise you that appear alternatively with the "READY" message on ...
... See 5-23 See 5-27 *3 See 5-16 See 5-9 FO-2CL Note The Ozone Filter does not have an LCD message indicator. READY Fusing unit Drum Cleaner, Paper Discharger, Transfer Roller, Paper Pickup Roller Separator Pad, Transfer Drum Waste Toner Pack Oil Bottle Approximate Life 12,000 pages *1 60...,000 images (Continuously printed) *4 60,000 pages *1 120,000 pages 18,000 Images 12,000 pages How to Replace Fuser Cleaner OPC Belt Cartridge REPLACE FUSER !" READY REPLACE OPC BELT !" READY NEAR WASTE TONER !" These messages advise you that appear alternatively with the "READY" message on ...

Users Manual - English
Page 126
Warning The Fusing unit and the parts around it has cooled down sufficiently. 2. Press the Power button to wait until it are HOT! Release the Oil Bottle Lock Levers on both sides as shown: Fig. 5-8 5-14 Open the Top Cover. 3. If you touch the HOT parts, you might get injured. 1. Be sure to turn the printer off, and then wait until the Fusing Unit has cooled sufficiently before replacing the Fuser Cleaner. CHAPTER 5 MAINTENANCE Replacing the Fuser Cleaner !
Warning The Fusing unit and the parts around it has cooled down sufficiently. 2. Press the Power button to wait until it are HOT! Release the Oil Bottle Lock Levers on both sides as shown: Fig. 5-8 5-14 Open the Top Cover. 3. If you touch the HOT parts, you might get injured. 1. Be sure to turn the printer off, and then wait until the Fusing Unit has cooled sufficiently before replacing the Fuser Cleaner. CHAPTER 5 MAINTENANCE Replacing the Fuser Cleaner !

Users Manual - English
Page 127
Install the new Fuser Cleaner into the guide with the Oil Bottle Lock Levers. 7. Press Set to proceed to turn the printer On. 9. CHAPTER 5 MAINTENANCE Fig. 5-9 Fig. 5-10 6. "FC ... Press the Power button to the next menu level, and then press + or - Press any of the Fuser Cleaner as shown: 5. Press + or - Press Set, and then press +. Take the Fuser Cleaner out of the Fusing Unit by holding the handle of the Menu buttons (+, - , Set or Back) to take the printer Off...
Install the new Fuser Cleaner into the guide with the Oil Bottle Lock Levers. 7. Press Set to proceed to turn the printer On. 9. CHAPTER 5 MAINTENANCE Fig. 5-9 Fig. 5-10 6. "FC ... Press the Power button to the next menu level, and then press + or - Press any of the Fuser Cleaner as shown: 5. Press + or - Press Set, and then press +. Take the Fuser Cleaner out of the Fusing Unit by holding the handle of the Menu buttons (+, - , Set or Back) to take the printer Off...

Users Manual - English
Page 135
Warning The Fusing Unit and the parts around it are HOT! Be sure to circulate. 5-23 READY ! If you touch the HOT parts, you must replace the Fusing Unit: REPLACE FUSER !" CHAPTER 5 MAINTENANCE FUUSSIINNGG UNNIITT Fusing Unit When the following message appears on the LCD panel, you might get injured. ! Warning After replacing the Fusing Unit, wait for approximately 30 minutes before you print to allow the fusing oil to wait until the Fusing Unit has cooled down sufficiently before replacing the Fusing Unit.
Warning The Fusing Unit and the parts around it are HOT! Be sure to circulate. 5-23 READY ! If you touch the HOT parts, you must replace the Fusing Unit: REPLACE FUSER !" CHAPTER 5 MAINTENANCE FUUSSIINNGG UNNIITT Fusing Unit When the following message appears on the LCD panel, you might get injured. ! Warning After replacing the Fusing Unit, wait for approximately 30 minutes before you print to allow the fusing oil to wait until the Fusing Unit has cooled down sufficiently before replacing the Fusing Unit.

Users Manual - English
Page 137
...Plug the printer into the new Fusing Unit, and then lock the Oil Bottle Lock Levers. CHAPTER 5 MAINTENANCE ! Install the new Fusing Unit into the printer. 7. Fig. 5-22 Fig. 5-23 8. This could damage the printer. 9. Remove the Oil Bottle and the Fuser Cleaner from the printer, be sure to... spill oil inside the printer. 5. Be sure to insert the Fusing Unit completely into the printer. Considerable damage can occur if oil is spilled inside the printer. Caution...
...Plug the printer into the new Fusing Unit, and then lock the Oil Bottle Lock Levers. CHAPTER 5 MAINTENANCE ! Install the new Fusing Unit into the printer. 7. Fig. 5-22 Fig. 5-23 8. This could damage the printer. 9. Remove the Oil Bottle and the Fuser Cleaner from the printer, be sure to... spill oil inside the printer. 5. Be sure to insert the Fusing Unit completely into the printer. Considerable damage can occur if oil is spilled inside the printer. Caution...

Users Manual - English
Page 138
...counter for instructions. Press the Power button to turn on the Fusing Unit; Caution, Warning Please be careful when replacing the Fusing Unit. If it should fit in the READY state. ! Please refer to the Heat Roller. 11. until "FUSER UNIT" appears. 16. Press Set, and then press Go. Do not... apply force! Please wait for 30 minutes after installing a new Fusing Unit to allow the oil to circulate completely through to page 5-15 for the Fuser Cleaner will also need to be reused with...
...counter for instructions. Press the Power button to turn on the Fusing Unit; Caution, Warning Please be careful when replacing the Fusing Unit. If it should fit in the READY state. ! Please refer to the Heat Roller. 11. until "FUSER UNIT" appears. 16. Press Set, and then press Go. Do not... apply force! Please wait for 30 minutes after installing a new Fusing Unit to allow the oil to circulate completely through to page 5-15 for the Fuser Cleaner will also need to be reused with...

Users Manual - English
Page 163
We recommend removing those caps with a coin or a screwdriver. 3. Push down lightly on the caps and then slide them . Remove the left handside cover of the printer to remove them to the rear of the Lower Tray Unit. Remove the Back caps (2 pieces) of the printer. Turn the printer off and unplug the power cord from the fuser unit. Fig. 5-63 Fig. 5-64 5-51 CHAPTER 5 MAINTENANCE 1. Remove the Fuser Cover that is located at the rear top of the Lower Tray Unit. Remove the Rear Caps (2 pieces) from the AC outlet. 2. Fig. 5-62 4.
We recommend removing those caps with a coin or a screwdriver. 3. Push down lightly on the caps and then slide them . Remove the left handside cover of the printer to remove them to the rear of the Lower Tray Unit. Remove the Back caps (2 pieces) of the printer. Turn the printer off and unplug the power cord from the fuser unit. Fig. 5-63 Fig. 5-64 5-51 CHAPTER 5 MAINTENANCE 1. Remove the Fuser Cover that is located at the rear top of the Lower Tray Unit. Remove the Rear Caps (2 pieces) from the AC outlet. 2. Fig. 5-62 4.
Users Manual - English
Page 182
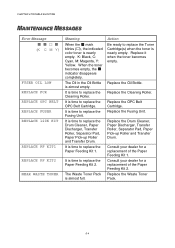
... REPLACE FCR REPLACE OPC BELT REPLACE FUSER REPLACE 120K KIT REPLACE PF KIT1 REPLACE PF KIT2 NEAR WASTE TONER Meaning When the ! K: Black, C: Cyan, M: Magenta, Y: Yellow. The Oil in the Oil Bottle ... Toner Pack. 6-4 It is time to replace the Toner Cartridge(s) when the toner is time to replace the Fusing Unit. Action Be ready to replace the Paper Feeding Kit 2. Replace the Fusing Unit. Consult your dealer for a replacement of the Paper Feeding Kit 1. The Waste Toner Pack is almost empty. Replace the...
... REPLACE FCR REPLACE OPC BELT REPLACE FUSER REPLACE 120K KIT REPLACE PF KIT1 REPLACE PF KIT2 NEAR WASTE TONER Meaning When the ! K: Black, C: Cyan, M: Magenta, Y: Yellow. The Oil in the Oil Bottle ... Toner Pack. 6-4 It is time to replace the Toner Cartridge(s) when the toner is time to replace the Fusing Unit. Action Be ready to replace the Paper Feeding Kit 2. Replace the Fusing Unit. Consult your dealer for a replacement of the Paper Feeding Kit 1. The Waste Toner Pack is almost empty. Replace the...

Users Manual - English
Page 184
... error Transfer roller solenoid error Drum cleaning solenoid error Drum cleaning clutch error Fuser unit clutch error Belt marker sensor error Erase LED error Cooling fan error Ozone fan error Fuser fan error Charger HV unit error Fuser thermistor error Fuser temperature 2 error Fuser temperature 3 error Turn off the printer. Wait a few seconds, and then turn it...
... error Transfer roller solenoid error Drum cleaning solenoid error Drum cleaning clutch error Fuser unit clutch error Belt marker sensor error Erase LED error Cooling fan error Ozone fan error Fuser fan error Charger HV unit error Fuser thermistor error Fuser temperature 2 error Fuser temperature 3 error Turn off the printer. Wait a few seconds, and then turn it...

Users Manual - English
Page 224
...28 2-5 E emulation mode 4-36 Emulation Mode 1-8 Envelopes 3-10 EPSON FX-850 mode 4-37 F factory setting 2-21 factory settings 4-38 Fuser Cleaner 5-13 Fusing Unit 5-23 G Go switch 4-2 H High Resolution Control 1-6 HP LaserJet mode 4-36 HP-GL mode 4-37 I IBM Proprinter XL mode 4-37...interface 4-42 interface mode 4-32 IP address 4-35 J Job Cancel switch 4-2 L LCD LCD message LED Legal Cassette Lower Media Cassette Lower Tray Unit 4-1, 4-16 4-17 4-15 1-12 5-45 1-12, 5-45, 5-50 M Macintosh 2-18 Maintenance Messages 6-4 Manual Feed 3-13 MIO interface ...
...28 2-5 E emulation mode 4-36 Emulation Mode 1-8 Envelopes 3-10 EPSON FX-850 mode 4-37 F factory setting 2-21 factory settings 4-38 Fuser Cleaner 5-13 Fusing Unit 5-23 G Go switch 4-2 H High Resolution Control 1-6 HP LaserJet mode 4-36 HP-GL mode 4-37 I IBM Proprinter XL mode 4-37...interface 4-42 interface mode 4-32 IP address 4-35 J Job Cancel switch 4-2 L LCD LCD message LED Legal Cassette Lower Media Cassette Lower Tray Unit 4-1, 4-16 4-17 4-15 1-12 5-45 1-12, 5-45, 5-50 M Macintosh 2-18 Maintenance Messages 6-4 Manual Feed 3-13 MIO interface ...

Quick Setup Guide - English
Page 1
...Unit Pressure Release Lever Oil Bottle Fuser Cleaner Oil Bottle Lock Lever 1 Remove the protective parts. Maintenance Tutorial Instructional movie for the remaining toner cartridges. OPC Belt Cartridge Belt Tension Release Pin Printer Guides 3 Remove the orange belt tension release pins from an HL-2600CN... cord to load. Carton Components Carton components may not be used when shipping the printer. Macintosh® Brother Solutions Center The Brother Solutions Center (http://solutions.brother.com) is Included on the reverse. The printer will appear. 5 Press the Go button. Note: ...
...Unit Pressure Release Lever Oil Bottle Fuser Cleaner Oil Bottle Lock Lever 1 Remove the protective parts. Maintenance Tutorial Instructional movie for the remaining toner cartridges. OPC Belt Cartridge Belt Tension Release Pin Printer Guides 3 Remove the orange belt tension release pins from an HL-2600CN... cord to load. Carton Components Carton components may not be used when shipping the printer. Macintosh® Brother Solutions Center The Brother Solutions Center (http://solutions.brother.com) is Included on the reverse. The printer will appear. 5 Press the Go button. Note: ...

Service Manual
Page 59
... applied to -DBV(V) by the power supply DBV. iii) The developer magnetic roller of the transfer drum is biased to the charger unit by the power supply CBV. Fuser Unit Cleaning Unit FCBV Cleaning Burush OPC Belt Paper Discharger Transfer Drum Toner Toner Cartridge K Develop Y ACHV Transfer Roller THV (+) THV ( - ) Paper Cleaning Blade Erase...
... applied to -DBV(V) by the power supply DBV. iii) The developer magnetic roller of the transfer drum is biased to the charger unit by the power supply CBV. Fuser Unit Cleaning Unit FCBV Cleaning Burush OPC Belt Paper Discharger Transfer Drum Toner Toner Cartridge K Develop Y ACHV Transfer Roller THV (+) THV ( - ) Paper Cleaning Blade Erase...

Service Manual
Page 197
...4) Press any of Assembling 1) Install the new fusing unit onto the printer. VI-26 i) Tighten the securing screws. Fig.6-22 PRECAUTION When replacing the fusing unit, take the printer Off Line. 5) Press + or - ii) Close the paper exit unit cover 2. until "FUSER UNIT" appears. 8) Press Set, and then press Go.... Application of strong force to the fusing unit may result in the failure of the fusing unit and other parts. 2) Plug the power code into the printer, you ...
...4) Press any of Assembling 1) Install the new fusing unit onto the printer. VI-26 i) Tighten the securing screws. Fig.6-22 PRECAUTION When replacing the fusing unit, take the printer Off Line. 5) Press + or - ii) Close the paper exit unit cover 2. until "FUSER UNIT" appears. 8) Press Set, and then press Go.... Application of strong force to the fusing unit may result in the failure of the fusing unit and other parts. 2) Plug the power code into the printer, you ...

Service Manual
Page 279
...Parts Replacement] The fuser unit consists of parts. Fuser cover (L) Fu paper guide Fuser cover (B) Fusing unit Fig.7-97 BR felt ASSY 2 Fuser cover (R) VII-68 After re-assembly the product safety should only be reconfirmed. Since the fuser unit is very hot, make sure that the fuser unit and surrounding area ...are well cooled down prior to remove the fu paper guide from the fusing unit. 5) Remove the set screws ST3X6 (3 pcs.) to remove...
...Parts Replacement] The fuser unit consists of parts. Fuser cover (L) Fu paper guide Fuser cover (B) Fusing unit Fig.7-97 BR felt ASSY 2 Fuser cover (R) VII-68 After re-assembly the product safety should only be reconfirmed. Since the fuser unit is very hot, make sure that the fuser unit and surrounding area ...are well cooled down prior to remove the fu paper guide from the fusing unit. 5) Remove the set screws ST3X6 (3 pcs.) to remove...

Service Manual
Page 325
... NO Are H2,H3 and H4 errors cleared ? YES Is the line voltage to be the default value ? YES Is the fuser connector damaged ? NO Install it properly. Replace the fusing unit. NO Confirm the input voltage. Replace the lamp and lamp holder. NO Replace the MCTL PWB 2. Job is lit. NO... YES Is the rating of the heater. YES Is the fuser unit properly installed ? Are H2,H3 and H4 errors cleared ? Is the connector HP/HN connected ? NO NO YES Is there any contract failure of the...
... NO Are H2,H3 and H4 errors cleared ? YES Is the line voltage to be the default value ? YES Is the fuser connector damaged ? NO Install it properly. Replace the fusing unit. NO Confirm the input voltage. Replace the lamp and lamp holder. NO Replace the MCTL PWB 2. Job is lit. NO... YES Is the rating of the heater. YES Is the fuser unit properly installed ? Are H2,H3 and H4 errors cleared ? Is the connector HP/HN connected ? NO NO YES Is there any contract failure of the...

Service Manual
Page 377
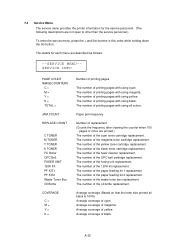
...life menu is distinguished from the service menu described in principal. Initializes the remaining life of the transfer drum. Initializes the life of the fusing unit. Initializes the remaining life of the OPC belt cartridge. A-31 7.3 Reset Parts Life The Reset parts life menu is assumed that the user replaces... oil pad. Initializes the remaining life of the 120K kit. You may let users know as follows; RESET PARTS LIFE FC Roller OPC Belt FUSER UNIT 120K Kit Trf Drum 240K Kit Oil Pad PF KIT1 PF KIT2 Initializes the life of the 240K kit. The details for the menu are...
...life menu is distinguished from the service menu described in principal. Initializes the remaining life of the transfer drum. Initializes the life of the fusing unit. Initializes the remaining life of the OPC belt cartridge. A-31 7.3 Reset Parts Life The Reset parts life menu is assumed that the user replaces... oil pad. Initializes the remaining life of the 120K kit. You may let users know as follows; RESET PARTS LIFE FC Roller OPC Belt FUSER UNIT 120K Kit Trf Drum 240K Kit Oil Pad PF KIT1 PF KIT2 Initializes the life of the 240K kit. The details for the menu are...
Service Manual
Page 378
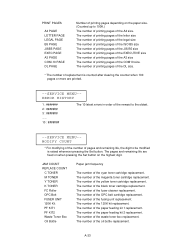
The number of the fusing unit replacement. The number of the fuser cleaner replacement. Average coverage of the paper feeding kit 1 replacement. The number of printing pages with using all black is 100%) Average coverage of the ... menu are described as follows; --SERVICE MENU-SERVICE INFO PAGE COUNT IMAGECOUNTERS C = M = Y = K = TOTAL = JAM COUNT REPLACE COUNT C TONER M TONER Y TONER K TONER FC Roller OPC Belt FUSER UNIT 120K Kit PF KIT1 PF KIT2 Waste Toner Box Oil Bottle COVERAGE C = M = Y = K = Number of printing pages The number of printing pages with using black. The...
The number of the fusing unit replacement. The number of the fuser cleaner replacement. Average coverage of the paper feeding kit 1 replacement. The number of printing pages with using all black is 100%) Average coverage of the ... menu are described as follows; --SERVICE MENU-SERVICE INFO PAGE COUNT IMAGECOUNTERS C = M = Y = K = TOTAL = JAM COUNT REPLACE COUNT C TONER M TONER Y TONER K TONER FC Roller OPC Belt FUSER UNIT 120K Kit PF KIT1 PF KIT2 Waste Toner Box Oil Bottle COVERAGE C = M = Y = K = Number of printing pages The number of printing pages with using black. The...
Service Manual
Page 379
.... The number of the cyan toner cartridge replacement. JAM COUNT REPLACE COUNT C TONER M TONER Y TONER K TONER FC Roller OPC Belt FUSER UNIT 120K Kit PF KIT1 PF KIT2 Waste Toner Box Oil Bottle Paper jam frequency The number of the oil bottle replacement. The number of the ... Set button on the paper size. (Counted up to 100K.) The number of printing pages of the magenta toner cartridge replacement. The number of the fuser cleaner replacement. A-33 PRINT PAGES A4 PAGE LETTER PAGE LEGAL PAGE B5 PAGE JISB5 PAGE EXEC PAGE A3 PAGE COM-10 PAGE DL PAGE Number...
.... The number of the cyan toner cartridge replacement. JAM COUNT REPLACE COUNT C TONER M TONER Y TONER K TONER FC Roller OPC Belt FUSER UNIT 120K Kit PF KIT1 PF KIT2 Waste Toner Box Oil Bottle Paper jam frequency The number of the oil bottle replacement. The number of the ... Set button on the paper size. (Counted up to 100K.) The number of printing pages of the magenta toner cartridge replacement. The number of the fuser cleaner replacement. A-33 PRINT PAGES A4 PAGE LETTER PAGE LEGAL PAGE B5 PAGE JISB5 PAGE EXEC PAGE A3 PAGE COM-10 PAGE DL PAGE Number...

