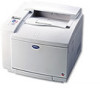

Users Manual - English
Page 5
.... Warning Do not run the printer with the Top Cover, Front Cover and Rear Access Covers open the printer's safety interlocks. ! Warning In case of a fuser oil spill, you must clean it up immediately. ! Warning If the printer becomes hot, blows smoke, or generates obscure odor, turn the printer off the...
.... Warning Do not run the printer with the Top Cover, Front Cover and Rear Access Covers open the printer's safety interlocks. ! Warning In case of a fuser oil spill, you must clean it up immediately. ! Warning If the printer becomes hot, blows smoke, or generates obscure odor, turn the printer off the...
Users Manual - English
Page 9
CHAPTER 5 MAINTENANCE REPLACING THE CONSUMABLES Toner Cartridges Oil Bottle Fuser Cleaner Waste Toner Pack OPC Belt Cartridge Ozone Filter Fusing Unit 120K Kit CLEANING THE PRINTER REPACKING AND RELOCATING THE PRINTER OPTIONS Lower Tray Unit (...
CHAPTER 5 MAINTENANCE REPLACING THE CONSUMABLES Toner Cartridges Oil Bottle Fuser Cleaner Waste Toner Pack OPC Belt Cartridge Ozone Filter Fusing Unit 120K Kit CLEANING THE PRINTER REPACKING AND RELOCATING THE PRINTER OPTIONS Lower Tray Unit (...
Users Manual - English
Page 20
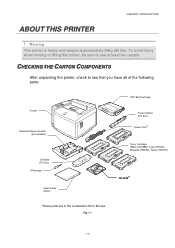
... you have all of the following parts: Printer Standard Paper Cassette (pre-installed) Oil Bottle (FO-2CL) Oil Syringe Quick Setup Guide* OPC Belt Cartridge Fuser Cleaner (CR-3CL) * Power Cord Toner Cartridge (Black (TN03BK), Cyan (TN03C), Magenta (TN03M), Yellow (TN03Y)) CD-ROM* *These parts are in the Localization Kit in...
... you have all of the following parts: Printer Standard Paper Cassette (pre-installed) Oil Bottle (FO-2CL) Oil Syringe Quick Setup Guide* OPC Belt Cartridge Fuser Cleaner (CR-3CL) * Power Cord Toner Cartridge (Black (TN03BK), Cyan (TN03C), Magenta (TN03M), Yellow (TN03Y)) CD-ROM* *These parts are in the Localization Kit in...
Users Manual - English
Page 21
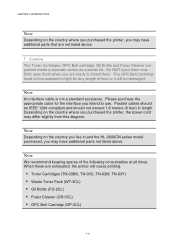
...the country you live in length. Parallel cables should be IEEE 1284 compliant and should not exceed 1.8 meters (6 feet) in and the HL-2600CN series model purchased, you purchased the printer, the power cord may differ slightly from this diagram. When these are packed inside a separate carton...not a standard accessory. The OPC Belt Cartridge must not be damaged. Caution The Toner Cartridges, OPC Belt cartridge, Oil Bottle and Fuser Cleaner are exhausted, the printer will be exposed to light for the interface you intend to install them. CHAPTER 1 INTRODUCTION Note Depending...
...the country you live in length. Parallel cables should be IEEE 1284 compliant and should not exceed 1.8 meters (6 feet) in and the HL-2600CN series model purchased, you purchased the printer, the power cord may differ slightly from this diagram. When these are packed inside a separate carton...not a standard accessory. The OPC Belt Cartridge must not be damaged. Caution The Toner Cartridges, OPC Belt cartridge, Oil Bottle and Fuser Cleaner are exhausted, the printer will be exposed to light for the interface you intend to install them. CHAPTER 1 INTRODUCTION Note Depending...

Users Manual - English
Page 91
... Build date (Network users only) ENGINE VER=#### Engine Firmware version RAM SIZE=###MB The size of all 4 colors. REMAIN FC ROLLER REMAIN OPC BELT REMAIN FUSER REMAIN 120K KIT REMAIN PF KIT1 REMAIN PF KIT2 This is the remaining life for the FC roller, OPC Belt..., Fuser, 120K Kit, PF Kit1 and PF Kit2 4-22 PRINT TEST Print a test page. VERSION Submenu Description SER.NO=######### Printer serial number. PRINT FILE LIST Print ...
... Build date (Network users only) ENGINE VER=#### Engine Firmware version RAM SIZE=###MB The size of all 4 colors. REMAIN FC ROLLER REMAIN OPC BELT REMAIN FUSER REMAIN 120K KIT REMAIN PF KIT1 REMAIN PF KIT2 This is the remaining life for the FC roller, OPC Belt..., Fuser, 120K Kit, PF Kit1 and PF Kit2 4-22 PRINT TEST Print a test page. VERSION Submenu Description SER.NO=######### Printer serial number. PRINT FILE LIST Print ...
Users Manual - English
Page 102
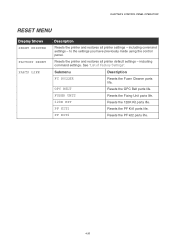
OPC BELT Resets the OPC Belt parts life. PF KIT2 Resets the PF kit2 parts life. 4-33 FUSER UNIT Resets the Fixing Unit parts life. 120K KIT Resets the 120K Kit parts life. Resets the printer and restores all printer...settings - to the settings you have previously made using the control panel. See "List of Factory Settings". Submenu Description FC ROLLER Resets the Fuser Cleaner parts life. including command settings. CHAPTER 4 CONTROL PANEL OPERATION RESET MENU DDiissppllaayy SShhoowwss RESET PRINTER FACTORY RESET PARTS LIFE DDeessccrriippttiioonn Resets the ...
OPC BELT Resets the OPC Belt parts life. PF KIT2 Resets the PF kit2 parts life. 4-33 FUSER UNIT Resets the Fixing Unit parts life. 120K KIT Resets the 120K Kit parts life. Resets the printer and restores all printer...settings - to the settings you have previously made using the control panel. See "List of Factory Settings". Submenu Description FC ROLLER Resets the Fuser Cleaner parts life. including command settings. CHAPTER 4 CONTROL PANEL OPERATION RESET MENU DDiissppllaayy SShhoowwss RESET PRINTER FACTORY RESET PARTS LIFE DDeessccrriippttiioonn Resets the ...

Users Manual - English
Page 113
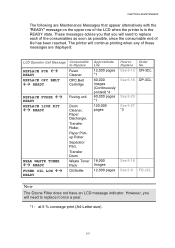
... Cartridge C = Cyan, M = Magenta, Y = Yellow, K = Black WASTE TONER Waste Toner Replace the waste toner pack Pack OIL EMPTY Oil Bottle Replace the oil bottle CHANGE FCR Fuser Cleaner Replace the cleaning roller Approximate Life 12,000 pages (Black) 7,200 pages (Cyan, Magenta, Yellow) *1 18,000 images *1 *4 12,000 pages 12,000 pages...
... Cartridge C = Cyan, M = Magenta, Y = Yellow, K = Black WASTE TONER Waste Toner Replace the waste toner pack Pack OIL EMPTY Oil Bottle Replace the oil bottle CHANGE FCR Fuser Cleaner Replace the cleaning roller Approximate Life 12,000 pages (Black) 7,200 pages (Cyan, Magenta, Yellow) *1 18,000 images *1 *4 12,000 pages 12,000 pages...
Users Manual - English
Page 115
READY REPLACE OPC BELT !" READY Consumable to Order Replace No. READY REPLACE 120K KIT !" READY NEAR WASTE TONER !" READY FUSER OIL LOW !" CHAPTER 5 MAINTENANCE The following are displayed: LCD Operator Call Message REPLACE FCR !" See 5-13 CR-3CL See 5-18 OP-3CL...pages *1 60,000 images (Continuously printed) *4 60,000 pages *1 120,000 pages 18,000 Images 12,000 pages How to Replace Fuser Cleaner OPC Belt Cartridge REPLACE FUSER !" The printer will continue printing when any of these messages are Maintenance Messages that you will need to replace it once a year. ...
READY REPLACE OPC BELT !" READY Consumable to Order Replace No. READY REPLACE 120K KIT !" READY NEAR WASTE TONER !" READY FUSER OIL LOW !" CHAPTER 5 MAINTENANCE The following are displayed: LCD Operator Call Message REPLACE FCR !" See 5-13 CR-3CL See 5-18 OP-3CL...pages *1 60,000 images (Continuously printed) *4 60,000 pages *1 120,000 pages 18,000 Images 12,000 pages How to Replace Fuser Cleaner OPC Belt Cartridge REPLACE FUSER !" The printer will continue printing when any of these messages are Maintenance Messages that you will need to replace it once a year. ...

Users Manual - English
Page 121
OIILL BOOTTTTLLEE CHAPTER 5 MAINTENANCE Oil Bottle Low Message When the Oil has almost run out, the following message appears on the LCD panel. After this message, you can print approximately 30 pages: FUSER OIL LOW !" Prepare a new Oil Bottle to replace the nearly empty bottle. When you see this message appears, you must replace the Oil Bottle with a new one: OIL EMPTY Replace the oil bottle 5-9 READY Oil Bottle Empty Message When the Oil completely runs out, the following message appears on the LCD panel and the printer stops printing.
OIILL BOOTTTTLLEE CHAPTER 5 MAINTENANCE Oil Bottle Low Message When the Oil has almost run out, the following message appears on the LCD panel. After this message, you can print approximately 30 pages: FUSER OIL LOW !" Prepare a new Oil Bottle to replace the nearly empty bottle. When you see this message appears, you must replace the Oil Bottle with a new one: OIL EMPTY Replace the oil bottle 5-9 READY Oil Bottle Empty Message When the Oil completely runs out, the following message appears on the LCD panel and the printer stops printing.

Users Manual - English
Page 125
READY Fuser Cleaner Change Message When the following message appears on the LCD and the printer stops printing, you will need a replacement Fuser Cleaner Roller: REPLACE FCR !" FUUSSEERR CLLEEAANNEERR CHAPTER 5 MAINTENANCE Fuser Cleaner Message When the following message appears on the LCD panel, you must replace the Fuser Cleaner: CHANGE FCR Replace the cleaning roller 5-13
READY Fuser Cleaner Change Message When the following message appears on the LCD and the printer stops printing, you will need a replacement Fuser Cleaner Roller: REPLACE FCR !" FUUSSEERR CLLEEAANNEERR CHAPTER 5 MAINTENANCE Fuser Cleaner Message When the following message appears on the LCD panel, you must replace the Fuser Cleaner: CHANGE FCR Replace the cleaning roller 5-13

Users Manual - English
Page 126
Press the Power button to wait until it are HOT! Open the Top Cover. 3. Release the Oil Bottle Lock Levers on both sides as shown: Fig. 5-8 5-14 CHAPTER 5 MAINTENANCE Replacing the Fuser Cleaner ! Warning The Fusing unit and the parts around it has cooled down sufficiently. 2. If you touch the HOT parts, you might get injured. 1. Be sure to turn the printer off, and then wait until the Fusing Unit has cooled sufficiently before replacing the Fuser Cleaner.
Press the Power button to wait until it are HOT! Open the Top Cover. 3. Release the Oil Bottle Lock Levers on both sides as shown: Fig. 5-8 5-14 CHAPTER 5 MAINTENANCE Replacing the Fuser Cleaner ! Warning The Fusing unit and the parts around it has cooled down sufficiently. 2. If you touch the HOT parts, you might get injured. 1. Be sure to turn the printer off, and then wait until the Fusing Unit has cooled sufficiently before replacing the Fuser Cleaner.

Users Manual - English
Page 127
4. CHAPTER 5 MAINTENANCE Fig. 5-9 Fig. 5-10 6. Press any of the Fuser Cleaner as shown: 5. "FC ROLLER" appears. 13. Close the Top Cover. 8. until "PARTS ...press + or - until "RESET MENU" appears. 11. Lock the Fuser Cleaner with the roller side facing you. Press + or - Press Set, and then press Go. Take the Fuser Cleaner out of the Fusing Unit by holding the handle of the Menu ... take the printer Off Line. 10. Press Set, and then press +. Install the new Fuser Cleaner into the guide with the Oil Bottle Lock Levers. 7. The printer is now in the READY state. 5-15
4. CHAPTER 5 MAINTENANCE Fig. 5-9 Fig. 5-10 6. Press any of the Fuser Cleaner as shown: 5. "FC ROLLER" appears. 13. Close the Top Cover. 8. until "PARTS ...press + or - until "RESET MENU" appears. 11. Lock the Fuser Cleaner with the roller side facing you. Press + or - Press Set, and then press Go. Take the Fuser Cleaner out of the Fusing Unit by holding the handle of the Menu ... take the printer Off Line. 10. Press Set, and then press +. Install the new Fuser Cleaner into the guide with the Oil Bottle Lock Levers. 7. The printer is now in the READY state. 5-15

Users Manual - English
Page 135
Warning After replacing the Fusing Unit, wait for approximately 30 minutes before replacing the Fusing Unit. Be sure to circulate. 5-23 Warning The Fusing Unit and the parts around it are HOT! CHAPTER 5 MAINTENANCE FUUSSIINNGG UNNIITT Fusing Unit When the following message appears on the LCD panel, you print to allow the fusing oil to wait until the Fusing Unit has cooled down sufficiently before you must replace the Fusing Unit: REPLACE FUSER !" If you touch the HOT parts, you might get injured. ! READY !
Warning After replacing the Fusing Unit, wait for approximately 30 minutes before replacing the Fusing Unit. Be sure to circulate. 5-23 Warning The Fusing Unit and the parts around it are HOT! CHAPTER 5 MAINTENANCE FUUSSIINNGG UNNIITT Fusing Unit When the following message appears on the LCD panel, you print to allow the fusing oil to wait until the Fusing Unit has cooled down sufficiently before you must replace the Fusing Unit: REPLACE FUSER !" If you touch the HOT parts, you might get injured. ! READY !

Users Manual - English
Page 137
.... 9. Fig. 5-22 Fig. 5-23 8. Install the new Fusing Unit into the new Fusing Unit, and then lock the Oil Bottle Lock Levers. Install the Fuser Cleaner and the Oil Bottle into the printer. Be careful not to keep the Fusing Unit flat, so oil will not spill. Plug the printer...the printer. 7. Caution When removing the Fusing Unit from the Fusing Unit. 6. CHAPTER 5 MAINTENANCE ! Close the Top Cover. 10. Remove the Oil Bottle and the Fuser Cleaner from the printer, be sure to spill oil inside the printer. 5. Secure the Fusing Unit with the two long screws. Be sure to insert...
.... 9. Fig. 5-22 Fig. 5-23 8. Install the new Fusing Unit into the new Fusing Unit, and then lock the Oil Bottle Lock Levers. Install the Fuser Cleaner and the Oil Bottle into the printer. Be careful not to keep the Fusing Unit flat, so oil will not spill. Plug the printer...the printer. 7. Caution When removing the Fusing Unit from the Fusing Unit. 6. CHAPTER 5 MAINTENANCE ! Close the Top Cover. 10. Remove the Oil Bottle and the Fuser Cleaner from the printer, be sure to spill oil inside the printer. 5. Secure the Fusing Unit with the two long screws. Be sure to insert...

Users Manual - English
Page 138
... 5 MAINTENANCE Note If the condition of the Menu buttons (+, - , Set or Back) to take the printer Off Line. 13. The life counter for the Fuser Cleaner will also need to page 5-15 for 30 minutes after installing a new Fusing Unit to allow the oil to circulate completely through to move. ... Fusing Unit connector is now in easily. Please wait for instructions. Press the Power button to the next menu level, and then press + or - until "FUSER UNIT" appears. 16. Press Set, and then press + until "RESET MENU" appears. 14. The printer is free to the Heat Roller. 11. If it should...
... 5 MAINTENANCE Note If the condition of the Menu buttons (+, - , Set or Back) to take the printer Off Line. 13. The life counter for the Fuser Cleaner will also need to page 5-15 for 30 minutes after installing a new Fusing Unit to allow the oil to circulate completely through to move. ... Fusing Unit connector is now in easily. Please wait for instructions. Press the Power button to the next menu level, and then press + or - until "FUSER UNIT" appears. 16. Press Set, and then press + until "RESET MENU" appears. 14. The printer is free to the Heat Roller. 11. If it should...

Users Manual - English
Page 163
Fig. 5-62 4. Fig. 5-63 Fig. 5-64 5-51 Remove the Fuser Cover that is located at the rear top of the printer to remove them. Turn the printer off and unplug the power cord from the fuser unit. Remove the Rear Caps (2 pieces) from the AC outlet. 2. We recommend removing those caps with a coin or a screwdriver. 3. Push down lightly on the caps and then slide them to the rear of the printer. Remove the left handside cover of the Lower Tray Unit. CHAPTER 5 MAINTENANCE 1. Remove the Back caps (2 pieces) of the Lower Tray Unit.
Fig. 5-62 4. Fig. 5-63 Fig. 5-64 5-51 Remove the Fuser Cover that is located at the rear top of the printer to remove them. Turn the printer off and unplug the power cord from the fuser unit. Remove the Rear Caps (2 pieces) from the AC outlet. 2. We recommend removing those caps with a coin or a screwdriver. 3. Push down lightly on the caps and then slide them to the rear of the printer. Remove the left handside cover of the Lower Tray Unit. CHAPTER 5 MAINTENANCE 1. Remove the Back caps (2 pieces) of the Lower Tray Unit.
Users Manual - English
Page 182
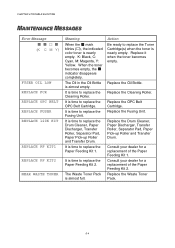
... REPLACE FCR REPLACE OPC BELT REPLACE FUSER REPLACE 120K KIT REPLACE PF KIT1 REPLACE PF KIT2 NEAR WASTE TONER Meaning When the ! It is time to replace the Paper Feeding Kit 2. It ...
... REPLACE FCR REPLACE OPC BELT REPLACE FUSER REPLACE 120K KIT REPLACE PF KIT1 REPLACE PF KIT2 NEAR WASTE TONER Meaning When the ! It is time to replace the Paper Feeding Kit 2. It ...

Users Manual - English
Page 184
... Transfer roller solenoid error Drum cleaning solenoid error Drum cleaning clutch error Fuser unit clutch error Belt marker sensor error Erase LED error Cooling fan error Ozone fan error Fuser fan error Charger HV unit error Fuser thermistor error Fuser temperature 2 error Fuser temperature 3 error Turn off the printer. Turn off the printer. Turn off...
... Transfer roller solenoid error Drum cleaning solenoid error Drum cleaning clutch error Fuser unit clutch error Belt marker sensor error Erase LED error Cooling fan error Ozone fan error Fuser fan error Charger HV unit error Fuser thermistor error Fuser temperature 2 error Fuser temperature 3 error Turn off the printer. Turn off the printer. Turn off...

Users Manual - English
Page 185
... EL2 WARNING ERROR ELL WARNING ERROR EP1 WARNING ERROR EP3 WARNING ERROR EP4 WARNING ERROR EP5 WARNING ERROR EP6 WARNING CHAPTER 6 TROUBLE SHOOTING Meaning Action Fuser temperature 4 error Beam detector error Scanner motor error Laser power error Duplex controller hardware error Feeder pass select solenoid error Duplex motor error Outer pass...
... EL2 WARNING ERROR ELL WARNING ERROR EP1 WARNING ERROR EP3 WARNING ERROR EP4 WARNING ERROR EP5 WARNING ERROR EP6 WARNING CHAPTER 6 TROUBLE SHOOTING Meaning Action Fuser temperature 4 error Beam detector error Scanner motor error Laser power error Duplex controller hardware error Feeder pass select solenoid error Duplex motor error Outer pass...
Users Manual - English
Page 202
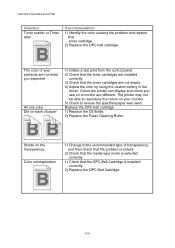
... 6 TROUBLE SHOOTING Question Toner scatter or Toner stain ABCDEFGHIJKLMNOPQRSTUVWXYZ. 0123456789. ABCDEFGHIJKLMNOPQRSTUVWXYZ. 0123456789. ABCDEFGHIJKLMNOPQRSTUVWXYZ. 0123456789. Replace the OPC belt cartridge 1) Replace the Oil Bottle. 2) Replace the Fuser Cleaning Roller. ABCDEFGHIJKLMNOPQRSTUVWXYZ. 0123456789. abcdefghijklmnopqrstuvwxyz. 1) Change to ensure the specified paper was used.
... 6 TROUBLE SHOOTING Question Toner scatter or Toner stain ABCDEFGHIJKLMNOPQRSTUVWXYZ. 0123456789. ABCDEFGHIJKLMNOPQRSTUVWXYZ. 0123456789. ABCDEFGHIJKLMNOPQRSTUVWXYZ. 0123456789. Replace the OPC belt cartridge 1) Replace the Oil Bottle. 2) Replace the Fuser Cleaning Roller. ABCDEFGHIJKLMNOPQRSTUVWXYZ. 0123456789. abcdefghijklmnopqrstuvwxyz. 1) Change to ensure the specified paper was used.


