Users Manual - English
Page 3
...printer, some internal parts of the printer, make sure you open the front or back cover of it according to clean up scattered toner. Please do not remove or damage the label. Doing this might cause the toner dust to ignite inside of the printer are high voltage electrodes inside the printer. Cleaning..., lint-free cloth and dispose of the printer, never touch the shaded parts shown in the illustration. The fuser unit is marked a caution label. CAUTION Cleaning the outside surface of the printer: ■ Make sure you clean the inside the vacuum cleaner, potentially starting ...
...printer, some internal parts of the printer, make sure you open the front or back cover of it according to clean up scattered toner. Please do not remove or damage the label. Doing this might cause the toner dust to ignite inside of the printer are high voltage electrodes inside the printer. Cleaning..., lint-free cloth and dispose of the printer, never touch the shaded parts shown in the illustration. The fuser unit is marked a caution label. CAUTION Cleaning the outside surface of the printer: ■ Make sure you clean the inside the vacuum cleaner, potentially starting ...
Users Manual - English
Page 6
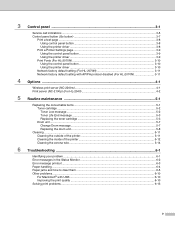
...)...4-1 Print server (NC-2100p) (For HL-2040 4-2 5 Routine maintenance 5-1 Replacing the consumable items...5-1 Toner cartridge ...5-2 Toner Low message ...5-2 Toner Life End message ...5-3 Replacing the toner cartridge 5-3 Drum unit ...5-7 Change Drum message...5-7 Replacing the drum unit...5-8 Cleaning ...5-11 Cleaning the outside of the printer 5-11 Cleaning the inside of the printer 5-12 Cleaning the corona wire...5-14 6 Troubleshooting ...6-1 Identifying...
...)...4-1 Print server (NC-2100p) (For HL-2040 4-2 5 Routine maintenance 5-1 Replacing the consumable items...5-1 Toner cartridge ...5-2 Toner Low message ...5-2 Toner Life End message ...5-3 Replacing the toner cartridge 5-3 Drum unit ...5-7 Change Drum message...5-7 Replacing the drum unit...5-8 Cleaning ...5-11 Cleaning the outside of the printer 5-11 Cleaning the inside of the printer 5-12 Cleaning the corona wire...5-14 6 Troubleshooting ...6-1 Identifying...
Users Manual - English
Page 10
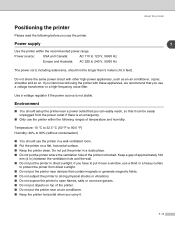
...AC 220 to open flames, salty or corrosive gasses. ■ Do not put objects on a flat, horizontal surface. ■ Keep the printer clean. Do not share the same power circuit with these appliances, we recommend that contain magnets or generate magnetic fields. ■ Do not subject the... printer to strong physical shocks or vibrations. ■ Do not expose the printer to 240 V, 50/60 Hz The power cord, including extensions, should not be easily unplugged from direct ...
...AC 220 to open flames, salty or corrosive gasses. ■ Do not put objects on a flat, horizontal surface. ■ Keep the printer clean. Do not share the same power circuit with these appliances, we recommend that contain magnets or generate magnetic fields. ■ Do not subject the... printer to strong physical shocks or vibrations. ■ Do not expose the printer to 240 V, 50/60 Hz The power cord, including extensions, should not be easily unplugged from direct ...

Users Manual - English
Page 47
...jam Clear the paper jam. If the printer does not start printing, press the Go button. See Solving print problems on page 6-5. See Paper jams and how to be cleaned. Memory full The printer memory is open Close the back cover of a document. See Cleaning the corona wire on page 5-14. ...3 - 4 LED Control panel Printer status Front cover is full and the printer cannot print full pages of a document. No ...
...jam Clear the paper jam. If the printer does not start printing, press the Go button. See Solving print problems on page 6-5. See Paper jams and how to be cleaned. Memory full The printer memory is open Close the back cover of a document. See Cleaning the corona wire on page 5-14. ...3 - 4 LED Control panel Printer status Front cover is full and the printer cannot print full pages of a document. No ...

Users Manual - English
Page 57
...need to replace certain parts and clean the printer regularly. Note These instructions are extremely hot. 5 Routine maintenance You will need to replace the consumable items regularly. When you have just used the printer, some parts inside the printer are also included in the illustrations....on page 5-2. Consumables Toner Cartridge Drum Unit See Toner cartridge on page 5-7. 5 - 1 WARNING 5 When you replace certain parts or clean the printer regularly, pay attention to the following: ■ If your clothes are smeared with toner, wipe off the toner with a dry cloth...
...need to replace certain parts and clean the printer regularly. Note These instructions are extremely hot. 5 Routine maintenance You will need to replace the consumable items regularly. When you have just used the printer, some parts inside the printer are also included in the illustrations....on page 5-2. Consumables Toner Cartridge Drum Unit See Toner cartridge on page 5-7. 5 - 1 WARNING 5 When you replace certain parts or clean the printer regularly, pay attention to the following: ■ If your clothes are smeared with toner, wipe off the toner with a dry cloth...

Users Manual - English
Page 59
... toner cartridges, call the dealer you bought the printer from or Brother Customer Service. • We recommend that you clean the printer when you use quality Brother toner cartridges. Routine maintenance Toner Life End message If the LED shows the message below, the printer has run out of the printer. 2 Pull out the drum unit and toner...
... toner cartridges, call the dealer you bought the printer from or Brother Customer Service. • We recommend that you clean the printer when you use quality Brother toner cartridges. Routine maintenance Toner Life End message If the LED shows the message below, the printer has run out of the printer. 2 Pull out the drum unit and toner...

Users Manual - English
Page 62
... maintenance 5 8 Put the drum unit and toner cartridge assembly back in the printer. If you put the drum unit back in the printer. If you do not, printed pages may separate from the drum unit. 7 Clean the primary corona wire inside the drum unit by gently sliding the blue tab from right to...
... maintenance 5 8 Put the drum unit and toner cartridge assembly back in the printer. If you put the drum unit back in the printer. If you do not, printed pages may separate from the drum unit. 7 Clean the primary corona wire inside the drum unit by gently sliding the blue tab from right to...

Users Manual - English
Page 63
...print quality but also the quality and life of printed pages will be printed by the use only genuine Brother toner. The actual number of the printer itself. The printer should clean the inside of third-party drum unit. Note • There are many factors that determine the actual drum... life, we have no control over the many factors that your drum. • For best performance, use of the printer. The actual ...
...print quality but also the quality and life of printed pages will be printed by the use only genuine Brother toner. The actual number of the printer itself. The printer should clean the inside of third-party drum unit. Note • There are many factors that determine the actual drum... life, we have no control over the many factors that your drum. • For best performance, use of the printer. The actual ...

Users Manual - English
Page 64
... page 5-11. 5 Follow these steps to replace the drum unit. 1 Make sure that you clean the printer when you replace only the toner cartridge. 3 Pull out the drum unit and toner cartridge assembly. 5 - 8 IMPROPER SETUP Do not reset the drum counter when ...you replace the drum unit. Routine maintenance Replacing the drum unit Note We recommend that the printer is turned on and the Drum LED is blinking. Once all the LEDs light up. Open the front cover of the...
... page 5-11. 5 Follow these steps to replace the drum unit. 1 Make sure that you clean the printer when you replace only the toner cartridge. 3 Pull out the drum unit and toner cartridge assembly. 5 - 8 IMPROPER SETUP Do not reset the drum counter when ...you replace the drum unit. Routine maintenance Replacing the drum unit Note We recommend that the printer is turned on and the Drum LED is blinking. Once all the LEDs light up. Open the front cover of the...

Users Manual - English
Page 67
... drum unit, make sure you clean the inside of the printer with toner, clean the inside of the printer. If printed pages are stained with a dry, lint-free cloth. 5 Cleaning the outside of the printer CAUTION • Use neutral detergents. Cleaning with a dry, lint-free cloth. Routine maintenance Cleaning Clean the outside of the printer as thinner or benzine will...
... drum unit, make sure you clean the inside of the printer with toner, clean the inside of the printer. If printed pages are stained with a dry, lint-free cloth. 5 Cleaning the outside of the printer CAUTION • Use neutral detergents. Cleaning with a dry, lint-free cloth. Routine maintenance Cleaning Clean the outside of the printer as thinner or benzine will...
Users Manual - English
Page 68
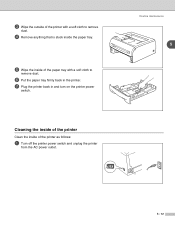
Routine maintenance 5 5 - 12 3 Wipe the outside of the printer as follows: 1 Turn off the printer power switch and unplug the printer from the AC power outlet. Cleaning the inside of the printer Clean the inside of the paper tray with a soft cloth to remove dust. 4 Remove anything that is stuck inside the paper tray. 5 Wipe the inside of the printer with a soft cloth to remove dust. 6 Put the paper tray firmly back in the printer. 7 Plug the printer back in and turn on the printer power switch.
Routine maintenance 5 5 - 12 3 Wipe the outside of the printer as follows: 1 Turn off the printer power switch and unplug the printer from the AC power outlet. Cleaning the inside of the printer Clean the inside of the paper tray with a soft cloth to remove dust. 4 Remove anything that is stuck inside the paper tray. 5 Wipe the inside of the printer with a soft cloth to remove dust. 6 Put the paper tray firmly back in the printer. 7 Plug the printer back in and turn on the printer power switch.
Users Manual - English
Page 70
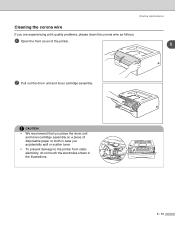
Routine maintenance Cleaning the corona wire If you are experiencing print quality problems, please clean the corona wire as follows: 1 Open the front cover of disposable paper or cloth in the illustrations. 5 - 14 CAUTION • We recommend that you accidentally spill or scatter toner. • To prevent damage to the printer from static electricity, do not touch the electrodes shown in case you place the drum unit and toner cartridge assembly on a piece of the printer. 5 2 Pull out the drum unit and toner cartridge assembly.
Routine maintenance Cleaning the corona wire If you are experiencing print quality problems, please clean the corona wire as follows: 1 Open the front cover of disposable paper or cloth in the illustrations. 5 - 14 CAUTION • We recommend that you accidentally spill or scatter toner. • To prevent damage to the printer from static electricity, do not touch the electrodes shown in case you place the drum unit and toner cartridge assembly on a piece of the printer. 5 2 Pull out the drum unit and toner cartridge assembly.

Users Manual - English
Page 71
If you put the drum unit back in the printer. Routine maintenance 5 Home position (▲) 5 - 15 3 Clean the primary corona wire inside the drum unit by gently sliding the blue tab from right to left and left to the home position (▲) before you do not, printed pages may have a vertical stripe. 4 Put the drum unit and toner cartridge assembly back in the printer. Close the front cover of the printer. Return the tab to right several times.
If you put the drum unit back in the printer. Routine maintenance 5 Home position (▲) 5 - 15 3 Clean the primary corona wire inside the drum unit by gently sliding the blue tab from right to left and left to the home position (▲) before you do not, printed pages may have a vertical stripe. 4 Put the drum unit and toner cartridge assembly back in the printer. Close the front cover of the printer. Return the tab to right several times.

Users Manual - English
Page 73
...the paper tray and then press the Go button. ■ If there is straight. See Replacing the drum unit on page 5-8. ■ See Cleaning the corona wire on page 3-7. ■ If this does not clear the error, reduce the complexity of your document: • Graphics mode &#...properly installed. If you would like to AUTO by using the supplied Windows® driver or Remote Printer Console program. ■ Change the following table for the error message that meets Brother's recommended paper specifications. The default setting for when the Toner Life End status is indicated. ■...
...the paper tray and then press the Go button. ■ If there is straight. See Replacing the drum unit on page 5-8. ■ See Cleaning the corona wire on page 3-7. ■ If this does not clear the error, reduce the complexity of your document: • Graphics mode &#...properly installed. If you would like to AUTO by using the supplied Windows® driver or Remote Printer Console program. ■ Change the following table for the error message that meets Brother's recommended paper specifications. The default setting for when the Toner Life End status is indicated. ■...
Users Manual - English
Page 82
... ■ Try using . ■ Check the printer's environment because conditions such as high humidity can cause hollow print. See What kind of paper can I use paper that meets our specifications. See Replacing the drum unit on page 1-3. ■ Clean the primary corona wire inside the drum unit by ...use ? See What kind of paper can increase the amount of background shading. See Positioning the printer on page 5-8. Rough-surfaced paper or thick print media may cause the problem. See Cleaning the corona wire on page 5-8. ■ Make sure that you return the blue tab to...
... ■ Try using . ■ Check the printer's environment because conditions such as high humidity can cause hollow print. See What kind of paper can I use paper that meets our specifications. See Replacing the drum unit on page 1-3. ■ Clean the primary corona wire inside the drum unit by ...use ? See What kind of paper can increase the amount of background shading. See Positioning the printer on page 5-8. Rough-surfaced paper or thick print media may cause the problem. See Cleaning the corona wire on page 5-8. ■ Make sure that you return the blue tab to...
Users Manual - English
Page 83
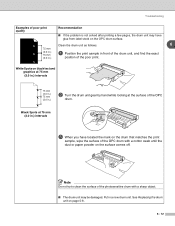
... the surface of the photosensitive drum with a cotton swab until the dust or paper powder on the OPC drum surface. Note Do not try to clean the surface of the OPC drum with a sharp object. ■ The drum unit may have located the mark on page 5-8. 6 - 12 Put in front of... at the surface of poor print quality Recommendation ■ If the problem is not solved after printing a few pages, the drum unit may be damaged. Clean the drum unit as follows: 6 75 mm (3.0 in.) 75 mm (3.0 in.) 1 Position the print sample in a new drum unit.
... the surface of the photosensitive drum with a cotton swab until the dust or paper powder on the OPC drum surface. Note Do not try to clean the surface of the OPC drum with a sharp object. ■ The drum unit may have located the mark on page 5-8. 6 - 12 Put in front of... at the surface of poor print quality Recommendation ■ If the problem is not solved after printing a few pages, the drum unit may be damaged. Clean the drum unit as follows: 6 75 mm (3.0 in.) 75 mm (3.0 in.) 1 Position the print sample in a new drum unit.
Users Manual - English
Page 84
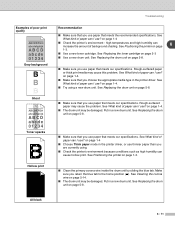
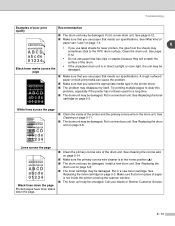
...9632; The drum unit may be damaged. White lines across the page ■ Clean the primary corona wire of the drum unit. See Cleaning the corona wire on page 5-3. Call your dealer or Brother Customer Service. Try printing multiple pages to the OPC drum surface. Black lines ...Clean the drum unit. See Replacing the toner cartridge on page 5-14 ABCDEFGH abcdefghijk ABCD abcde 01234 ■ Make sure the primary corona wire cleaner is in direct sunlight or room light, the unit may sometimes stick to clear this problem, especially if the printer has not been used for laser printers...
...9632; The drum unit may be damaged. White lines across the page ■ Clean the primary corona wire of the drum unit. See Cleaning the corona wire on page 5-3. Call your dealer or Brother Customer Service. Try printing multiple pages to the OPC drum surface. Black lines ...Clean the drum unit. See Replacing the toner cartridge on page 5-14 ABCDEFGH abcdefghijk ABCD abcde 01234 ■ Make sure the primary corona wire cleaner is in direct sunlight or room light, the unit may sometimes stick to clear this problem, especially if the printer has not been used for laser printers...
Users Manual - English
Page 85
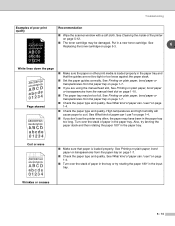
See Cleaning the inside of the printer on page 1-7. ■ Check the paper type and quality. Put in the input tray. 6 - 14 See What kind of paper in the tray or try ... paper or other print media is loaded properly. See Replacing the toner cartridge on page 1-4. ■ Turn over the stack of paper can I use the printer very often, the paper may be damaged. Curl or wave B DEFGH abc efghijk A CD bcde 1 34 Wrinkles or creases ■ Make sure that the guides...
See Cleaning the inside of the printer on page 1-7. ■ Check the paper type and quality. Put in the input tray. 6 - 14 See What kind of paper in the tray or try ... paper or other print media is loaded properly. See Replacing the toner cartridge on page 1-4. ■ Turn over the stack of paper can I use the printer very often, the paper may be damaged. Curl or wave B DEFGH abc efghijk A CD bcde 1 34 Wrinkles or creases ■ Make sure that the guides...
Users Manual - English
Page 108
... Accessory 4-1 Advanced tab 2-4 Automatic Emulation Selection 2-17 B Back view 1-2 Basic tab 2-3 BRAdmin Professional 2-16 Brother Solutions Center 2-1 C Cancel printing 3-7 Carton contents 1-1 Cartridge position error 3-3 Character sets A-9 Cleaning 5-11 Control panel 3-1, A-3 Control panel button 3-7 Corona wire 5-6, 5-14, 5-15 D Device options 2-6 ... Print media 1-4 Print overrun 3-4 Print quality 6-10 Print server 4-1, 4-2 Print test page 3-8 Printable area 1-6 Printer driver 2-3, 2-14, A-3 Printer settings 3-9 Processor A-2 R Register your product B-1, C-1 Remote...
... Accessory 4-1 Advanced tab 2-4 Automatic Emulation Selection 2-17 B Back view 1-2 Basic tab 2-3 BRAdmin Professional 2-16 Brother Solutions Center 2-1 C Cancel printing 3-7 Carton contents 1-1 Cartridge position error 3-3 Character sets A-9 Cleaning 5-11 Control panel 3-1, A-3 Control panel button 3-7 Corona wire 5-6, 5-14, 5-15 D Device options 2-6 ... Print media 1-4 Print overrun 3-4 Print quality 6-10 Print server 4-1, 4-2 Print test page 3-8 Printable area 1-6 Printer driver 2-3, 2-14, A-3 Printer settings 3-9 Processor A-2 R Register your product B-1, C-1 Remote...
Quick Setup Guide - English
Page 2
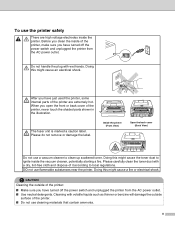
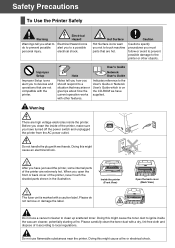
... icons warn you not to prevent possible personal injury. Indicates reference to clean up scattered toner. Do not handle the plug with the printer. Before you clean the inside of the printer, make sure you have just used the printer, some internal parts of the printer are extremely hot. Doing this might cause the toner dust to...
... icons warn you not to prevent possible personal injury. Indicates reference to clean up scattered toner. Do not handle the plug with the printer. Before you clean the inside of the printer, make sure you have just used the printer, some internal parts of the printer are extremely hot. Doing this might cause the toner dust to...


