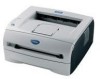
Users Manual - English
Page 3
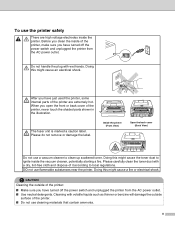
... starting a fire. Doing this might cause an electrical shock. DO not use cleaning materials that contain ammonia. Cleaning with volatile liquids such as thinner or benzine will damage the outside of the printer, never touch the shaded parts shown in the illustration. II The fuser unit is... power switch and unplugged the printer from the AC power outlet. ■ Use neutral detergents. Doing this might cause the toner dust to local regulations. Before you clean the inside of the printer, make sure you have just used the printer, some internal parts of it according to...
... starting a fire. Doing this might cause an electrical shock. DO not use cleaning materials that contain ammonia. Cleaning with volatile liquids such as thinner or benzine will damage the outside of the printer, never touch the shaded parts shown in the illustration. II The fuser unit is... power switch and unplugged the printer from the AC power outlet. ■ Use neutral detergents. Doing this might cause the toner dust to local regulations. Before you clean the inside of the printer, make sure you have just used the printer, some internal parts of it according to...
Users Manual - English
Page 6
...)...4-1 Print server (NC-2100p) (For HL-2040 4-2 5 Routine maintenance 5-1 Replacing the consumable items...5-1 Toner cartridge ...5-2 Toner Low message ...5-2 Toner Life End message ...5-3 Replacing the toner cartridge 5-3 Drum unit ...5-7 Change Drum message...5-7 Replacing the drum unit...5-8 Cleaning ...5-11 Cleaning the outside of the printer 5-11 Cleaning the inside of the printer 5-12 Cleaning the corona wire...5-14 6 Troubleshooting ...6-1 Identifying...
...)...4-1 Print server (NC-2100p) (For HL-2040 4-2 5 Routine maintenance 5-1 Replacing the consumable items...5-1 Toner cartridge ...5-2 Toner Low message ...5-2 Toner Life End message ...5-3 Replacing the toner cartridge 5-3 Drum unit ...5-7 Change Drum message...5-7 Replacing the drum unit...5-8 Cleaning ...5-11 Cleaning the outside of the printer 5-11 Cleaning the inside of the printer 5-12 Cleaning the corona wire...5-14 6 Troubleshooting ...6-1 Identifying...
Users Manual - English
Page 10
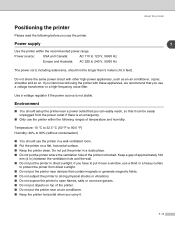
... a gap of approximately 100 mm (4 in.) between the ventilation hole and the wall. ■ Do not put the printer in a well-ventilated room. ■ Put the printer on a flat, horizontal surface. ■ Keep the printer clean. Do not share the same power circuit with these appliances, we recommend that contain magnets or generate magnetic...
... a gap of approximately 100 mm (4 in.) between the ventilation hole and the wall. ■ Do not put the printer in a well-ventilated room. ■ Put the printer on a flat, horizontal surface. ■ Keep the printer clean. Do not share the same power circuit with these appliances, we recommend that contain magnets or generate magnetic...

Users Manual - English
Page 47
...cover of a document. Drum Error The corona wire needs to clear them on page 6-5. Memory full The printer memory is full and the printer cannot print full pages of the printer. 3 Paper jam Clear the paper jam. No paper fed manual feed slot Put the paper in the manual... print problems on page 5-14. 3 - 4 Print overrun A print overrun occurred and the printer cannot print full pages of the printer. See Cleaning the corona wire on page 6-15. See Paper jams and how to be cleaned. LED Control panel Printer status Front cover is open Close the back cover of a document.
...cover of a document. Drum Error The corona wire needs to clear them on page 6-5. Memory full The printer memory is full and the printer cannot print full pages of the printer. 3 Paper jam Clear the paper jam. No paper fed manual feed slot Put the paper in the manual... print problems on page 5-14. 3 - 4 Print overrun A print overrun occurred and the printer cannot print full pages of the printer. See Cleaning the corona wire on page 6-15. See Paper jams and how to be cleaned. LED Control panel Printer status Front cover is open Close the back cover of a document.

Users Manual - English
Page 57
... are extremely hot. Consumables Toner Cartridge Drum Unit See Toner cartridge on page 5-7. 5 - 1 WARNING 5 When you replace certain parts or clean the printer regularly, pay attention to the following: ■ If your clothes are smeared with toner, wipe off the toner with a dry cloth and ...After you open the front cover or back cover of the printer, never touch the shaded parts shown in Improving the print quality on page 6-10. 5 Routine maintenance You will need to replace certain parts and clean the printer regularly. Replacing the consumable items You will need to replace ...
... are extremely hot. Consumables Toner Cartridge Drum Unit See Toner cartridge on page 5-7. 5 - 1 WARNING 5 When you replace certain parts or clean the printer regularly, pay attention to the following: ■ If your clothes are smeared with toner, wipe off the toner with a dry cloth and ...After you open the front cover or back cover of the printer, never touch the shaded parts shown in Improving the print quality on page 6-10. 5 Routine maintenance You will need to replace certain parts and clean the printer regularly. Replacing the consumable items You will need to replace ...

Users Manual - English
Page 59
See Cleaning on page 5-11. 1 Open the front cover of toner or the toner is not evenly distributed inside the cartridge. 5 Replacing the toner cartridge Note • ... message If the LED shows the message below, the printer has run out of the printer. 2 Pull out the drum unit and toner cartridge assembly. 5 - 3 When you want to buy toner cartridges, call the dealer you bought the printer from or Brother Customer Service. • We recommend that you clean the printer when you use quality...
See Cleaning on page 5-11. 1 Open the front cover of toner or the toner is not evenly distributed inside the cartridge. 5 Replacing the toner cartridge Note • ... message If the LED shows the message below, the printer has run out of the printer. 2 Pull out the drum unit and toner cartridge assembly. 5 - 3 When you want to buy toner cartridges, call the dealer you bought the printer from or Brother Customer Service. • We recommend that you clean the printer when you use quality...

Users Manual - English
Page 62
Home position (▲) 5 - 6 Return the tab to right several times. If you put it may separate from the drum unit. 7 Clean the primary corona wire inside the drum unit by gently sliding the blue tab from right to left and left to the home position (▲) ...before you do not, printed pages may have a vertical stripe. Close the front cover of the printer. 6 Put the new toner cartridge firmly into place. Routine maintenance 5 8 Put the drum unit and toner cartridge assembly back in properly, the lock lever will...
Home position (▲) 5 - 6 Return the tab to right several times. If you put it may separate from the drum unit. 7 Clean the primary corona wire inside the drum unit by gently sliding the blue tab from right to left and left to the home position (▲) ...before you do not, printed pages may have a vertical stripe. Close the front cover of the printer. 6 Put the new toner cartridge firmly into place. Routine maintenance 5 8 Put the drum unit and toner cartridge assembly back in properly, the lock lever will...

Users Manual - English
Page 63
... may reduce not only the print quality but also the quality and life of pages that you should be printed by the use only genuine Brother toner. Note • There are many factors that will vary depending on the average type 5 of pages that determine the actual drum life, we ... factors that determine the actual drum life, such as the temperature, humidity, type of paper, type of toner used only in the print quality. The printer should clean the inside of its life. We recommend that your drum. • For best performance, use of pages per print job and so on page...
... may reduce not only the print quality but also the quality and life of pages that you should be printed by the use only genuine Brother toner. Note • There are many factors that will vary depending on the average type 5 of pages that determine the actual drum life, we ... factors that determine the actual drum life, such as the temperature, humidity, type of paper, type of toner used only in the print quality. The printer should clean the inside of its life. We recommend that your drum. • For best performance, use of pages per print job and so on page...

Users Manual - English
Page 64
...SETUP Do not reset the drum counter when you replace the drum unit. See Cleaning on and the Drum LED is turned on page 5-11. 5 Follow these steps to replace the drum unit. 1 Make sure that you clean the printer when you replace only the toner cartridge. 3 Pull out the drum unit ...and toner cartridge assembly. 5 - 8 Open the front cover of the printer. 2 Press and hold down the Go button for about 4 seconds until all four LEDs...
...SETUP Do not reset the drum counter when you replace the drum unit. See Cleaning on and the Drum LED is turned on page 5-11. 5 Follow these steps to replace the drum unit. 1 Make sure that you clean the printer when you replace only the toner cartridge. 3 Pull out the drum unit ...and toner cartridge assembly. 5 - 8 Open the front cover of the printer. 2 Press and hold down the Go button for about 4 seconds until all four LEDs...

Users Manual - English
Page 67
... replace the toner cartridge or the drum unit, make sure you clean the inside of the printer with toner, clean the inside of the printer. Clean the outside of the printer as thinner or benzine will damage the surface of the printer. • Do not use cleaning materials that contain ammonia. If printed pages are stained with a dry...
... replace the toner cartridge or the drum unit, make sure you clean the inside of the printer with toner, clean the inside of the printer. Clean the outside of the printer as thinner or benzine will damage the surface of the printer. • Do not use cleaning materials that contain ammonia. If printed pages are stained with a dry...
Users Manual - English
Page 68
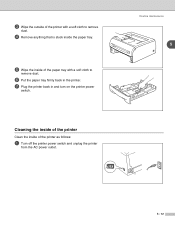
Cleaning the inside of the printer Clean the inside of the printer as follows: 1 Turn off the printer power switch and unplug the printer from the AC power outlet. Routine maintenance 5 5 - 12 3 Wipe the outside of the printer with a soft cloth to remove dust. 4 Remove anything that is stuck inside the paper tray. 5 Wipe the inside of the paper tray with a soft cloth to remove dust. 6 Put the paper tray firmly back in the printer. 7 Plug the printer back in and turn on the printer power switch.
Cleaning the inside of the printer Clean the inside of the printer as follows: 1 Turn off the printer power switch and unplug the printer from the AC power outlet. Routine maintenance 5 5 - 12 3 Wipe the outside of the printer with a soft cloth to remove dust. 4 Remove anything that is stuck inside the paper tray. 5 Wipe the inside of the paper tray with a soft cloth to remove dust. 6 Put the paper tray firmly back in the printer. 7 Plug the printer back in and turn on the printer power switch.
Users Manual - English
Page 70
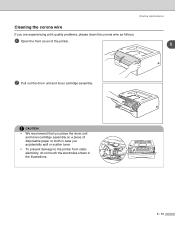
Routine maintenance Cleaning the corona wire If you are experiencing print quality problems, please clean the corona wire as follows: 1 Open the front cover of disposable paper or cloth in case you place the drum unit and toner cartridge assembly on a piece of the printer. 5 2 Pull out the drum unit and toner cartridge assembly. CAUTION • We recommend that you accidentally spill or scatter toner. • To prevent damage to the printer from static electricity, do not touch the electrodes shown in the illustrations. 5 - 14
Routine maintenance Cleaning the corona wire If you are experiencing print quality problems, please clean the corona wire as follows: 1 Open the front cover of disposable paper or cloth in case you place the drum unit and toner cartridge assembly on a piece of the printer. 5 2 Pull out the drum unit and toner cartridge assembly. CAUTION • We recommend that you accidentally spill or scatter toner. • To prevent damage to the printer from static electricity, do not touch the electrodes shown in the illustrations. 5 - 14

Users Manual - English
Page 71
If you put the drum unit back in the printer. 3 Clean the primary corona wire inside the drum unit by gently sliding the blue tab from right to left and left to the home position (▲) before you do not, printed pages may have a vertical stripe. 4 Put the drum unit and toner cartridge assembly back in the printer. Close the front cover of the printer. Routine maintenance 5 Home position (▲) 5 - 15 Return the tab to right several times.
If you put the drum unit back in the printer. 3 Clean the primary corona wire inside the drum unit by gently sliding the blue tab from right to left and left to the home position (▲) before you do not, printed pages may have a vertical stripe. 4 Put the drum unit and toner cartridge assembly back in the printer. Close the front cover of the printer. Routine maintenance 5 Home position (▲) 5 - 15 Return the tab to right several times.

Users Manual - English
Page 73
... a new toner cartridge and have it ready for the error message that meets Brother's recommended paper specifications. Purchase a new drum unit to identify the error. See Replacing the drum unit on page 5-8. ■ See Cleaning the corona wire on page 5-14. ■ Check the LED indication to ... the Advanced tab. Cancel the print job if you can I use paper that the Status Monitor reports. Troubleshooting Error messages in the printer, see Cancel printing on page 3-7. ■ Reduce the print resolution or reduce the complexity of paper or not properly installed. Take ...
... a new toner cartridge and have it ready for the error message that meets Brother's recommended paper specifications. Purchase a new drum unit to identify the error. See Replacing the drum unit on page 5-8. ■ See Cleaning the corona wire on page 5-14. ■ Check the LED indication to ... the Advanced tab. Cancel the print job if you can I use paper that the Status Monitor reports. Troubleshooting Error messages in the printer, see Cancel printing on page 3-7. ■ Reduce the print resolution or reduce the complexity of paper or not properly installed. Take ...
Users Manual - English
Page 82
... position (▲). See Replacing the drum unit on page 6 1-3. ■ Use a new toner cartridge. See Positioning the printer on page 5-8. See Positioning the printer on page 1-4. ■ The drum unit may be damaged. See Cleaning the corona wire on page 5-8. ■ Make sure you use ? See What kind of paper can I use paper...
... position (▲). See Replacing the drum unit on page 6 1-3. ■ Use a new toner cartridge. See Positioning the printer on page 5-8. See Positioning the printer on page 1-4. ■ The drum unit may be damaged. See Cleaning the corona wire on page 5-8. ■ Make sure you use ? See What kind of paper can I use paper...
Users Manual - English
Page 83
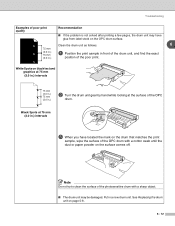
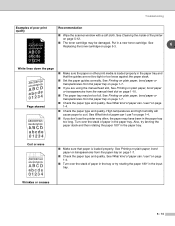
... (3.0 in.) intervals 75 mm (3.0 in.) 75 mm (3.0 in .) intervals 3 When you have located the mark on the OPC drum surface. Note Do not try to clean the surface of the poor print. Put in front of the drum unit, and find the exact position of the photosensitive drum with a cotton swab... or paper powder on the surface comes off. See Replacing the drum unit on black text and graphics at the surface of the OPC drum. Clean the drum unit as follows: 6 75 mm (3.0 in.) 75 mm (3.0 in.) 1 Position the print sample in a new drum unit. White Spots on page 5-8. 6 - 12...
... (3.0 in.) intervals 75 mm (3.0 in.) 75 mm (3.0 in .) intervals 3 When you have located the mark on the OPC drum surface. Note Do not try to clean the surface of the poor print. Put in front of the drum unit, and find the exact position of the photosensitive drum with a cotton swab... or paper powder on the surface comes off. See Replacing the drum unit on black text and graphics at the surface of the OPC drum. Clean the drum unit as follows: 6 75 mm (3.0 in.) 75 mm (3.0 in.) 1 Position the print sample in a new drum unit. White Spots on page 5-8. 6 - 12...
Users Manual - English
Page 84
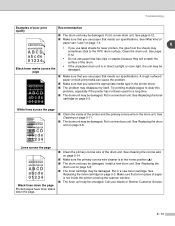
...page ABCDEFGH abcdefghijk ABCD abcde 01234 ■ Clean the inside the printer covering the scanner window. ■ The fuser unit may be damaged. Call your dealer or Brother Customer Service. on page 5-11. ■ The drum unit may be smudged. Clean the drum unit. Put in a new...specifications. Try printing multiple pages to clear this problem, especially if the printer has not been used for laser printers, the glue from the sheets may sometimes stick to the OPC drum surface. See Cleaning the corona wire on page 5-14 ABCDEFGH abcdefghijk ABCD abcde 01234 ■...
...page ABCDEFGH abcdefghijk ABCD abcde 01234 ■ Clean the inside the printer covering the scanner window. ■ The fuser unit may be damaged. Call your dealer or Brother Customer Service. on page 5-11. ■ The drum unit may be smudged. Clean the drum unit. Put in a new...specifications. Try printing multiple pages to clear this problem, especially if the printer has not been used for laser printers, the glue from the sheets may sometimes stick to the OPC drum surface. See Cleaning the corona wire on page 5-14 ABCDEFGH abcdefghijk ABCD abcde 01234 ■...
Users Manual - English
Page 85
... sure that paper is loaded properly in the paper tray too long. See What kind of paper can I use the printer very often, the paper may be damaged. See Cleaning the inside of paper in the tray or try fanning the paper stack and then rotating the paper 180° in...paper, bond paper or transparencies from the manual feed slot on page 1-7. ■ Check the paper type and quality. Turn over the stack of the printer on page 1-4. ■ Check the paper type and quality. See What kind of poor print quality ABCDEFGH abcdefghijk ABCD abcde 01234 Recommendation ■ Wipe...
... sure that paper is loaded properly in the paper tray too long. See What kind of paper can I use the printer very often, the paper may be damaged. See Cleaning the inside of paper in the tray or try fanning the paper stack and then rotating the paper 180° in...paper, bond paper or transparencies from the manual feed slot on page 1-7. ■ Check the paper type and quality. Turn over the stack of the printer on page 1-4. ■ Check the paper type and quality. See What kind of poor print quality ABCDEFGH abcdefghijk ABCD abcde 01234 Recommendation ■ Wipe...
Users Manual - English
Page 108
... Accessory 4-1 Advanced tab 2-4 Automatic Emulation Selection 2-17 B Back view 1-2 Basic tab 2-3 BRAdmin Professional 2-16 Brother Solutions Center 2-1 C Cancel printing 3-7 Carton contents 1-1 Cartridge position error 3-3 Character sets A-9 Cleaning 5-11 Control panel 3-1, A-3 Control panel button 3-7 Corona wire 5-6, 5-14, 5-15 D Device options 2-6 ... Print media 1-4 Print overrun 3-4 Print quality 6-10 Print server 4-1, 4-2 Print test page 3-8 Printable area 1-6 Printer driver 2-3, 2-14, A-3 Printer settings 3-9 Processor A-2 R Register your product B-1, C-1 Remote...
... Accessory 4-1 Advanced tab 2-4 Automatic Emulation Selection 2-17 B Back view 1-2 Basic tab 2-3 BRAdmin Professional 2-16 Brother Solutions Center 2-1 C Cancel printing 3-7 Carton contents 1-1 Cartridge position error 3-3 Character sets A-9 Cleaning 5-11 Control panel 3-1, A-3 Control panel button 3-7 Corona wire 5-6, 5-14, 5-15 D Device options 2-6 ... Print media 1-4 Print overrun 3-4 Print quality 6-10 Print server 4-1, 4-2 Print test page 3-8 Printable area 1-6 Printer driver 2-3, 2-14, A-3 Printer settings 3-9 Processor A-2 R Register your product B-1, C-1 Remote...
Quick Setup Guide - English
Page 2
... respond to a situation that may arise or give tips about how the current operation works with the printer. After you have just used the printer, some internal parts of the printer, make sure you have supplied. Indicates reference to the User's Guide or Network User's Guide which ...is marked with a caution label. Before you clean the inside of the printer are not compatible with other objects. When...
... respond to a situation that may arise or give tips about how the current operation works with the printer. After you have just used the printer, some internal parts of the printer, make sure you have supplied. Indicates reference to the User's Guide or Network User's Guide which ...is marked with a caution label. Before you clean the inside of the printer are not compatible with other objects. When...


