
Users Manual - English
Page 58
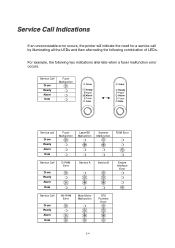
... Paper Alarm Toner Data Service call by illuminating all the LEDs and then alternating the following two indications alternate when a fuser malfunction error occurs. Service Call Indications If an unrecoverable error occurs, the printer will indicate the need for a service call... Drum Ready Alarm Data Fuser Malfunction ❍ ❍ ❍ Laser BD Malfunction ❍ Scanner Malfunction ❍ ❍ ❍ ❍ ROM Error ❍ ❍...
... Paper Alarm Toner Data Service call by illuminating all the LEDs and then alternating the following two indications alternate when a fuser malfunction error occurs. Service Call Indications If an unrecoverable error occurs, the printer will indicate the need for a service call... Drum Ready Alarm Data Fuser Malfunction ❍ ❍ ❍ Laser BD Malfunction ❍ Scanner Malfunction ❍ ❍ ❍ ❍ ROM Error ❍ ❍...
Users Manual - English
Page 89
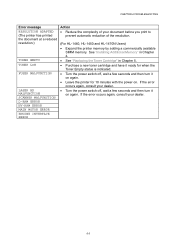
... has printed the document at a reduced resolution.) TONER EMPTY TONER LOW FUSER MALFUNCTION LASER BD MALFUNCTION SCANNER MALFUNCTION D-RAM ERROR NV-RAM ERROR MAIN MOTOR ERROR ENGINE INTERFACE ERROR Action • Reduce the complexity of the resolution. (For HL-1440, HL-1450 and HL-1470N Users) • Expand the printer memory by adding a commercially available...
... has printed the document at a reduced resolution.) TONER EMPTY TONER LOW FUSER MALFUNCTION LASER BD MALFUNCTION SCANNER MALFUNCTION D-RAM ERROR NV-RAM ERROR MAIN MOTOR ERROR ENGINE INTERFACE ERROR Action • Reduce the complexity of the resolution. (For HL-1440, HL-1450 and HL-1470N Users) • Expand the printer memory by adding a commercially available...
Users Manual - English
Page 95
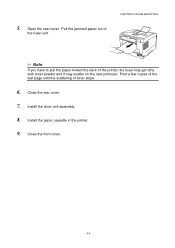
Install the paper cassette in the printer. 9. Open the rear cover. Close the rear cover. 7. Print a few copies of the test page until the scattering of the printer, the fuser may get dirty 0 with toner powder and it may scatter on the next printouts. Close the front cover. 6-9 CHAPTER 6 TROUBLESHOOTING ✏ Note If you have to pull the paper toward the back of toner stops. 6. Install the drum unit assembly. 8. Pull the jammed paper out of the fuser unit. 5.
Install the paper cassette in the printer. 9. Open the rear cover. Close the rear cover. 7. Print a few copies of the test page until the scattering of the printer, the fuser may get dirty 0 with toner powder and it may scatter on the next printouts. Close the front cover. 6-9 CHAPTER 6 TROUBLESHOOTING ✏ Note If you have to pull the paper toward the back of toner stops. 6. Install the drum unit assembly. 8. Pull the jammed paper out of the fuser unit. 5.


