
User Guide
Page 3
Cleaning with wet hands - Before you clean the printer, clear a paper jam or replace parts, make sure you have turned off the power switch and unplugged the printer from the AC power outlet. Caution Use water or neutral detergents for cleaning. To use cleaning materials that contain ammonia. When you an electrical shock. ...
Cleaning with wet hands - Before you clean the printer, clear a paper jam or replace parts, make sure you have turned off the power switch and unplugged the printer from the AC power outlet. Caution Use water or neutral detergents for cleaning. To use cleaning materials that contain ammonia. When you an electrical shock. ...
User Guide
Page 12
... ...5-9 Cleaning ...5-12 Replacing maintenance parts ...5-13 6 Troubleshooting ...6-1 Identifying your problem ...6-1 Error messages in the status monitor 6-2 Error message printouts ...6-3 Paper handling ...6-4 Paper jams and how to clear them 6-5 Other problems ...6-10 For Macintosh® with USB ...6-10 Improving the print quality ...6-10 Solving print problems ...6-15 7 Appendix ...A-1 Printer specifications ...A-1 Important information for choosing your...
... ...5-9 Cleaning ...5-12 Replacing maintenance parts ...5-13 6 Troubleshooting ...6-1 Identifying your problem ...6-1 Error messages in the status monitor 6-2 Error message printouts ...6-3 Paper handling ...6-4 Paper jams and how to clear them 6-5 Other problems ...6-10 For Macintosh® with USB ...6-10 Improving the print quality ...6-10 Solving print problems ...6-15 7 Appendix ...A-1 Printer specifications ...A-1 Important information for choosing your...

User Guide
Page 18
... jet paper, or it may cause a paper jam and damage your paper on page A-3. 1 - 6 ABOUT THIS PRINTER Recommended paper Plain paper Recycled paper Transparency Labels Europe Xerox Premier 80 g/m2 Xerox Business 80 g/m2 Modo DATACOPY 80 g/m2 IGEPA X-Press 80 g/m2 Xerox RECYCLED SUPREMES 3M CG 3300 Avery laser label L7163 USA Xerox 4200DP 20 lb Hammermill Laser Paper 24...
... jet paper, or it may cause a paper jam and damage your paper on page A-3. 1 - 6 ABOUT THIS PRINTER Recommended paper Plain paper Recycled paper Transparency Labels Europe Xerox Premier 80 g/m2 Xerox Business 80 g/m2 Modo DATACOPY 80 g/m2 IGEPA X-Press 80 g/m2 Xerox RECYCLED SUPREMES 3M CG 3300 Avery laser label L7163 USA Xerox 4200DP 20 lb Hammermill Laser Paper 24...

User Guide
Page 22
...the printer. 6 Send the print data to pull out the support flap, we recommend that it is going to prevent paper from sliding off the top output tray. Figure 1-8 For two-sided printing, put more than 250 sheets of the tray. 5 Put the paper tray firmly back in the tray, or paper jams ...may occur. Check that is inserted fully into the printer.
...the printer. 6 Send the print data to pull out the support flap, we recommend that it is going to prevent paper from sliding off the top output tray. Figure 1-8 For two-sided printing, put more than 250 sheets of the tray. 5 Put the paper tray firmly back in the tray, or paper jams ...may occur. Check that is inserted fully into the printer.

User Guide
Page 25
If it is straight and in Step 4 above. ABOUT THIS PRINTER 1 - 13 Repeat for each page that the paper is not, the paper may cause a jam. 5 After the printed page comes out of the printer, put in the next sheet of paper as in the proper position on the manual feed slot. ■ Put the paper into the manual feed slot with the side to be fed properly, resulting in a skewed printout or a paper jam. ■ Do not put more than one piece of paper in the manual feed slot at any one time, or it may not be printed face up. ■ Make sure that you want to print.
If it is straight and in Step 4 above. ABOUT THIS PRINTER 1 - 13 Repeat for each page that the paper is not, the paper may cause a jam. 5 After the printed page comes out of the printer, put in the next sheet of paper as in the proper position on the manual feed slot. ■ Put the paper into the manual feed slot with the side to be fed properly, resulting in a skewed printout or a paper jam. ■ Do not put more than one piece of paper in the manual feed slot at any one time, or it may not be printed face up. ■ Make sure that you want to print.

User Guide
Page 28
... feed slot. Figure 1-18 1 - 16 ABOUT THIS PRINTER Repeat for each sheet immediately after printing. ■ Put the paper into the manual feed slot with the side to be fed properly, resulting in a skewed printout or a paper jam. ■ Do not put more than one piece of paper in the manual feed slot at any...
... feed slot. Figure 1-18 1 - 16 ABOUT THIS PRINTER Repeat for each sheet immediately after printing. ■ Put the paper into the manual feed slot with the side to be fed properly, resulting in a skewed printout or a paper jam. ■ Do not put more than one piece of paper in the manual feed slot at any...
User Guide
Page 29
... THE TYPES OF ENVELOPES LISTED ABOVE, THEY MAY DAMAGE YOUR PRINTER. ABOUT THIS PRINTER 1 - 17 Brother will be of paper. You are what you want. However, some envelopes will be suitable for the printer ■ that have been made , with edges that are...a particular envelope because envelope manufacturers may cause paper jams or misfeeds. ■ Do not print envelopes using the envelopes in a laser printer. A suitable envelope should buy quality envelopes from your printer. Printing on envelopes Types of envelopes to avoid paper jams and misfeeds. ■ Do not put ...
... THE TYPES OF ENVELOPES LISTED ABOVE, THEY MAY DAMAGE YOUR PRINTER. ABOUT THIS PRINTER 1 - 17 Brother will be of paper. You are what you want. However, some envelopes will be suitable for the printer ■ that have been made , with edges that are...a particular envelope because envelope manufacturers may cause paper jams or misfeeds. ■ Do not print envelopes using the envelopes in a laser printer. A suitable envelope should buy quality envelopes from your printer. Printing on envelopes Types of envelopes to avoid paper jams and misfeeds. ■ Do not put ...

User Guide
Page 34
Check that the guides are flat and below the maximum paper mark (▼). Check that the transparencies are firmly in the slots. Figure 1-25 4 Put transparencies in the tray at any one time, or it may cause a jam. Figure 1-26 1 - 22 ABOUT THIS PRINTER Do not put more than 10 transparencies in the tray. 3 While pressing the blue paper-guide release levers, slide the paper guides to fit the transparency size.
Check that the guides are flat and below the maximum paper mark (▼). Check that the transparencies are firmly in the slots. Figure 1-25 4 Put transparencies in the tray at any one time, or it may cause a jam. Figure 1-26 1 - 22 ABOUT THIS PRINTER Do not put more than 10 transparencies in the tray. 3 While pressing the blue paper-guide release levers, slide the paper guides to fit the transparency size.

User Guide
Page 38
... feed slot at any one time, or it may cause a jam. 6 After the printed transparency comes out of the printer, put in the next transparency as described in the proper position on the manual feed slot. If it is not, the transparency may cause a paper jam or the transparency to curl. 1 - 26 ABOUT THIS...
... feed slot at any one time, or it may cause a jam. 6 After the printed transparency comes out of the printer, put in the next transparency as described in the proper position on the manual feed slot. If it is not, the transparency may cause a paper jam or the transparency to curl. 1 - 26 ABOUT THIS...
User Guide
Page 41
...the sheets back in the manual feed slot, you use very thin or very thick paper. ■ When you will have printed all the even-numbered pages. Manual Duplex printing from the Advanced tab in the printer driver. Repeat this step until you have to straighten them on the computer screen. ...you put the paper in the manual feed slot with the side to clear them , or you may be printed on first facing up. If there is possible that there may get paper jams. ■ You should not use the manual duplex function, it is a paper jam, see Paper jams and how to be paper jams or poor print...
...the sheets back in the manual feed slot, you use very thin or very thick paper. ■ When you will have printed all the even-numbered pages. Manual Duplex printing from the Advanced tab in the printer driver. Repeat this step until you have to straighten them on the computer screen. ...you put the paper in the manual feed slot with the side to clear them , or you may be printed on first facing up. If there is possible that there may get paper jams. ■ You should not use the manual duplex function, it is a paper jam, see Paper jams and how to be paper jams or poor print...

User Guide
Page 57
If the printer does not start printing again. 3 - 4 CONTROL PANEL See Paper jams and how to clear them on page 1-8. Then press the Control panel button. LED Drum Ready Paper Alarm Toner Data Figure 3-10 Printer status Paper jam Clear the paper jam. The printer will start printing, press the Control panel button. See Printing on plain paper on page 6-5. No paper Put paper in properly, and then press the Control panel button. Misfeed Put the paper back in the printer.
If the printer does not start printing again. 3 - 4 CONTROL PANEL See Paper jams and how to clear them on page 1-8. Then press the Control panel button. LED Drum Ready Paper Alarm Toner Data Figure 3-10 Printer status Paper jam Clear the paper jam. The printer will start printing, press the Control panel button. See Printing on plain paper on page 6-5. No paper Put paper in properly, and then press the Control panel button. Misfeed Put the paper back in the printer.
User Guide
Page 76
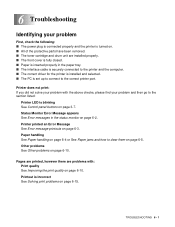
... on page 6-4 or See Paper jams and how to the correct printer port. Other problems See Other problems on page 6-3. Printer printed an Error Message See Error message printouts on page 6-10. 6 Troubleshooting Identifying your problem and then go to the section listed: Printer LED is blinking See Control... on page 3-7. Status Monitor Error Message appears See Error messages in the paper tray. ■ The interface cable is securely connected to the printer and the computer. ■ The correct driver for the printer is installed and selected. ■ The PC is incorrect See Solving print...
... on page 6-4 or See Paper jams and how to the correct printer port. Other problems See Other problems on page 6-3. Printer printed an Error Message See Error message printouts on page 6-10. 6 Troubleshooting Identifying your problem and then go to the section listed: Printer LED is blinking See Control... on page 3-7. Status Monitor Error Message appears See Error messages in the paper tray. ■ The interface cable is securely connected to the printer and the computer. ■ The correct driver for the printer is installed and selected. ■ The PC is incorrect See Solving print...
User Guide
Page 77
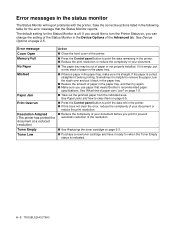
...Brother's recommended paper specifications. If it is empty, put it is helpful to print the data remaining in the following table for the Status Monitor is paper in the paper tray, and then try again. ■ Make sure you can I use paper that the Status Monitor reports. on page 2-5. See Paper jams... it back in the status monitor The Status Monitor will report problems with the printer. Error message Cover Open Memory Full No Paper Misfeed Paper Jam Print Overrun Resolution Adapted (The printer has printed the document at a reduced resolution) Toner Empty Toner Low Action &#...
...Brother's recommended paper specifications. If it is empty, put it is helpful to print the data remaining in the following table for the Status Monitor is paper in the paper tray, and then try again. ■ Make sure you can I use paper that the Status Monitor reports. on page 2-5. See Paper jams... it back in the status monitor The Status Monitor will report problems with the printer. Error message Cover Open Memory Full No Paper Misfeed Paper Jam Print Overrun Resolution Adapted (The printer has printed the document at a reduced resolution) Toner Empty Toner Low Action &#...

User Guide
Page 79
... meets Brother recommended paper specifications. on the envelope size you should straighten it is paper in the page setup or document setup menu of your software application manual. ■ Clear the jammed paper. Your application software must be out of paper in the paper tray. ■ If there is empty, put it is helpful to the printer. ■...
... meets Brother recommended paper specifications. on the envelope size you should straighten it is paper in the page setup or document setup menu of your software application manual. ■ Clear the jammed paper. Your application software must be out of paper in the paper tray. ■ If there is empty, put it is helpful to the printer. ■...

User Guide
Page 80
... panel button. Then try printing again. ■ Always remove all the jammed paper has been removed from the printer. If the printer does not start printing, please check that all paper from feeding through the printer at one time and reduces paper jams. TROUBLESHOOTING 6 - 5 Figure 6-2 If the jammed paper is removed completely by lighting the control panel LEDs as follows...
... panel button. Then try printing again. ■ Always remove all the jammed paper has been removed from the printer. If the printer does not start printing, please check that all paper from feeding through the printer at one time and reduces paper jams. TROUBLESHOOTING 6 - 5 Figure 6-2 If the jammed paper is removed completely by lighting the control panel LEDs as follows...

User Guide
Page 81
Figure 6-3 2 Pull the jammed paper up and out of the printer. 1 Pull the paper tray completely out of the printer. 3 Open the front cover. Figure 6-4 6 - 6 TROUBLESHOOTING
Figure 6-3 2 Pull the jammed paper up and out of the printer. 1 Pull the paper tray completely out of the printer. 3 Open the front cover. Figure 6-4 6 - 6 TROUBLESHOOTING

User Guide
Page 82
Pull the jammed paper up and out of the jammed paper from the paper tray. If you cannot remove the drum unit assembly easily at this time, do not touch the electrodes shown in Figure 6-6. 4 Pull out the drum unit assembly. Instead, pull the edge of the printer. Figure 6-6 TROUBLESHOOTING 6 - 7 Figure 6-5 Caution To prevent damage to the printer caused by static electricity, do not use extra force.
Pull the jammed paper up and out of the jammed paper from the paper tray. If you cannot remove the drum unit assembly easily at this time, do not touch the electrodes shown in Figure 6-6. 4 Pull out the drum unit assembly. Instead, pull the edge of the printer. Figure 6-6 TROUBLESHOOTING 6 - 7 Figure 6-5 Caution To prevent damage to the printer caused by static electricity, do not use extra force.

User Guide
Page 83
Figure 6-7 If you have just used the printer, some internal parts of the printer are extremely hot! HOT! 6 Close the rear cover. Pull the jammed paper out of toner stops. Figure 6-8 6 - 8 TROUBLESHOOTING Caution After you touch the internal parts of the printer, the fuser may get dirty with toner powder and it may scatter on the next printouts. Wait for the printer to cool down before you have to pull the paper toward the back of the printer. Print a few copies of the test page until the scattering of the fuser unit. 5 Open the rear cover.
Figure 6-7 If you have just used the printer, some internal parts of the printer are extremely hot! HOT! 6 Close the rear cover. Pull the jammed paper out of toner stops. Figure 6-8 6 - 8 TROUBLESHOOTING Caution After you touch the internal parts of the printer, the fuser may get dirty with toner powder and it may scatter on the next printouts. Wait for the printer to cool down before you have to pull the paper toward the back of the printer. Print a few copies of the test page until the scattering of the fuser unit. 5 Open the rear cover.

User Guide
Page 84
7 Push the lock lever down and take the toner cartridge out of the drum unit assembly. TROUBLESHOOTING 6 - 9 Take out the jammed paper if there is any inside the drum unit. Figure 6-9 8 Put the drum unit assembly back in the printer. 9 Put the paper tray in the printer. 10 Close the front cover.
7 Push the lock lever down and take the toner cartridge out of the drum unit assembly. TROUBLESHOOTING 6 - 9 Take out the jammed paper if there is any inside the drum unit. Figure 6-9 8 Put the drum unit assembly back in the printer. 9 Put the paper tray in the printer. 10 Close the front cover.
User Guide
Page 95
INDEX A Accessories tab 2-7 B Brother numbers (USA/Canada iii Brother Solutions Center 2-1 C carton contents 1-1 cleaning 5-12 control panel 3-1, A-1 control panel button 3-7 corona wire ...A-2 memory A-1 misfeed 3-4 N no paper 3-4 P paper 1-5, A-3 paper handling 6-4, A-2 paper jams 3-4, 6-5 Parallel interface cable 1-1 pick up roller 5-13 plain paper 1-6 power supply 1-4 print media 1-5 print quality 2-4, 6-10 print test page 3-8 printable area 1-7 printer driver 2-1, A-1 printer parts 1-2, 1-3 processor A-1 R Register your printer (USA iii resolution A-1 S separator ...
INDEX A Accessories tab 2-7 B Brother numbers (USA/Canada iii Brother Solutions Center 2-1 C carton contents 1-1 cleaning 5-12 control panel 3-1, A-1 control panel button 3-7 corona wire ...A-2 memory A-1 misfeed 3-4 N no paper 3-4 P paper 1-5, A-3 paper handling 6-4, A-2 paper jams 3-4, 6-5 Parallel interface cable 1-1 pick up roller 5-13 plain paper 1-6 power supply 1-4 print media 1-5 print quality 2-4, 6-10 print test page 3-8 printable area 1-7 printer driver 2-1, A-1 printer parts 1-2, 1-3 processor A-1 R Register your printer (USA iii resolution A-1 S separator ...


