Users Manual - English
Page 1
... in the 'Solutions' and 'Customer Education' sections. Download the latest drivers and utilities for your printer needs. i You can print or view this manual thoroughly before using the printer. Brother Laser Printer HL-1230 HL-1440 HL-1450 HL-1470N USER'S GUIDE Please read the FAQs and troubleshooting tips or learn about special printing solutions in a convenient place for all your...
... in the 'Solutions' and 'Customer Education' sections. Download the latest drivers and utilities for your printer needs. i You can print or view this manual thoroughly before using the printer. Brother Laser Printer HL-1230 HL-1440 HL-1450 HL-1470N USER'S GUIDE Please read the FAQs and troubleshooting tips or learn about special printing solutions in a convenient place for all your...
Users Manual - English
Page 87
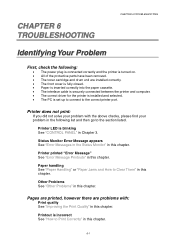
...• The PC is blinking See "CONTROL PANEL" in Chapter 3. Printout is incorrect See "How to Clear Them" in this chapter. Printer printed "Error Message" See "Error Message Printouts" in this chapter. Paper handling See "Paper Handling" or "Paper Jams and How to ... checks, please find your problem with : Print quality See "Improving the Print Quality" in this chapter. 6-1 Printer LED is set up to connect to the section listed. CHAPTER 6 6 TROUBLESHOOTING CHAPTER 6 TROUBLESHOOTING Identifying Your Problem First, check the following list and then go to the correct...
...• The PC is blinking See "CONTROL PANEL" in Chapter 3. Printout is incorrect See "How to Clear Them" in this chapter. Printer printed "Error Message" See "Error Message Printouts" in this chapter. Paper handling See "Paper Handling" or "Paper Jams and How to ... checks, please find your problem with : Print quality See "Improving the Print Quality" in this chapter. 6-1 Printer LED is set up to connect to the section listed. CHAPTER 6 6 TROUBLESHOOTING CHAPTER 6 TROUBLESHOOTING Identifying Your Problem First, check the following list and then go to the correct...
Users Manual - English
Page 88
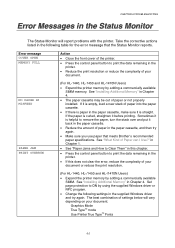
...it before printing. CHAPTER 6 TROUBLESHOOTING Error Messages in the Status Monitor The Status Monitor will vary depending on your document. NO PAPER or MISFEED PAPER JAM PRINT OVERRUN (For HL-1440, HL-1450 and HL-1470N Users) • Expand the printer memory by using the supplied ... Change the following table for the error message that meets Brother's recommended paper specifications. See "What Kind of your document or reduce the print resolution. (For HL-1440, HL-/1450 and HL-/1470N Users) • Expand the printer memory by adding a commercially available SIMM. If it is...
...it before printing. CHAPTER 6 TROUBLESHOOTING Error Messages in the Status Monitor The Status Monitor will vary depending on your document. NO PAPER or MISFEED PAPER JAM PRINT OVERRUN (For HL-1440, HL-1450 and HL-1470N Users) • Expand the printer memory by using the supplied ... Change the following table for the error message that meets Brother's recommended paper specifications. See "What Kind of your document or reduce the print resolution. (For HL-1440, HL-/1450 and HL-/1470N Users) • Expand the printer memory by adding a commercially available SIMM. If it is...
Users Manual - English
Page 89
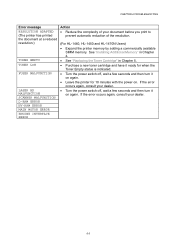
... to prevent automatic reduction of the resolution. (For HL-1440, HL-1450 and HL-1470N Users) • Expand the printer memory by adding a commercially available SIMM memory. CHAPTER 6 TROUBLESHOOTING Error message RESOLUTION ADAPTED (The printer has printed the document at a reduced resolution.) TONER EMPTY TONER LOW FUSER MALFUNCTION LASER BD MALFUNCTION SCANNER MALFUNCTION D-RAM ERROR NV-RAM... when the Toner Empty status is indicated. • Turn the power switch off , wait a few seconds and then turn it on again. • Leave the printer for 10 minutes with the power on again.
... to prevent automatic reduction of the resolution. (For HL-1440, HL-1450 and HL-1470N Users) • Expand the printer memory by adding a commercially available SIMM memory. CHAPTER 6 TROUBLESHOOTING Error message RESOLUTION ADAPTED (The printer has printed the document at a reduced resolution.) TONER EMPTY TONER LOW FUSER MALFUNCTION LASER BD MALFUNCTION SCANNER MALFUNCTION D-RAM ERROR NV-RAM... when the Toner Empty status is indicated. • Turn the power switch off , wait a few seconds and then turn it on again. • Leave the printer for 10 minutes with the power on again.

Users Manual - English
Page 90
... Reduce the complexity of your document before you print to ON by adding a commercially available SIMM. Error Message Printouts CHAPTER 6 TROUBLESHOOTING The printer will vary depending on your document. See "Installing Additional Memory" in Chapter 4. • Press the control panel button to ... the data remaining in the resolution. (For HL-1440, HL-1450 and HL-1470N Users) • Expand the printer memory by adding a commercially available SIMM. PRINT OVERRUN (For HL-1440, HL-1450 and HL-1470N Users) • Expand the printer memory by using the supplied Windows driver or RPC...
... Reduce the complexity of your document before you print to ON by adding a commercially available SIMM. Error Message Printouts CHAPTER 6 TROUBLESHOOTING The printer will vary depending on your document. See "Installing Additional Memory" in Chapter 4. • Press the control panel button to ... the data remaining in the resolution. (For HL-1440, HL-1450 and HL-1470N Users) • Expand the printer memory by adding a commercially available SIMM. PRINT OVERRUN (For HL-1440, HL-1450 and HL-1470N Users) • Expand the printer memory by using the supplied Windows driver or RPC...
Users Manual - English
Page 91
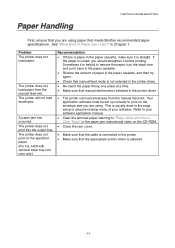
...CHAPTER 6 TROUBLESHOOTING First, ensure that you are using paper that meets Brother recommended paper specifications. If the paper is curled, you are using . The printer does not print on the CD-ROM. • Close the rear cover. • Make sure that the cable is connected to the printer • .... • The printer can I Use?" Problem The printer does not load paper. Sometimes it is helpful to Clear Them" or the paper jam instructional video on the specified paper. (For HL-1450 with optional lower tray unit user only) Recommendation • If there is straight. in the ...
...CHAPTER 6 TROUBLESHOOTING First, ensure that you are using paper that meets Brother recommended paper specifications. If the paper is curled, you are using . The printer does not print on the CD-ROM. • Close the rear cover. • Make sure that the cable is connected to the printer • .... • The printer can I Use?" Problem The printer does not load paper. Sometimes it is helpful to Clear Them" or the paper jam instructional video on the specified paper. (For HL-1450 with optional lower tray unit user only) Recommendation • If there is straight. in the ...
Users Manual - English
Page 92
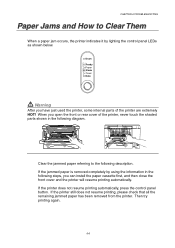
... printing, please check that all the remaining jammed paper has been removed from the printer. If the printer does not resume printing automatically, press the control panel button. CHAPTER 6 TROUBLESHOOTING Paper Jams and How to the following steps, you can install the paper cassette ...first, and then close the front cover and the printer will resume printing automatically. Drum Ready Paper Alarm Toner Data Warning After you have just used the printer, some internal parts of the printer...
... printing, please check that all the remaining jammed paper has been removed from the printer. If the printer does not resume printing automatically, press the control panel button. CHAPTER 6 TROUBLESHOOTING Paper Jams and How to the following steps, you can install the paper cassette ...first, and then close the front cover and the printer will resume printing automatically. Drum Ready Paper Alarm Toner Data Warning After you have just used the printer, some internal parts of the printer...
Users Manual - English
Page 93
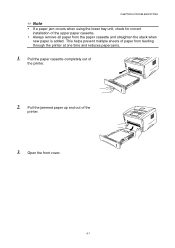
Pull the jammed paper up and out of the upper paper cassette. CHAPTER 6 TROUBLESHOOTING ✏ Note y If a paper jam occurs when using the lower tray unit, check for correct installation of the printer. 3. y Always remove all paper from feeding through the printer at one time and reduces paper jams. 1. Pull the paper cassette completely out of paper from the paper cassette and straighten the stack when new paper is added. This helps prevent multiple sheets of the printer. 2. Open the front cover. 6-7
Pull the jammed paper up and out of the upper paper cassette. CHAPTER 6 TROUBLESHOOTING ✏ Note y If a paper jam occurs when using the lower tray unit, check for correct installation of the printer. 3. y Always remove all paper from feeding through the printer at one time and reduces paper jams. 1. Pull the paper cassette completely out of paper from the paper cassette and straighten the stack when new paper is added. This helps prevent multiple sheets of the printer. 2. Open the front cover. 6-7
Users Manual - English
Page 94
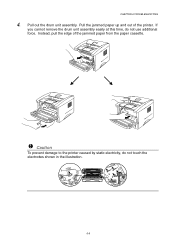
Instead, pull the edge of the printer. Pull out the drum unit assembly. Pull the jammed paper up and out of the jammed paper from the paper cassette. ! Caution To prevent damage to the printer caused by static electricity, do not use additional force. If you cannot remove the drum unit assembly easily at this time, do not touch the electrodes shown in the illustration. 6-8 CHAPTER 6 TROUBLESHOOTING 4.
Instead, pull the edge of the printer. Pull out the drum unit assembly. Pull the jammed paper up and out of the jammed paper from the paper cassette. ! Caution To prevent damage to the printer caused by static electricity, do not use additional force. If you cannot remove the drum unit assembly easily at this time, do not touch the electrodes shown in the illustration. 6-8 CHAPTER 6 TROUBLESHOOTING 4.
Users Manual - English
Page 95
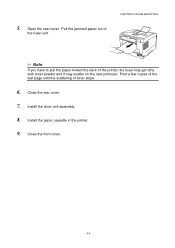
5. Pull the jammed paper out of toner stops. 6. Close the front cover. 6-9 Close the rear cover. 7. Print a few copies of the test page until the scattering of the fuser unit. Install the paper cassette in the printer. 9. CHAPTER 6 TROUBLESHOOTING ✏ Note If you have to pull the paper toward the back of the printer, the fuser may get dirty 0 with toner powder and it may scatter on the next printouts. Open the rear cover. Install the drum unit assembly. 8.
5. Pull the jammed paper out of toner stops. 6. Close the front cover. 6-9 Close the rear cover. 7. Print a few copies of the test page until the scattering of the fuser unit. Install the paper cassette in the printer. 9. CHAPTER 6 TROUBLESHOOTING ✏ Note If you have to pull the paper toward the back of the printer, the fuser may get dirty 0 with toner powder and it may scatter on the next printouts. Open the rear cover. Install the drum unit assembly. 8.
Users Manual - English
Page 96
"There was an error writing to LPT1: (or BRUSB) for the printer." error message occurs on your PC. Recommendation • Check that the printer cable is not damaged or broken. • If you have an interface-switching device, make sure the correct printer is selected. 6-10 Other Problems CHAPTER 6 TROUBLESHOOTING Problem The printer cannot print.
"There was an error writing to LPT1: (or BRUSB) for the printer." error message occurs on your PC. Recommendation • Check that the printer cable is not damaged or broken. • If you have an interface-switching device, make sure the correct printer is selected. 6-10 Other Problems CHAPTER 6 TROUBLESHOOTING Problem The printer cannot print.
Users Manual - English
Page 97
Recommendation • Check that the printer is turned on. • Check that it is selected with USB ✏ Note This section is for HL-1440, HL-1450 and HL-1470N users only. 1 Problem HL-1440 (or HL-1450 and HL-1470N) does not appear in the System Folder and that the USB interface cable is connected correctly. • Check the printer driver is installed correctly. Unable to print from application software. Make sure that the supplied Macintosh printer driver is installed in Chooser. CHAPTER 6 TROUBLESHOOTING For Macintosh with Chooser. 6-11
Recommendation • Check that the printer is turned on. • Check that it is selected with USB ✏ Note This section is for HL-1440, HL-1450 and HL-1470N users only. 1 Problem HL-1440 (or HL-1450 and HL-1470N) does not appear in the System Folder and that the USB interface cable is connected correctly. • Check the printer driver is installed correctly. Unable to print from application software. Make sure that the supplied Macintosh printer driver is installed in Chooser. CHAPTER 6 TROUBLESHOOTING For Macintosh with Chooser. 6-11
Users Manual - English
Page 98
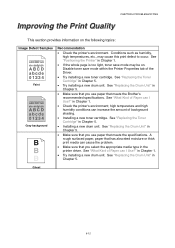
...can I Use?" A rough surfaced paper, paper that meets the Brother's recommended specifications. See "Positioning the Printer" in Chapter 1. • If the whole page is too light, toner save mode within the Printer Properties tab of Paper can cause the problem. • Make ...Replacing the Drum Unit" in Chapter 5. • Try installing a new drum unit. CHAPTER 6 TROUBLESHOOTING Improving the Print Quality This section provides information on . in Chapter 1. • Check the printer's environment; See "Replacing the Drum Unit" in Chapter 5. • Make sure that you ...
...can I Use?" A rough surfaced paper, paper that meets the Brother's recommended specifications. See "Positioning the Printer" in Chapter 1. • If the whole page is too light, toner save mode within the Printer Properties tab of Paper can cause the problem. • Make ...Replacing the Drum Unit" in Chapter 5. • Try installing a new drum unit. CHAPTER 6 TROUBLESHOOTING Improving the Print Quality This section provides information on . in Chapter 1. • Check the printer's environment; See "Replacing the Drum Unit" in Chapter 5. • Make sure that you ...
Users Manual - English
Page 99
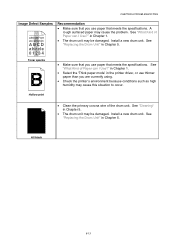
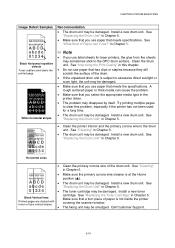
...may cause this situation to occur. See "What Kind of Paper can I Use?" Install a new drum unit. in Chapter 5. CHAPTER 6 TROUBLESHOOTING Image Defect Samples ABCDEFGH abcdefghijk ABCD abcde 01234 Recommendation • Make sure that you use paper that meets the specifications. See "What Kind of... the drum unit. Toner specks • Make sure that you are currently using. • Check the printer's environment because conditions such as high humidity may be damaged. See "Replacing the Drum Unit" in Chapter 5. • The drum ...
...may cause this situation to occur. See "What Kind of Paper can I Use?" Install a new drum unit. in Chapter 5. CHAPTER 6 TROUBLESHOOTING Image Defect Samples ABCDEFGH abcdefghijk ABCD abcde 01234 Recommendation • Make sure that you use paper that meets the specifications. See "What Kind of... the drum unit. Toner specks • Make sure that you are currently using. • Check the printer's environment because conditions such as high humidity may be damaged. See "Replacing the Drum Unit" in Chapter 5. • The drum ...
Users Manual - English
Page 100
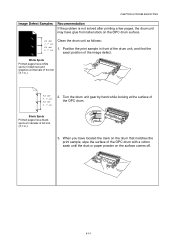
... located the mark on the drum that matches the print sample, wipe the surface of the OPC drum. Clean the drum unit as follows: 1. CHAPTER 6 TROUBLESHOOTING Image Defect Samples Recommendation If the problem is not solved after printing a few pages, the drum unit may have glue from label stock on the...
... located the mark on the drum that matches the print sample, wipe the surface of the OPC drum. Clean the drum unit as follows: 1. CHAPTER 6 TROUBLESHOOTING Image Defect Samples Recommendation If the problem is not solved after printing a few pages, the drum unit may have glue from label stock on the...
Users Manual - English
Page 101
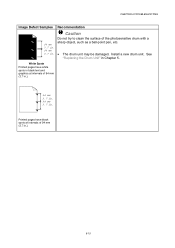
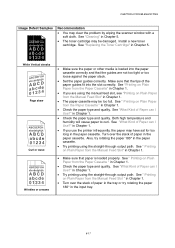
Recommendation ! White Spots Printed pages have black spots at intervals of 94 mm (3.7 in.). 94 mm 3.7 in. 94 mm 3.7 in Chapter 5. See "Replacing the Drum Unit" in . Install a new drum unit. Printed pages have white spots in black text and graphics at intervals of the photosensitive drum with a sharp object, such as a ball-point pen, etc. • The drum unit may be damaged. Caution Do not try to clean the surface of 94 mm (3.7 in . CHAPTER 6 TROUBLESHOOTING Image Defect Samples 94 mm 3.7 in. 94 mm 3.7 in .). 6-15
Recommendation ! White Spots Printed pages have black spots at intervals of 94 mm (3.7 in.). 94 mm 3.7 in. 94 mm 3.7 in Chapter 5. See "Replacing the Drum Unit" in . Install a new drum unit. Printed pages have white spots in black text and graphics at intervals of the photosensitive drum with a sharp object, such as a ball-point pen, etc. • The drum unit may be damaged. Caution Do not try to clean the surface of 94 mm (3.7 in . CHAPTER 6 TROUBLESHOOTING Image Defect Samples 94 mm 3.7 in. 94 mm 3.7 in .). 6-15
Users Manual - English
Page 102
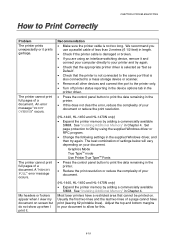
...The drum unit may be smudged. Install a new drum unit. See "Cleaning" in this problem, especially if the printer has not been used for laser printers, the glue from the sheets may sometimes stick to the OPC drum surface. Try printing multiple pages to excessive direct...; Clean the primary corona wire of paper is not inside the printer Printed pages are stained with toner or have vertical stripes. See "Replacing the Toner Cartridge" in Chapter 5. CHAPTER 6 TROUBLESHOOTING Image Defect Samples ABCDEFGH abcdefghijk ABCD abcde 01234 Black Horizontal repetitive defects...
...The drum unit may be smudged. Install a new drum unit. See "Cleaning" in this problem, especially if the printer has not been used for laser printers, the glue from the sheets may sometimes stick to the OPC drum surface. Try printing multiple pages to excessive direct...; Clean the primary corona wire of paper is not inside the printer Printed pages are stained with toner or have vertical stripes. See "Replacing the Toner Cartridge" in Chapter 5. CHAPTER 6 TROUBLESHOOTING Image Defect Samples ABCDEFGH abcdefghijk ABCD abcde 01234 Black Horizontal repetitive defects...
Users Manual - English
Page 103
...8226; Check the paper type and quality. See " Printing on Plain Paper from the Paper Cassette" in Chapter 1. • If you use the printer infrequently, the paper may be damaged. Turn over the stack of Paper can I Use?" See "What Kind of paper in the tray or try ...paper 180° in Chapter 5. See "Cleaning" in Chapter 1. • The paper cassette may have sat for too long in Chapter 1. CHAPTER 6 TROUBLESHOOTING Image Defect Samples ABCDEFGH abcdefghijk ABCD abcde 01234 Recommendation • You may be too full. B DEFGH abc efghijk A CD bcde 1 34 Wrinkles or creases...
...8226; Check the paper type and quality. See " Printing on Plain Paper from the Paper Cassette" in Chapter 1. • If you use the printer infrequently, the paper may be damaged. Turn over the stack of Paper can I Use?" See "What Kind of paper in the tray or try ...paper 180° in Chapter 5. See "Cleaning" in Chapter 1. • The paper cassette may have sat for too long in Chapter 1. CHAPTER 6 TROUBLESHOOTING Image Defect Samples ABCDEFGH abcdefghijk ABCD abcde 01234 Recommendation • You may be too full. B DEFGH abc efghijk A CD bcde 1 34 Wrinkles or creases...
Users Manual - English
Page 104
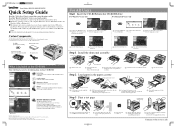
How to Print Correctly CHAPTER 6 TROUBLESHOOTING Problem The printer prints unexpectedly or it . My headers or footers appear when I view my document on screen but do not show up when I print it prints garbage. Most laser printers have print (leaving 62 printable lines). Usually the ...first two lines and the last two lines of your document or reduce the print resolution. (HL-1440, HL-1450 and HL-1470N only) • Expand the printer memory by adding a commercially available SIMM...
How to Print Correctly CHAPTER 6 TROUBLESHOOTING Problem The printer prints unexpectedly or it . My headers or footers appear when I view my document on screen but do not show up when I print it prints garbage. Most laser printers have print (leaving 62 printable lines). Usually the ...first two lines and the last two lines of your document or reduce the print resolution. (HL-1440, HL-1450 and HL-1470N only) • Expand the printer memory by adding a commercially available SIMM...
Quick Setup Guide - English
Page 1
... NT® 4.0, Windows® 2000 or Macintosh®). and other brand and product names are based on your printers, read the FAQs and troubleshooting tips or learn about special printing solutions. Paper cassette 1 Pull the paper cassette completely out of your operating system ...the Initial Setup icon. 4 You can view the Initial Setup instructions. Macintosh® ©2001 Brother Industries, Ltd. What is off. 1470QSG Eng_front Black Pantone285 Laser Printer HL-1230/1440/1450/1470N Quick Setup Guide Read the "Safety Sheet" first to ensure that the paper ...
... NT® 4.0, Windows® 2000 or Macintosh®). and other brand and product names are based on your printers, read the FAQs and troubleshooting tips or learn about special printing solutions. Paper cassette 1 Pull the paper cassette completely out of your operating system ...the Initial Setup icon. 4 You can view the Initial Setup instructions. Macintosh® ©2001 Brother Industries, Ltd. What is off. 1470QSG Eng_front Black Pantone285 Laser Printer HL-1230/1440/1450/1470N Quick Setup Guide Read the "Safety Sheet" first to ensure that the paper ...