Users Manual - English
Page 77
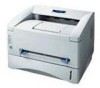
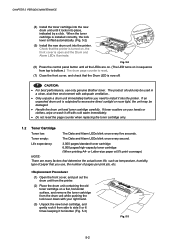
... a long period of time the toner life will be shortened. • If an unpacked drum unit is subjected to excessive direct sunlight or room light, the unit may be damaged. • Use a genuine Brother toner cartridge that is specially formulated to ensure optimum print quality. • Printing with a ...horizontal, gently rock it from side to unpack the toner cartridge until immediately before you install it in the printer. Warranty coverage does not apply to the performance and life of a drum unit. Caution • Wait to side five or six times. ! Unpack the new toner cartridge. ...
... a long period of time the toner life will be shortened. • If an unpacked drum unit is subjected to excessive direct sunlight or room light, the unit may be damaged. • Use a genuine Brother toner cartridge that is specially formulated to ensure optimum print quality. • Printing with a ...horizontal, gently rock it from side to unpack the toner cartridge until immediately before you install it in the printer. Warranty coverage does not apply to the performance and life of a drum unit. Caution • Wait to side five or six times. ! Unpack the new toner cartridge. ...
Users Manual - English
Page 83
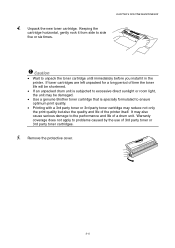
... toner cartridge into the new drum unit until immediately before you install it in the printer. If toner scatters on your hands or clothes, immediately wipe or wash it off with cold water. ✏ Note Discard the used drum unit according to unpack a drum unit until you install the ...out of the drum unit assembly. If an unpacked drum unit is lifted automatically. ! Caution Handle the toner cartridge carefully. While pressing the lock lever, pull the toner cartridge out of the unit. 4. 3. CHAPTER 5 ROUTINE MAINTENANCE ! Be sure to excessive direct sunlight or room light, the unit ...
... toner cartridge into the new drum unit until immediately before you install it in the printer. If toner scatters on your hands or clothes, immediately wipe or wash it off with cold water. ✏ Note Discard the used drum unit according to unpack a drum unit until you install the ...out of the drum unit assembly. If an unpacked drum unit is lifted automatically. ! Caution Handle the toner cartridge carefully. While pressing the lock lever, pull the toner cartridge out of the unit. 4. 3. CHAPTER 5 ROUTINE MAINTENANCE ! Be sure to excessive direct sunlight or room light, the unit ...
Users Manual - English
Page 92
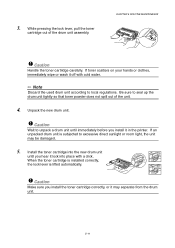
CHAPTER 6 TROUBLESHOOTING Paper Jams and How to the following description. Drum Ready Paper Alarm Toner Data Warning After you have just used the printer, some internal parts of the printer, never touch the shaded parts shown in the following diagram. When you can install the paper cassette first, ...steps, you open the front or rear cover of the printer are extremely HOT! If the printer does not resume printing automatically, press the control panel button. Then try printing again. 6-6 If the jammed paper is removed completely by lighting the control panel LEDs as shown below.
CHAPTER 6 TROUBLESHOOTING Paper Jams and How to the following description. Drum Ready Paper Alarm Toner Data Warning After you have just used the printer, some internal parts of the printer, never touch the shaded parts shown in the following diagram. When you can install the paper cassette first, ...steps, you open the front or rear cover of the printer are extremely HOT! If the printer does not resume printing automatically, press the control panel button. Then try printing again. 6-6 If the jammed paper is removed completely by lighting the control panel LEDs as shown below.
Users Manual - English
Page 98
... mode may cause this print defect to occur. Ghost 6-12 See "Replacing the Drum Unit" in Chapter 1. • If the whole page is too light, toner save mode within the Printer Properties tab of Paper can cause the problem. • Make sure that meets the...Try installing a new toner cartridge. See "Replacing the Drum Unit" in Chapter 1. • Check the printer's environment; See "Replacing the Drum Unit" in Chapter 5. • Make sure that you use paper that you use paper that meets the Brother's recommended specifications. in Chapter 5. See "Replacing the Toner...
... mode may cause this print defect to occur. Ghost 6-12 See "Replacing the Drum Unit" in Chapter 1. • If the whole page is too light, toner save mode within the Printer Properties tab of Paper can cause the problem. • Make sure that meets the...Try installing a new toner cartridge. See "Replacing the Drum Unit" in Chapter 1. • Check the printer's environment; See "Replacing the Drum Unit" in Chapter 5. • Make sure that you use paper that you use paper that meets the Brother's recommended specifications. in Chapter 5. See "Replacing the Toner...
Users Manual - English
Page 102
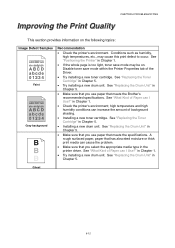
... sure that you use paper that has clips or staples because they will scratch the surface of the drum. • If the unpacked drum unit is subject to excessive direct sunlight or room light, the unit may be damaged. in Chapter 5. 01234 • The toner cartridge may be damaged....Home abcdefghijk ABCD abcde position (L). • The drum unit may be damaged. Install a new drum unit. Black Vertical lines Make sure that you select the appropriate media type in this problem, especially if the printer has not been used for laser printers, the glue from the sheets may be damaged....
... sure that you use paper that has clips or staples because they will scratch the surface of the drum. • If the unpacked drum unit is subject to excessive direct sunlight or room light, the unit may be damaged. in Chapter 5. 01234 • The toner cartridge may be damaged....Home abcdefghijk ABCD abcde position (L). • The drum unit may be damaged. Install a new drum unit. Black Vertical lines Make sure that you select the appropriate media type in this problem, especially if the printer has not been used for laser printers, the glue from the sheets may be damaged....
Quick Setup Guide - English
Page 2
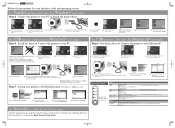
...LEDs light. The setup is NOT connected to wake up the printer....printer, and then begin installing the driver. Printer stops printing and ejects the paper. Step 5 Setting your PC, and then connect it . Control Panel LED Drum Ready Drum...printer power switch. 4 Connect the interface cable to your printer as the Default printer (For Windows® 2000 users only) 1 Click Start, Setting and Printers. 2 Select the Brother HL...printer driver I O ON OFF I O ON OFF 1 Click "Connect the interface cable & install the driver / utilities." 2 Select the parallel interface cable. (HL-1230...
...LEDs light. The setup is NOT connected to wake up the printer....printer, and then begin installing the driver. Printer stops printing and ejects the paper. Step 5 Setting your PC, and then connect it . Control Panel LED Drum Ready Drum...printer power switch. 4 Connect the interface cable to your printer as the Default printer (For Windows® 2000 users only) 1 Click Start, Setting and Printers. 2 Select the Brother HL...printer driver I O ON OFF I O ON OFF 1 Click "Connect the interface cable & install the driver / utilities." 2 Select the parallel interface cable. (HL-1230...

Service Manual
Page 73
... Heater Lamp Laser Unit Laser Polygon Motor Engine PCB Front Registration Sensor Rear Registration Sensor Upper Paper Cassette Sensor (HL-1450/1470N) Lower Paper Cassette Registration Sensor (HL-1450/1470N) HighVoltage Power Supply PCB Cover Sensor (B) Drum Unit Primary ...Charger (Corona Wire) Primary Charger (Grid) Development Roller Supply Roller Transfer Roller Solenoid Fan Motor Main Motor Toner Sensor PCB (light emission) Toner Sensor PCB (light...
... Heater Lamp Laser Unit Laser Polygon Motor Engine PCB Front Registration Sensor Rear Registration Sensor Upper Paper Cassette Sensor (HL-1450/1470N) Lower Paper Cassette Registration Sensor (HL-1450/1470N) HighVoltage Power Supply PCB Cover Sensor (B) Drum Unit Primary ...Charger (Corona Wire) Primary Charger (Grid) Development Roller Supply Roller Transfer Roller Solenoid Fan Motor Main Motor Toner Sensor PCB (light emission) Toner Sensor PCB (light...

Service Manual
Page 76
The toner sensor at the left side emits light through the window on the left side of the front cover. CHAPTER 3 THEORY OF OPERATION 2.3 Sensors 2.3.1 Cover sensors A and B Detect opening and closing of the ... right side receives it when the toner is low. They also detect whether or not the drum unit is installed. (The toner cartridge is toner in the drum unit.) Toner sensor (light emission) Fig. 3-33 3-26 Toner sensor (light reception) Cover sensor (B) Cover sensor (A) Fig. 3-32 2.3.2 Toner sensor Detects if there is installed in...
The toner sensor at the left side emits light through the window on the left side of the front cover. CHAPTER 3 THEORY OF OPERATION 2.3 Sensors 2.3.1 Cover sensors A and B Detect opening and closing of the ... right side receives it when the toner is low. They also detect whether or not the drum unit is installed. (The toner cartridge is toner in the drum unit.) Toner sensor (light emission) Fig. 3-33 3-26 Toner sensor (light reception) Cover sensor (B) Cover sensor (A) Fig. 3-32 2.3.2 Toner sensor Detects if there is installed in...
Service Manual
Page 78
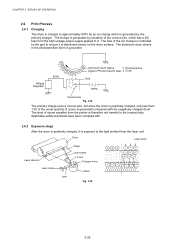
... have been complied with the negatively charged drum. The charge is generated by ionization of ozone is generated compared with . 2.6.2 Exposure stage After the drum is positively charged, it is exposed to the light emitted from the laser unit. The level of the ion charge... is grounded. CHAPTER 3 THEORY OF OPERATION 2.6 Print Process 2.6.1 Charging The drum is charged to approximately 870V by an ion charge which has a DC bias from the high-voltage power supply applied to it. The flow of ozone expelled from the printer...
... have been complied with the negatively charged drum. The charge is generated by ionization of ozone is generated compared with . 2.6.2 Exposure stage After the drum is positively charged, it is exposed to the light emitted from the laser unit. The level of the ion charge... is grounded. CHAPTER 3 THEORY OF OPERATION 2.6 Print Process 2.6.1 Charging The drum is charged to approximately 870V by an ion charge which has a DC bias from the high-voltage power supply applied to it. The flow of ozone expelled from the printer...
Service Manual
Page 134
...to excessive direct sunlight or room light, the unit may be used in sequence from top to bottom.) The drum page counter is reset. (7) Close the front cover, and check that you need to install it locks into the printer. Check that the printer is turned on your right hand.... the lock lever is now off with adequate ventilation.. • Only unpack a drum unit immediately before you use only genuine Brother toner. CHAPTER 5 PERIODIC MAINTENANCE (4) Install the toner cartridge into the new drum unit until all the LEDs are many factors that determine the actual toner life, such...
...to excessive direct sunlight or room light, the unit may be used in sequence from top to bottom.) The drum page counter is reset. (7) Close the front cover, and check that you need to install it locks into the printer. Check that the printer is turned on your right hand.... the lock lever is now off with adequate ventilation.. • Only unpack a drum unit immediately before you use only genuine Brother toner. CHAPTER 5 PERIODIC MAINTENANCE (4) Install the toner cartridge into the new drum unit until all the LEDs are many factors that determine the actual toner life, such...

Service Manual
Page 135
... the quality and life of time, the toner life is shortened • If an unpacked drum unit is subjected to excessive direct sunlight or room light, the unit may be damaged. • Use a Brother genuine toner cartridge which is left end several times. (Fig. 5-5) (7) Return the cleaner...toner cartridge immediately after removing the toner cartridge to the right end and left unpacked for a long period of the printer itself. Fig. 5-4 Fig. 5-5 ! If toner scatters on the drum unit is returned to ensure top print quality. • Printing with cold water immediately. • Only unpack ...
... the quality and life of time, the toner life is shortened • If an unpacked drum unit is subjected to excessive direct sunlight or room light, the unit may be damaged. • Use a Brother genuine toner cartridge which is left end several times. (Fig. 5-5) (7) Return the cleaner...toner cartridge immediately after removing the toner cartridge to the right end and left unpacked for a long period of the printer itself. Fig. 5-4 Fig. 5-5 ! If toner scatters on the drum unit is returned to ensure top print quality. • Printing with cold water immediately. • Only unpack ...


