
Basic Instruction Manual - English
Page 1
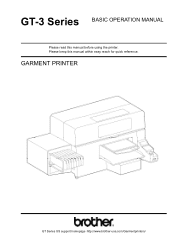
GARMENT PRINTER GT Series US support homepage http://www.brother-usa.com/Garmentprinters/ GT-3 Series BASIC OPERATION MANUAL Please read this manual within easy reach for quick reference. Please keep this manual before using the printer.
GARMENT PRINTER GT Series US support homepage http://www.brother-usa.com/Garmentprinters/ GT-3 Series BASIC OPERATION MANUAL Please read this manual within easy reach for quick reference. Please keep this manual before using the printer.
Basic Instruction Manual - English
Page 3
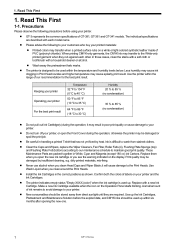
... that you very much for any accidents or problems resulting from the wall outlet before opening the right side cover. Brother will result in minor or moderate injury. Before using your new printer, please read the safety instructions below . Thank you should be careful of. The meanings of these indications and symbols... failure to follow the instructions could result in order to ensure safe operation of this term indicate situations where failure to yourself or other people. GT-3 Series i
... that you very much for any accidents or problems resulting from the wall outlet before opening the right side cover. Brother will result in minor or moderate injury. Before using your new printer, please read the safety instructions below . Thank you should be careful of. The meanings of these indications and symbols... failure to follow the instructions could result in order to ensure safe operation of this term indicate situations where failure to yourself or other people. GT-3 Series i

Basic Instruction Manual - English
Page 4
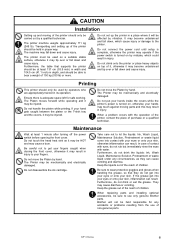
...which are lower or higher than this may cause fire or electric shocks or problems with correct operation. Use the printer in a dusty environment. ii GT-3 Series The ambient temperature should be within the range of receiving a serious electric shock, and problems with staples or... there is the danger that fire or electric shocks could occur. WARNING Installation Do not set up the printer in a place which is adequately ventilated. Contact Brother to arrange a service call to come into contact with liquids, otherwise it may cause problems with correct operation...
...which are lower or higher than this may cause fire or electric shocks or problems with correct operation. Use the printer in a dusty environment. ii GT-3 Series The ambient temperature should be within the range of receiving a serious electric shock, and problems with staples or... there is the danger that fire or electric shocks could occur. WARNING Installation Do not set up the printer in a place which is adequately ventilated. Contact Brother to arrange a service call to come into contact with liquids, otherwise it may cause problems with correct operation...
Basic Instruction Manual - English
Page 5
... become unbalanced and fall down and cause injury. Furthermore, do not rub but immediately rinse the eyes with your eyes or onto your skin. GT-3 Series iii Do not move the Platen by hand. Maintenance Wait at least 137 cm (53.9 inch) in width and 104.5 cm (...eyes, do not drink or eat the grease. Do not handle the platen while printing. Brother will be affected by operators who are appropriately trained in its operation. Do not climb onto the printer or place heavy objects on , otherwise your skin, inflammation can cause vomiting and diarrhea. ...
... become unbalanced and fall down and cause injury. Furthermore, do not rub but immediately rinse the eyes with your eyes or onto your skin. GT-3 Series iii Do not move the Platen by hand. Maintenance Wait at least 137 cm (53.9 inch) in width and 104.5 cm (...eyes, do not drink or eat the grease. Do not handle the platen while printing. Brother will be affected by operators who are appropriately trained in its operation. Do not climb onto the printer or place heavy objects on , otherwise your skin, inflammation can cause vomiting and diarrhea. ...
Basic Instruction Manual - English
Page 6
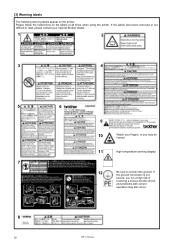
GT-3 Series Please follow the instructions on the printer. [3] Warning labels The following warning labels appear on the labels at all times when using the printer. If the ground connection is not secure, you may be injured. 11 High temperature warning display 12 Be sure to read, please contact your nearest Brother dealer. 1 2 3 4 5 7 8 iv 6 9 10 Watch your fingers, or you run a high risk of receiving a serious electric shock, and problems with correct operation may also occur. If the labels have been removed or are difficult to connect the ground.
GT-3 Series Please follow the instructions on the printer. [3] Warning labels The following warning labels appear on the labels at all times when using the printer. If the ground connection is not secure, you may be injured. 11 High temperature warning display 12 Be sure to read, please contact your nearest Brother dealer. 1 2 3 4 5 7 8 iv 6 9 10 Watch your fingers, or you run a high risk of receiving a serious electric shock, and problems with correct operation may also occur. If the labels have been removed or are difficult to connect the ground.
Basic Instruction Manual - English
Page 8
......6 1-3-3. Right ...9 2-3. Under the Platen...12 2-7. Menu List...15 3. Placing Your Printer...18 3-2. Turning On Your Printer...19 3-2-2. When you already have GT-541/GT-782 ...21 3-3-2. Language ...28 4. Replacing the Wiper Cleaner and Cleaning the Caps /...17 3-1. Adjusting the Speaker Volume...28 3-4-3. Basic Printing Procedure ...30 5. Consumable Requirements and Options ...7 2. Setting Up Your Printer...28 3-4-1. Maintenance...31 5-1. Replacing Consumables ...32 5-1-1. Replacing the Fan Filter ...37 5-1-5. Replacing the Roller Felts ...39 5-1-6....
......6 1-3-3. Right ...9 2-3. Under the Platen...12 2-7. Menu List...15 3. Placing Your Printer...18 3-2. Turning On Your Printer...19 3-2-2. When you already have GT-541/GT-782 ...21 3-3-2. Language ...28 4. Replacing the Wiper Cleaner and Cleaning the Caps /...17 3-1. Adjusting the Speaker Volume...28 3-4-3. Basic Printing Procedure ...30 5. Consumable Requirements and Options ...7 2. Setting Up Your Printer...28 3-4-1. Maintenance...31 5-1. Replacing Consumables ...32 5-1-1. Replacing the Fan Filter ...37 5-1-5. Replacing the Roller Felts ...39 5-1-6....
Basic Instruction Manual - English
Page 10
... condensation) z Do not pull out Ink Cartridge(s) during the operation; Less humidity may be used within the range of GT-381, GT-361 and GT-341 models. z Do not turn off your printer. otherwise the printer may cause ink clogging in the correct positions as shown. z Clean the Caps and Wipers, replace the Wiper Cleaners, Fan...
... condensation) z Do not pull out Ink Cartridge(s) during the operation; Less humidity may be used within the range of GT-381, GT-361 and GT-341 models. z Do not turn off your printer. otherwise the printer may cause ink clogging in the correct positions as shown. z Clean the Caps and Wipers, replace the Wiper Cleaners, Fan...
Basic Instruction Manual - English
Page 11
... z The pretreated area may be app. 2 mm. z Tubes and Print Heads for a period of the printer and keep printer in the United States This device complies with Part 15 of the Control Panel after applied and cured, wash lightly... new ink cartridges should be decolorized by Pretreatment; z The clearance between the Clearance Sensor and the surface of the printer and restart" and "5-1-7. Ventilate your dealer. we recommend that may cause serious damage to your local regulations. To ... White must accept any problem caused by the menu Tube Cleaning. GT-3 Series 2
... z The pretreated area may be app. 2 mm. z Tubes and Print Heads for a period of the printer and keep printer in the United States This device complies with Part 15 of the Control Panel after applied and cured, wash lightly... new ink cartridges should be decolorized by Pretreatment; z The clearance between the Clearance Sensor and the surface of the printer and restart" and "5-1-7. Ventilate your dealer. we recommend that may cause serious damage to your local regulations. To ... White must accept any problem caused by the menu Tube Cleaning. GT-3 Series 2

Basic Instruction Manual - English
Page 14
... Sponge) z Print Head Protection Film: 8 for GT-381, 6 for GT-361, 4 for maintenance & transport operations. 1-3. Required Condition Please use your room is missing. Unpacking Your Printer Your printer must be used for GT-341 z Basic Operation Manual z "How to avoid Print Heads from clogging with dried ink. 5 GT-3 Series Contact Brother Customer Service Hot Line if any of...
... Sponge) z Print Head Protection Film: 8 for GT-381, 6 for GT-361, 4 for maintenance & transport operations. 1-3. Required Condition Please use your room is missing. Unpacking Your Printer Your printer must be used for GT-341 z Basic Operation Manual z "How to avoid Print Heads from clogging with dried ink. 5 GT-3 Series Contact Brother Customer Service Hot Line if any of...

Basic Instruction Manual - English
Page 17
... T-shirt hanging from the Platen (e.g. Prevents a T-shirt from the left side W1, W2, W3, W4, Black(K), Magenta (M), Cyan (C), Yellow (Y). Keeps parts of the printer. 2. Adjusts the T-shirt position. GT-3 Series 8 Load the Ink Cartridges of the Front Cover. Turns on the inside of the Clearance Sensor. Front 2. Open this to release the...
... T-shirt hanging from the Platen (e.g. Prevents a T-shirt from the left side W1, W2, W3, W4, Black(K), Magenta (M), Cyan (C), Yellow (Y). Keeps parts of the printer. 2. Adjusts the T-shirt position. GT-3 Series 8 Load the Ink Cartridges of the Front Cover. Turns on the inside of the Clearance Sensor. Front 2. Open this to release the...
Basic Instruction Manual - English
Page 18
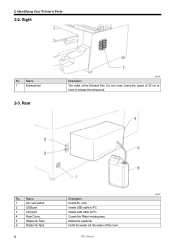
Right No. Name 1 Exhaust slot 2-3. Do not cover; Be aware of the Exhaust Fan. Rear 0044Y Description The outlet of the room. 9 GT-3 Series Name Description 1 AC cord socket Inserts AC cord. 2 USB port Inserts USB cable to PC. 3 LAN port Inserts LAN cable to release the exhaust air. 0045Y No. Identifying Your Printer's Parts 2-2. 2. Leave the space of 20 cm or more to PC. 4 Rear Cover Covers the Platen moving area. 5 Waste Ink Tube Drains the waste ink. 6 Waste Ink Tank Holds the waste ink.
Right No. Name 1 Exhaust slot 2-3. Do not cover; Be aware of the Exhaust Fan. Rear 0044Y Description The outlet of the room. 9 GT-3 Series Name Description 1 AC cord socket Inserts AC cord. 2 USB port Inserts USB cable to PC. 3 LAN port Inserts LAN cable to release the exhaust air. 0045Y No. Identifying Your Printer's Parts 2-2. 2. Leave the space of 20 cm or more to PC. 4 Rear Cover Covers the Platen moving area. 5 Waste Ink Tube Drains the waste ink. 6 Waste Ink Tank Holds the waste ink.
Basic Instruction Manual - English
Page 19
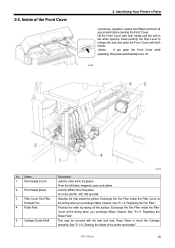
... yellow. Replacing the Fan Filter". Cleaning the inside the Filter Cover at the timing when you exchange Wiper Cleaner. Identifying Your Printer's Parts Cancel any operation, restore the Platens and turn off the surface. Exchange the Fan Filter inside of the Front Cover ..."5-1-5. Keep Clean to the platen. Lift the Front Cover with both hands. Replacing the Roller Felts". Inside of the printer and restart " GT-3 Series 10 Exchange the Fan Filter inside the printer. See "5-1-6. Name 1 Print Heads (Front) 2 Print Heads (Back) 3 Filter Cover, Fan Filter, Exhaust Fan ...
... yellow. Replacing the Fan Filter". Cleaning the inside the Filter Cover at the timing when you exchange Wiper Cleaner. Identifying Your Printer's Parts Cancel any operation, restore the Platens and turn off the surface. Exchange the Fan Filter inside of the Front Cover ..."5-1-5. Keep Clean to the platen. Lift the Front Cover with both hands. Replacing the Roller Felts". Inside of the printer and restart " GT-3 Series 10 Exchange the Fan Filter inside the printer. See "5-1-6. Name 1 Print Heads (Front) 2 Print Heads (Back) 3 Filter Cover, Fan Filter, Exhaust Fan ...
Basic Instruction Manual - English
Page 20
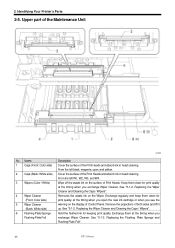
... Plate Felt Description Cover the surface of Control Panel. See "5-1-2. See "5-1-3. Exchange regularly and keep them clean for keeping print quality. Identifying Your Printer's Parts 2-5. From the left W1, W2, W3, and W4. Hold the flushed ink for print quality, at the timing when you open... them clean for print quality at the timing when you exchange Wiper Cleaner. Replacing the Flushing Plate Sponge and Flushing Plate Felt". 11 GT-3 Series Wipe off the waste ink on the Wiper. Replacing the Wiper Cleaner and Cleaning the Caps / Wipers". Removes the waste ink...
... Plate Felt Description Cover the surface of Control Panel. See "5-1-2. See "5-1-3. Exchange regularly and keep them clean for keeping print quality. Identifying Your Printer's Parts 2-5. From the left W1, W2, W3, and W4. Hold the flushed ink for print quality, at the timing when you open... them clean for print quality at the timing when you exchange Wiper Cleaner. Replacing the Flushing Plate Sponge and Flushing Plate Felt". 11 GT-3 Series Wipe off the waste ink on the Wiper. Replacing the Wiper Cleaner and Cleaning the Caps / Wipers". Removes the waste ink...
Basic Instruction Manual - English
Page 21
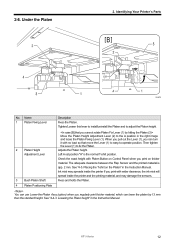
...the Instruction Manual. When you pull out the Lever (1), you print on the Platen" in the Instruction Manual. Ink mist may spreads inside the printer If you regularly print thicker material, which can turn it with no load so that move the Lever (1) to easy-to fix the Platen. 2-6....Fixes the Platen. Check the exact height with wider clearance, the ink mist will spread inside the printer and the printing material, and may damage the sensors. Placing the T-shirt on thicker material. GT-3 Series 12 See "4-5. Lowering the Platen height" in the right image and loose the Platen Fixing...
...the Instruction Manual. When you pull out the Lever (1), you print on the Platen" in the Instruction Manual. Ink mist may spreads inside the printer If you regularly print thicker material, which can turn it with no load so that move the Lever (1) to easy-to fix the Platen. 2-6....Fixes the Platen. Check the exact height with wider clearance, the ink mist will spread inside the printer and the printing material, and may damage the sensors. Placing the T-shirt on thicker material. GT-3 Series 12 See "4-5. Lowering the Platen height" in the right image and loose the Platen Fixing...
Basic Instruction Manual - English
Page 22
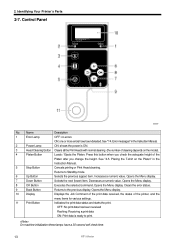
Press this button when you check the adequate height of the printer, and the menu items for various settings. 11 Print Button Indicates the print data status and starts the print. Opens the Menu display. 7 Down Button... Panel 0050Y No. Name Description 1 Error Lamp OFF: no errors ON: one or more errors have a 30-second self check time. 13 GT-3 Series Decreases a numeric value. See "4-5. Identifying Your Printer's Parts 2-7. See "7-4. Increases a numeric value. Opens the Menu display. Error messages" in the Instruction Manual. 2 Power Lamp ON: shows the ...
Press this button when you check the adequate height of the printer, and the menu items for various settings. 11 Print Button Indicates the print data status and starts the print. Opens the Menu display. 7 Down Button... Panel 0050Y No. Name Description 1 Error Lamp OFF: no errors ON: one or more errors have a 30-second self check time. 13 GT-3 Series Decreases a numeric value. See "4-5. Identifying Your Printer's Parts 2-7. See "7-4. Increases a numeric value. Opens the Menu display. Error messages" in the Instruction Manual. 2 Power Lamp ON: shows the ...

Basic Instruction Manual - English
Page 23
...of the print data. The Display indicates Job, printer status and the information needed for making one print data. GT-3 Series 14 Item Shown Description 1 Job Name Shows the indentified name of the print data, which is automatically set by Printer Driver. 2 Job Comment Shows the 30 characters... of the Job Comment set by Printer Driver. 5 Number of Platen Shows ...
...of the print data. The Display indicates Job, printer status and the information needed for making one print data. GT-3 Series 14 Item Shown Description 1 Job Name Shows the indentified name of the print data, which is automatically set by Printer Driver. 2 Job Comment Shows the 30 characters... of the Job Comment set by Printer Driver. 5 Number of Platen Shows ...
Basic Instruction Manual - English
Page 24
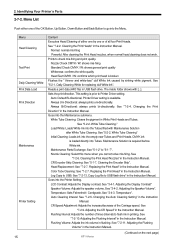
...check mis-firing and print quality. See "3-4-3. See "7-2-10. GT-3 Series (Continued on the next page) Menu Head Cleaning Test Print Daily Cleaning White Print Data Load Print Direction Maintenance Printer Setting 15 Content Executes Head Cleaning of either one or of ...Cleaning the Encoder Strip". See "7-2-11. Temperature: Sets Fahrenheit / Centigrade. Adjusting the Flushing Volume" in the Instruction Manual. Identifying Your Printer's Parts 2-7-2. Load White: Loads White Ink into the Menu. Maintenance Parts Exchange: See "5-1-2" to flush ink in the Instruction Manual....
...check mis-firing and print quality. See "3-4-3. See "7-2-10. GT-3 Series (Continued on the next page) Menu Head Cleaning Test Print Daily Cleaning White Print Data Load Print Direction Maintenance Printer Setting 15 Content Executes Head Cleaning of either one or of ...Cleaning the Encoder Strip". See "7-2-11. Temperature: Sets Fahrenheit / Centigrade. Adjusting the Flushing Volume" in the Instruction Manual. Identifying Your Printer's Parts 2-7-2. Load White: Loads White Ink into the Menu. Maintenance Parts Exchange: See "5-1-2" to flush ink in the Instruction Manual....

Basic Instruction Manual - English
Page 25
... Long Storage" in DailyCleaning White. Restores the Platen. Shows versions of White Heads. Menu Printer Setting Total Print Platen Reset Language Version 2. Language". GT-341 mode (No White): Sets the printer to stop all the operation of the firmware. See "7-2-12. Auto Job Delete: Deletes ...the print data automatically after the print number which is set with Printer Driver is OFF. See "6-2-5. ...
... Long Storage" in DailyCleaning White. Restores the Platen. Shows versions of White Heads. Menu Printer Setting Total Print Platen Reset Language Version 2. Language". GT-341 mode (No White): Sets the printer to stop all the operation of the firmware. See "7-2-12. Auto Job Delete: Deletes ...the print data automatically after the print number which is set with Printer Driver is OFF. See "6-2-5. ...

Basic Instruction Manual - English
Page 26
...printer should only be used on a suitable stable surface, otherwise it will be affected by vibration. The machine may tip over or fall down and cause injury. Do not set up the printer...printer should be correctly setup as described in a dusty environment. The printer... the printer should...printer may become unbalanced and tip over or fall down , which could occur. Do not set up the printer... in injury. WARNING Do not handle the power cord with correct operation. If dust collects inside the printer...printer...The printer machine ...printer. Furthermore, the table that...
...printer should only be used on a suitable stable surface, otherwise it will be affected by vibration. The machine may tip over or fall down and cause injury. Do not set up the printer...printer should be correctly setup as described in a dusty environment. The printer... the printer should...printer may become unbalanced and tip over or fall down , which could occur. Do not set up the printer... in injury. WARNING Do not handle the power cord with correct operation. If dust collects inside the printer...printer...The printer machine ...printer. Furthermore, the table that...
Basic Instruction Manual - English
Page 27
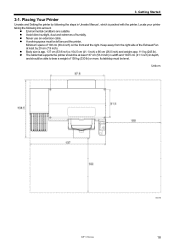
... 20 cm (7.9 inch). Keep away from the right side of 150 kg (330 lb) or more. Unit:cm GT-3 Series 0051Y 18 Locate your printer taking the following the steps in depth, and should be level. Minimum space of humidity. z Avoid direct sunlight, dust and extremes of 100 cm...the right. z A working space must be at least by following into account z Environmental conditions are suitable. z The table that supports the printer should be left around the printer. Getting Started 3-1. Its tabletop must be able to bear a weight of the Exhaust Fan at least 137 cm (53.9 inch) in ...
... 20 cm (7.9 inch). Keep away from the right side of 150 kg (330 lb) or more. Unit:cm GT-3 Series 0051Y 18 Locate your printer taking the following the steps in depth, and should be level. Minimum space of humidity. z Avoid direct sunlight, dust and extremes of 100 cm...the right. z A working space must be at least by following into account z Environmental conditions are suitable. z The table that supports the printer should be left around the printer. Getting Started 3-1. Its tabletop must be able to bear a weight of the Exhaust Fan at least 137 cm (53.9 inch) in ...


