
Basic Instruction Manual - English
Page 5
...the grease, so that supports the printer should be at least 1 minute after turning off the power switch before opening the front cover. GT-3 Series iii The printer machine weighs approximately 111 kg (245 lb). The machine may fall down and cause injury. Do not climb ... drink the liquids: Ink, Wash Liquid, Maintenance Solution, Pretreatment or waste liquid under any accidents or problems resulting from the use only genuine Brother parts. They may touch against moving of children. Furthermore, the table that they can cause vomiting and diarrhea. Maintenance Wait at least 137 cm ...
...the grease, so that supports the printer should be at least 1 minute after turning off the power switch before opening the front cover. GT-3 Series iii The printer machine weighs approximately 111 kg (245 lb). The machine may fall down and cause injury. Do not climb ... drink the liquids: Ink, Wash Liquid, Maintenance Solution, Pretreatment or waste liquid under any accidents or problems resulting from the use only genuine Brother parts. They may touch against moving of children. Furthermore, the table that they can cause vomiting and diarrhea. Maintenance Wait at least 137 cm ...
Basic Instruction Manual - English
Page 8
Upper part of the Front Cover...10 2-5. Getting Started...17 3-1. Turning On/Off Your Printer...19 3-2-1. Preparing Your PC...21 3-3-1. When you already have GT-541/GT-782 ...21 3-3-2. Installation of the printer and restart ... Volume...28 3-4-3. Basic Printing Procedure ...30 5. Maintenance...31 5-1. Replacing Consumables ...32 5-1-1. Electrical Requirements...6 1-3-3. Identifying Your Printer's Parts...8 2-1. Temperature...28 3-4-4. Replacing Flushing Plate Sponge and Flushing Plate Felt 37 5-1-4. Unpacking Your Printer ...5 1-3. Required Condition...5 1-3-1. Software...
Upper part of the Front Cover...10 2-5. Getting Started...17 3-1. Turning On/Off Your Printer...19 3-2-1. Preparing Your PC...21 3-3-1. When you already have GT-541/GT-782 ...21 3-3-2. Installation of the printer and restart ... Volume...28 3-4-3. Basic Printing Procedure ...30 5. Maintenance...31 5-1. Replacing Consumables ...32 5-1-1. Electrical Requirements...6 1-3-3. Identifying Your Printer's Parts...8 2-1. Temperature...28 3-4-4. Replacing Flushing Plate Sponge and Flushing Plate Felt 37 5-1-4. Unpacking Your Printer ...5 1-3. Required Condition...5 1-3-1. Software...
Basic Instruction Manual - English
Page 10
z GT-3 represents the common specifications of our recommendation for the best print result. Keeping your printer Operating your printer. otherwise the printer may be damaged by heat. Those Maintenance Parts are packed together in Print Head nozzles and higher temperature may transfer to 85 % (no condensation)...poor print quality or cause damage to be used up within the range of GT-381, GT-361 and GT-341 models. Read This First 1. Use the printer within six months after opening the new one. 1 GT-3 Series Ink is used up . z Clean the Caps and Wipers, replace ...
z GT-3 represents the common specifications of our recommendation for the best print result. Keeping your printer Operating your printer. otherwise the printer may be damaged by heat. Those Maintenance Parts are packed together in Print Head nozzles and higher temperature may transfer to 85 % (no condensation)...poor print quality or cause damage to be used up within the range of GT-381, GT-361 and GT-341 models. Read This First 1. Use the printer within six months after opening the new one. 1 GT-3 Series Ink is used up . z Clean the Caps and Wipers, replace ...
Basic Instruction Manual - English
Page 11
... even Print Head and may cause serious damage to the following two conditions: (1) this device may turn yellow when you print with Part 15 of the Print Heads should always be used waste ink, pretreatment, maintenance solution (all water-based) or other wastes in good condition.... GT-3 Series 2 1. Read This First z Never refill ink, never reconstruct ink cartridges; Cleaning the inside . Some dyes may damage the sensors inside ...
... even Print Head and may cause serious damage to the following two conditions: (1) this device may turn yellow when you print with Part 15 of the Print Heads should always be used waste ink, pretreatment, maintenance solution (all water-based) or other wastes in good condition.... GT-3 Series 2 1. Read This First z Never refill ink, never reconstruct ink cartridges; Cleaning the inside . Some dyes may damage the sensors inside ...
Basic Instruction Manual - English
Page 13
... Separate Terms Regarding the use of the various terms in part (2) Duplicate this software for purposes other warranties. Agree to these separate terms, these terms shall take priority over any reproductions belongs to Brother Industries (herein referred to the customer. 2. Ownership The ownership... of this software by the aforementioned terms. GT-3 Series 4 This agreement does not transfer this software and any terms not...
... Separate Terms Regarding the use of the various terms in part (2) Duplicate this software for purposes other warranties. Agree to these separate terms, these terms shall take priority over any reproductions belongs to Brother Industries (herein referred to the customer. 2. Ownership The ownership... of this software by the aforementioned terms. GT-3 Series 4 This agreement does not transfer this software and any terms not...

Basic Instruction Manual - English
Page 14
... unpacked by a Brother representative or a Brother authorized shipping company. After unpacking, check that the following parts are installed in this section. 1-3-1. Read This First 1-2. Required Condition Please use your room is missing. z GT-3 Printer z Install CD z AC cord z Nozzle Cleaning Kit: 2 for GT-381 and GT-361, 1 for GT-341 z Print Heads: 8 for GT-381, 6 for GT-361, 4 for GT-341 z One...
... unpacked by a Brother representative or a Brother authorized shipping company. After unpacking, check that the following parts are installed in this section. 1-3-1. Read This First 1-2. Required Condition Please use your room is missing. z GT-3 Printer z Install CD z AC cord z Nozzle Cleaning Kit: 2 for GT-381 and GT-361, 1 for GT-341 z Print Heads: 8 for GT-381, 6 for GT-361, 4 for GT-341 z One...
Basic Instruction Manual - English
Page 16
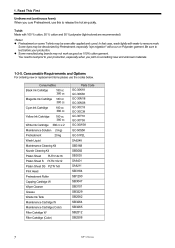
...Pretreatment Roller Capping Cartridge W Wiper Cleaner Grease Waste Ink Tank Maintenance Cartridge W Maintenance Cartridge (Color) Filter Cartridge W Filter Cartridge (Color) Parts Code GC-30K18 GC-30K38 GC-30M18 GC-30M38 GC-30C18 GC-30C38 GC-30Y18 GC-30Y38 GC-30W38 GC-50S5K GC-51P2L SA6248 ...SB3168 SB3082 SB3035 SA6401 SA8211 SB3184 SB1290 SB3047 SB3101 SB3229 SB2582 SB3264 SB3265 SB2512 SB2508 7 GT-3 Series In that case, wash lightly with 100 % cotton, 50 % cotton and 50 % polyester (light-colored are recommended) z Pretreatment on...
...Pretreatment Roller Capping Cartridge W Wiper Cleaner Grease Waste Ink Tank Maintenance Cartridge W Maintenance Cartridge (Color) Filter Cartridge W Filter Cartridge (Color) Parts Code GC-30K18 GC-30K38 GC-30M18 GC-30M38 GC-30C18 GC-30C38 GC-30Y18 GC-30Y38 GC-30W38 GC-50S5K GC-51P2L SA6248 ...SB3168 SB3082 SB3035 SA6401 SA8211 SB3184 SB1290 SB3047 SB3101 SB3229 SB2582 SB3264 SB3265 SB2512 SB2508 7 GT-3 Series In that case, wash lightly with 100 % cotton, 50 % cotton and 50 % polyester (light-colored are recommended) z Pretreatment on...

Basic Instruction Manual - English
Page 17
...the platen for the details. Indicates the serial number of the appropriate color: from slipping so that an image is too low). GT-3 Series 8 When you open the Front Cover while operating, the power automatically turns off your desired position. Use this T-shirt ... this to be printed. Adjusts the T-shirt position. Keeps the loading space of your printer. Identifying Your Printer's Parts No. Identifying Your Printer's Parts 2-1. Control Panel" for printing thicker materials, use Platen Button on /off .) Unlocks the lock of the Clearance Sensor. 2. ...
...the platen for the details. Indicates the serial number of the appropriate color: from slipping so that an image is too low). GT-3 Series 8 When you open the Front Cover while operating, the power automatically turns off your desired position. Use this T-shirt ... this to be printed. Adjusts the T-shirt position. Keeps the loading space of your printer. Identifying Your Printer's Parts No. Identifying Your Printer's Parts 2-1. Control Panel" for printing thicker materials, use Platen Button on /off .) Unlocks the lock of the Clearance Sensor. 2. ...
Basic Instruction Manual - English
Page 18
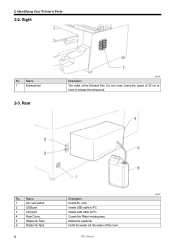
Name 1 Exhaust slot 2-3. Rear 0044Y Description The outlet of 20 cm or more to PC. 4 Rear Cover Covers the Platen moving area. 5 Waste Ink Tube Drains the waste ink. 6 Waste Ink Tank Holds the waste ink. Do not cover; Leave the space of the Exhaust Fan. Identifying Your Printer's Parts 2-2. Right No. Be aware of the room. 9 GT-3 Series Name Description 1 AC cord socket Inserts AC cord. 2 USB port Inserts USB cable to PC. 3 LAN port Inserts LAN cable to release the exhaust air. 0045Y No. 2.
Name 1 Exhaust slot 2-3. Rear 0044Y Description The outlet of 20 cm or more to PC. 4 Rear Cover Covers the Platen moving area. 5 Waste Ink Tube Drains the waste ink. 6 Waste Ink Tank Holds the waste ink. Do not cover; Leave the space of the Exhaust Fan. Identifying Your Printer's Parts 2-2. Right No. Be aware of the room. 9 GT-3 Series Name Description 1 AC cord socket Inserts AC cord. 2 USB port Inserts USB cable to PC. 3 LAN port Inserts LAN cable to release the exhaust air. 0045Y No. 2.
Basic Instruction Manual - English
Page 19
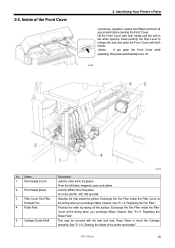
... when you exchange Wiper Cleaner. This may be covered with both hands until the lock is set when opening the Front Cover. Identifying Your Printer's Parts Cancel any operation, restore the Platens and turn off . 0046Y No. Name 1 Print Heads (Front) 2 Print Heads (Back) 3 Filter Cover, Fan Filter... the left W1, W2, W3 and W4. Protects the roller by wiping off the surface. See "5-1-4. Inside of the printer and restart " GT-3 Series 10 Replacing the Fan Filter". 2-4. Replacing the Roller Felts". Keep Clean to release the lock and close the Front Cover with ink mist...
... when you exchange Wiper Cleaner. This may be covered with both hands until the lock is set when opening the Front Cover. Identifying Your Printer's Parts Cancel any operation, restore the Platens and turn off . 0046Y No. Name 1 Print Heads (Front) 2 Print Heads (Back) 3 Filter Cover, Fan Filter... the left W1, W2, W3 and W4. Protects the roller by wiping off the surface. See "5-1-4. Inside of the printer and restart " GT-3 Series 10 Replacing the Fan Filter". 2-4. Replacing the Roller Felts". Keep Clean to release the lock and close the Front Cover with ink mist...
Basic Instruction Manual - English
Page 20
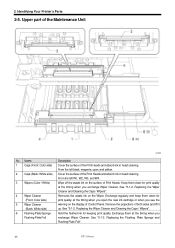
... flushed ink for print quality at the timing when you exchange Wiper Cleaner. See "5-1-2. Replacing the Flushing Plate Sponge and Flushing Plate Felt". 11 GT-3 Series From the left black, magenta, cyan, and yellow. Replacing the Wiper Cleaner and Cleaning the Caps / Wipers". Exchange regularly and keep ...keeping print quality. See "5-1-2. Keep them at the timing when you open the new ink cartridge or when you exchange Wiper Cleaner. Upper part of Print Heads. Cover the surface of both sides and lift it up. Remove the projections of the Print Heads and absorb ink in...
... flushed ink for print quality at the timing when you exchange Wiper Cleaner. See "5-1-2. Replacing the Flushing Plate Sponge and Flushing Plate Felt". 11 GT-3 Series From the left black, magenta, cyan, and yellow. Replacing the Wiper Cleaner and Cleaning the Caps / Wipers". Exchange regularly and keep ...keeping print quality. See "5-1-2. Keep them at the timing when you open the new ink cartridge or when you exchange Wiper Cleaner. Upper part of Print Heads. Cover the surface of both sides and lift it up. Remove the projections of the Print Heads and absorb ink in...
Basic Instruction Manual - English
Page 21
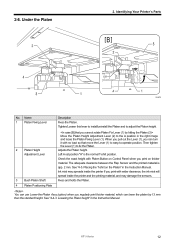
... fix the Platen. Lowering the Platen height" in the Instruction Manual. Then tighten the Lever (1) to the A position in the Instruction Manual. Identifying Your Printer's Parts 0049Y No. Fixes and holds the Platen. 4 Platen Positioning Plate You can use Lower-the-Platen Assy (option) when you print on the Platen" in...
... fix the Platen. Lowering the Platen height" in the Instruction Manual. Then tighten the Lever (1) to the A position in the Instruction Manual. Identifying Your Printer's Parts 0049Y No. Fixes and holds the Platen. 4 Platen Positioning Plate You can use Lower-the-Platen Assy (option) when you print on the Platen" in...
Basic Instruction Manual - English
Page 22
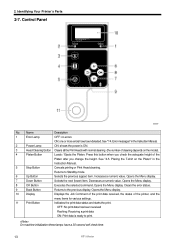
Name Description 1 Error Lamp OFF: no errors ON: one or more errors have a 30-second self check time. 13 GT-3 Series See "7-4. Opens the Menu display. 10 Display Displays the Job Comment of the print data received, the status of the Platen after you change ... ON: shows the power is ready to Standby mode. 6 Up Button Selects the previous (upper) item. Returns to print. Decreases a numeric value. 2. Identifying Your Printer's Parts 2-7. Clears the error status. 9 Back Button Returns to the previous display.
Name Description 1 Error Lamp OFF: no errors ON: one or more errors have a 30-second self check time. 13 GT-3 Series See "7-4. Opens the Menu display. 10 Display Displays the Job Comment of the print data received, the status of the Platen after you change ... ON: shows the power is ready to Standby mode. 6 Up Button Selects the previous (upper) item. Returns to print. Decreases a numeric value. 2. Identifying Your Printer's Parts 2-7. Clears the error status. 9 Back Button Returns to the previous display.

Basic Instruction Manual - English
Page 23
... in printing one print data. 11 Resolution Icon Shows the resolution of the print data. 2-7-1. Display 2. Identifying Your Printer's Parts The following image indicates that GT-3 has received a print data and ready to uni-directional printing. Required Shows warning message(s) if necessary. 4 Platen Size Shows...amount of ink remained in printing one print of Ink Shows how much ink (cc) is required for printing operations. 01e0026Y No. GT-3 Series 14 It flashes when ink is set by Printer Driver. 5 Number of Platen Shows the number of White Print Head ...
... in printing one print data. 11 Resolution Icon Shows the resolution of the print data. 2-7-1. Display 2. Identifying Your Printer's Parts The following image indicates that GT-3 has received a print data and ready to uni-directional printing. Required Shows warning message(s) if necessary. 4 Platen Size Shows...amount of ink remained in printing one print of Ink Shows how much ink (cc) is required for printing operations. 01e0026Y No. GT-3 Series 14 It flashes when ink is set by Printer Driver. 5 Number of Platen Shows the number of White Print Head ...
Basic Instruction Manual - English
Page 24
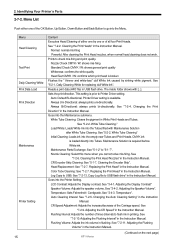
... Adjustment: Adjusts the increase/decrease of lines (interval) to USB flash drive" in printing. Adjusting the Flushing Volume" in the Instruction Manual. Identifying Your Printer's Parts 2-7-2. See "5-2-1. Always Uni-Directional: always prints uni-directionally. White Tube Cleaning" Initial Cleaning: Loads ink into Tubes. CMYK ink is loaded directly into the empty... Copy to Printer Driver setting. Copy Log file to flush ink in the Instruction Manual. See "7-2-9. Flushing Interval: Adjusts the number of the Carriage speed. GT-3 Series (Continued on the next page)
... Adjustment: Adjusts the increase/decrease of lines (interval) to USB flash drive" in printing. Adjusting the Flushing Volume" in the Instruction Manual. Identifying Your Printer's Parts 2-7-2. See "5-2-1. Always Uni-Directional: always prints uni-directionally. White Tube Cleaning" Initial Cleaning: Loads ink into Tubes. CMYK ink is loaded directly into the empty... Copy to Printer Driver setting. Copy Log file to flush ink in the Instruction Manual. See "7-2-9. Flushing Interval: Adjusts the number of the Carriage speed. GT-3 Series (Continued on the next page)

Basic Instruction Manual - English
Page 25
Restores the Platen. Shows versions of White Heads. Identifying Your Printer's Parts Content Daily Cleaning W Setting: Adjusts the amount of White Ink that is finished. Sets the language shown on the display. GT-341 mode (No White): Sets the printer to stop all the operation of the firmware. See "7-2-...print data automatically after the print number which is set with Printer Driver is flushed in DailyCleaning White. See "6-2-5. Language". See "3-4-4. GT-3 Series 16 Shows the number of White Ink in Daily Cleaning White" in the Instruction Manual. Default is OFF.
Restores the Platen. Shows versions of White Heads. Identifying Your Printer's Parts Content Daily Cleaning W Setting: Adjusts the amount of White Ink that is finished. Sets the language shown on the display. GT-341 mode (No White): Sets the printer to stop all the operation of the firmware. See "7-2-...print data automatically after the print number which is set with Printer Driver is flushed in DailyCleaning White. See "6-2-5. Language". See "3-4-4. GT-3 Series 16 Shows the number of White Ink in Daily Cleaning White" in the Instruction Manual. Default is OFF.
Basic Instruction Manual - English
Page 28
...Cleaners and Flushing Sponge et al. Ensue the printer is connected to a suitable earth point (4) Press the Power Switch to [standby] mode. 19 GT-3 Series When it finishes, the machine goes to turn ON your printer. (3) Connect the power plug to the power outlet. are adequately installed....included) to the AC cord socket of your printer. Turning On Your Printer (1) Hold the White Ink Cartridges upside down from the Exhaust Fan for part code.) z The Rear Cover is properly set the Waste Ink Tank*. (* See "1-3-5. Consumable Requirements and Options" for exhausting air. 3-2-1. The ...
...Cleaners and Flushing Sponge et al. Ensue the printer is connected to a suitable earth point (4) Press the Power Switch to [standby] mode. 19 GT-3 Series When it finishes, the machine goes to turn ON your printer. (3) Connect the power plug to the power outlet. are adequately installed....included) to the AC cord socket of your printer. Turning On Your Printer (1) Hold the White Ink Cartridges upside down from the Exhaust Fan for part code.) z The Rear Cover is properly set the Waste Ink Tank*. (* See "1-3-5. Consumable Requirements and Options" for exhausting air. 3-2-1. The ...

Basic Instruction Manual - English
Page 40
... result in severe injury. Take care not to your skin, otherwise inflammation can result. When replacing parts and installing optional accessories, be HOT and may be sure to wear protective goggles and gloves when ... get into contact with your eyes or onto your fingers. Be sure to use of non-genuine parts. 31 GT-3 Series Brother will not be seriously damaged by hand. 5. If the grease get your skin, inflammation can result... and disconnecting the power cord from the use only genuine Brother parts. Maintenance 5. In case of the control unit.
... result in severe injury. Take care not to your skin, otherwise inflammation can result. When replacing parts and installing optional accessories, be HOT and may be sure to wear protective goggles and gloves when ... get into contact with your eyes or onto your fingers. Be sure to use of non-genuine parts. 31 GT-3 Series Brother will not be seriously damaged by hand. 5. If the grease get your skin, inflammation can result... and disconnecting the power cord from the use only genuine Brother parts. Maintenance 5. In case of the control unit.
Basic Instruction Manual - English
Page 41
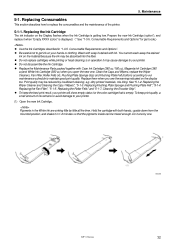
... new Ink Cartridge. Replacing Consumables This section describes how to your printer will show empty status for part code.) z Use the Ink Cartridges described in operation it one . 0054Y GT-3 Series 32 z Replace the Maintenance Parts packed together with ink. You cannot wash away the stained ink on the Display flashes when the...
... new Ink Cartridge. Replacing Consumables This section describes how to your printer will show empty status for part code.) z Use the Ink Cartridges described in operation it one . 0054Y GT-3 Series 32 z Replace the Maintenance Parts packed together with ink. You cannot wash away the stained ink on the Display flashes when the...
Basic Instruction Manual - English
Page 42
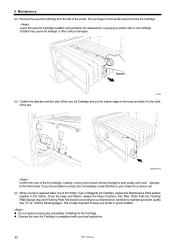
... repeat unnecessary uninstalling / installing the Ink Cartridge. Leaving your local regulations. 33 GT-3 Series Leave the used Ink Cartridge from the slot of the White, Cyan or Magenta Ink Cartridge, replace the Maintenance Parts packed together in compliance with your printer with no Ink Cartridge installed may cause ink.... Maintenance (2) Remove the used Ink Cartridge installed until just before the replacement. If you have installed a wrong color, immediately contact Brother or your dealer for a service call. (4) When you have replaced either one of the printer.
... repeat unnecessary uninstalling / installing the Ink Cartridge. Leaving your local regulations. 33 GT-3 Series Leave the used Ink Cartridge from the slot of the White, Cyan or Magenta Ink Cartridge, replace the Maintenance Parts packed together in compliance with your printer with no Ink Cartridge installed may cause ink.... Maintenance (2) Remove the used Ink Cartridge installed until just before the replacement. If you have installed a wrong color, immediately contact Brother or your dealer for a service call. (4) When you have replaced either one of the printer.


