

Instruction Manual - English
Page 9
... Print Quality Problems...104 7-2-1. Print with Black Ink on Transparent Layer 58 4-3-14. Making Gray with Nozzle Check Pattern 108 GT-3 Series Uninstalling / Installing the Platen ...65 4-4-1. Installing the Platen...66 4-4-3. Applying the Pretreatment...72 4-6-2. Making One Print......53 4-3-6. Printing ...72 4-6-1. Making Print Data in a USB flash drive 79 5-3. Replacing Consumables ...84 6-1-1. Regular Maintenance...95 6-2-1. Troubleshooting...101 7-1. Procedure for Color Inks ...56 4-3-11. Printing Color Chart ...64 4-4. Curing the Ink onto the T-shirt...76 5. ...
... Print Quality Problems...104 7-2-1. Print with Black Ink on Transparent Layer 58 4-3-14. Making Gray with Nozzle Check Pattern 108 GT-3 Series Uninstalling / Installing the Platen ...65 4-4-1. Installing the Platen...66 4-4-3. Applying the Pretreatment...72 4-6-2. Making One Print......53 4-3-6. Printing ...72 4-6-1. Making Print Data in a USB flash drive 79 5-3. Replacing Consumables ...84 6-1-1. Regular Maintenance...95 6-2-1. Troubleshooting...101 7-1. Procedure for Color Inks ...56 4-3-11. Printing Color Chart ...64 4-4. Curing the Ink onto the T-shirt...76 5. ...

Instruction Manual - English
Page 111
...not to let the liquids: Ink, Wash Liquid, Maintenance Solution, Pretreatment or waste liquid come into contact with water. Troubleshooting 7. The Printer may be injured. In case of children. GT-3 Series 101 The Platen moves forward while operating and it may be injured. Do not move the Platen by this may... with your eyes or onto your hand gets caught between the platen or the T-shirt tray and the covers, it may cause a bum. Troubleshooting CAUTION Ensure there is turned on, otherwise your fingers. 7. Do not touch the head heat sink as they can result.
...not to let the liquids: Ink, Wash Liquid, Maintenance Solution, Pretreatment or waste liquid come into contact with water. Troubleshooting 7. The Printer may be injured. In case of children. GT-3 Series 101 The Platen moves forward while operating and it may be injured. Do not move the Platen by this may... with your eyes or onto your hand gets caught between the platen or the T-shirt tray and the covers, it may cause a bum. Troubleshooting CAUTION Ensure there is turned on, otherwise your fingers. 7. Do not touch the head heat sink as they can result.
Instruction Manual - English
Page 112
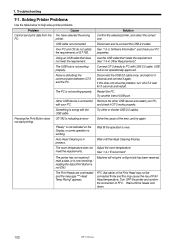
... is not working . Wait until the heads cool down. 102 GT-3 Series The printer has not received / read a data, or is now receiving / reading the data.(Print Button is not operationally approved. 7. Troubleshooting 7-1. Cause You have selected the wrong printer. USB cable not connected...Use the USB cable that meets the requirement. The Print Heads are overheated and the message "** Head Temp Rising" appears. Connect GT-3 directly to help solve printer problems. Problem Cannot send print data from the PC. The room temperature does not Adjust the room ...
... is not working . Wait until the heads cool down. 102 GT-3 Series The printer has not received / read a data, or is now receiving / reading the data.(Print Button is not operationally approved. 7. Troubleshooting 7-1. Cause You have selected the wrong printer. USB cable not connected...Use the USB cable that meets the requirement. The Print Heads are overheated and the message "** Head Temp Rising" appears. Connect GT-3 directly to help solve printer problems. Problem Cannot send print data from the PC. The room temperature does not Adjust the room ...

Instruction Manual - English
Page 113
... read data from USB flash drive. Check the error code with Brother GT-3 File Output printer driver. Make AR3 print data with "7-4. GT-3 Series 103 Troubleshooting Problem GT-3 does not turn on GT-3. An error occurred. The setting between the Printer Driver and the Printer does not match. Cannot do...Confirm that is not inserted properly. Cause Solution There is prior to the Printer Driver. Check the power cable connections. GT-3 cannot print GT-541/GT-782 print data. quality. That USB flash drive does not Use a USB flash drive that USB flash drive with your...
... read data from USB flash drive. Check the error code with Brother GT-3 File Output printer driver. Make AR3 print data with "7-4. GT-3 Series 103 Troubleshooting Problem GT-3 does not turn on GT-3. An error occurred. The setting between the Printer Driver and the Printer does not match. Cannot do...Confirm that is not inserted properly. Cause Solution There is prior to the Printer Driver. Check the power cable connections. GT-3 cannot print GT-541/GT-782 print data. quality. That USB flash drive does not Use a USB flash drive that USB flash drive with your...
Instruction Manual - English
Page 114
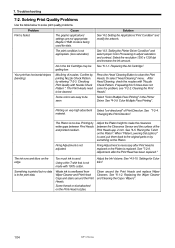
... after the Print Head has been replaced." Something is printed but no data is used . Replacing the Wiper Cleaner and Cleaning the Caps / Wipers". 104 GT-3 Series Ink in the Ink Cartridge may be cleaned. Checking Print Quality with "Nozzle Check Pattern. See "4-3. Or select "Head Cleaning" menu. Printing on the... to be getting low. Press the Head Cleaning Button to be seen. See "4-3-10. See "6-1-1. See "4-5. Select "Color Multiple Pass Printing" in the print data. 7. Troubleshooting 7-2. See "4-3-9. Firing Adjustment is faded.
... after the Print Head has been replaced." Something is printed but no data is used . Replacing the Wiper Cleaner and Cleaning the Caps / Wipers". 104 GT-3 Series Ink in the Ink Cartridge may be cleaned. Checking Print Quality with "Nozzle Check Pattern. See "4-3. Or select "Head Cleaning" menu. Printing on the... to be getting low. Press the Head Cleaning Button to be seen. See "4-3-10. See "6-1-1. See "4-5. Select "Color Multiple Pass Printing" in the print data. 7. Troubleshooting 7-2. See "4-3-9. Firing Adjustment is faded.
Instruction Manual - English
Page 115
.... Pretreatment was not applied enough. Applying the Pretreatment". If repeating this 5 times does not solve the problem, see "7-2-2. Shake the White Ink not shaken enough. Troubleshooting Problem The outlines of printed image are not clear, or texts and outlines are getting dried under the humid high-temperature condition. White is stained... "Head Cleaning" menu. After Head Cleaning, check the nozzles with Nozzle Check Pattern ". Daily Cleaning White is dirty. Daily Cleaning White for done. Cartridges well. GT-3 Series 105
.... Pretreatment was not applied enough. Applying the Pretreatment". If repeating this 5 times does not solve the problem, see "7-2-2. Shake the White Ink not shaken enough. Troubleshooting Problem The outlines of printed image are not clear, or texts and outlines are getting dried under the humid high-temperature condition. White is stained... "Head Cleaning" menu. After Head Cleaning, check the nozzles with Nozzle Check Pattern ". Daily Cleaning White is dirty. Daily Cleaning White for done. Cartridges well. GT-3 Series 105
Instruction Manual - English
Page 116
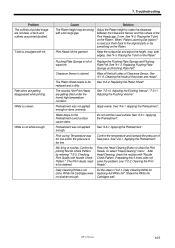
... humidity up to 35% to replace the old ink. If the problem is large, execute Initial Cleaning in the Ink Cartridge and execute Normal Cleaning. Troubleshooting 7-2-1. Do not tilt the Wiper Cleaner Cassette; If not enough or the "empty" air is not solved, proceed to Check: (1) See "6-1-2. The following steps are... concerned (see "7-2-3. Step 3: Check the ink tubes and execute Powerful Cleaning. Confirm by test printing of White Print Heads. How to the next step. 106 GT-3 Series
... humidity up to 35% to replace the old ink. If the problem is large, execute Initial Cleaning in the Ink Cartridge and execute Normal Cleaning. Troubleshooting 7-2-1. Do not tilt the Wiper Cleaner Cassette; If not enough or the "empty" air is not solved, proceed to Check: (1) See "6-1-2. The following steps are... concerned (see "7-2-3. Step 3: Check the ink tubes and execute Powerful Cleaning. Confirm by test printing of White Print Heads. How to the next step. 106 GT-3 Series
Instruction Manual - English
Page 117
... is not solved after Nozzle Cleaning. GT-3 Series 107 Replacing the Print Head" for 15- 20 minutes then the tiny air may be settled. Step 6: Contact Brother Customer Service or your service how the issue has started, the present conditions, the troubleshooting that you have done, etc. Troubleshooting Step 4: Confirm the "conditions" of mis...
... is not solved after Nozzle Cleaning. GT-3 Series 107 Replacing the Print Head" for 15- 20 minutes then the tiny air may be settled. Step 6: Contact Brother Customer Service or your service how the issue has started, the present conditions, the troubleshooting that you have done, etc. Troubleshooting Step 4: Confirm the "conditions" of mis...

Instruction Manual - English
Page 118
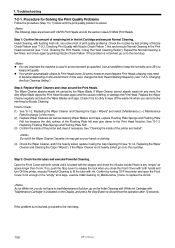
Troubleshooting 7-2-2. see "4-4. Please do the "manual" head cleaning. Press the Stop Button to select "Head Cleaning", and then press the OK Button. Normal / Powerful Cleaning (1) Make ... Print Head Selection menu when the head cleaning has been completed. Placing the T-shirt on the printed image). stripes/ banding appears on the Platen"). 108 GT-3 Series See "6-2-3. However, the auto-cleaning may not be seen in "Maintenance" menu and execute Initial Head Cleaning. 04e0029Y (4) Press the Up/Down Button to...
Troubleshooting 7-2-2. see "4-4. Please do the "manual" head cleaning. Press the Stop Button to select "Head Cleaning", and then press the OK Button. Normal / Powerful Cleaning (1) Make ... Print Head Selection menu when the head cleaning has been completed. Placing the T-shirt on the printed image). stripes/ banding appears on the Platen"). 108 GT-3 Series See "6-2-3. However, the auto-cleaning may not be seen in "Maintenance" menu and execute Initial Head Cleaning. 04e0029Y (4) Press the Up/Down Button to...

Instruction Manual - English
Page 119
Troubleshooting (3) Place a sheet of paper (A4 or letter size) at the right corner of paper. Paper of A4/ Letter size 0081Y (4) Select [ Test Print ] with the ... Check CMYK", or "Nozzle Check White" and then press the OK Button. The Print Heads need to make the paper flat. Cleaning the Print Heads"). 2 1 GT-3 Series (Continued on the next page) 109 You can use a T-shirt instead of the Platen as shown below. Use adhesive tape to be cleaned (see...
Troubleshooting (3) Place a sheet of paper (A4 or letter size) at the right corner of paper. Paper of A4/ Letter size 0081Y (4) Select [ Test Print ] with the ... Check CMYK", or "Nozzle Check White" and then press the OK Button. The Print Heads need to make the paper flat. Cleaning the Print Heads"). 2 1 GT-3 Series (Continued on the next page) 109 You can use a T-shirt instead of the Platen as shown below. Use adhesive tape to be cleaned (see...
Instruction Manual - English
Page 120
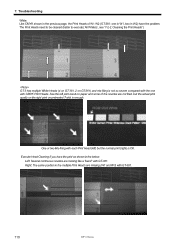
...GT-381. 110 GT-3 Series GT-3 has multiple White Heads (4 on GT-381, 2 on pretreated T-shirt is enough. The Print Heads need to be cleaned (better to execute [ All Whites] , see "7-2-2. Cleaning the Print Heads"). See the left ) but the actual print quality on the right print on GT-361) and mis-firing is OK. Troubleshooting... White: Like CMYK shown in the below: Left: Several continuous nozzles are missing (W1 and W3) with GT-381. Execute Head Cleaning if you have the problem. 7.
...GT-381. 110 GT-3 Series GT-3 has multiple White Heads (4 on GT-381, 2 on pretreated T-shirt is enough. The Print Heads need to be cleaned (better to execute [ All Whites] , see "7-2-2. Cleaning the Print Heads"). See the left ) but the actual print quality on the right print on GT-361) and mis-firing is OK. Troubleshooting... White: Like CMYK shown in the below: Left: Several continuous nozzles are missing (W1 and W3) with GT-381. Execute Head Cleaning if you have the problem. 7.

Instruction Manual - English
Page 121
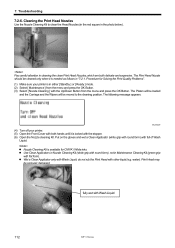
...at every number of prints you adjust to the Printer Driver setting. Setting Print Direction as follows. Changing the Auto Cleaning Setting GT-3 automatically cleans its Print Heads every 24 prints. You can set . If you have set with Up/Down Button from ... Heads cleaning needs to 24, and then press the OK Button. Cleaning the Print Heads frequently may hasten the Wiper Cleaner consumption. 07e0032Y GT-3 Series 111 Troubleshooting 7-2-4. This setting is Bi-Directional. 7-2-5. 7. The following display appears. (3) Press the Up/Down Button to select the frequency from 1...
...at every number of prints you adjust to the Printer Driver setting. Setting Print Direction as follows. Changing the Auto Cleaning Setting GT-3 automatically cleans its Print Heads every 24 prints. You can set . If you have set with Up/Down Button from ... Heads cleaning needs to 24, and then press the OK Button. Cleaning the Print Heads frequently may hasten the Wiper Cleaner consumption. 07e0032Y GT-3 Series 111 Troubleshooting 7-2-4. This setting is Bi-Directional. 7-2-5. 7. The following display appears. (3) Press the Up/Down Button to select the frequency from 1...
Instruction Manual - English
Page 122
... Nozzle should be seriously damaged. Print Head may be cleaned only when it is in Maintenance Cleaning Kit (green grip with Wash Liquid 112 GT-3 Series Procedure for CMYK / White inks. z Wet a Clean Applicator only with Wash Liquid, do not rub the Print Head with full... and press the OK Button. (3) Select [ Nozzle Cleaning ] with the Up/Down Button from the menu and press the OK Button. water). Troubleshooting 7-2-6. Pay careful attention in cleaning the clean Print Head Nozzles, which are both hands until it is available for Solving the Print Quality Problems". (1)...
... Nozzle should be seriously damaged. Print Head may be cleaned only when it is in Maintenance Cleaning Kit (green grip with Wash Liquid 112 GT-3 Series Procedure for CMYK / White inks. z Wet a Clean Applicator only with Wash Liquid, do not rub the Print Head with full... and press the OK Button. (3) Select [ Nozzle Cleaning ] with the Up/Down Button from the menu and press the OK Button. water). Troubleshooting 7-2-6. Pay careful attention in cleaning the clean Print Head Nozzles, which are both hands until it is available for Solving the Print Quality Problems". (1)...
Instruction Manual - English
Page 123
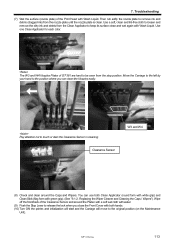
... form with white grip) and Clean Stick (flag form with green grip). (See "6-1-2. Replacing the Wiper Cleaner and Cleaning the Caps / Wipers"). Troubleshooting (7) Wet the surface (nozzle plate) of GT-381 are hard to the original position (on the Maintenance Unit). The W3 and W4 Nozzles Plates of the Print Head with Wash...) from the stop position. Wipe off the front/back of the Clearance Sensor and around the Caps and Wipers. 7. You can clean the Nozzles easily. GT-3 Series 113 Then rub softly the nozzle plate to touch or stain the Clearance Sensor in cleaning.
... form with white grip) and Clean Stick (flag form with green grip). (See "6-1-2. Replacing the Wiper Cleaner and Cleaning the Caps / Wipers"). Troubleshooting (7) Wet the surface (nozzle plate) of GT-381 are hard to the original position (on the Maintenance Unit). The W3 and W4 Nozzles Plates of the Print Head with Wash...) from the stop position. Wipe off the front/back of the Clearance Sensor and around the Caps and Wipers. 7. You can clean the Nozzles easily. GT-3 Series 113 Then rub softly the nozzle plate to touch or stain the Clearance Sensor in cleaning.

Instruction Manual - English
Page 124
Troubleshooting (11) Execute Powerful Cleaning of the Waste Ink Tank (200 ml or more ... the OK Button. (4) Clean the Tube and the Print Head. CMYK Print Head: (1) Make sure your dealer or Brother. Confirm the room of all the Print Heads to your printer is necessary to confirm the print quality. (See "7-2-3. ...and Options" for further information. Checking Print Quality with the Maintenance Solution of the Bottle. 0082Y (Continued on the next page) 114 GT-3 Series Select [ Maintenance ] and [ Color Tube Cleaning ], select the Print Head to the bottom of 250 ml or more ...
Troubleshooting (11) Execute Powerful Cleaning of the Waste Ink Tank (200 ml or more ... the OK Button. (4) Clean the Tube and the Print Head. CMYK Print Head: (1) Make sure your dealer or Brother. Confirm the room of all the Print Heads to your printer is necessary to confirm the print quality. (See "7-2-3. ...and Options" for further information. Checking Print Quality with the Maintenance Solution of the Bottle. 0082Y (Continued on the next page) 114 GT-3 Series Select [ Maintenance ] and [ Color Tube Cleaning ], select the Print Head to the bottom of 250 ml or more ...

Instruction Manual - English
Page 125
... be on the Wrist Strap. Fitting (11) Take off the gloves and touch some metallic part to put on the Display (ex. GT-3 Series 115 The Color Maintenance Cartridge will be used during the operation. Better to dissipate static electricity (e.g. Black). The fitting on the Display... hands not to be replaced and press the OK Button. Color Tube Cleaning then starts. Replace to be replaced and press the OK Button. 7. Troubleshooting (5) Select [ Maintenance ] > [ Color Tube Cleaning ] from the menu and select the Print Head to the Filter Cartridge and wash away the...
... be on the Wrist Strap. Fitting (11) Take off the gloves and touch some metallic part to put on the Display (ex. GT-3 Series 115 The Color Maintenance Cartridge will be used during the operation. Better to dissipate static electricity (e.g. Black). The fitting on the Display... hands not to be replaced and press the OK Button. Color Tube Cleaning then starts. Replace to be replaced and press the OK Button. 7. Troubleshooting (5) Select [ Maintenance ] > [ Color Tube Cleaning ] from the menu and select the Print Head to the Filter Cartridge and wash away the...

Instruction Manual - English
Page 126
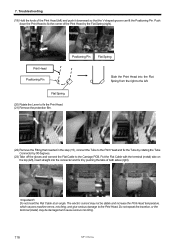
Disconnect the white cable (left ), and remove the holes of the cover (right), and remove the plastic cover. (14) Pull out the black tabs at the both edges (right). (13) Remove the silicone tubes that are attached the screws under the Carriage PCB (left ) and remove the four claws on the Carriage PCB. Troubleshooting (12) Remove the plastic cover on the both edges of Flat Cable of the Print Head to the front side of the printer, and remove the Flat Cable (the following example: Magenta). 116 GT-3 Series 7.
Disconnect the white cable (left ), and remove the holes of the cover (right), and remove the plastic cover. (14) Pull out the black tabs at the both edges (right). (13) Remove the silicone tubes that are attached the screws under the Carriage PCB (left ) and remove the four claws on the Carriage PCB. Troubleshooting (12) Remove the plastic cover on the both edges of Flat Cable of the Print Head to the front side of the printer, and remove the Flat Cable (the following example: Magenta). 116 GT-3 Series 7.

Instruction Manual - English
Page 127
... gloves again. V-shaped groove Positioning Pin Surface of the Print Head (Nozzles) safe, do not touch to the Tube. Troubleshooting (15) Put on the printer. Keep the surface of Print Head (Nozzles) GT-3 Series 117 7. Do not force to the Positioning Pin (right). Rotate the Tube little by 90 degrees (left ), hold...
... gloves again. V-shaped groove Positioning Pin Surface of the Print Head (Nozzles) safe, do not touch to the Tube. Troubleshooting (15) Put on the printer. Keep the surface of Print Head (Nozzles) GT-3 Series 117 7. Do not force to the Positioning Pin (right). Rotate the Tube little by 90 degrees (left ), hold...
Instruction Manual - English
Page 128
... tabs of the Print Head (left . Do not repeat the insertion, or the terminal (metal) may not be damaged and cause serious mis-firing. 118 GT-3 Series Put the Flat Cable with the terminal (metal) side on the top (left), insert straight into the Flat Spring from the right to fix... fix the Tube by rotating the Tube Connector by 90 degrees. (23) Take off the gloves and connect the Flat Cable to the Print Head. Troubleshooting (19) Hold the knob of both sides (right). 7.
... tabs of the Print Head (left . Do not repeat the insertion, or the terminal (metal) may not be damaged and cause serious mis-firing. 118 GT-3 Series Put the Flat Cable with the terminal (metal) side on the top (left), insert straight into the Flat Spring from the right to fix... fix the Tube by rotating the Tube Connector by 90 degrees. (23) Take off the gloves and connect the Flat Cable to the Print Head. Troubleshooting (19) Hold the knob of both sides (right). 7.

Instruction Manual - English
Page 129
... Cover so that were removed in the step (12) (left ), and apply the silicone tubes to confirm if the replaced Print Head works OK. (See "7-2-3. GT-3 Series 119 7. silicone tubes (27) Put the claws on the Carriage PCB in the step (13). Put it on the Plastic Cover that the fold... Cover (left ), and connect the Harness. (28) Push the Stop Lever to release the lock when you close the Front Cover with Nozzle Check Pattern"). Troubleshooting (24) Mount the Plastic Cover over the Carriage PCB.
... Cover so that were removed in the step (12) (left ), and apply the silicone tubes to confirm if the replaced Print Head works OK. (See "7-2-3. GT-3 Series 119 7. silicone tubes (27) Put the claws on the Carriage PCB in the step (13). Put it on the Plastic Cover that the fold... Cover (left ), and connect the Harness. (28) Push the Stop Lever to release the lock when you close the Front Cover with Nozzle Check Pattern"). Troubleshooting (24) Mount the Plastic Cover over the Carriage PCB.


