
Basic Instruction Manual - English
Page 5
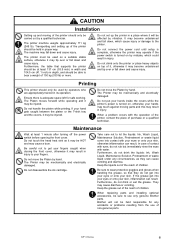
...When replacing parts and installing optional accessories, be sure to bear a weight of non-genuine parts. GT-3 Series iii Do not climb onto the printer or place heavy objects on by a qualified technician....may be used by vibration. The Printer may tip over or fall down and cause injury. Brother will be used on , otherwise your skin, inflammation can cause vomiting and diarrhea. The printer... must be HOT and may result in its operation. Do not handle the platen while printing. Do not put your fingers. In case of children. Keep the grease out ...
...When replacing parts and installing optional accessories, be sure to bear a weight of non-genuine parts. GT-3 Series iii Do not climb onto the printer or place heavy objects on by a qualified technician....may be used by vibration. The Printer may tip over or fall down and cause injury. Brother will be used on , otherwise your skin, inflammation can cause vomiting and diarrhea. The printer... must be HOT and may result in its operation. Do not handle the platen while printing. Do not put your fingers. In case of children. Keep the grease out ...
Basic Instruction Manual - English
Page 8
... manuals ...25 3-3-7. Setting Up Your Printer...28 3-4-1. Maintenance...31 5-1. Cleaning the Encoder Strip ...40 GT-3 Series Unpacking Your Printer ...5 1-3. Environment...5 1-3-2. Software Information...6 1-3-4. Identifying Your Printer's Parts...8 2-1. Under the Platen...12 2-7. Getting Started...17 3-1. When you already have GT-541/GT-782 ...21 3-3-2. Right ...9 2-3. Display...14 2-7-2. Turning On/Off Your Printer...19 3-2-1. Opening the Useful...
... manuals ...25 3-3-7. Setting Up Your Printer...28 3-4-1. Maintenance...31 5-1. Cleaning the Encoder Strip ...40 GT-3 Series Unpacking Your Printer ...5 1-3. Environment...5 1-3-2. Software Information...6 1-3-4. Identifying Your Printer's Parts...8 2-1. Under the Platen...12 2-7. Getting Started...17 3-1. When you already have GT-541/GT-782 ...21 3-3-2. Right ...9 2-3. Display...14 2-7-2. Turning On/Off Your Printer...19 3-2-1. Opening the Useful...
Basic Instruction Manual - English
Page 15
... with the tunnel 2.4 meter long as a rough indication) Separator sheet: When you cure Pretreatment and ink, be able to handle the area of Platen 14 x 16 (355.6 mm x 406.4 mm) and maintain heat production of oven to keep the surface flat and smooth. USB flash memory:... of heat press. (320°F (160 °C), 3 and half minutes with the heat press instead of 356 °F (180 °C) for 35 seconds. GT-3 Series 6 Read This First 1-3-3. Electrical Requirements Power: Single-phase 100-240 V, 50/60 Hz Power Consumptions: 0.4 A (average) 1. Other Requirements When purchasing optional...
... with the tunnel 2.4 meter long as a rough indication) Separator sheet: When you cure Pretreatment and ink, be able to handle the area of Platen 14 x 16 (355.6 mm x 406.4 mm) and maintain heat production of oven to keep the surface flat and smooth. USB flash memory:... of heat press. (320°F (160 °C), 3 and half minutes with the heat press instead of 356 °F (180 °C) for 35 seconds. GT-3 Series 6 Read This First 1-3-3. Electrical Requirements Power: Single-phase 100-240 V, 50/60 Hz Power Consumptions: 0.4 A (average) 1. Other Requirements When purchasing optional...
Basic Instruction Manual - English
Page 16
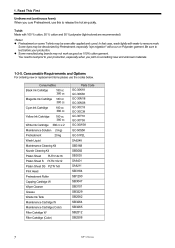
... 380 cc White Ink Cartridge 380 cc x 2 Maintenance Solution (5 kg) Pretreatment 20 kg Wash Liquid Maintenance Cleaning Kit Nozzle Cleaning Kit Platen Sheet PLTN 14x16 Platen Sheet S PLTN 10x12 Platen Sheet SS PLTN 7x8 Print Head Pretreatment Roller Capping Cartridge W Wiper Cleaner Grease Waste Ink Tank Maintenance Cartridge W Maintenance Cartridge (Color) Filter... GC-30Y38 GC-30W38 GC-50S5K GC-51P2L SA6248 SB3168 SB3082 SB3035 SA6401 SA8211 SB3184 SB1290 SB3047 SB3101 SB3229 SB2582 SB3264 SB3265 SB2512 SB2508 7 GT-3 Series T-shirt: Made with water to your production.
... 380 cc White Ink Cartridge 380 cc x 2 Maintenance Solution (5 kg) Pretreatment 20 kg Wash Liquid Maintenance Cleaning Kit Nozzle Cleaning Kit Platen Sheet PLTN 14x16 Platen Sheet S PLTN 10x12 Platen Sheet SS PLTN 7x8 Print Head Pretreatment Roller Capping Cartridge W Wiper Cleaner Grease Waste Ink Tank Maintenance Cartridge W Maintenance Cartridge (Color) Filter... GC-30Y38 GC-30W38 GC-50S5K GC-51P2L SA6248 SB3168 SB3082 SB3035 SA6401 SA8211 SB3184 SB1290 SB3047 SB3101 SB3229 SB2582 SB3264 SB3265 SB2512 SB2508 7 GT-3 Series T-shirt: Made with water to your production.

Basic Instruction Manual - English
Page 17
... printer. Load the Ink Cartridges of the product. Indicates the serial number of the appropriate color: from slipping so that an image is too low). GT-3 Series 8 Prevents a T-shirt from the left side W1, W2, W3, W4, Black(K), Magenta (M), Cyan (C), Yellow (Y). Keep pushing it detects ..." for safety, if it to work when the clearance between the print head and the material is too wide (the platen is printed on the Platen. Confirm the platen height by referring "4-5. Identifying Your Printer's Parts 2-1. Stores the new Ink Cartridges. Use this to be printed. Keeps the...
... printer. Load the Ink Cartridges of the product. Indicates the serial number of the appropriate color: from slipping so that an image is too low). GT-3 Series 8 Prevents a T-shirt from the left side W1, W2, W3, W4, Black(K), Magenta (M), Cyan (C), Yellow (Y). Keep pushing it detects ..." for safety, if it to work when the clearance between the print head and the material is too wide (the platen is printed on the Platen. Confirm the platen height by referring "4-5. Identifying Your Printer's Parts 2-1. Stores the new Ink Cartridges. Use this to be printed. Keeps the...
Basic Instruction Manual - English
Page 18
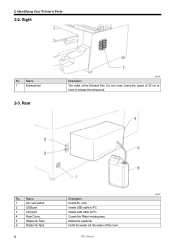
Identifying Your Printer's Parts 2-2. Rear 0044Y Description The outlet of 20 cm or more to PC. 4 Rear Cover Covers the Platen moving area. 5 Waste Ink Tube Drains the waste ink. 6 Waste Ink Tank Holds the waste ink. Leave the space of the Exhaust Fan. Name 1 Exhaust slot 2-3. Name Description 1 AC cord socket Inserts AC cord. 2 USB port Inserts USB cable to PC. 3 LAN port Inserts LAN cable to release the exhaust air. 0045Y No. 2. Do not cover; Right No. Be aware of the room. 9 GT-3 Series
Identifying Your Printer's Parts 2-2. Rear 0044Y Description The outlet of 20 cm or more to PC. 4 Rear Cover Covers the Platen moving area. 5 Waste Ink Tube Drains the waste ink. 6 Waste Ink Tank Holds the waste ink. Leave the space of the Exhaust Fan. Name 1 Exhaust slot 2-3. Name Description 1 AC cord socket Inserts AC cord. 2 USB port Inserts USB cable to PC. 3 LAN port Inserts LAN cable to release the exhaust air. 0045Y No. 2. Do not cover; Right No. Be aware of the room. 9 GT-3 Series
Basic Instruction Manual - English
Page 19
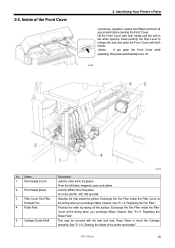
Jets the White Ink to the platen. Replacing the Roller Felts". This may be covered with both hands until the lock is set when opening the Front Cover. Lift the Front Cover with both hands. See "5-1-6. Inside of the printer and restart " GT-3 Series 10 Name 1 Print Heads... (Front) 2 Print Heads (Back) 3 Filter Cover, Fan Filter, Exhaust Fan 4 Roller Felts 5 Carriage Guide Shaft 0047Y Description Jets the Color Ink to the platen. See "5-1-5. Keep Clean to release the lock...
Jets the White Ink to the platen. Replacing the Roller Felts". This may be covered with both hands until the lock is set when opening the Front Cover. Lift the Front Cover with both hands. See "5-1-6. Inside of the printer and restart " GT-3 Series 10 Name 1 Print Heads... (Front) 2 Print Heads (Back) 3 Filter Cover, Fan Filter, Exhaust Fan 4 Roller Felts 5 Carriage Guide Shaft 0047Y Description Jets the Color Ink to the platen. See "5-1-5. Keep Clean to release the lock...
Basic Instruction Manual - English
Page 21
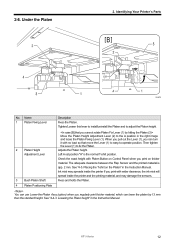
...GT-3 Series 12 Identifying Your Printer's Parts 0049Y No. Tighten/Loosen this lever to install/uninstall the Platen and to adjust the Platen height. 2 Platen Height Adjustment Lever 3 Bush Platen Shaft Move the Platen Height Adjustment Lever (2) to fix the Platen. Then tighten the Lever (1) to the A position in the right image and loose the Platen...easy-to-operate position. Placing the T-shirt on thicker material. Fixes and holds the Platen. 4 Platen Positioning Plate You can use Lower-the-Platen Assy (option) when you regularly print thicker material, which can turn it with wider ...
...GT-3 Series 12 Identifying Your Printer's Parts 0049Y No. Tighten/Loosen this lever to install/uninstall the Platen and to adjust the Platen height. 2 Platen Height Adjustment Lever 3 Bush Platen Shaft Move the Platen Height Adjustment Lever (2) to fix the Platen. Then tighten the Lever (1) to the A position in the right image and loose the Platen...easy-to-operate position. Placing the T-shirt on thicker material. Fixes and holds the Platen. 4 Platen Positioning Plate You can use Lower-the-Platen Assy (option) when you regularly print thicker material, which can turn it with wider ...
Basic Instruction Manual - English
Page 22
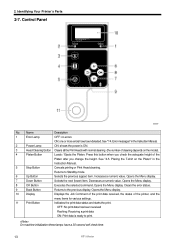
...OK Button Executes the selected command. Opens the Menu display. Identifying Your Printer's Parts 2-7. Placing the T-shirt on the model). 4 Platen Button Loads / Ejects the Platen. Clears the error status. 9 Back Button Returns to print. OFF: No print data has been received Flashing: Receiving a print ...the height. Name Description 1 Error Lamp OFF: no errors ON: one or more errors have a 30-second self check time. 13 GT-3 Series Error messages" in the Instruction Manual. 5 Stop Button Cancels printing or Print Head cleaning. Returns to Standby mode. 6 Up...
...OK Button Executes the selected command. Opens the Menu display. Identifying Your Printer's Parts 2-7. Placing the T-shirt on the model). 4 Platen Button Loads / Ejects the Platen. Clears the error status. 9 Back Button Returns to print. OFF: No print data has been received Flashing: Receiving a print ...the height. Name Description 1 Error Lamp OFF: no errors ON: one or more errors have a 30-second self check time. 13 GT-3 Series Error messages" in the Instruction Manual. 5 Stop Button Cancels printing or Print Head cleaning. Returns to Standby mode. 6 Up...

Basic Instruction Manual - English
Page 23
... or more errors are used in each cartridge, from the left, W1, W2, W3, W4 , Black Remained (K), Magenta (M), Cyan (C) and Yellow (Y). GT-3 Series 14 Move 6 Number of Print Shows the number of prints completed of the print data. 7 Printer Status Shows the printer status. 8 Amount of ...Ink Shows amount of the Platen Move (loading/unloading) in printing one print data. 11 Resolution Icon Shows the resolution of White Print Head Icon Shows how many White Print...
... or more errors are used in each cartridge, from the left, W1, W2, W3, W4 , Black Remained (K), Magenta (M), Cyan (C) and Yellow (Y). GT-3 Series 14 Move 6 Number of Print Shows the number of prints completed of the print data. 7 Printer Status Shows the printer status. 8 Amount of ...Ink Shows amount of the Platen Move (loading/unloading) in printing one print data. 11 Resolution Icon Shows the resolution of White Print Head Icon Shows how many White Print...

Basic Instruction Manual - English
Page 25
... the operation of the firmware. Language". Shows versions of White Heads. GT-3 Series 16 Shows the number of White Ink in Daily Cleaning White" in the Instruction Manual. Restores the Platen. Auto Job Delete: Deletes the print data automatically after the print number... Printer Driver is flushed in DailyCleaning White. Required Maintenance for the Long Storage" in the Instruction Manual. Menu Printer Setting Total Print Platen Reset Language Version 2. See "3-4-4. Identifying Your Printer's Parts Content Daily Cleaning W Setting: Adjusts the amount of White Ink that is...
... the operation of the firmware. Language". Shows versions of White Heads. GT-3 Series 16 Shows the number of White Ink in Daily Cleaning White" in the Instruction Manual. Restores the Platen. Auto Job Delete: Deletes the print data automatically after the print number... Printer Driver is flushed in DailyCleaning White. Required Maintenance for the Long Storage" in the Instruction Manual. Menu Printer Setting Total Print Platen Reset Language Version 2. See "3-4-4. Identifying Your Printer's Parts Content Daily Cleaning W Setting: Adjusts the amount of White Ink that is...
Basic Instruction Manual - English
Page 28
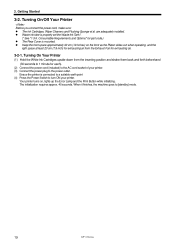
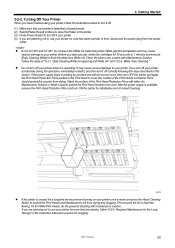
... Fan for part code.) z The Rear Cover is properly set the Waste Ink Tank*. (* See "1-3-5. 3. Getting Started 3-2. Your printer turns on the front as the Platen slides out when operating, and the right space at least 20 cm (7.9 inch) for exhausting air from the inserting position and shake them back and...
... Fan for part code.) z The Rear Cover is properly set the Waste Ink Tank*. (* See "1-3-5. 3. Getting Started 3-2. Your printer turns on the front as the Platen slides out when operating, and the right space at least 20 cm (7.9 inch) for exhausting air from the inserting position and shake them back and...
Basic Instruction Manual - English
Page 29
... to 1 minutes and execute [Daily Cleaning White] to protect the Print Head Nozzles from the power outlet. Daily Cleaning White for GT-381 and GT-361, do the powerful cleaning with Maintenance Solution. It may cause serious damage to your printer accidentally during the operation, immediately restart it...Button to use your printer. Getting Started 3-2-2. This ensures the ink is [standby] or [ready] mode. (2) Select [Platen Reset] in Menu to store the Platen in the Instruction Manual to use your printer when it off your printer for White Print Heads, do not leave the ...
... to 1 minutes and execute [Daily Cleaning White] to protect the Print Head Nozzles from the power outlet. Daily Cleaning White for GT-381 and GT-361, do the powerful cleaning with Maintenance Solution. It may cause serious damage to your printer accidentally during the operation, immediately restart it...Button to use your printer. Getting Started 3-2-2. This ensures the ink is [standby] or [ready] mode. (2) Select [Platen Reset] in Menu to store the Platen in the Instruction Manual to use your printer when it off your printer for White Print Heads, do not leave the ...
Basic Instruction Manual - English
Page 35
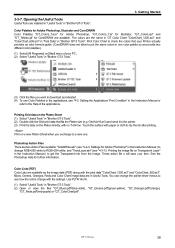
....cpl" and "GT_Tshirts.cpl" for further information. Print Color Chart to check the colors that fits the Platen size (e.g. Printing Grid data on Transparent Layer" in "Brother GT-3 Tools". (2) Double-click the Grid print data that your Printer actually provides as color formula guide. (CorelDRAW... does not allow to get the Transparent Info from the image. Printing the image file on the Platen Sheet (1) Select "Useful Tools...
....cpl" and "GT_Tshirts.cpl" for further information. Print Color Chart to check the colors that fits the Platen size (e.g. Printing Grid data on Transparent Layer" in "Brother GT-3 Tools". (2) Double-click the Grid print data that your Printer actually provides as color formula guide. (CorelDRAW... does not allow to get the Transparent Info from the image. Printing the image file on the Platen Sheet (1) Select "Useful Tools...
Basic Instruction Manual - English
Page 38
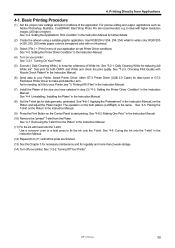
... Directly from Applications WARNING If a foreign object gets inside , it may result in its operation. Contact Brother to arrange a service call to resolve. Do not move the Platen by this. When a problem occurs with correct operation. Printing Directly from Applications 4. The Printer may cause... fire or electric shocks or problems with the operation of the printer, contact the place of purchase or a qualified technician. 29 GT-3 Series Do ...
... Directly from Applications WARNING If a foreign object gets inside , it may result in its operation. Contact Brother to arrange a service call to resolve. Do not move the Platen by this. When a problem occurs with correct operation. Printing Directly from Applications 4. The Printer may cause... fire or electric shocks or problems with the operation of the printer, contact the place of purchase or a qualified technician. 29 GT-3 Series Do ...
Basic Instruction Manual - English
Page 39
... ] to your Printer, see "5. Test print for further details. (2) Create the artwork using a suitable graphic application. Select Printer Driver: either GT-3 Printer Driver (USB 2.0 Cable) for replacing dull White Ink". The operation on your application an set Printer Driver conditions. in the Instruction Manual... Photo Pro are finished. (13) See the Chapter 5 for necessary maintenance and for dark garments, pretreated. Removing the T-shirt from the Platen" in the Instruction Manual. (11) Fix the ink with Nozzle Check Pattern" in the Instruction Manual. (12) Repeat (8) to start ...
... ] to your Printer, see "5. Test print for further details. (2) Create the artwork using a suitable graphic application. Select Printer Driver: either GT-3 Printer Driver (USB 2.0 Cable) for replacing dull White Ink". The operation on your application an set Printer Driver conditions. in the Instruction Manual... Photo Pro are finished. (13) See the Chapter 5 for necessary maintenance and for dark garments, pretreated. Removing the T-shirt from the Platen" in the Instruction Manual. (11) Fix the ink with Nozzle Check Pattern" in the Instruction Manual. (12) Repeat (8) to start ...

Basic Instruction Manual - English
Page 40
...Keep the liquids out of the reach of contact with water. Be careful not to get your fingers. Do not disassemble the ink cartridge. Brother will not be held responsible for any circumstances, as it may be HOT and may cause diarrhea or vomiting. The Printer may result in severe...eyes, do not get into your eyes or onto your skin, inflammation can result in injury to use of non-genuine parts. 31 GT-3 Series Do not move the Platen by this. Furthermore, do not drink or eat the grease. Maintenance 5. CAUTION Wait at least 5 minutes after turning off the power...
...Keep the liquids out of the reach of contact with water. Be careful not to get your fingers. Do not disassemble the ink cartridge. Brother will not be held responsible for any circumstances, as it may be HOT and may cause diarrhea or vomiting. The Printer may result in severe...eyes, do not get into your eyes or onto your skin, inflammation can result in injury to use of non-genuine parts. 31 GT-3 Series Do not move the Platen by this. Furthermore, do not drink or eat the grease. Maintenance 5. CAUTION Wait at least 5 minutes after turning off the power...
Basic Instruction Manual - English
Page 43
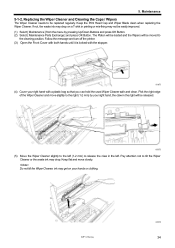
Pick the right edge of the Wiper Cleaner and move slowly. GT-3 Series 0059Y 34 Replacing the Wiper Cleaner and Cleaning the Caps / Wipers The Wiper Cleaner needs to be released. 0058Y (5) Move the Wiper Cleaner slightly ..., the waste ink may drop on your right hand with a plastic bag so that you can hold the used Wiper Cleaner safe and clean. The Platen will be loaded and the Wipers will be replaced regularly. Follow the message and turn off the printer. (3) Open the Front Cover with both hands...
Pick the right edge of the Wiper Cleaner and move slowly. GT-3 Series 0059Y 34 Replacing the Wiper Cleaner and Cleaning the Caps / Wipers The Wiper Cleaner needs to be released. 0058Y (5) Move the Wiper Cleaner slightly ..., the waste ink may drop on your right hand with a plastic bag so that you can hold the used Wiper Cleaner safe and clean. The Platen will be loaded and the Wipers will be replaced regularly. Follow the message and turn off the printer. (3) Open the Front Cover with both hands...
Basic Instruction Manual - English
Page 47
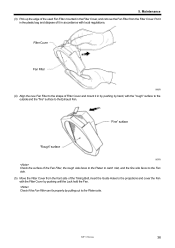
Filter Cover Fan Filter 0069Y (4) Align the new Fan Filter to the Exhaust Fan. GT-3 Series 38 Put it in the plastic bag and dispose of it in by pushing by pushing until the Lock hold the Fan. Check if ... mount it in the Filter Cover, and remove the Fan Filter from the front side of the Fan Filter, the rough side faces to the Platen to catch mist, and the fine side faces to the Fan side. (5) Move the Filter Cover from the Filter Cover. "Fine" surface "Rough" surface 0070Y...
Filter Cover Fan Filter 0069Y (4) Align the new Fan Filter to the Exhaust Fan. GT-3 Series 38 Put it in the plastic bag and dispose of it in by pushing by pushing until the Lock hold the Fan. Check if ... mount it in the Filter Cover, and remove the Fan Filter from the front side of the Fan Filter, the rough side faces to the Platen to catch mist, and the fine side faces to the Fan side. (5) Move the Filter Cover from the Filter Cover. "Fine" surface "Rough" surface 0070Y...
Basic Instruction Manual - English
Page 48
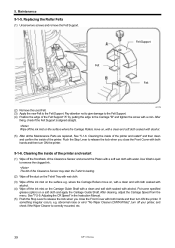
... and soft cloth soaked with both hands and then turn ON the printer. After fixing, check if the Felt Support is correctly mounted, etc. 39 GT-3 Series Cleaning the inside of the Felt Support "A" by putting the edge to the Felt Support. (4) Position the edge of the printer. See "7-2-9....T-shirt Tray with water. Replacing the Roller Felts (1) Unscrew two screws and remove the Felt Support. The dirt of the Clearance Sensor and around the Platen with a soft wet cloth with wet cloth. (3) Wipe off the ink mist on a soft cloth and apply the Carriage Guide Shaft. Maintenance 5-1-5. If...
... and soft cloth soaked with both hands and then turn ON the printer. After fixing, check if the Felt Support is correctly mounted, etc. 39 GT-3 Series Cleaning the inside of the Felt Support "A" by putting the edge to the Felt Support. (4) Position the edge of the printer. See "7-2-9....T-shirt Tray with water. Replacing the Roller Felts (1) Unscrew two screws and remove the Felt Support. The dirt of the Clearance Sensor and around the Platen with a soft wet cloth with wet cloth. (3) Wipe off the ink mist on a soft cloth and apply the Carriage Guide Shaft. Maintenance 5-1-5. If...

