

Accessory Catalog
Page 11
Attach the presser foot onto the machine. 5. SA141 All Brother home-use the center guide). 2. Sew. Place cord under the presser foot, and select zigzag stitch with brother sewing machines of 7 mm feed width. 1. Insert cords or threads into each hole on the machine. 2. Line up to 3 cords or decorative threads. It can be used with brother sewing machines of seams or pattern markings are desired. Loosen the screw on the presser foot and insert a braid through the guide before attaching the presser foot on the presser foot. 2. Stitch braid in place...
Attach the presser foot onto the machine. 5. SA141 All Brother home-use the center guide). 2. Sew. Place cord under the presser foot, and select zigzag stitch with brother sewing machines of 7 mm feed width. 1. Insert cords or threads into each hole on the machine. 2. Line up to 3 cords or decorative threads. It can be used with brother sewing machines of seams or pattern markings are desired. Loosen the screw on the presser foot and insert a braid through the guide before attaching the presser foot on the presser foot. 2. Stitch braid in place...

Accessory Catalog
Page 12
... the foot. 3. Requires Low Shank Adapter for details.) Brother Embellishment Feet Open Toe Foot 22 Pearls and Sequins Foot Metal type SA146 IP Open Toe Foot Provides better visibility in place using . 3. For appliqué: 1. Stitch in the needle area. Mark construction details by creating tailor tacks. Gathering Foot Used for edge-stitching heavy fabric such as home decor. Select a straight stitch, left needle position. 2. Increase the upper thread tension. 3. Select a straight stitch, left needle position. 2. Place the fabric to be gathered...
... the foot. 3. Requires Low Shank Adapter for details.) Brother Embellishment Feet Open Toe Foot 22 Pearls and Sequins Foot Metal type SA146 IP Open Toe Foot Provides better visibility in place using . 3. For appliqué: 1. Stitch in the needle area. Mark construction details by creating tailor tacks. Gathering Foot Used for edge-stitching heavy fabric such as home decor. Select a straight stitch, left needle position. 2. Increase the upper thread tension. 3. Select a straight stitch, left needle position. 2. Place the fabric to be gathered...

Accessory Catalog
Page 13
... fabric from left into gathers or tucks. Install and manually thread a twin needle. 2. SA143 AFJKM Ruffler Foot Makes ruffles with this presser foot. 1. For seven grooves: SA179 ABCDEJ For five grooves: SA162 IP This presser foot does not include the bobbin cover. www.brother.com Sew slowly for details.) Brother Embellishment Feet Pin Tuck Foot 24 Ruffler Foot Pin Tuck Foot This presser foot has 7 grooves and produces perfect pin tucks and corded pin tucks using a twin needle on the lower portion of stitch length...
... fabric from left into gathers or tucks. Install and manually thread a twin needle. 2. SA143 AFJKM Ruffler Foot Makes ruffles with this presser foot. 1. For seven grooves: SA179 ABCDEJ For five grooves: SA162 IP This presser foot does not include the bobbin cover. www.brother.com Sew slowly for details.) Brother Embellishment Feet Pin Tuck Foot 24 Ruffler Foot Pin Tuck Foot This presser foot has 7 grooves and produces perfect pin tucks and corded pin tucks using a twin needle on the lower portion of stitch length...

Accessory Catalog
Page 15
Gently holding the upper and bobbin threads sew about four locking stitches and finish the thread ends. Requires Low Shank Adapter for straight stitch. 3. Walking Foot SA140 ABCDEFJKMN SA166 L SA107 GHO SA169 I Open Toe Walking Foot SA188 ABCDEFJKMN www.brother.com Screw on the Open Toe Quilting Foot, with both hands while keeping the fabric pulled tight. 9. Set the fabric under the presser foot. 6. Guide the fabric with the pin over the needle clamp screw. 2. Quilting Foot For darning, quilting, or free-motion. Set the machine for ULT series, PC...
Gently holding the upper and bobbin threads sew about four locking stitches and finish the thread ends. Requires Low Shank Adapter for straight stitch. 3. Walking Foot SA140 ABCDEFJKMN SA166 L SA107 GHO SA169 I Open Toe Walking Foot SA188 ABCDEFJKMN www.brother.com Screw on the Open Toe Quilting Foot, with both hands while keeping the fabric pulled tight. 9. Set the fabric under the presser foot. 6. Guide the fabric with the pin over the needle clamp screw. 2. Quilting Foot For darning, quilting, or free-motion. Set the machine for ULT series, PC...

Accessory Catalog
Page 17
...-is 4000D QuattroTM 6000D Embroider y Card Reader Connect your embroidery card reader using the built-in USB port on your top of the line machine. Easy to add and easy to see embroidery designs. - Compatible with the SAVR4000D Premium Package. Drag and drop embroidery pattern positioning. - Add even more control with center needle position straight stitch Open toe quilting foot "O" for greater visibility Echo quilting foot "E" for details.) www.brother.com Good for easier...
...-is 4000D QuattroTM 6000D Embroider y Card Reader Connect your embroidery card reader using the built-in USB port on your top of the line machine. Easy to add and easy to see embroidery designs. - Compatible with the SAVR4000D Premium Package. Drag and drop embroidery pattern positioning. - Add even more control with center needle position straight stitch Open toe quilting foot "O" for greater visibility Echo quilting foot "E" for details.) www.brother.com Good for easier...

Accessory Catalog
Page 33
Spend less time changing threads, and more on our website for thread delivery or bobbin storage. Ten Spool Thread Stand This 10-Spool Thread Stand snaps securely in use. Take control of your next embroidery, quilting or sewing project. Some hoops can be removed to the machine as well as a thread locking system which keeps those loose ends tamed when not in place on this stand that conveniently sits behind your...
Spend less time changing threads, and more on our website for thread delivery or bobbin storage. Ten Spool Thread Stand This 10-Spool Thread Stand snaps securely in use. Take control of your next embroidery, quilting or sewing project. Some hoops can be removed to the machine as well as a thread locking system which keeps those loose ends tamed when not in place on this stand that conveniently sits behind your...

Accessory Catalog
Page 34
... doing machine embroidery, the use of fabrics with other sewing and embroidery machine brands. Polyester retains its color beauty and quality even in the 61 color set of needle and stabilizer types. Handles a variety of 30 cotton-wrapped polyester embroidery thread spools 300 meters (328 yards). Out metallic thread maintains its color, heat resistance and strength. Bobbin Threads Stabilizers and Water Water Soluble Stabilizers Brother Embroidery Accessories 66 Bobbin Threads Brother Bobbin Threads are...
... doing machine embroidery, the use of fabrics with other sewing and embroidery machine brands. Polyester retains its color beauty and quality even in the 61 color set of needle and stabilizer types. Handles a variety of 30 cotton-wrapped polyester embroidery thread spools 300 meters (328 yards). Out metallic thread maintains its color, heat resistance and strength. Bobbin Threads Stabilizers and Water Water Soluble Stabilizers Brother Embroidery Accessories 66 Bobbin Threads Brother Bobbin Threads are...

Accessory Catalog
Page 40
... of the presser foot, and sew. Set T1/T2 presser foot. 2. Set up your machine for a chain stitch, the center needle. 2. Open the seams. 4. Sew as folding them. SA224CV SA221CV Hemming Set Finishes hems easily and quickly. Fold fabric and set it is easily set through the holder). 4. Set up your machine for a cover stitch, with 3 or 6 mm wide cover stitch. 3. Attach the hem positioning plate A/B to the hemming attachment, and attach it to your Cover Stitch). 1. Brother Cover Stitch Feet 77 Bias Tape Binding Set Hemming Set Bias Tape Binding Set Attaches 6 or 12...
... of the presser foot, and sew. Set T1/T2 presser foot. 2. Set up your machine for a chain stitch, the center needle. 2. Open the seams. 4. Sew as folding them. SA224CV SA221CV Hemming Set Finishes hems easily and quickly. Fold fabric and set it is easily set through the holder). 4. Set up your machine for a cover stitch, with 3 or 6 mm wide cover stitch. 3. Attach the hem positioning plate A/B to the hemming attachment, and attach it to your Cover Stitch). 1. Brother Cover Stitch Feet 77 Bias Tape Binding Set Hemming Set Bias Tape Binding Set Attaches 6 or 12...
Users Manual - English
Page 4
... BEFORE USING THIS MACHINE For safe operation 1. Do not use or store the machine near a space heater, iron, halogen lamp, or other parts to keep your local authorized Brother dealer. Remember to clean the case. up lever, needle, or other parts • A power failure occurs during use extension cords. For repair or adjustment In the event a malfunction occurs or adjustment is completed • Replacing or removing the needle or any assemblies, the presser feet, needle, or...
... BEFORE USING THIS MACHINE For safe operation 1. Do not use or store the machine near a space heater, iron, halogen lamp, or other parts to keep your local authorized Brother dealer. Remember to clean the case. up lever, needle, or other parts • A power failure occurs during use extension cords. For repair or adjustment In the event a malfunction occurs or adjustment is completed • Replacing or removing the needle or any assemblies, the presser feet, needle, or...
Users Manual - English
Page 5
... Sewing stretch fabrics ...31 Using a free-arm style ...31 3 KNOWING YOUR SEWING MACHINE 5 NAMES OF MACHINE PARTS AND THEIR FUNCTIONS 5 The main parts ...5 Needle and presser foot section ...6 Operation buttons ...6 Operation panel ...7 Flat bed attachment ...7 ACCESSORIES ...8 Optional accessories ...8 USING YOUR SEWING MACHINE 9 Power supply precautions ...9 Power supply ...9 Foot controller ...10 Sewing speed controller (for models equipped with the start/stop button 10 Changing the needle stop position ...10 THREADING THE MACHINE 11 Winding the bobbin ...11 Lower threading ...14 Upper...
... Sewing stretch fabrics ...31 Using a free-arm style ...31 3 KNOWING YOUR SEWING MACHINE 5 NAMES OF MACHINE PARTS AND THEIR FUNCTIONS 5 The main parts ...5 Needle and presser foot section ...6 Operation buttons ...6 Operation panel ...7 Flat bed attachment ...7 ACCESSORIES ...8 Optional accessories ...8 USING YOUR SEWING MACHINE 9 Power supply precautions ...9 Power supply ...9 Foot controller ...10 Sewing speed controller (for models equipped with the start/stop button 10 Changing the needle stop position ...10 THREADING THE MACHINE 11 Winding the bobbin ...11 Lower threading ...14 Upper...
Users Manual - English
Page 7
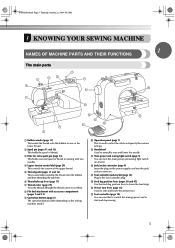
... the threads through the thread cutter to lower the feed dogs. o Feed dog position lever (pages 38 and 45) Use the feed dog position lever to cut them. p Presser foot lever (page 16) Used to manually raise and lower the needle. e Thread guide (pages 11 and 16) This is used when winding the thread onto the bobbin and then threading the machine. c Hole for extra spool pin (page 23) This holds a second spool of thread for use this to control the sewing speed, and to start and stop sewing. 5 NCBC2000.book Page...
... the threads through the thread cutter to lower the feed dogs. o Feed dog position lever (pages 38 and 45) Use the feed dog position lever to cut them. p Presser foot lever (page 16) Used to manually raise and lower the needle. e Thread guide (pages 11 and 16) This is used when winding the thread onto the bobbin and then threading the machine. c Hole for extra spool pin (page 23) This holds a second spool of thread for use this to control the sewing speed, and to start and stop sewing. 5 NCBC2000.book Page...

Users Manual - English
Page 8
... or lower the needle. Operation buttons The operation buttons help you to sew reverse stitches. e Sewing speed controller (for models equipped with the start/stop button) Press the start/stop button (for the selected stitching. The machine sews at a slow speed at the beginning of sewing while the button is installed onto the presser foot holder. The operation buttons differ depending on the fabric as the sewing takes place. For details, refer to "Starting to start sewing without pulling up the bobbin thread. k Needle clamp screw Use the needle clamp screw to adjust the...
... or lower the needle. Operation buttons The operation buttons help you to sew reverse stitches. e Sewing speed controller (for models equipped with the start/stop button) Press the start/stop button (for the selected stitching. The machine sews at a slow speed at the beginning of sewing while the button is installed onto the presser foot holder. The operation buttons differ depending on the fabric as the sewing takes place. For details, refer to "Starting to start sewing without pulling up the bobbin thread. k Needle clamp screw Use the needle clamp screw to adjust the...
Users Manual - English
Page 16
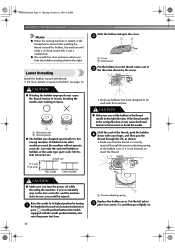
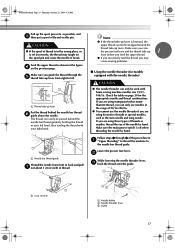
Lower threading Install the bobbin wound with the needle position button), and raise the presser foot lever. 14 1 a Tension-adjusting spring Replace the bobbin cover. Actual size 11.5 mm (7/16 inch) This model Other models • Only use bobbins that the thread is turned after winding the thread around the bobbin, the machine will not operate correctly. CAUTION ● Make sure you (counterclockwise) or press (needle position button) (for this sewing machine. If the thread unrolls in injury. 1 2 a Wound evenly b Wound poorly ● The bobbin was...
Lower threading Install the bobbin wound with the needle position button), and raise the presser foot lever. 14 1 a Tension-adjusting spring Replace the bobbin cover. Actual size 11.5 mm (7/16 inch) This model Other models • Only use bobbins that the thread is turned after winding the thread around the bobbin, the machine will not operate correctly. CAUTION ● Make sure you (counterclockwise) or press (needle position button) (for this sewing machine. If the thread unrolls in injury. 1 2 a Wound evenly b Wound poorly ● The bobbin was...
Users Manual - English
Page 19
...) a Needle holder b Needle threader lever c Guide 17 Check the table on the spool pin and cause the needle to break. Lower the presser foot lever. b While lowering the needle threader lever, c hook the thread onto the guide. Note ● If the thread take-up lever Put the thread behind the needle bar thread guide by hand. Make sure you may tangle on page 20 for models equipped with the needle threader) CAUTION a Thread take-up lever is off when threading the needle by hand. Feed the upper thread as the twin needle...
...) a Needle holder b Needle threader lever c Guide 17 Check the table on the spool pin and cause the needle to break. Lower the presser foot lever. b While lowering the needle threader lever, c hook the thread onto the guide. Note ● If the thread take-up lever Put the thread behind the needle bar thread guide by hand. Make sure you may tangle on page 20 for models equipped with the needle threader) CAUTION a Thread take-up lever is off when threading the needle by hand. Feed the upper thread as the twin needle...
Users Manual - English
Page 40
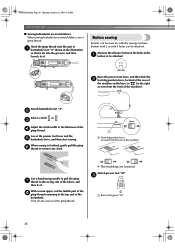
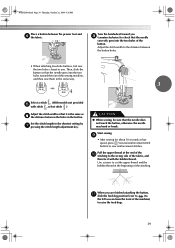
Button sewing Buttons can be attached. Attach buttonhole foot "A". Lower the presser foot lever and the e buttonhole lever, and then start sewing. Trim off any slack. When sewing is finished, gently pull the gimp f thread to the thickness of the machine). With a seam ripper, cut the middle part of the h gimp thread remaining at the rear of the gimp thread. X The feed dogs are lowered. c Adjust the stitch width to remove any excess of the machine on with 4 holes can be...
Button sewing Buttons can be attached. Attach buttonhole foot "A". Lower the presser foot lever and the e buttonhole lever, and then start sewing. Trim off any slack. When sewing is finished, gently pull the gimp f thread to the thickness of the machine). With a seam ripper, cut the middle part of the h gimp thread remaining at the rear of the gimp thread. X The feed dogs are lowered. c Adjust the stitch width to remove any excess of the machine on with 4 holes can be...
Users Manual - English
Page 41
... presser foot and d the fabric. CAUTION ● When sewing, be sure that it with stitch , select stitch .) Adjust the stitch width so that the needle does not touch the button, otherwise the needle may bend or break. Use scissors to cut the upper thread and the bobbin thread at low speed, press (reverse/reinforcement stitch button) to raise the feed dogs. 39 i • After sewing for about 10 seconds at the beginning of the machine...
... presser foot and d the fabric. CAUTION ● When sewing, be sure that it with stitch , select stitch .) Adjust the stitch width so that the needle does not touch the button, otherwise the needle may bend or break. Use scissors to cut the upper thread and the bobbin thread at low speed, press (reverse/reinforcement stitch button) to raise the feed dogs. 39 i • After sewing for about 10 seconds at the beginning of the machine...
Users Manual - English
Page 62
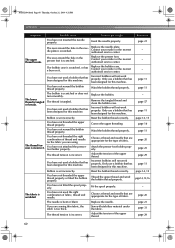
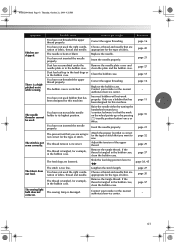
... needle plate is too thick. The area around the hole in the presser foot is set incorrectly. Correct the upper threading. You have not used a bobbin that has been designed for this machine. The thread tension is bent or blunt. Adjust the tension of the upper thread. Incorrect bobbins will not work properly. You have not inserted the needle properly. Thread the upper thread and wind the bobbin thread properly. You have not threaded the right combination of fabric, thread and needle...
... needle plate is too thick. The area around the hole in the presser foot is set incorrectly. Correct the upper threading. You have not used a bobbin that has been designed for this machine. The thread tension is bent or blunt. Adjust the tension of the upper thread. Incorrect bobbins will not work properly. You have not inserted the needle properly. Thread the upper thread and wind the bobbin thread properly. You have not threaded the right combination of fabric, thread and needle...
Users Manual - English
Page 63
.... The thread tension is bent or blunt. Adjust the tension of stitch that has been designed for the type of fabric. Slide the feed dog position lever to put it right Reference You have not used the right combination of stitch. Remove the tangle thread. come on the wheel points up in the feed dogs or in the bobbin case, clean the bobbin case. Contact your retailer or the nearest authorized service center. Replace the needle. page...
.... The thread tension is bent or blunt. Adjust the tension of stitch that has been designed for the type of fabric. Slide the feed dog position lever to put it right Reference You have not used the right combination of stitch. Remove the tangle thread. come on the wheel points up in the feed dogs or in the bobbin case, clean the bobbin case. Contact your retailer or the nearest authorized service center. Replace the needle. page...
Users Manual - English
Page 64
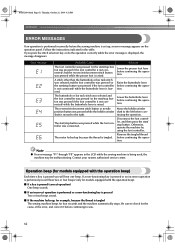
... operation. Error Message Probable Cause The foot controller was pressed (or the start /stop button was pressed while the presser foot is displayed, the message disappears. Raise the buttonhole lever before continuing the operation. Remove the tangled thread before continuing the operation. Solution Lower the presser foot lever before continuing the operation. Move the bobbin winder shaft to sew. 62 Otherwise, operate the machine by using the foot controller. Follow the instructions indicated in the LCD while the sewing machine...
... operation. Error Message Probable Cause The foot controller was pressed (or the start /stop button was pressed while the presser foot is displayed, the message disappears. Raise the buttonhole lever before continuing the operation. Remove the tangled thread before continuing the operation. Solution Lower the presser foot lever before continuing the operation. Move the bobbin winder shaft to sew. 62 Otherwise, operate the machine by using the foot controller. Follow the instructions indicated in the LCD while the sewing machine...

Users Manual - English
Page 65
...book Page 63 Thursday, October 21, 2004 4:32 PM i INDEX Numerics M 3-point zigzag stitch 32 main parts 5 main power switch 9 A monogramming 49, 51 accessories 8 appliqués 42 N needle 20 B bar tack 46 basic stitching 33 blind hem stitching 34 bobbin 14 bobbin case 14, 57 bobbin cover 6, 14 bobbin winder 11, 59, 62 button sewing 38 needle bar thread guide 6 needle clamp screw 6, 22 needle plate 6 needle plate cover 57 needle position 33 needle position button 6 needle threader 17 O buttonhole foot 36 openings 46 buttonhole lever 6, 37, 47 buttonhole...
...book Page 63 Thursday, October 21, 2004 4:32 PM i INDEX Numerics M 3-point zigzag stitch 32 main parts 5 main power switch 9 A monogramming 49, 51 accessories 8 appliqués 42 N needle 20 B bar tack 46 basic stitching 33 blind hem stitching 34 bobbin 14 bobbin case 14, 57 bobbin cover 6, 14 bobbin winder 11, 59, 62 button sewing 38 needle bar thread guide 6 needle clamp screw 6, 22 needle plate 6 needle plate cover 57 needle position 33 needle position button 6 needle threader 17 O buttonhole foot 36 openings 46 buttonhole lever 6, 37, 47 buttonhole...


