

Users Manual - English
Page 3
... Environment ...16 Changing Machine Format Properties...17 Adjusting the View of the Workspace ...18 Magnifying and Reducing the View ...18 Hiding the Properties Panel Automatically ...19 Viewing Different Parts of the Workspace (Panning)...20 Taking Measurements ...21 Displaying the Hoop ...21 Viewing and Hiding the Hoop ...22 Selecting a Hoop ...22 Available Hoops...23 Getting Help...24 Opening the Help ...24 Using the Contents...
... Environment ...16 Changing Machine Format Properties...17 Adjusting the View of the Workspace ...18 Magnifying and Reducing the View ...18 Hiding the Properties Panel Automatically ...19 Viewing Different Parts of the Workspace (Panning)...20 Taking Measurements ...21 Displaying the Hoop ...21 Viewing and Hiding the Hoop ...22 Selecting a Hoop ...22 Available Hoops...23 Getting Help...24 Opening the Help ...24 Using the Contents...
Users Manual - English
Page 4
... Lettering...49 Changing Font Spacing ...50 Width Percentage ...50 Changing the Slant Setting...51 Applying an Envelope...51 Properties Specific to Particular Text Frames...52 Changing Properties with the Context Menu (Right-click) ...54 Adjusting Fill Settings ...56 Choosing a Fill Pattern ...56 Fill Density Setting...57 2 Pacesetter Embroidery Lettering Software Instruction Manual Creating Lettering...29 Creating Lettering ...30 Normal Text Tool...30 Circle Text Tool ...31 Creating Monograms...
... Lettering...49 Changing Font Spacing ...50 Width Percentage ...50 Changing the Slant Setting...51 Applying an Envelope...51 Properties Specific to Particular Text Frames...52 Changing Properties with the Context Menu (Right-click) ...54 Adjusting Fill Settings ...56 Choosing a Fill Pattern ...56 Fill Density Setting...57 2 Pacesetter Embroidery Lettering Software Instruction Manual Creating Lettering...29 Creating Lettering ...30 Normal Text Tool...30 Circle Text Tool ...31 Creating Monograms...
Users Manual - English
Page 10
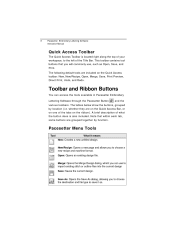
... to import existing stitch or outline files into the current design Save: Saves the current design. A brief description of what the button does is located right along the top of the Title Bar. The following default tools are grouped together by location (i.e. 8 Pacesetter Embroidery Lettering Software Instruction Manual Quick Access Toolbar The Quick Access Toolbar is also included. New/Recipe: Opens a new page and allows...
... to import existing stitch or outline files into the current design Save: Saves the current design. A brief description of what the button does is located right along the top of the Title Bar. The following default tools are grouped together by location (i.e. 8 Pacesetter Embroidery Lettering Software Instruction Manual Quick Access Toolbar The Quick Access Toolbar is also included. New/Recipe: Opens a new page and allows...
Users Manual - English
Page 14
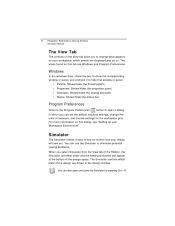
... button to open and close the Simulator by pressing Ctrl + R. The Simulator controls which you to see on . 12 Pacesetter Embroidery Lettering Software Instruction Manual The View Tab The controls on the View tab allow you can set the default machine settings, change what appears on this tab are drawn in which parts of the Ribbon, the Simulator (scrollbar slider and the sewing simulator) will sew...
... button to open and close the Simulator by pressing Ctrl + R. The Simulator controls which you to see on . 12 Pacesetter Embroidery Lettering Software Instruction Manual The View Tab The controls on the View tab allow you can set the default machine settings, change what appears on this tab are drawn in which parts of the Ribbon, the Simulator (scrollbar slider and the sewing simulator) will sew...

Users Manual - English
Page 15
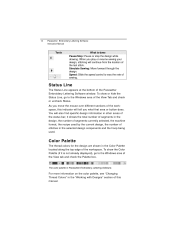
... the thread color that will be sewn when the scrollbar slider is does Previous Stitch: Move backward in the design. Next Stitch: Move forward in the opened design. The Simulator controls include pause, stop, sew forward and sew backwards. You can push various control buttons and slide the speed control to a specific position. Clicking on a stitch-by dragging it will advance or retrace the design position by one stitch.
... the thread color that will be sewn when the scrollbar slider is does Previous Stitch: Move backward in the design. Next Stitch: Move forward in the opened design. The Simulator controls include pause, stop, sew forward and sew backwards. You can push various control buttons and slide the speed control to a specific position. Clicking on a stitch-by dragging it will advance or retrace the design position by one stitch.
Users Manual - English
Page 16
... Embroidery Lettering Software window. Speed: Slide the speed control to the Windows area of the last stitch. For more information on the color palette, see "Changing Thread Colors" in the "Working with Designs" section of stitches in other areas of the status bar; To show the Color Palette (if it shows the total number of segments in the design, the number of segments currently selected, the machine...
... Embroidery Lettering Software window. Speed: Slide the speed control to the Windows area of the last stitch. For more information on the color palette, see "Changing Thread Colors" in the "Working with Designs" section of stitches in other areas of the status bar; To show the Color Palette (if it shows the total number of segments in the design, the number of segments currently selected, the machine...

Users Manual - English
Page 21
...button and drag it ; Do one is over it to form a flexible box around the area you can choose from any of the following steps: Š Š To increase the zoom, continue clicking and dragging the flexible box. Hiding the Properties Panel Automatically To increase the amount of space for your design... remove the mouse, the panel will collapse to a narrow sidebar. Learning about the Workspace 19 Š Right-click that area to make the whole design the size of the design window. • To Selection to zoom to the size of the currently selected embroidery segment, or set ...
...button and drag it ; Do one is over it to form a flexible box around the area you can choose from any of the following steps: Š Š To increase the zoom, continue clicking and dragging the flexible box. Hiding the Properties Panel Automatically To increase the amount of space for your design... remove the mouse, the panel will collapse to a narrow sidebar. Learning about the Workspace 19 Š Right-click that area to make the whole design the size of the design window. • To Selection to zoom to the size of the currently selected embroidery segment, or set ...
Users Manual - English
Page 24
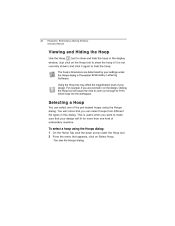
Just click on Select Hoop. Selecting a Hoop You can select hoops from different file types in on the design, clicking the Hoop tool will fit for more than one of your settings under the Hoop tool. To select a hoop using the Hoops dialog. 22 Pacesetter Embroidery Lettering Software Instruction Manual Viewing and Hiding the Hoop Use the Hoop tool to show the hoop (if it is useful when you are determined by...
Just click on Select Hoop. Selecting a Hoop You can select hoops from different file types in on the design, clicking the Hoop tool will fit for more than one of your settings under the Hoop tool. To select a hoop using the Hoops dialog. 22 Pacesetter Embroidery Lettering Software Instruction Manual Viewing and Hiding the Hoop Use the Hoop tool to show the hoop (if it is useful when you are determined by...
Users Manual - English
Page 25
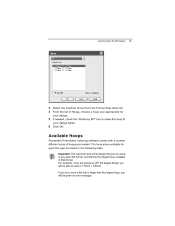
.... Learning about the Workspace 23 3 4 5 6 Select the machine format from the Format drop-down list. Available Hoops Pacesetter Embroidery Lettering software comes with a number different sizes of Hoops, choose a hoop size appropriate for each file type are saving as VIP, the largest design you will be given an error message. The hoop sizes available for your design better. If you are listed in that is limited by 90º" box...
.... Learning about the Workspace 23 3 4 5 6 Select the machine format from the Format drop-down list. Available Hoops Pacesetter Embroidery Lettering software comes with a number different sizes of Hoops, choose a hoop size appropriate for each file type are saving as VIP, the largest design you will be given an error message. The hoop sizes available for your design better. If you are listed in that is limited by 90º" box...

Users Manual - English
Page 33
... now make any other changes to the right of the font field. You will be adjusted using the Circle Text tool. tool. For more information, see "Changing Text Direction" in the Lower Text field will have to click again to complete the text segment. Text typed in the Upper Text ...the properties panel. Š Click Apply in the Properties panel. To choose a new font (i.e., other text settings, see a list of fonts. 6 Creating Lettering 31 A preview of the newly selected font is created using the text tools. For information on a circular path is now displayed at the ...
... now make any other changes to the right of the font field. You will be adjusted using the Circle Text tool. tool. For more information, see "Changing Text Direction" in the Lower Text field will have to click again to complete the text segment. Text typed in the Upper Text ...the properties panel. Š Click Apply in the Properties panel. To choose a new font (i.e., other text settings, see a list of fonts. 6 Creating Lettering 31 A preview of the newly selected font is created using the text tools. For information on a circular path is now displayed at the ...
Users Manual - English
Page 35
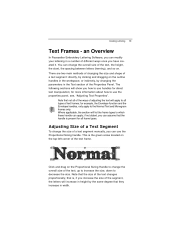
...change the size of the segment, the letters will show you how to the Normal Text and Monogram frames only. This is , if you increase the size of a text segment manually, you can use the properties panel, see, "Adjusting Text Properties". for example, the Envelope function and the Envelope handles, only apply to use handles for direct...how to decrease the size. up to increase the size, down to use the Proportional Sizing handle. for all types of the Properties Panel. an Overview In Pacesetter Embroidery Lettering Software, you can modify your lettering in the Text ...
...change the size of the segment, the letters will show you how to the Normal Text and Monogram frames only. This is , if you increase the size of a text segment manually, you can use the properties panel, see, "Adjusting Text Properties". for example, the Envelope function and the Envelope handles, only apply to use handles for direct...how to decrease the size. up to increase the size, down to use the Proportional Sizing handle. for all types of the Properties Panel. an Overview In Pacesetter Embroidery Lettering Software, you can modify your lettering in the Text ...

Users Manual - English
Page 57
... in both directions, within a single Circle text segment, type text directly into the Circle text properties page: 'Normal' direction into the Upper text box, and 'Reverse' text into the Lower text box. Changing Text Direction The text direction setting is available when you activate individual letter size handles and right-click the individual letter with your cursor. If you have text in cases where you...
... in both directions, within a single Circle text segment, type text directly into the Circle text properties page: 'Normal' direction into the Upper text box, and 'Reverse' text into the Lower text box. Changing Text Direction The text direction setting is available when you activate individual letter size handles and right-click the individual letter with your cursor. If you have text in cases where you...

Users Manual - English
Page 59
... 57 3 4 From the Pattern list, select a pattern. Click Apply. Note that the density setting is measured in millimeters. Use the density setting to adjust your text segment is the distance between individual lines of embroidery. This setting works well almost universally, as long as this, you can lower the density of your fill to use, try the standard setting of stitches; Therefore, larger values...
... 57 3 4 From the Pattern list, select a pattern. Click Apply. Note that the density setting is measured in millimeters. Use the density setting to adjust your text segment is the distance between individual lines of embroidery. This setting works well almost universally, as long as this, you can lower the density of your fill to use, try the standard setting of stitches; Therefore, larger values...
Users Manual - English
Page 60
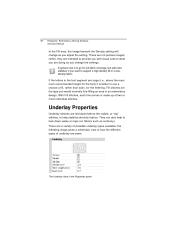
... Underlay stitches are doing as you adjust the setting. A general rule is to go for the font) it is made up of possible underlay types available; The Underlay Area in the text segment are intended to provide you with visual cues to support a high-density fill on fabrics such as you change as corduroy). 58 Pacesetter Embroidery Lettering Software Instruction Manual In...
... Underlay stitches are doing as you adjust the setting. A general rule is to go for the font) it is made up of possible underlay types available; The Underlay Area in the text segment are intended to provide you with visual cues to support a high-density fill on fabrics such as you change as corduroy). 58 Pacesetter Embroidery Lettering Software Instruction Manual In...

Users Manual - English
Page 62
... Embroidery Lettering Software Instruction Manual Specifying the Underlay Stitch Length You can change the inset distance: 1 2 Select the segment. In the Properties Panel, scroll down to the related procedures for more information. To change the inset distance. You can increase or decrease the length according to the Underlay area. Select one or more coverage you want to use: Contour, Parallel, or Zig-Zag...
... Embroidery Lettering Software Instruction Manual Specifying the Underlay Stitch Length You can change the inset distance: 1 2 Select the segment. In the Properties Panel, scroll down to the related procedures for more information. To change the inset distance. You can increase or decrease the length according to the Underlay area. Select one or more coverage you want to use: Contour, Parallel, or Zig-Zag...

Users Manual - English
Page 82
... selecting the Print Setup toolbar icon. This button opens your designs in the design and its overall size. puter's Print dialog, where you can choose printer options such as well - To close print preview and return to the design window, click Close. Š 3 Printing Design Worksheets You can make print-outs of each thread used. 80 Pacesetter Embroidery Lettering Software Instruction Manual Printing Designs You can print...
... selecting the Print Setup toolbar icon. This button opens your designs in the design and its overall size. puter's Print dialog, where you can choose printer options such as well - To close print preview and return to the design window, click Close. Š 3 Printing Design Worksheets You can make print-outs of each thread used. 80 Pacesetter Embroidery Lettering Software Instruction Manual Printing Designs You can print...
Users Manual - English
Page 88
... fabrics, generally need for a particular brand of stitches covering a given area. The Imperial system measures density in stitches per inch (spi). 65spi means 65 stitches in embroidery points (pt). The reverse can be true as Color Change . 86 Pacesetter Embroidery Lettering Software Instruction Manual Automatic Trim An automated machine process that instructs an embroidery machine to stop sewing a design in order to change . This function is the number of thread. This process eliminates the need...
... fabrics, generally need for a particular brand of stitches covering a given area. The Imperial system measures density in stitches per inch (spi). 65spi means 65 stitches in embroidery points (pt). The reverse can be true as Color Change . 86 Pacesetter Embroidery Lettering Software Instruction Manual Automatic Trim An automated machine process that instructs an embroidery machine to stop sewing a design in order to change . This function is the number of thread. This process eliminates the need...
Users Manual - English
Page 90
... computer software, which allows for global changes (automatically changes density, size, stitch width, stitch count in a name. Used for storing and retrieving designs, which allows variance of letter styles, size, height, density and other characteristics. Outline file File format for outlining and fine detail. Monogram Embroidered design composed of one stitch between two points. 88 Pacesetter Embroidery Lettering Software Instruction Manual Jump Stitch Movement of the pantograph without needle penetration, commonly used to...
... computer software, which allows for global changes (automatically changes density, size, stitch width, stitch count in a name. Used for storing and retrieving designs, which allows variance of letter styles, size, height, density and other characteristics. Outline file File format for outlining and fine detail. Monogram Embroidered design composed of one stitch between two points. 88 Pacesetter Embroidery Lettering Software Instruction Manual Jump Stitch Movement of the pantograph without needle penetration, commonly used to...

Users Manual - English
Page 91
... you select outline segments, you to draw a box around parts of a design that is created at one time. Segment A single piece of the design. Select tool The Select tool allows you can select outline segments by clicking on a single segment or by closely arranged zig-zag stitches. Also known as its size, color, sequence in designs, stitch type and values, including stitching instructions.
... you select outline segments, you to draw a box around parts of a design that is created at one time. Segment A single piece of the design. Select tool The Select tool allows you can select outline segments by clicking on a single segment or by closely arranged zig-zag stitches. Also known as its size, color, sequence in designs, stitch type and values, including stitching instructions.
Installation Guide - English
Page 10
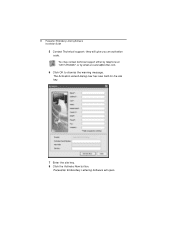
they will open. You may contact technical support either by telephone at 1-877-276-8437, or by email at custsrv@brother.com. 6 Click OK to dismiss the warning message. The Activation wizard dialog now has new field for the site key. 7 Enter the site key. 8 Click the Activate Now button. 8 Pacesetter Embroidery Lettering Software Installation Guide 5 Contact Technical support; Pacesetter Embroidery Lettering Software will give you an activation code.
they will open. You may contact technical support either by telephone at 1-877-276-8437, or by email at custsrv@brother.com. 6 Click OK to dismiss the warning message. The Activation wizard dialog now has new field for the site key. 7 Enter the site key. 8 Click the Activate Now button. 8 Pacesetter Embroidery Lettering Software Installation Guide 5 Contact Technical support; Pacesetter Embroidery Lettering Software will give you an activation code.


