
Quick Setup Guide - English
Page 2
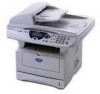
...feet (2.0 meters). Manual Feed Slot Flap Quick Setup Guide CD-ROMs For Windows® For Macintosh® User's Guide Drum Unit Assembly (including Starter Toner Cartridge) AC Power Cord Accessory Order Form (USA/Canada only) Carton components may differ ...). Save all packing materials and the carton. When you use a Parallel interface cable that is not a standard accessory. ■ Getting Started Carton Components DCP 9 1 2 8 3 7 4 6 5 1. Face-down Output Tray 7. Power Switch Support Flap with Extension 8. Please purchase the appropriate interface cable...
...feet (2.0 meters). Manual Feed Slot Flap Quick Setup Guide CD-ROMs For Windows® For Macintosh® User's Guide Drum Unit Assembly (including Starter Toner Cartridge) AC Power Cord Accessory Order Form (USA/Canada only) Carton components may differ ...). Save all packing materials and the carton. When you use a Parallel interface cable that is not a standard accessory. ■ Getting Started Carton Components DCP 9 1 2 8 3 7 4 6 5 1. Face-down Output Tray 7. Power Switch Support Flap with Extension 8. Please purchase the appropriate interface cable...
Users Manual - English
Page 6
...ask you to do if you think your Product is not covered by another device or software used (including but are not limited to toner, drums, print heads and ink cartridges. • Except as "this Product"). • If you are not the Original Purchaser and the product ... (by improper installation, improper or abnormal use, misuse, neglect or accident (including but used in the United States. Brother® Three-Year Limited Warranty and Exchange Service For DCP-8020 and DCP-8025D (USA only) Who is covered: • This limited warranty ("warranty") is given only to the original end...
...ask you to do if you think your Product is not covered by another device or software used (including but are not limited to toner, drums, print heads and ink cartridges. • Except as "this Product"). • If you are not the Original Purchaser and the product ... (by improper installation, improper or abnormal use, misuse, neglect or accident (including but used in the United States. Brother® Three-Year Limited Warranty and Exchange Service For DCP-8020 and DCP-8025D (USA only) Who is covered: • This limited warranty ("warranty") is given only to the original end...
Users Manual - English
Page 9
For laser products: Failure to remove the Toner Cartridge (and Toner Drum Unit on applicable models) during shipping. BROTHER MULTIFUNCTION CENTER/FACSIMILE MACHINE LIMITED WARRANTY (Canada only) Pursuant to your Operation Manual for proper packaging.) For ink-jet products: Do not remove the ink cartridges during shipping will cause severe damage to the DCP/Facsimile...
For laser products: Failure to remove the Toner Cartridge (and Toner Drum Unit on applicable models) during shipping. BROTHER MULTIFUNCTION CENTER/FACSIMILE MACHINE LIMITED WARRANTY (Canada only) Pursuant to your Operation Manual for proper packaging.) For ink-jet products: Do not remove the ink cartridges during shipping will cause severe damage to the DCP/Facsimile...
Users Manual - English
Page 19
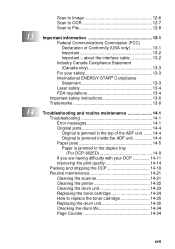
...the toner cartridge 14-25 Replacing the drum unit 14-30 Checking the drum life 14-34 Page Counter 14-34 xvii about the interface cable 13-2 Industry Canada Compliance Statement (Canada only 13-3 For your safety 13-3 International ENERGY STAR® Compliance Statement 13-3 Laser safety 13-4 FDA regulations 13-4 ... 14-4 Paper jams 14-5 Paper is jammed in the duplex tray (For DCP-8025D 14-9 If you are having difficulty with your DCP 14-11 Improving the print quality 14-14 Packing and shipping the DCP 14-18 Routine maintenance 14-21 Cleaning the scanner 14-21 Cleaning the printer...
...the toner cartridge 14-25 Replacing the drum unit 14-30 Checking the drum life 14-34 Page Counter 14-34 xvii about the interface cable 13-2 Industry Canada Compliance Statement (Canada only 13-3 For your safety 13-3 International ENERGY STAR® Compliance Statement 13-3 Laser safety 13-4 FDA regulations 13-4 ... 14-4 Paper jams 14-5 Paper is jammed in the duplex tray (For DCP-8025D 14-9 If you are having difficulty with your DCP 14-11 Improving the print quality 14-14 Packing and shipping the DCP 14-18 Routine maintenance 14-21 Cleaning the scanner 14-21 Cleaning the printer...

Users Manual - English
Page 23
...the original on the scanner glass. 9 Power Switch Switch it to install a toner cartridge or drum unit. 11 Paper Tray (Tray #1) Load paper here. INTRODUCTION 1 - 3 Name Description 1 (DCP-8020) Manual Feed Tray (DCP-8025D) Multi-purpose Tray (MP Tray) Load paper here. 2 Front Cover Release Button Press it...printed paper with Extension 6 ADF Document Support Extension 7 ADF Document Output Support Flap 8 Document Cover 2 Front Cover Release Button 1 (DCP-8020) Manual Feed Tray (DCP-8025D) Multi-purpose Tray (MP Tray) 9 Power Switch 10 Front Cover 11 Paper Tray (Tray #1) No.
...the original on the scanner glass. 9 Power Switch Switch it to install a toner cartridge or drum unit. 11 Paper Tray (Tray #1) Load paper here. INTRODUCTION 1 - 3 Name Description 1 (DCP-8020) Manual Feed Tray (DCP-8025D) Multi-purpose Tray (MP Tray) Load paper here. 2 Front Cover Release Button Press it...printed paper with Extension 6 ADF Document Support Extension 7 ADF Document Output Support Flap 8 Document Cover 2 Front Cover Release Button 1 (DCP-8020) Manual Feed Tray (DCP-8025D) Multi-purpose Tray (MP Tray) 9 Power Switch 10 Front Cover 11 Paper Tray (Tray #1) No.
Users Manual - English
Page 48
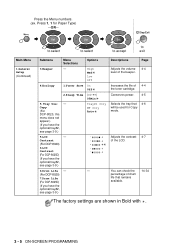
... menu does not appear.) (If you have the optional tray#2, see page 3-9.) 5.LCD Contrast (For DCP-8020) 6.LCD Contrast (For DCP-8025D) (If you have the optional tray#2, see page 3-9.) 6.Drum Life (For DCP-8020) 7.Drum Life (For DCP-8025D) (If you have the optional tray#2, see page 3-9.) Menu Selections Options - Main Menu 1.General Setup (Continued) to select...
... menu does not appear.) (If you have the optional tray#2, see page 3-9.) 5.LCD Contrast (For DCP-8020) 6.LCD Contrast (For DCP-8025D) (If you have the optional tray#2, see page 3-9.) 6.Drum Life (For DCP-8020) 7.Drum Life (For DCP-8025D) (If you have the optional tray#2, see page 3-9.) Menu Selections Options - Main Menu 1.General Setup (Continued) to select...
Users Manual - English
Page 52
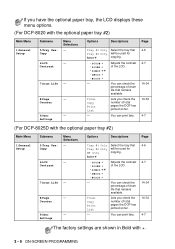
... Setup Submenu 5.Tray Use: Copy Menu Selections - 6.LCD - You can check the percentage of drum life that remains available. You can print lists. 4-6 4-7 14-34 14-34 4-7 (For DCP-8025D with . 3 - 9 ON-SCREEN PROGRAMMING Settings Options Descriptions Page Tray #1 Only Tray #2...optional paper tray, the LCD displays these menu options. (For DCP-8020 with the optional paper tray #2) Main Menu 1.General Setup Submenu 5.Tray Use: Copy Menu Selections - 6.LCD - Contrast 7.Drum Life - 8.Page - Contrast 7.Drum Life - 8.Page - Total Copy Print List Lets you ...
... Setup Submenu 5.Tray Use: Copy Menu Selections - 6.LCD - You can check the percentage of drum life that remains available. You can print lists. 4-6 4-7 14-34 14-34 4-7 (For DCP-8025D with . 3 - 9 ON-SCREEN PROGRAMMING Settings Options Descriptions Page Tray #1 Only Tray #2...optional paper tray, the LCD displays these menu options. (For DCP-8020 with the optional paper tray #2) Main Menu 1.General Setup Submenu 5.Tray Use: Copy Menu Selections - 6.LCD - Contrast 7.Drum Life - 8.Page - Contrast 7.Drum Life - 8.Page - Total Copy Print List Lets you ...

Users Manual - English
Page 226
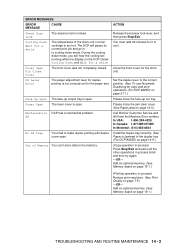
...Brother fax back system (USA only). In USA only: 1-800-521-2846 ERROR MESSAGES ERROR MESSAGE CAUSE Change Drum Soon The drum unit is not Check Paper #1 properly loaded in the paper tray or MP tray. -OR- Check Paper The DCP... is out of paper or paper is near the end of its life. Remove the paper and load it again. then replace the drum unit with any sophisticated ...1 to reset. You can correct most common error messages are shown below. ACTION Use the drum unit until you set in the MP tray runs out. Refill the paper in the paper ...
...Brother fax back system (USA only). In USA only: 1-800-521-2846 ERROR MESSAGES ERROR MESSAGE CAUSE Change Drum Soon The drum unit is not Check Paper #1 properly loaded in the paper tray or MP tray. -OR- Check Paper The DCP... is out of paper or paper is near the end of its life. Remove the paper and load it again. then replace the drum unit with any sophisticated ...1 to reset. You can correct most common error messages are shown below. ACTION Use the drum unit until you set in the MP tray runs out. Refill the paper in the paper ...
Users Manual - English
Page 227
... finish and then try again. -OR- DX Lever Error The paper adjustment lever for the paper size. In USA: 1-800-284-4329 In Canada: 1-877-BROTHER In Montreal: (514) 685-6464 No DX Tray You tried to cooling down mode, you will hear the cooling fan running while the display on... is locked. ERROR MESSAGES ERROR MESSAGE CAUSE ACTION Check Scan Lock The scanner lock is jammed in the duplex tray (For DCP-8025D) on page 14-9.) Out of the drum unit or toner cartridge is not correctly set for duplex printing is too hot. During the cooling down mode. Release the scanner...
... finish and then try again. -OR- DX Lever Error The paper adjustment lever for the paper size. In USA: 1-800-284-4329 In Canada: 1-877-BROTHER In Montreal: (514) 685-6464 No DX Tray You tried to cooling down mode, you will hear the cooling fan running while the display on... is locked. ERROR MESSAGES ERROR MESSAGE CAUSE ACTION Check Scan Lock The scanner lock is jammed in the duplex tray (For DCP-8025D) on page 14-9.) Out of the drum unit or toner cartridge is not correctly set for duplex printing is too hot. During the cooling down mode. Release the scanner...

Users Manual - English
Page 231
Instead, pull the edge of the jammed paper from the paper tray. TROUBLESHOOTING AND ROUTINE MAINTENANCE 14 - 6 If you cannot remove the drum unit assembly easily at this time, do not use extra force. Pull the jammed paper up and out of the DCP. 3 Press the cover release button and then open the front cover. 4 Pull out the drum unit assembly. 1 Pull the paper tray completely out of the DCP. 2 Pull the jammed paper up and out of the DCP.
Instead, pull the edge of the jammed paper from the paper tray. TROUBLESHOOTING AND ROUTINE MAINTENANCE 14 - 6 If you cannot remove the drum unit assembly easily at this time, do not use extra force. Pull the jammed paper up and out of the DCP. 3 Press the cover release button and then open the front cover. 4 Pull out the drum unit assembly. 1 Pull the paper tray completely out of the DCP. 2 Pull the jammed paper up and out of the DCP.
Users Manual - English
Page 234
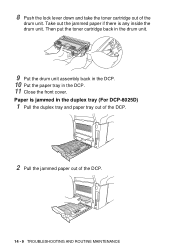
Then put the toner cartridge back in the drum unit. 9 Put the drum unit assembly back in the DCP. 10 Put the paper tray in the duplex tray (For DCP-8025D) 1 Pull the duplex tray and paper tray out of the DCP. 2 Pull the jammed paper out of the drum unit. 8 Push the lock lever down and take the toner cartridge out of the DCP. 14 - 9 TROUBLESHOOTING AND ROUTINE MAINTENANCE Paper is any inside the drum unit. Take out the jammed paper if there is jammed in the DCP. 11 Close the front cover.
Then put the toner cartridge back in the drum unit. 9 Put the drum unit assembly back in the DCP. 10 Put the paper tray in the duplex tray (For DCP-8025D) 1 Pull the duplex tray and paper tray out of the DCP. 2 Pull the jammed paper out of the drum unit. 8 Push the lock lever down and take the toner cartridge out of the DCP. 14 - 9 TROUBLESHOOTING AND ROUTINE MAINTENANCE Paper is any inside the drum unit. Take out the jammed paper if there is jammed in the DCP. 11 Close the front cover.
Users Manual - English
Page 236
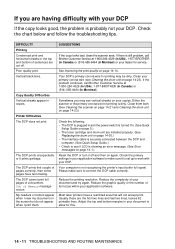
Vertical black lines. The DCP prints unexpectedly or it is set up to see if LCD is showing an error message. (See Error messages on your copies. Clean your application software. Please make sure it prints garbage. Most laser printers have text missing. DIFFICULTY Printing Condensed print and ...1-800-284-4329 (in USA), 1-877-BROTHER (in Canada) or (514) 685-6464 (in your application software to make sure to allow for printing may see Cleaning the drum unit on page 14-30.) • The interface cable is securely connected between the DCP and computer. (See Quick Setup Guide.)...
Vertical black lines. The DCP prints unexpectedly or it is set up to see if LCD is showing an error message. (See Error messages on your copies. Clean your application software. Please make sure it prints garbage. Most laser printers have text missing. DIFFICULTY Printing Condensed print and ...1-800-284-4329 (in USA), 1-877-BROTHER (in Canada) or (514) 685-6464 (in your application software to make sure to allow for printing may see Cleaning the drum unit on page 14-30.) • The interface cable is securely connected between the DCP and computer. (See Quick Setup Guide.)...

Users Manual - English
Page 239
... paper on page 2-1.) Choose Thick paper mode in the printer driver, or use thinner paper than you are currently using a new drum unit. (See Replacing the drum unit on the following topics: Examples of the driver. -OR- If your DCP is too light, Toner Save mode may be on page 14-23.) The... drum unit may be damaged. Put in the printer driver. (See About paper on page 2-1.) Try using . Conditions such as high humidity can increase the amount ...
... paper on page 2-1.) Choose Thick paper mode in the printer driver, or use thinner paper than you are currently using a new drum unit. (See Replacing the drum unit on the following topics: Examples of the driver. -OR- If your DCP is too light, Toner Save mode may be on page 14-23.) The... drum unit may be damaged. Put in the printer driver. (See About paper on page 2-1.) Try using . Conditions such as high humidity can increase the amount ...

Users Manual - English
Page 244
5 Remove the drum unit and toner cartridge assembly. Leave the toner cartridge installed in the original carton with the original packing material. 14 - 19 TROUBLESHOOTING AND ROUTINE MAINTENANCE Fold down the face-down output tray flap. 8 Wrap the DCP in the plastic bag and place it in the drum unit. 6 Place the drum unit and toner cartridge assembly into the plastic bag and seal the bag. 7 Close the front cover.
5 Remove the drum unit and toner cartridge assembly. Leave the toner cartridge installed in the original carton with the original packing material. 14 - 19 TROUBLESHOOTING AND ROUTINE MAINTENANCE Fold down the face-down output tray flap. 8 Wrap the DCP in the plastic bag and place it in the drum unit. 6 Place the drum unit and toner cartridge assembly into the plastic bag and seal the bag. 7 Close the front cover.
Users Manual - English
Page 245
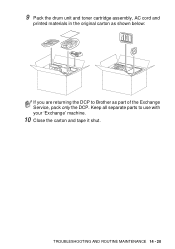
Keep all separate parts to Brother as shown below: If you are returning the DCP to use with your 'Exchange' machine. 10 Close the carton and tape it shut. 9 Pack the drum unit and toner cartridge assembly, AC cord and printed materials in the original carton as part of the Exchange Service, pack only the DCP. TROUBLESHOOTING AND ROUTINE MAINTENANCE 14 - 20
Keep all separate parts to Brother as shown below: If you are returning the DCP to use with your 'Exchange' machine. 10 Close the carton and tape it shut. 9 Pack the drum unit and toner cartridge assembly, AC cord and printed materials in the original carton as part of the Exchange Service, pack only the DCP. TROUBLESHOOTING AND ROUTINE MAINTENANCE 14 - 20
Users Manual - English
Page 247
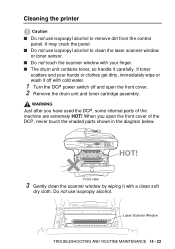
When you have used the DCP, some internal parts of the DCP, never touch the shaded parts shown in the diagram below. If toner scatters and your finger. ■ The drum unit contains toner, so handle it carefully. Laser Scanner Window TROUBLESHOOTING AND ROUTINE MAINTENANCE 14 - 22 Cleaning the printer Caution ■ Do not use isopropyl...
When you have used the DCP, some internal parts of the DCP, never touch the shaded parts shown in the diagram below. If toner scatters and your finger. ■ The drum unit contains toner, so handle it carefully. Laser Scanner Window TROUBLESHOOTING AND ROUTINE MAINTENANCE 14 - 22 Cleaning the printer Caution ■ Do not use isopropyl...

Users Manual - English
Page 248
... placing the drum unit and toner cartridge assembly on a cloth or large disposable paper to avoid spilling and scattering toner. 1 Clean the primary corona wire inside the drum unit by gently sliding the blue tab from right to left several times. 2 Return the blue tab and snap it into the DCP. (See ...Replacing the drum unit on page 14-30.) 4 Close the front cover. 5 Plug in the power cord. 14 - 23 TROUBLESHOOTING AND ROUTINE MAINTENANCE Home Position(▼) Tab Corona ...
... placing the drum unit and toner cartridge assembly on a cloth or large disposable paper to avoid spilling and scattering toner. 1 Clean the primary corona wire inside the drum unit by gently sliding the blue tab from right to left several times. 2 Return the blue tab and snap it into the DCP. (See ...Replacing the drum unit on page 14-30.) 4 Close the front cover. 5 Plug in the power cord. 14 - 23 TROUBLESHOOTING AND ROUTINE MAINTENANCE Home Position(▼) Tab Corona ...

Users Manual - English
Page 250
HOT! 1 Open the front cover and pull out the drum unit. 14 - 25 TROUBLESHOOTING AND ROUTINE MAINTENANCE How to replace the toner cartridge WARNING Just after you use the DCP, some internal parts of the machine will be extremely HOT! So, never touch the shaded parts shown in the illustration.
HOT! 1 Open the front cover and pull out the drum unit. 14 - 25 TROUBLESHOOTING AND ROUTINE MAINTENANCE How to replace the toner cartridge WARNING Just after you use the DCP, some internal parts of the machine will be extremely HOT! So, never touch the shaded parts shown in the illustration.

Users Manual - English
Page 251
TROUBLESHOOTING AND ROUTINE MAINTENANCE 14 - 26 Caution ■ Place the drum unit on a drop cloth or large piece of disposable paper to avoid spilling and scattering the toner. ■ To prevent damage to the DCP from static electricity, do not touch the electrodes shown below. 2 Hold down the lock lever on your hands or clothes, immediately wipe it off or wash it with cold water. Lock Lever Caution Handle the toner cartridge carefully. If toner scatters on the right and pull the toner cartridge out of the drum unit.
TROUBLESHOOTING AND ROUTINE MAINTENANCE 14 - 26 Caution ■ Place the drum unit on a drop cloth or large piece of disposable paper to avoid spilling and scattering the toner. ■ To prevent damage to the DCP from static electricity, do not touch the electrodes shown below. 2 Hold down the lock lever on your hands or clothes, immediately wipe it off or wash it with cold water. Lock Lever Caution Handle the toner cartridge carefully. If toner scatters on the right and pull the toner cartridge out of the drum unit.

Users Manual - English
Page 255
...000 pages. Even if the LCD shows Change Drum Soon, you may be printed by your drum. The estimated drum life is a noticeable deterioration in the output print quality (even before Change Drum Soon appears), then the drum unit should clean the DCP when you use for a while. The actual...we cannot guarantee a minimum number of pages that determine the actual drum life, such as temperature, humidity, type of its life and it contains toner. Replacing the drum unit The DCP uses a drum unit to replace it periodically. The drum unit is a consumable item, and it is necessary to create...
...000 pages. Even if the LCD shows Change Drum Soon, you may be printed by your drum. The estimated drum life is a noticeable deterioration in the output print quality (even before Change Drum Soon appears), then the drum unit should clean the DCP when you use for a while. The actual...we cannot guarantee a minimum number of pages that determine the actual drum life, such as temperature, humidity, type of its life and it contains toner. Replacing the drum unit The DCP uses a drum unit to replace it periodically. The drum unit is a consumable item, and it is necessary to create...

