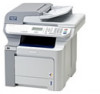
Software Users Manual - English
Page 14
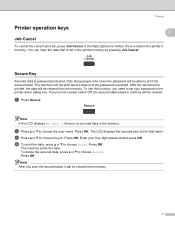
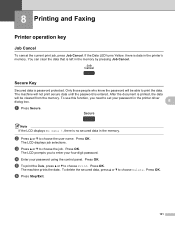
... the printer driver dialog box. The LCD displays the secured jobs list for that is printed, the data will be able to set your four-digit password and press OK. c Press a or b to choose Delete. Press OK. Note After you need to print the secured data. Press OK. Note If the...
... the printer driver dialog box. The LCD displays the secured jobs list for that is printed, the data will be able to set your four-digit password and press OK. c Press a or b to choose Delete. Press OK. Note After you need to print the secured data. Press OK. Note If the...
Software Users Manual - English
Page 66
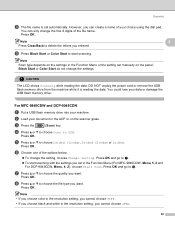
... USB. Press OK and go to start scanning with the settings you set in the resolution setting, you entered. Press OK. For MFC-9840CDW and DCP-9045CDN 2 a Put a USB flash memory drive into your data or damage the USB flash memory drive. c Press the (Scan) key. g Press a or b ...digits of the options below. „ To change the settings. DO NOT unplug the power cord or remove the USB flash memory drive from the machine while it is set manually on the scanner glass. However, you choose black and white in the Function Menu (For MFC-9840CDW, Menu, 5, 2 and For DCP-9045CDN...
... USB. Press OK and go to start scanning with the settings you set in the resolution setting, you entered. Press OK. For MFC-9840CDW and DCP-9045CDN 2 a Put a USB flash memory drive into your data or damage the USB flash memory drive. c Press the (Scan) key. g Press a or b ...digits of the options below. „ To change the settings. DO NOT unplug the power cord or remove the USB flash memory drive from the machine while it is set manually on the scanner glass. However, you choose black and white in the Function Menu (For MFC-9840CDW, Menu, 5, 2 and For DCP-9045CDN...
Software Users Manual - English
Page 67
..., you entered. Press OK. CAUTION The LCD shows Scanning while reading the data. For DCP-9045CDN, press Menu, 4, 2, 1. d Press Stop/Exit. 60 Note Scan type depends on the panel, Black Start or Color Start do not change the first 6 digits of the file name. You can create a name of the following: „ For...
..., you entered. Press OK. CAUTION The LCD shows Scanning while reading the data. For DCP-9045CDN, press Menu, 4, 2, 1. d Press Stop/Exit. 60 Note Scan type depends on the panel, Black Start or Color Start do not change the first 6 digits of the file name. You can create a name of the following: „ For...

Software Users Manual - English
Page 101
.... The default setting is your PC name in the Pin number and Retype Pin number field. e If you want to avoid receiving unwanted documents, enter a 4-digit PIN number in the Display Name field.
.... The default setting is your PC name in the Pin number and Retype Pin number field. e If you want to avoid receiving unwanted documents, enter a 4-digit PIN number in the Display Name field.
Software Users Manual - English
Page 103
... b to Step f. If the LCD prompts you can choose PDF or TIFF for Black and White and PDF or JPEG for E-mailing your machine is DCP-9045CDN, go to choose 1sided, 2sided (L)edge or 2sided (S)edge. Note • Scan type depends on the settings on the Device Button tab, Black Start ...can scan a black and white or color document and send it directly to choose the destination PC you want to enter a PIN number, enter the 4-digit PIN number for the destination PC on the Device Button tab of the ControlCenter3 configuration. (See SCAN on your document layout. b Press (Scan). Press OK...
... b to Step f. If the LCD prompts you can choose PDF or TIFF for Black and White and PDF or JPEG for E-mailing your machine is DCP-9045CDN, go to choose 1sided, 2sided (L)edge or 2sided (S)edge. Note • Scan type depends on the settings on the Device Button tab, Black Start ...can scan a black and white or color document and send it directly to choose the destination PC you want to enter a PIN number, enter the 4-digit PIN number for the destination PC on the Device Button tab of the ControlCenter3 configuration. (See SCAN on your document layout. b Press (Scan). Press OK...
Software Users Manual - English
Page 105
If your machine is an MFC-9440CN or DCP-9040CN, go to Step d. Press OK. Press OK. Note • Scan type depends on the settings on the Device Button tab, Black Start or Color ... the LCD prompts you to enter a PIN number, enter the 4-digit PIN number for the destination PC on your network. c Press a or b to choose Scan to choose 1sided, 2sided (L)edge or 2sided (S)edge. If your machine is an MFC-9840CDW or DCP-9045CDN, go to Step e. f Press Black Start or Color Start. Network...
If your machine is an MFC-9440CN or DCP-9040CN, go to Step d. Press OK. Press OK. Note • Scan type depends on the settings on the Device Button tab, Black Start or Color ... the LCD prompts you to enter a PIN number, enter the 4-digit PIN number for the destination PC on your network. c Press a or b to choose Scan to choose 1sided, 2sided (L)edge or 2sided (S)edge. If your machine is an MFC-9840CDW or DCP-9045CDN, go to Step e. f Press Black Start or Color Start. Network...

Software Users Manual - English
Page 106
If your machine is an MFC-9840CDW or DCP-9045CDN, go to Step d. Note If you want to send to enter a PIN number, enter the 4-digit PIN number for viewing and editing from a word processing application on the designated PC. If the LCD prompts you to . You can change the settings. &#... white, choose black and white in the ADF, or face down on your document layout. Press OK. If your machine is an MFC-9440CN or DCP-9040CN, go to Step e. e Press a or b to choose the destination PC you want to scan a document using the duplex scanning feature, you need to choose...
If your machine is an MFC-9840CDW or DCP-9045CDN, go to Step d. Note If you want to send to enter a PIN number, enter the 4-digit PIN number for viewing and editing from a word processing application on the designated PC. If the LCD prompts you to . You can change the settings. &#... white, choose black and white in the ADF, or face down on your document layout. Press OK. If your machine is an MFC-9440CN or DCP-9040CN, go to Step e. e Press a or b to choose the destination PC you want to scan a document using the duplex scanning feature, you need to choose...

Software Users Manual - English
Page 107
... OK. If your machine is an MFC-9440CN or DCP-9040CN, go to Step e. If your machine is an MFC-9840CDW or DCP-9045CDN, go to Step d. e Press a or b to choose the destination PC you want to send to enter a PIN number, enter the 4-digit PIN number for the destination PC on the Device...
... OK. If your machine is an MFC-9440CN or DCP-9040CN, go to Step e. If your machine is an MFC-9840CDW or DCP-9045CDN, go to Step d. e Press a or b to choose the destination PC you want to send to enter a PIN number, enter the 4-digit PIN number for the destination PC on the Device...

Software Users Manual - English
Page 109
... folder where your FTP server and network firewall configuration. You can set Passive Mode to OFF or ON depending on the FTP server (for example 4 /brother/abc/) (up to 15 characters. i You can also manually enter a File Name up to 60 characters). The file name that has been registered with... that will be stored on your document will be up to 32 characters). You can be the file name you selected plus the last 6 digits of the flatbed/ADF scanner counter plus the file extension (For example, Estimate098765.pdf). The default for this setting is the domain name of ...
... folder where your FTP server and network firewall configuration. You can set Passive Mode to OFF or ON depending on the FTP server (for example 4 /brother/abc/) (up to 15 characters. i You can also manually enter a File Name up to 60 characters). The file name that has been registered with... that will be stored on your document will be up to 32 characters). You can be the file name you selected plus the last 6 digits of the flatbed/ADF scanner counter plus the file extension (For example, Estimate098765.pdf). The default for this setting is the domain name of ...
Software Users Manual - English
Page 138
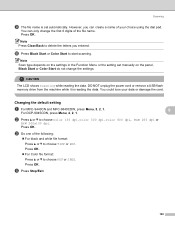
... Secure. The LCD displays job selections. Only those people who know the password will be able to print the data. Press OK. d Enter your four-digit password. b Press a or b to choose Delete. Press OK. To delete the secured data, press a or b to choose the user name. The machine will not print...
... Secure. The LCD displays job selections. Only those people who know the password will be able to print the data. Press OK. d Enter your four-digit password. b Press a or b to choose Delete. Press OK. To delete the secured data, press a or b to choose the user name. The machine will not print...
Software Users Manual - English
Page 174
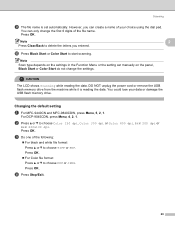
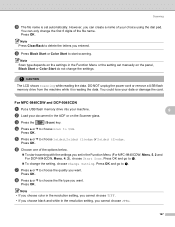
...in the resolution setting, you cannot choose TIFF. • If you choose black and white in the Function Menu (For MFC-9840CDW, Menu, 5, 2 and For DCP-9045CDN, Menu, 4, 2), choose Start Scan. Note Press Clear/Back to g. CAUTION The LCD shows Scanning while reading the data. f Choose one of the options below.... 2sided (S)edge. Press OK. Press OK. However, you set manually on the panel, Black Start or Color Start do not change the first 6 digits of your data or damage the card. Press OK and go to delete the letters you cannot choose JPEG. 167 Press OK. Note Scan type...
...in the resolution setting, you cannot choose TIFF. • If you choose black and white in the Function Menu (For MFC-9840CDW, Menu, 5, 2 and For DCP-9045CDN, Menu, 4, 2), choose Start Scan. Note Press Clear/Back to g. CAUTION The LCD shows Scanning while reading the data. f Choose one of the options below.... 2sided (S)edge. Press OK. Press OK. However, you set manually on the panel, Black Start or Color Start do not change the first 6 digits of your data or damage the card. Press OK and go to delete the letters you cannot choose JPEG. 167 Press OK. Note Scan type...
Software Users Manual - English
Page 175
... a USB flash memory drive from the machine while it is set manually on the panel, Black Start or Color Start do not change the first 6 digits of the following: „ For black and white file format: Press a or b to choose Color 150 dpi, Color 300 dpi, Color 600 dpi, B&W 200 dpi... on the settings in the Function Menu or the setting set automatically. Changing the default setting 9 a For MFC-9440CN and MFC-9840CDW, press Menu, 5, 2, 1. 9 For DCP-9045CDN, press Menu, 4, 2, 1.
... a USB flash memory drive from the machine while it is set manually on the panel, Black Start or Color Start do not change the first 6 digits of the following: „ For black and white file format: Press a or b to choose Color 150 dpi, Color 300 dpi, Color 600 dpi, B&W 200 dpi... on the settings in the Function Menu or the setting set automatically. Changing the default setting 9 a For MFC-9440CN and MFC-9840CDW, press Menu, 5, 2, 1. 9 For DCP-9045CDN, press Menu, 4, 2, 1.
Software Users Manual - English
Page 201
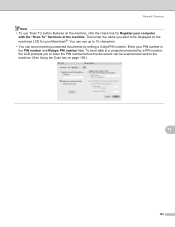
... 15 characters. • You can be scanned and sent to be displayed on page 195.) 11 194 To send data to a computer protected by setting a 4-digit PIN number. Then enter the name you to enter the PIN number before the document can avoid receiving unwanted documents by a PIN number, the LCD...
... 15 characters. • You can be scanned and sent to be displayed on page 195.) 11 194 To send data to a computer protected by setting a 4-digit PIN number. Then enter the name you to enter the PIN number before the document can avoid receiving unwanted documents by a PIN number, the LCD...
Software Users Manual - English
Page 203
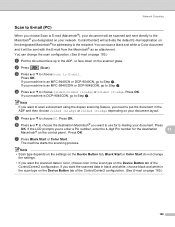
... to the recipient. If the LCD prompts you to enter a Pin number, enter the 4-digit Pin number for the destination 11 Macintosh® on the designated Macintosh® for E-mailing your machine is an MFC-9840CDW or DCP-9045CDN, go to Step f. Press OK. g Press Black Start or Color Start. The machine starts... choose Scan to E-mail (Macintosh®), your document will be sent with the E-mail from the Macintosh® as an attachment. If your machine is DCP-9045CDN, go to choose PC. If your document. d Press a or b to E-mail. e Press a or b to Step d. Press OK.
... to the recipient. If the LCD prompts you to enter a Pin number, enter the 4-digit Pin number for the destination 11 Macintosh® on the designated Macintosh® for E-mailing your machine is an MFC-9840CDW or DCP-9045CDN, go to Step f. Press OK. g Press Black Start or Color Start. The machine starts... choose Scan to E-mail (Macintosh®), your document will be sent with the E-mail from the Macintosh® as an attachment. If your machine is DCP-9045CDN, go to choose PC. If your document. d Press a or b to E-mail. e Press a or b to Step d. Press OK.
Software Users Manual - English
Page 205
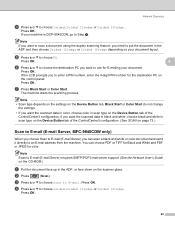
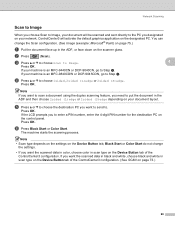
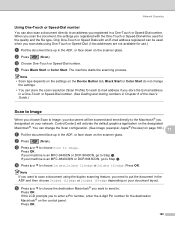
... Scan to Image 11 When you designated on your network. b Press (Scan). If your machine is an MFC-9440CN or DCP-9040CN, go to Step d. Press OK. Press OK. Only One-Touch or Speed Dials with the One-Touch or Speed...-Dial will be used when you to enter a Pin number, enter the 4-digit Pin number for the destination Macintosh® on the control panel. d Press a or b to Image. Network Scanning Using... Black Start or Color Start. Press OK. If your machine is an MFC-9840CDW or DCP-9045CDN, go to Step e. Press OK. 198
... Scan to Image 11 When you designated on your network. b Press (Scan). If your machine is an MFC-9440CN or DCP-9040CN, go to Step d. Press OK. Press OK. Only One-Touch or Speed Dials with the One-Touch or Speed...-Dial will be used when you to enter a Pin number, enter the 4-digit Pin number for the destination Macintosh® on the control panel. d Press a or b to Image. Network Scanning Using... Black Start or Color Start. Press OK. If your machine is an MFC-9840CDW or DCP-9045CDN, go to Step e. Press OK. 198
Software Users Manual - English
Page 206
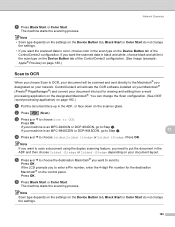
If your machine is an MFC-9840CDW or DCP-9045CDN, go to OCR. Press OK. f Press Black Start or Color Start. c Press a or b to choose Scan to Step e. Press OK. If you want to scan a ... installed on your Macintosh® (Presto!® PageManager®) and convert your machine is an MFC-9440CN or DCP-9040CN, go to Step d. 11 d Press a or b to enter a Pin number, enter the 4-digit Pin number for viewing and editing from a word processing application on the Device Button tab of the ControlCenter2 configuration...
If your machine is an MFC-9840CDW or DCP-9045CDN, go to OCR. Press OK. f Press Black Start or Color Start. c Press a or b to choose Scan to Step e. Press OK. If you want to scan a ... installed on your Macintosh® (Presto!® PageManager®) and convert your machine is an MFC-9440CN or DCP-9040CN, go to Step d. 11 d Press a or b to enter a Pin number, enter the 4-digit Pin number for viewing and editing from a word processing application on the Device Button tab of the ControlCenter2 configuration...
Software Users Manual - English
Page 207
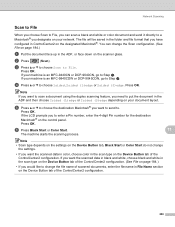
...then choose 2sided (L)edge or 2sided (S)edge depending on your machine is an MFC-9840CDW or DCP-9045CDN, go to File. Note • Scan type depends on the settings on the Device Button...to scan a document using the duplex scanning feature, you need to enter a Pin number, enter the 4-digit Pin number for the destination Macintosh® on the control panel. f Press Black Start or Color Start....the destination Macintosh® you have configured in ControlCenter2 on your machine is an MFC-9440CN or DCP-9040CN, go to change the file name of scanned documents, enter the file name in File ...
...then choose 2sided (L)edge or 2sided (S)edge depending on your machine is an MFC-9840CDW or DCP-9045CDN, go to File. Note • Scan type depends on the settings on the Device Button...to scan a document using the duplex scanning feature, you need to enter a Pin number, enter the 4-digit Pin number for the destination Macintosh® on the control panel. f Press Black Start or Color Start....the destination Macintosh® you have configured in ControlCenter2 on your machine is an MFC-9440CN or DCP-9040CN, go to change the file name of scanned documents, enter the file name in File ...
Software Users Manual - English
Page 209
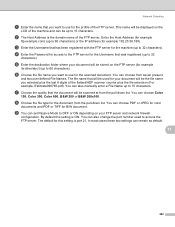
d Enter the Password for access to the FTP server for your document will be the file name you selected plus the last 6 digits of the machine and can be scanned at from the pull-down list. You can remain as default. 11 202 i You can set Passive Mode ..., Color 300, Color 600, B&W 200 or B&W 200x100. By default this setting is ON. Network Scanning a Enter the name that you want to use for example /brother/abc/) (up to 60 characters). This name will be used to 60 characters) or the IP address (for B/W document. e Enter the destination folder where your...
d Enter the Password for access to the FTP server for your document will be the file name you selected plus the last 6 digits of the machine and can be scanned at from the pull-down list. You can remain as default. 11 202 i You can set Passive Mode ..., Color 300, Color 600, B&W 200 or B&W 200x100. By default this setting is ON. Network Scanning a Enter the name that you want to use for example /brother/abc/) (up to 60 characters). This name will be used to 60 characters) or the IP address (for B/W document. e Enter the destination folder where your...
Network Users Manual - English
Page 18
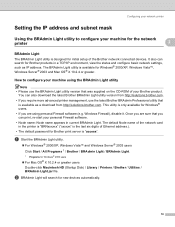
...re-start your personal Firewall software. • Node name: Node name appears in the printer is "BRNxxxxxx" ("xxxxxx" is the last six digits of the network card in current BRAdmin Light. Once you are using personal Firewall software (e.g. Windows Firewall), disable it. b BRAdmin Light will...® 2000 users „ For Mac OS® X 10.2.4 or greater users Double-click Macintosh HD (Startup Disk) / Library / Printers / Brother / Utilities / BRAdmin Light.jar file. How to configure your machine for the network printer 2 2 BRAdmin Light 2 The BRAdmin Light utility is available ...
...re-start your personal Firewall software. • Node name: Node name appears in the printer is "BRNxxxxxx" ("xxxxxx" is the last six digits of the network card in current BRAdmin Light. Once you are using personal Firewall software (e.g. Windows Firewall), disable it. b BRAdmin Light will...® 2000 users „ For Mac OS® X 10.2.4 or greater users Double-click Macintosh HD (Startup Disk) / Library / Printers / Brother / Utilities / BRAdmin Light.jar file. How to configure your machine for the network printer 2 2 BRAdmin Light 2 The BRAdmin Light utility is available ...

Network Users Manual - English
Page 22
... of the print server. The NetBIOS name assigned is the first 15 characters of the Ethernet address. If a different web browser is the last six digits of the node name and by default it is compatible with HTTP 1.0 and HTTP 1.1. • To use . c Enter a user name and a password. Configuring your network...
... of the print server. The NetBIOS name assigned is the first 15 characters of the Ethernet address. If a different web browser is the last six digits of the node name and by default it is compatible with HTTP 1.0 and HTTP 1.1. • To use . c Enter a user name and a password. Configuring your network...


