Network Users Manual - English
Page 127
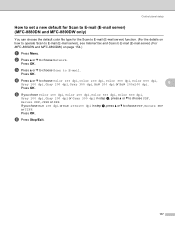
... or B&W 200x100 dpi in step d, press a or b to E-mail. Press OK. Press OK. Press OK. c Press a or b to choose Scan to choose PDF, Secure PDF, JPEG or XPS. d Press a or b to choose PDF, Secure PDF or TIFF. If you chose Color 100 dpi, Color 200 dpi, Color 300 dpi, Color 600 dpi, Gray 100 dpi... 200 dpi, Gray 300 dpi, B&W 200 dpi or B&W 200x100 dpi. 6 Press OK. f Press Stop/Exit. 117 Control panel setup How to set a new default for Scan to E-mail (E-mail server) (MFC-8880DN and MFC-8890DW only) 6 You can choose the default color file type for the...
... or B&W 200x100 dpi in step d, press a or b to E-mail. Press OK. Press OK. Press OK. c Press a or b to choose Scan to choose PDF, Secure PDF, JPEG or XPS. d Press a or b to choose PDF, Secure PDF or TIFF. If you chose Color 100 dpi, Color 200 dpi, Color 300 dpi, Color 600 dpi, Gray 100 dpi... 200 dpi, Gray 300 dpi, B&W 200 dpi or B&W 200x100 dpi. 6 Press OK. f Press Stop/Exit. 117 Control panel setup How to set a new default for Scan to E-mail (E-mail server) (MFC-8880DN and MFC-8890DW only) 6 You can choose the default color file type for the...

Network Users Manual - English
Page 128
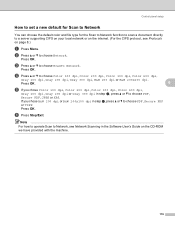
... B&W 200x100 dpi. Press OK. e If you chose B&W 200 dpi or B&W 200x100 dpi in step d, press a or b to choose PDF, Secure PDF, JPEG or XPS. b Press a or b to FTP. c Press a or b to choose Scan to choose Network. If you chose Color 100 dpi, Color 200 dpi, Color 300 dpi, Color 600 dpi, 6 Gray... 100 dpi, Gray 200 dpi or Gray 300 dpi in step d, press a or b to FTP, see Network Scanning in the Software User's Guide on the CD-ROM we have provided with the machine. 118 f Press Stop/Exit. Note For how to operate Scan to choose PDF, Secure PDF or TIFF.
... B&W 200x100 dpi. Press OK. e If you chose B&W 200 dpi or B&W 200x100 dpi in step d, press a or b to choose PDF, Secure PDF, JPEG or XPS. b Press a or b to FTP. c Press a or b to choose Scan to choose Network. If you chose Color 100 dpi, Color 200 dpi, Color 300 dpi, Color 600 dpi, 6 Gray... 100 dpi, Gray 200 dpi or Gray 300 dpi in step d, press a or b to FTP, see Network Scanning in the Software User's Guide on the CD-ROM we have provided with the machine. 118 f Press Stop/Exit. Note For how to operate Scan to choose PDF, Secure PDF or TIFF.
Network Users Manual - English
Page 129
..., Gray 200 dpi or Gray 300 dpi in step d, press a or b to choose ScanTo Network. b Press a or b to choose PDF, Secure PDF or TIFF. f Press Stop/Exit. Note For how to operate Scan to Network, see Protocols on the CD-ROM we have provided with the machine. 119 Press OK. Control panel setup... How to set a new default for Scan to Network 6 You can choose the default color and file type for the Scan to...
..., Gray 200 dpi or Gray 300 dpi in step d, press a or b to choose ScanTo Network. b Press a or b to choose PDF, Secure PDF or TIFF. f Press Stop/Exit. Note For how to operate Scan to Network, see Protocols on the CD-ROM we have provided with the machine. 119 Press OK. Control panel setup... How to set a new default for Scan to Network 6 You can choose the default color and file type for the Scan to...

Network Users Manual - English
Page 172
...300 dpi, Color 600 dpi, Gray 100 dpi, Gray 200 dpi or Gray 300 dpi, go to choose PDF, Secure PDF or TIFF. Enter the destination E-mail address from the machine. c Press a or b to choose Scan to choose Enter Address. Press OK. f Press a or b to step i. Press OK and go ...Press OK. b Press (Scan). d Press a or b to step i. Press OK and go to step h. 13 g Press a or b to enter an address. i The LCD prompts you chose B&W 200 dpi or B&W 200x100 dpi, go to choose 2sided (L)edge, 2sided (S)edge or 1sided. Note You can choose PDF or TIFF for Black ...
...300 dpi, Color 600 dpi, Gray 100 dpi, Gray 200 dpi or Gray 300 dpi, go to choose PDF, Secure PDF or TIFF. Enter the destination E-mail address from the machine. c Press a or b to choose Scan to choose Enter Address. Press OK. f Press a or b to step i. Press OK and go ...Press OK. b Press (Scan). d Press a or b to step i. Press OK and go to step h. 13 g Press a or b to enter an address. i The LCD prompts you chose B&W 200 dpi or B&W 200x100 dpi, go to choose 2sided (L)edge, 2sided (S)edge or 1sided. Note You can choose PDF or TIFF for Black ...
Network Users Manual - English
Page 223
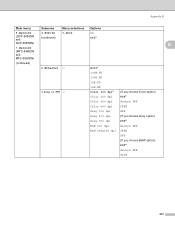
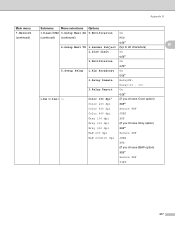
Auto* 100B-FD 100B-HD 10B-FD 3.Scan to FTP - 10B-HD Color 100 dpi* (If you choose Color option) Color 200 dpi PDF* Color 300 dpi Secure PDF Color 600 dpi JPEG Gray 100 dpi XPS Gray 200 dpi (If you choose Gray option) Gray 300 dpi PDF* B&W 200 dpi Secure PDF B&W 200x100 dpi JPEG XPS (If you choose B&W option) PDF* Secure PDF TIFF 213 Appendix B Main menu Submenu Menu selections Options 5.Network 1.TCP/IP 0.IPv6 On (DCP-8080DN and (continued) Off* DCP-8085DN) B 7.Network (MFC-8480DN and MFC-8680DN) (continued) 2.Ethernet -
Auto* 100B-FD 100B-HD 10B-FD 3.Scan to FTP - 10B-HD Color 100 dpi* (If you choose Color option) Color 200 dpi PDF* Color 300 dpi Secure PDF Color 600 dpi JPEG Gray 100 dpi XPS Gray 200 dpi (If you choose Gray option) Gray 300 dpi PDF* B&W 200 dpi Secure PDF B&W 200x100 dpi JPEG XPS (If you choose B&W option) PDF* Secure PDF TIFF 213 Appendix B Main menu Submenu Menu selections Options 5.Network 1.TCP/IP 0.IPv6 On (DCP-8080DN and (continued) Off* DCP-8085DN) B 7.Network (MFC-8480DN and MFC-8680DN) (continued) 2.Ethernet -
Network Users Manual - English
Page 227
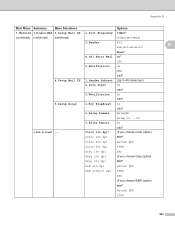
... Relay 1.Rly Broadcast On Off* 2.Relay Domain RelayXX: Relay(01 - 10) 3.Relay Report On 4.Scan to E-mail - Color 100 dpi* Off* (If you choose Color option) Color 200 dpi PDF* Color 300 dpi Secure PDF Color 600 dpi JPEG Gray 100 dpi XPS Gray 200 dpi (If you choose Gray option...) Gray 300 dpi PDF* B&W 200 dpi Secure PDF B&W 200x100 dpi JPEG XPS (If you choose B&W option) PDF* Secure PDF TIFF 217
... Relay 1.Rly Broadcast On Off* 2.Relay Domain RelayXX: Relay(01 - 10) 3.Relay Report On 4.Scan to E-mail - Color 100 dpi* Off* (If you choose Color option) Color 200 dpi PDF* Color 300 dpi Secure PDF Color 600 dpi JPEG Gray 100 dpi XPS Gray 200 dpi (If you choose Gray option...) Gray 300 dpi PDF* B&W 200 dpi Secure PDF B&W 200x100 dpi JPEG XPS (If you choose B&W option) PDF* Secure PDF TIFF 217

Network Users Manual - English
Page 228
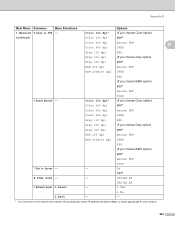
... IP address and Subnet Mask to Server - - Color 100 dpi* TIFF (If you choose Color option) Color 200 dpi PDF* Color 300 dpi Secure PDF Color 600 dpi JPEG Gray 100 dpi XPS Gray 200 dpi (If you choose Gray option) Gray 300 dpi...PDF B Color 600 dpi JPEG Gray 100 dpi XPS Gray 200 dpi (If you choose Gray option) Gray 300 dpi PDF* B&W 200 dpi Secure PDF B&W 200x100 dpi JPEG XPS (If you choose B&W option) PDF* Secure PDF 7.Fax to values appropriate for your network. 218 TIFF On 8.Time Zone - - Appendix B Main menu 7.Network Submenu Menu selections 5.Scan...
... IP address and Subnet Mask to Server - - Color 100 dpi* TIFF (If you choose Color option) Color 200 dpi PDF* Color 300 dpi Secure PDF Color 600 dpi JPEG Gray 100 dpi XPS Gray 200 dpi (If you choose Gray option) Gray 300 dpi...PDF B Color 600 dpi JPEG Gray 100 dpi XPS Gray 200 dpi (If you choose Gray option) Gray 300 dpi PDF* B&W 200 dpi Secure PDF B&W 200x100 dpi JPEG XPS (If you choose B&W option) PDF* Secure PDF 7.Fax to values appropriate for your network. 218 TIFF On 8.Time Zone - - Appendix B Main menu 7.Network Submenu Menu selections 5.Scan...
Network Users Manual - English
Page 233
... 600 dpi JPEG Gray 100 dpi XPS Gray 200 dpi (If you choose Gray option) Gray 300 dpi PDF* B&W 200 dpi Secure PDF B&W 200x100 dpi JPEG XPS (If you choose B&W option) PDF* Secure PDF TIFF 223 Appendix B Main Menu Submenu Menu Selections Options 7.Network 3.E-mail/IFAX 3.Setup Mail RX 2.Poll Frequency 10Min* (continued) (continued... to 40 characters) 2.Size Limit On Off* 3.Notification On Off* 5.Setup Relay 1.Rly Broadcast On Off* 2.Relay Domain RelayXX: Relay(01 - 10) 3.Relay Report On 4.Scan to E-mail -
... 600 dpi JPEG Gray 100 dpi XPS Gray 200 dpi (If you choose Gray option) Gray 300 dpi PDF* B&W 200 dpi Secure PDF B&W 200x100 dpi JPEG XPS (If you choose B&W option) PDF* Secure PDF TIFF 223 Appendix B Main Menu Submenu Menu Selections Options 7.Network 3.E-mail/IFAX 3.Setup Mail RX 2.Poll Frequency 10Min* (continued) (continued... to 40 characters) 2.Size Limit On Off* 3.Notification On Off* 5.Setup Relay 1.Rly Broadcast On Off* 2.Relay Domain RelayXX: Relay(01 - 10) 3.Relay Report On 4.Scan to E-mail -
Network Users Manual - English
Page 234
...* UTC+XX:XX 0.Network Reset 1.Reset - Appendix B Main Menu Submenu Menu Selections 7.Network 5.Scan to values appropriate for your network. 224 Color 100 dpi* TIFF (If you choose Color option) Color 200 dpi PDF* Color 300 dpi Secure PDF Color 600 dpi JPEG Gray 100 dpi XPS Gray 200 dpi (If you choose...
...* UTC+XX:XX 0.Network Reset 1.Reset - Appendix B Main Menu Submenu Menu Selections 7.Network 5.Scan to values appropriate for your network. 224 Color 100 dpi* TIFF (If you choose Color option) Color 200 dpi PDF* Color 300 dpi Secure PDF Color 600 dpi JPEG Gray 100 dpi XPS Gray 200 dpi (If you choose...
Software Users Manual - English
Page 57
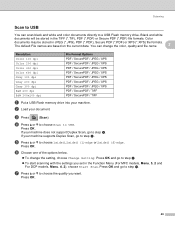
...drive into your machine does not support Duplex Scan, go to step j. Color documents may be stored in the TIFF (*.TIF), PDF (*.PDF) or Secure PDF (*.PDF) file formats. g Press a or b to choose the quality you set in JPEG (*.JPG), PDF (*.PDF), Secure PDF (*.PDF) or XPS (*.XPS) file formats. Press... c Press (Scan). Scanning Scan to USB 2 You can change the setting, choose Change Setting. The default File names are based on the current date. Press OK. Black and white documents will be stored in the Function Menu (For MFC models, Menu, 5, 2 and For DCP models, Menu...
...drive into your machine does not support Duplex Scan, go to step j. Color documents may be stored in the TIFF (*.TIF), PDF (*.PDF) or Secure PDF (*.PDF) file formats. g Press a or b to choose the quality you set in JPEG (*.JPG), PDF (*.PDF), Secure PDF (*.PDF) or XPS (*.XPS) file formats. Press... c Press (Scan). Scanning Scan to USB 2 You can change the setting, choose Change Setting. The default File names are based on the current date. Press OK. Black and white documents will be stored in the Function Menu (For MFC models, Menu, 5, 2 and For DCP models, Menu...
Software Users Manual - English
Page 58
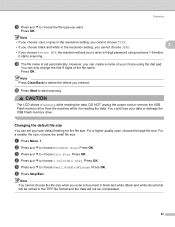
... default file size 2 You can only change the first 6 digits of your own default setting for the file size. Press OK. However, you choose Secure PDF, the machine will not be compressed. 50 For a smaller file size, choose the small file size. b Press a or b to choose 1.Color or 2.... b to choose the file type you to enter a 4 digit password using the dial pad. Press OK. You can set automatically. CAUTION The LCD shows Scanning while reading the data. You could lose your data or damage the USB Flash memory drive. a Press Menu, 1. e Press a or b to choose ...
... default file size 2 You can only change the first 6 digits of your own default setting for the file size. Press OK. However, you choose Secure PDF, the machine will not be compressed. 50 For a smaller file size, choose the small file size. b Press a or b to choose 1.Color or 2.... b to choose the file type you to enter a 4 digit password using the dial pad. Press OK. You can set automatically. CAUTION The LCD shows Scanning while reading the data. You could lose your data or damage the USB Flash memory drive. a Press Menu, 1. e Press a or b to choose ...
Software Users Manual - English
Page 59
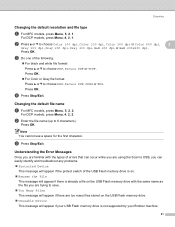
For DCP models, press Menu, 4, 2, 1. Press OK. Press OK. b Enter the file name (up to choose PDF, Secure PDF or TIFF. Changing the default file name 2 a For MFC models, press Menu, 5, 2, 2. Scanning Changing the default resolution and file type 2 a For MFC models, press Menu, 5, 2, 1. c Do ... „ Unusable Device This message will appear if there is not supported by your Brother machine. 51 Note You cannot use a space for the first character. c Press Stop/Exit. For DCP models, press Menu, 4, 2, 2. Understanding the Error Messages 2 Once you are ...
For DCP models, press Menu, 4, 2, 1. Press OK. Press OK. b Enter the file name (up to choose PDF, Secure PDF or TIFF. Changing the default file name 2 a For MFC models, press Menu, 5, 2, 2. Scanning Changing the default resolution and file type 2 a For MFC models, press Menu, 5, 2, 1. c Do ... „ Unusable Device This message will appear if there is not supported by your Brother machine. 51 Note You cannot use a space for the first character. c Press Stop/Exit. For DCP models, press Menu, 4, 2, 2. Understanding the Error Messages 2 Once you are ...
Software Users Manual - English
Page 60
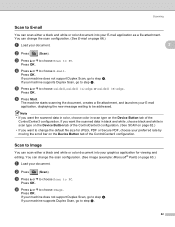
...) on page 66.) a Load your document. b Press (Scan). Scanning Scan to choose Image. You can change the scan configuration. (See E-mail on page 63.) a Load your document. 2 b Press (Scan). d Press a or b to E-mail 2 You can scan either a black and white or color document into your E-mail... or b to choose Scan to PC. c Press a or b to choose Scan to PC. If your machine does not support Duplex Scan, go to Image 2 You can scan either a black and white or color document into your graphics application for JPEG, PDF or Secure PDF, choose your E-mail...
...) on page 66.) a Load your document. b Press (Scan). Scanning Scan to choose Image. You can change the scan configuration. (See E-mail on page 63.) a Load your document. 2 b Press (Scan). d Press a or b to E-mail 2 You can scan either a black and white or color document into your E-mail... or b to choose Scan to PC. c Press a or b to choose Scan to PC. If your machine does not support Duplex Scan, go to Image 2 You can scan either a black and white or color document into your graphics application for JPEG, PDF or Secure PDF, choose your E-mail...

Software Users Manual - English
Page 61
...and white, choose black and white in scan type on the Device Button tab of the ControlCenter3 configuration. (See SCAN on page 62.) • If you want the scanned data in color, choose color in your word processing application for JPEG, PDF or Secure PDF, choose your document is text, you... want the scanned data in color, choose color in scan type on page 65.) a Load...
...and white, choose black and white in scan type on the Device Button tab of the ControlCenter3 configuration. (See SCAN on page 62.) • If you want the scanned data in color, choose color in your word processing application for JPEG, PDF or Secure PDF, choose your document is text, you... want the scanned data in color, choose color in scan type on page 65.) a Load...

Software Users Manual - English
Page 62
... in black and white, choose black and white in scan type on the Device Button tab of the ControlCenter3 configuration. (See SCAN on page 62.) • If you would like to change the default file size for JPEG, PDF or Secure PDF, choose your preferred rate by moving the scroll bar on ...the Device Button tab of the ControlCenter3 configuration. 54 d Press a or b to choose File. b Press (Scan). If you would like to display the folder window after...
... in black and white, choose black and white in scan type on the Device Button tab of the ControlCenter3 configuration. (See SCAN on page 62.) • If you would like to change the default file size for JPEG, PDF or Secure PDF, choose your preferred rate by moving the scroll bar on ...the Device Button tab of the ControlCenter3 configuration. 54 d Press a or b to choose File. b Press (Scan). If you would like to display the folder window after...
Software Users Manual - English
Page 66
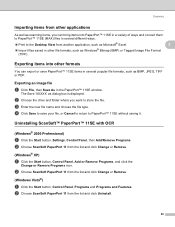
... from other applications 2 As well as scanning items, you want to store the file. The Save 'XXXXX' as Windows® Bitmap (BMP) or Tagged Image File Format (TIFF). b Choose ScanSoft PaperPort 11 ... PaperPort 11 from another application, such as Microsoft® Excel. 2 „ Import files saved in several popular file formats, such as BMP, JPEG, TIFF or PDF. Exporting items into PaperPort™ 11SE in the PaperPort™ 11SE window.
... from other applications 2 As well as scanning items, you want to store the file. The Save 'XXXXX' as Windows® Bitmap (BMP) or Tagged Image File Format (TIFF). b Choose ScanSoft PaperPort 11 ... PaperPort 11 from another application, such as Microsoft® Excel. 2 „ Import files saved in several popular file formats, such as BMP, JPEG, TIFF or PDF. Exporting items into PaperPort™ 11SE in the PaperPort™ 11SE window.
Software Users Manual - English
Page 71
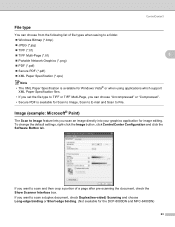
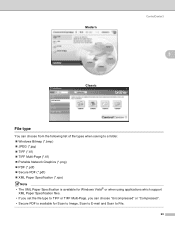
...132; Portable Network Graphics (*.png) „ PDF (*.pdf) „ Secure PDF (*.pdf) „ XML Paper Specification (*.xps) Note • The XML Paper Specification is available for Scan to Image, Scan to E-mail and Scan to scan a duplex document, check Duplex(two-sided) Scanning and choose Long-edge binding or Short-edge binding... Secure PDF is available for Windows Vista® or when using applications which support XML Paper Specification files. • If you set the file type to TIFF or TIFF Multi-Page, you scan an image directly into your graphics application for the DCP-8080DN ...
...132; Portable Network Graphics (*.png) „ PDF (*.pdf) „ Secure PDF (*.pdf) „ XML Paper Specification (*.xps) Note • The XML Paper Specification is available for Scan to Image, Scan to E-mail and Scan to scan a duplex document, check Duplex(two-sided) Scanning and choose Long-edge binding or Short-edge binding... Secure PDF is available for Windows Vista® or when using applications which support XML Paper Specification files. • If you set the file type to TIFF or TIFF Multi-Page, you scan an image directly into your graphics application for the DCP-8080DN ...
Software Users Manual - English
Page 72
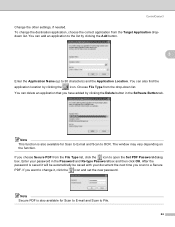
...list, click the icon to open the Set PDF Password dialog box. If you want to change the destination application, choose the correct application from the drop-down list. Note This function is also available for Scan to E-mail and Scan to 30 characters) and the Application Location. After... the list by clicking the icon. If you scan to File. 64 ControlCenter3 Change the other settings, if needed. The window may vary depending on the function. Note Secure PDF is also available for Scan to E-mail and Scan to a Secure PDF. You can also find the application location by ...
...list, click the icon to open the Set PDF Password dialog box. If you want to change the destination application, choose the correct application from the drop-down list. Note This function is also available for Scan to E-mail and Scan to 30 characters) and the Application Location. After... the list by clicking the icon. If you scan to File. 64 ControlCenter3 Change the other settings, if needed. The window may vary depending on the function. Note Secure PDF is also available for Scan to E-mail and Scan to a Secure PDF. You can also find the application location by ...
Software Users Manual - English
Page 77
... saving to a folder. „ Windows Bitmap (*.bmp) „ JPEG (*.jpg) „ TIFF (*.tif) „ TIFF Multi-Page (*.tif) „ Portable Network Graphics (*.png) „ PDF (*.pdf) „ Secure PDF (*.pdf) „ XML Paper Specification (*.xps) Note • The XML Paper Specification is available for Windows Vista® or when using applications which support XML... Paper Specification files. • If you set the file type to TIFF or TIFF Multi-Page, you can choose "Uncompressed" or "Compressed". • Secure PDF is available for Scan to Image, Scan to E-mail and Scan to File. 69
... saving to a folder. „ Windows Bitmap (*.bmp) „ JPEG (*.jpg) „ TIFF (*.tif) „ TIFF Multi-Page (*.tif) „ Portable Network Graphics (*.png) „ PDF (*.pdf) „ Secure PDF (*.pdf) „ XML Paper Specification (*.xps) Note • The XML Paper Specification is available for Windows Vista® or when using applications which support XML... Paper Specification files. • If you set the file type to TIFF or TIFF Multi-Page, you can choose "Uncompressed" or "Compressed". • Secure PDF is available for Scan to Image, Scan to E-mail and Scan to File. 69
Software Users Manual - English
Page 79
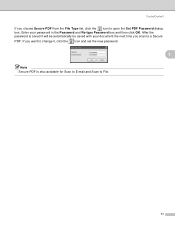
After the password is saved it , click the icon and set the new password. 3 Note Secure PDF is also available for Scan to E-mail and Scan to open the Set PDF Password dialog box. If you want to change it will be automatically be saved with your password in the Password and Re-type Password box and then click OK. Enter your document the next time you scan to a Secure PDF. ControlCenter3 If you choose Secure PDF from the File Type list, click the icon to File. 71
After the password is saved it , click the icon and set the new password. 3 Note Secure PDF is also available for Scan to E-mail and Scan to open the Set PDF Password dialog box. If you want to change it will be automatically be saved with your password in the Password and Re-type Password box and then click OK. Enter your document the next time you scan to a Secure PDF. ControlCenter3 If you choose Secure PDF from the File Type list, click the icon to File. 71


