Software Users Manual - English
Page 3
... dialog box 40 Scanning a document using the WIA driver (For Windows® XP only 43 WIA compliant ...43 Accessing the scanner ...43 Scanning a document into the PC ...44 Using the Scan key (For USB or Parallel cable users 48 Scan to E-mail ...49 Scan to Image ...... with OCR 56 3 ControlCenter2 Using ControlCenter2 ...57 Turning the AutoLoad feature off...58 SCAN...59 CUSTOM SCAN ...59 COPY ...59 PC-FAX (Not available for DCP models 60 DEVICE SETTINGS ...60 SCAN...61 Image (example: Microsoft Paint)...61 OCR (word processing application 63 E-mail ...64 Supported file types...65 File ...65...
... dialog box 40 Scanning a document using the WIA driver (For Windows® XP only 43 WIA compliant ...43 Accessing the scanner ...43 Scanning a document into the PC ...44 Using the Scan key (For USB or Parallel cable users 48 Scan to E-mail ...49 Scan to Image ...... with OCR 56 3 ControlCenter2 Using ControlCenter2 ...57 Turning the AutoLoad feature off...58 SCAN...59 CUSTOM SCAN ...59 COPY ...59 PC-FAX (Not available for DCP models 60 DEVICE SETTINGS ...60 SCAN...61 Image (example: Microsoft Paint)...61 OCR (word processing application 63 E-mail ...64 Supported file types...65 File ...65...
Software Users Manual - English
Page 5
...key ...111 Job Cancel...111 Secure Key ...111 Printer Emulation Support ...112 Printing the Internal Font List...113 Printing the Print Configuration List 113 Restoring default printer settings...113 Status ...114 Web Based Management (Network models Only 114 Using the Brother Laser driver for Macintosh® (Mac OS® X 115 Choosing page setup options ...115......125 Sending a fax (Not available for DCP models 128 For Mac OS® X...128 For Mac OS® 9.1 - 9.2 ...131 8 Scanning Scanning from a Macintosh® ...133 Accessing the scanner ...133 Scanning an image into your Macintosh ...
...key ...111 Job Cancel...111 Secure Key ...111 Printer Emulation Support ...112 Printing the Internal Font List...113 Printing the Print Configuration List 113 Restoring default printer settings...113 Status ...114 Web Based Management (Network models Only 114 Using the Brother Laser driver for Macintosh® (Mac OS® X 115 Choosing page setup options ...115......125 Sending a fax (Not available for DCP models 128 For Mac OS® X...128 For Mac OS® 9.1 - 9.2 ...131 8 Scanning Scanning from a Macintosh® ...133 Accessing the scanner ...133 Scanning an image into your Macintosh ...
Software Users Manual - English
Page 40
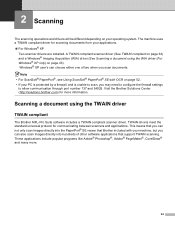
... and is unable to allow communication through port number 137 and 54925. Visit the Brother Solutions Center (http://solutions.brother.com) for communicating between scanners and applications. A TWAIN compliant scanner driver (See TWAIN compliant on page 34) and a Windows® Imaging Acquisition ...(WIA) driver (See Scanning a document using the TWAIN driver 2 TWAIN compliant 2 The Brother MFL-Pro Suite software includes a TWAIN compliant scanner driver. These applications include popular programs like Adobe® Photoshop®, Adobe® PageMaker®, CorelDraw...
... and is unable to allow communication through port number 137 and 54925. Visit the Brother Solutions Center (http://solutions.brother.com) for communicating between scanners and applications. A TWAIN compliant scanner driver (See TWAIN compliant on page 34) and a Windows® Imaging Acquisition ...(WIA) driver (See Scanning a document using the TWAIN driver 2 TWAIN compliant 2 The Brother MFL-Pro Suite software includes a TWAIN compliant scanner driver. These applications include popular programs like Adobe® Photoshop®, Adobe® PageMaker®, CorelDraw...
Software Users Manual - English
Page 41
...-XXXX. (Where XXXX is connected via: • Parallel-use Brother MFC-XXXX or Brother DCP-XXXX • USB-use Brother MFC-XXXX USB or Brother DCP-XXXX USB • LAN-use Brother MFC-XXXX LAN or Brother DCP-XXXX LAN If you use ScanSoft® PaperPort® SE. 2. Scanning Accessing the scanner 2 a Open the software application (ScanSoft® PaperPort®...
...-XXXX. (Where XXXX is connected via: • Parallel-use Brother MFC-XXXX or Brother DCP-XXXX • USB-use Brother MFC-XXXX USB or Brother DCP-XXXX USB • LAN-use Brother MFC-XXXX LAN or Brother DCP-XXXX LAN If you use ScanSoft® PaperPort® SE. 2. Scanning Accessing the scanner 2 a Open the software application (ScanSoft® PaperPort®...

Software Users Manual - English
Page 42
... 2. This is finished, click Cancel to return to crop an image when scanning. (See Settings in the Scanner Setup dialog box on the scanner glass. Scanning a whole page 2 a Put the document face up in the Scanner Setup dialog box: „ Scan (Image Type) (1) „ Resolution (2) „ Scan Type (3) „ Brightness (4) „ Contrast (5) „...
... 2. This is finished, click Cancel to return to crop an image when scanning. (See Settings in the Scanner Setup dialog box on the scanner glass. Scanning a whole page 2 a Put the document face up in the Scanner Setup dialog box: „ Scan (Image Type) (1) „ Resolution (2) „ Scan Type (3) „ Brightness (4) „ Contrast (5) „...

Software Users Manual - English
Page 43
... the following settings, if needed, in the ADF. Scanning Scanning a duplex document (For models that support duplex scanning) 2 a Put the document face up in the Scanner Setup dialog box: „ Scan (Image Type) „ Resolution „ Scan Type „ Brightness „ Contrast „ Document Size d Click Start. 2.
... the following settings, if needed, in the ADF. Scanning Scanning a duplex document (For models that support duplex scanning) 2 a Put the document face up in the Scanner Setup dialog box: „ Scan (Image Type) „ Resolution „ Scan Type „ Brightness „ Contrast „ Document Size d Click Start. 2.

Software Users Manual - English
Page 44
2. The whole image is used to crop a portion you are satisfied with the preview, click the Start button in the Scanning Area of the Scanner Setup dialog box. a Put the document face up in the ADF, or face down the left mouse button and drag it over the portion you ...want to scan 2 The PreScan button is scanned into the PC and appears in the Scanner Setup dialog box to scan. 1 Scanning area 1 38 c Click PreScan. Scanning Pre-Scanning to preview an image for Scan (Image Type), Resolution, Scan Type, Brightness...
2. The whole image is used to crop a portion you are satisfied with the preview, click the Start button in the Scanning Area of the Scanner Setup dialog box. a Put the document face up in the ADF, or face down the left mouse button and drag it over the portion you ...want to scan 2 The PreScan button is scanned into the PC and appears in the Scanner Setup dialog box to scan. 1 Scanning area 1 38 c Click PreScan. Scanning Pre-Scanning to preview an image for Scan (Image Type), Resolution, Scan Type, Brightness...

Software Users Manual - English
Page 45
Note Skip this step if you loaded the document on the scanner glass in the PaperPort® SE window (or your document again. f Click Start. g In the PaperPort® SE window, use the icon to restore the image to refine the image. 39 This time only the chosen area of the document appears in a. icon, and then use the options available to its e Load your application window). 2. Scanning Note You can enlarge the image using the original size.
Note Skip this step if you loaded the document on the scanner glass in the PaperPort® SE window (or your document again. f Click Start. g In the PaperPort® SE window, use the icon to restore the image to refine the image. 39 This time only the chosen area of the document appears in a. icon, and then use the options available to its e Load your application window). 2. Scanning Note You can enlarge the image using the original size.

Software Users Manual - English
Page 46
... give the appearance of gray. 40 2. Resolution and Scan Type will be altered for photographic images or graphics. The default settings are put in the Scanner Setup dialog box 2 Image Type 2 Choose the output image type from the Resolution drop-down list. Scanning Settings in a specific pattern to 256 shades of...
... give the appearance of gray. 40 2. Resolution and Scan Type will be altered for photographic images or graphics. The default settings are put in the Scanner Setup dialog box 2 Image Type 2 Choose the output image type from the Resolution drop-down list. Scanning Settings in a specific pattern to 256 shades of...

Software Users Manual - English
Page 47
... most accurate colors, the image file will be about three times larger than 24-bit Color. An increase emphasizes dark and light areas of the scanner glass. 41 2. This setting does not use Color Matching and is too light, set the Contrast. The default value is too dark, set the level...
... most accurate colors, the image file will be about three times larger than 24-bit Color. An increase emphasizes dark and light areas of the scanner glass. 41 2. This setting does not use Color Matching and is too light, set the Contrast. The default value is too dark, set the level...
Software Users Manual - English
Page 49
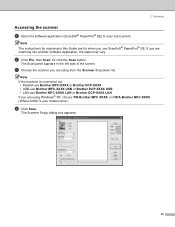
...The Scan panel appears on the left side of the screen. Accessing the scanner 2 a Open your machine or you can choose Windows® Image Acquisition (WIA) for when you use WIA-Brother MFC-XXXX LAN or WIA-Brother DCP-XXXX LAN If you are using the WIA driver (For Windows®... Scan dialog box appears: 43 c Choose the scanner you choose TW-Brother XXXXXXX, the TWAIN driver will run. (Where XXXX is connected via: • Parallel-use WIA-Brother MFC-XXXX or WIA-Brother DCP-XXXX • USB-use WIA-Brother MFC-XXXX USB or WIA-Brother DCP-XXXX USB • LAN-use ScanSoft® ...
...The Scan panel appears on the left side of the screen. Accessing the scanner 2 a Open your machine or you can choose Windows® Image Acquisition (WIA) for when you use WIA-Brother MFC-XXXX LAN or WIA-Brother DCP-XXXX LAN If you are using the WIA driver (For Windows®... Scan dialog box appears: 43 c Choose the scanner you choose TW-Brother XXXXXXX, the TWAIN driver will run. (Where XXXX is connected via: • Parallel-use WIA-Brother MFC-XXXX or WIA-Brother DCP-XXXX • USB-use WIA-Brother MFC-XXXX USB or WIA-Brother DCP-XXXX USB • LAN-use ScanSoft® ...

Software Users Manual - English
Page 50
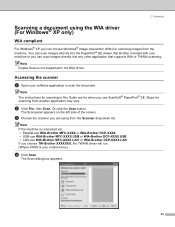
...4 1 Paper source 2 Picture type 3 Adjust the quality of a page after pre-scanning the document, you need to use the ADF (automatic document feeder) or the scanner glass. You can scan a whole page. d Choose the Paper size from the Paper source drop-down list (4). 44 c Choose the picture type (2). If you want... to scan on page 38.) Scanning a document using the ADF 2 a Put the document face up in which you can either use the scanner glass. (See Pre-Scanning to crop a portion you want to scan and then crop a portion of the scanned picture 4 Page size b Choose Document...
...4 1 Paper source 2 Picture type 3 Adjust the quality of a page after pre-scanning the document, you need to use the ADF (automatic document feeder) or the scanner glass. You can scan a whole page. d Choose the Paper size from the Paper source drop-down list (4). 44 c Choose the picture type (2). If you want... to scan on page 38.) Scanning a document using the ADF 2 a Put the document face up in which you can either use the scanner glass. (See Pre-Scanning to crop a portion you want to scan and then crop a portion of the scanned picture 4 Page size b Choose Document...

Software Users Manual - English
Page 51
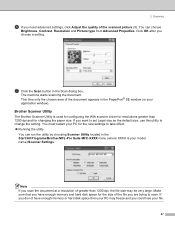
Note The scanner resolution can choose Brightness, Contrast, Resolution and Picture type from Advanced Properties. For resolutions greater than 1200 dpi, use the Brother Scanner Utility. (See Brother Scanner Utility on page 47.) f Click the Scan button in the Scan dialog box. 2. You can be set as high as 1200 dpi. The machine starts scanning the document. 45 Click OK after you need advanced settings, click Adjust the quality of the scanned picture (3). Scanning e If you choose a setting.
Note The scanner resolution can choose Brightness, Contrast, Resolution and Picture type from Advanced Properties. For resolutions greater than 1200 dpi, use the Brother Scanner Utility. (See Brother Scanner Utility on page 47.) f Click the Scan button in the Scan dialog box. 2. You can be set as high as 1200 dpi. The machine starts scanning the document. 45 Click OK after you need advanced settings, click Adjust the quality of the scanned picture (3). Scanning e If you choose a setting.

Software Users Manual - English
Page 52
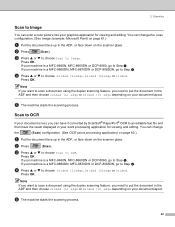
... crop a portion you want to preview an image for cropping any unwanted portions from the image. The whole image is used to scan using the scanner glass 2 The Preview button is scanned into the PC and appears in the scanning area (4). When you are satisfied with the preview, click the Scan... the portion you want to scan the image. b Choose Flatbed in the Scan dialog box to scan. 46 a Put the document face down on the scanner glass. 2.
... crop a portion you want to preview an image for cropping any unwanted portions from the image. The whole image is used to scan using the scanner glass 2 The Preview button is scanned into the PC and appears in the scanning area (4). When you are satisfied with the preview, click the Scan... the portion you want to scan the image. b Choose Flatbed in the Scan dialog box to scan. 46 a Put the document face down on the scanner glass. 2.
Software Users Manual - English
Page 53
...). Note If you are trying to scan. You can run the utility by choosing Scanner Utility located in the Start/All Programs/Brother/MFL-Pro Suite MFC-XXXX menu (where XXXX is used for configuring the WIA scanner driver for resolutions greater than 1200 dpi, the file size may freeze and you want... in the Scan dialog box. 2. This time only the chosen area of greater than 1200 dpi and for the new settings to change the setting. Brother Scanner Utility 2 The Brother Scanner Utility is your PC for changing the paper size. You must restart your model name...
...). Note If you are trying to scan. You can run the utility by choosing Scanner Utility located in the Start/All Programs/Brother/MFL-Pro Suite MFC-XXXX menu (where XXXX is used for configuring the WIA scanner driver for resolutions greater than 1200 dpi, the file size may freeze and you want... in the Scan dialog box. 2. This time only the chosen area of greater than 1200 dpi and for the new settings to change the setting. Brother Scanner Utility 2 The Brother Scanner Utility is your PC for changing the paper size. You must restart your model name...

Software Users Manual - English
Page 55
...be addressed. 49 e The machine starts scanning the document, creates a file attachment, and launches your machine is a MFC-8860DN, MFC-8870DW or DCP-8065DN, go to Step e. If your E-mail application, displaying the new message waiting to E-mail 2 You can change the scan configuration. (See E-mail... on page 64.) a Put the document face up in the ADF and then choose 2sided (L) edge or 2sided (S) edge depending on the scanner glass. d Press a or b to E-mail. 2. b Press (Scan). c Press a or b to choose Scan to choose 2sided (L)edge, 2sided (S)edge ...
...be addressed. 49 e The machine starts scanning the document, creates a file attachment, and launches your machine is a MFC-8860DN, MFC-8870DW or DCP-8065DN, go to Step e. If your E-mail application, displaying the new message waiting to E-mail 2 You can change the scan configuration. (See E-mail... on page 64.) a Put the document face up in the ADF and then choose 2sided (L) edge or 2sided (S) edge depending on the scanner glass. d Press a or b to E-mail. 2. b Press (Scan). c Press a or b to choose Scan to choose 2sided (L)edge, 2sided (S)edge ...
Software Users Manual - English
Page 56
... (S)edge or 1sided. If your machine is a MFC-8460N, MFC-8660DN or DCP-8060, go to Step d. If your machine is a MFC-8860DN, MFC-8870DW or DCP-8065DN, go to put the document in the ADF, or face down on the scanner glass. Press OK. If your document layout. d Press a or b to Image. b Press... to put the document in the ADF and then choose 2sided (L) edge or 2sided (S) edge depending on your machine is a MFC-8860DN, MFC-8870DW or DCP-8065DN, go to Image 2 You can have it converted by ScanSoft® PaperPort® OCR to an editable text file and then have the result displayed...
... (S)edge or 1sided. If your machine is a MFC-8460N, MFC-8660DN or DCP-8060, go to Step d. If your machine is a MFC-8860DN, MFC-8870DW or DCP-8065DN, go to put the document in the ADF, or face down on the scanner glass. Press OK. If your document layout. d Press a or b to Image. b Press... to put the document in the ADF and then choose 2sided (L) edge or 2sided (S) edge depending on your machine is a MFC-8860DN, MFC-8870DW or DCP-8065DN, go to Image 2 You can have it converted by ScanSoft® PaperPort® OCR to an editable text file and then have the result displayed...

Software Users Manual - English
Page 57
c Press a or b to choose Scan to Step d. If your machine is a MFC-8860DN, MFC-8870DW or DCP-8065DN, go to choose 2sided (L)edge, 2sided (S)edge or 1sided. If your machine is a MFC-8460N, MFC-8660DN or DCP-8060, go to File. d Press a or b to Step e. Note • If you want the scanned data in...the settings you want the scanned data in color, choose color in the ADF and then choose 2sided (L) edge or 2sided (S) edge depending on the scanner glass. If you have chosen in the Scan to put the document in scan type on page 61.) 51 Scanning Scan to display the folder...
c Press a or b to choose Scan to Step d. If your machine is a MFC-8860DN, MFC-8870DW or DCP-8065DN, go to choose 2sided (L)edge, 2sided (S)edge or 1sided. If your machine is a MFC-8460N, MFC-8660DN or DCP-8060, go to File. d Press a or b to Step e. Note • If you want the scanned data in...the settings you want the scanned data in color, choose color in the ADF and then choose 2sided (L) edge or 2sided (S) edge depending on the scanner glass. If you have chosen in the Scan to put the document in scan type on page 61.) 51 Scanning Scan to display the folder...

Software Users Manual - English
Page 67
... Long-edge binding or Short-edge binding. (Not available for image editing. Note You can configure your graphics application for MFC-8460N, MFC-8660DN and DCP-8060) 61 Image (example: Microsoft Paint) 3 The Scan to Image feature allows you want to File applications. 3. To change the default settings, right-click the... to Image, Scan to OCR, Scan to E-mail and Scan to scan and then crop a portion of a page after pre-scanning the document, check Show Scanner Interface box. ControlCenter2 SCAN 3 There are four buttons for each ControlCenter2 button in the Device Button tab.
... Long-edge binding or Short-edge binding. (Not available for image editing. Note You can configure your graphics application for MFC-8460N, MFC-8660DN and DCP-8060) 61 Image (example: Microsoft Paint) 3 The Scan to Image feature allows you want to File applications. 3. To change the default settings, right-click the... to Image, Scan to OCR, Scan to E-mail and Scan to scan and then crop a portion of a page after pre-scanning the document, check Show Scanner Interface box. ControlCenter2 SCAN 3 There are four buttons for each ControlCenter2 button in the Device Button tab.
Software Users Manual - English
Page 69
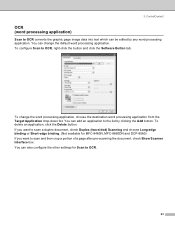
... from the Target Application drop-down list. To configure Scan to scan and then crop a portion of a page after pre-scanning the document, check Show Scanner Interface box. If you want to scan a duplex document, check Duplex (two-sided) Scanning and choose Long-edge binding or Short-edge binding. (Not available... application) 3 Scan to OCR converts the graphic page image data into text which can also configure the other settings for MFC-8460N, MFC-8660DN and DCP-8060) If you want to OCR, right-click the button and click the Software Button tab.
... from the Target Application drop-down list. To configure Scan to scan and then crop a portion of a page after pre-scanning the document, check Show Scanner Interface box. If you want to scan a duplex document, check Duplex (two-sided) Scanning and choose Long-edge binding or Short-edge binding. (Not available... application) 3 Scan to OCR converts the graphic page image data into text which can also configure the other settings for MFC-8460N, MFC-8660DN and DCP-8060) If you want to OCR, right-click the button and click the Software Button tab.


