Software Users Manual - English
Page 9
... Macintosh® (Mac OS® X) on page 115 or Using the Brother Laser driver for information about the Paper Tray and Recommended paper.) a From your printer driver from the paper tray. If you are installed on your computer, choose Brother MFC-XXXX or DCP-XXXX Printer* as your application, choose the Print command. Note You...
... Macintosh® (Mac OS® X) on page 115 or Using the Brother Laser driver for information about the Paper Tray and Recommended paper.) a From your printer driver from the paper tray. If you are installed on your computer, choose Brother MFC-XXXX or DCP-XXXX Printer* as your application, choose the Print command. Note You...
Software Users Manual - English
Page 10
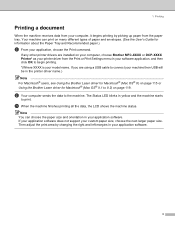
... 1 „ If the paper is thin, it may wrinkle. „ If paper is curled, straighten it and then put it back in the paper tray or the MP tray. „ If the paper is not recommended. 4 Then, the Windows® driver instructs you may be curled. Very thin or thick paper is...
... 1 „ If the paper is thin, it may wrinkle. „ If paper is curled, straighten it and then put it back in the paper tray or the MP tray. „ If the paper is not recommended. 4 Then, the Windows® driver instructs you may be curled. Very thin or thick paper is...

Software Users Manual - English
Page 11
...paper automatically. Simultaneous scanning, printing and faxing 1 Your machine can print from your computer while sending or receiving a fax in the paper tray or MP tray. For the BR-Script printer driver 1 Open the Properties dialog box in the printer driver. 2 From the General tab, click the ...Printing Preferences icon. 3 From the Layout tab, choose Orientation, Print on paper, it back in the paper tray. • You should use regular paper. Fax sending will print on both sides of the paper automatically. The printer will not be stopped during...
...paper automatically. Simultaneous scanning, printing and faxing 1 Your machine can print from your computer while sending or receiving a fax in the paper tray or MP tray. For the BR-Script printer driver 1 Open the Properties dialog box in the printer driver. 2 From the General tab, click the ...Printing Preferences icon. 3 From the Layout tab, choose Orientation, Print on paper, it back in the paper tray. • You should use regular paper. Fax sending will print on both sides of the paper automatically. The printer will not be stopped during...

Software Users Manual - English
Page 21
... for printing from the Advanced tab, choose a Duplex Type (See Duplex (two-sided) (For MFC-8660DN, MFC-8860DN, MFC-8870DW and DCP-8065DN) on page 18). Thin. Thin Bond Paper Recycled Paper Note • When using heavier weight paper, envelopes or rough paper choose Thick Paper...crumpled when Envelopes has been selected, choose Env. Thick. Printing Media Type 1 You can choose Auto Select, Tray1, MP Tray or Manual and specify separate trays for printing the first page and for OHP transparencies, choose Transparencies. • When you want to use. Plain Paper ...
... for printing from the Advanced tab, choose a Duplex Type (See Duplex (two-sided) (For MFC-8660DN, MFC-8860DN, MFC-8870DW and DCP-8065DN) on page 18). Thin. Thin Bond Paper Recycled Paper Note • When using heavier weight paper, envelopes or rough paper choose Thick Paper...crumpled when Envelopes has been selected, choose Env. Thick. Printing Media Type 1 You can choose Auto Select, Tray1, MP Tray or Manual and specify separate trays for printing the first page and for OHP transparencies, choose Transparencies. • When you want to use. Plain Paper ...
Software Users Manual - English
Page 31
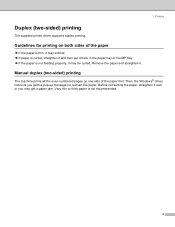
... Key on page 6.) Quick Print Setup 1 The Quick Print Setup feature allows you to quickly choose driver settings. b Enter your mouse button on the task tray icon. Only the people who know the password will be set to print them . Secure Print 1. Since the documents are sent to print them . c You...
... Key on page 6.) Quick Print Setup 1 The Quick Print Setup feature allows you to quickly choose driver settings. b Enter your mouse button on the task tray icon. Only the people who know the password will be set to print them . Secure Print 1. Since the documents are sent to print them . c You...

Software Users Manual - English
Page 36
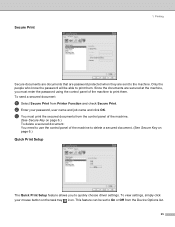
... click Auto Detect, options that are installed on the machine will then be listed. 1. Note Choose the paper size and the default tray for each tray. You can manually add or remove options. 30 Paper Source Setting This feature shows the paper size setting for printing from the Available ...Options list and click Add. The optional tray will be listed in the printer driver. Available Options In order to use in Print Mode in Chapter 3 of the User's Guide.) Auto ...
... click Auto Detect, options that are installed on the machine will then be listed. 1. Note Choose the paper size and the default tray for each tray. You can manually add or remove options. 30 Paper Source Setting This feature shows the paper size setting for printing from the Available ...Options list and click Add. The optional tray will be listed in the printer driver. Available Options In order to use in Print Mode in Chapter 3 of the User's Guide.) Auto ...

Quick Setup Guide - English
Page 3
... Please make sure you intend to use a Parallel interface cable that is no longer than 6 feet (2.0 meters). Face-down Output Tray Support Flap (Support Flap) 4. Please purchase the appropriate interface cable for 10BASE-T or 100Base-TX Fast Ethernet Network. 1 Document Cover... Control Panel 3. Use a shielded interface cable that is no longer than 6 feet (2.0 meters). Paper Tray 6. The interface cable is IEEE 1284-compliant. ■ Network cable (DCP-8065DN only) Use a straight-through Category5 (or greater) twisted-pair cable for the interface you use (Parallel...
... Please make sure you intend to use a Parallel interface cable that is no longer than 6 feet (2.0 meters). Face-down Output Tray Support Flap (Support Flap) 4. Please purchase the appropriate interface cable for 10BASE-T or 100Base-TX Fast Ethernet Network. 1 Document Cover... Control Panel 3. Use a shielded interface cable that is no longer than 6 feet (2.0 meters). Paper Tray 6. The interface cable is IEEE 1284-compliant. ■ Network cable (DCP-8065DN only) Use a straight-through Category5 (or greater) twisted-pair cable for the interface you use (Parallel...
Quick Setup Guide - English
Page 5
...XP/XP Professional x64 Edition) ... 12 For Windows NT® Workstation Version 4.0 Users 15 For Network Interface Cable Users (DCP-8065DN only) (For Windows® 98/98SE/Me/NT/2000 Professional/XP/XP Professional x64 Edition) ... 17 For USB Interface ... OS® 9.1 to 9.2 20 ■ For Mac OS® X 10.2.4 or greater 22 For Network Interface Cable Users (DCP-8065DN only 25 ■ For Mac OS® 9.1 to 9.2 25 ■ For Mac OS® X 10.2.4 or greater 27 &#... Lock 6 4. Install the Drum Unit and Toner Cartridge Assembly 4 2. Load Paper in the Paper Tray 5 3.
...XP/XP Professional x64 Edition) ... 12 For Windows NT® Workstation Version 4.0 Users 15 For Network Interface Cable Users (DCP-8065DN only) (For Windows® 98/98SE/Me/NT/2000 Professional/XP/XP Professional x64 Edition) ... 17 For USB Interface ... OS® 9.1 to 9.2 20 ■ For Mac OS® X 10.2.4 or greater 22 For Network Interface Cable Users (DCP-8065DN only 25 ■ For Mac OS® 9.1 to 9.2 25 ■ For Mac OS® X 10.2.4 or greater 27 &#... Lock 6 4. Install the Drum Unit and Toner Cartridge Assembly 4 2. Load Paper in the Paper Tray 5 3.
Quick Setup Guide - English
Page 7
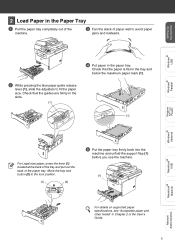
... lever (1), slide the adjusters to fit the paper size. Setting Up the machine Windows® USB 2 Load Paper in the Paper Tray 1 Pull the paper tray completely out of the machine. 3 Fan the stack of paper well to the lock position. (1) (2) 5 Put the paper...support flap (1) before you use the machine. (1) For details on supported paper specifications, see "Acceptable paper and other media" in Chapter 2 of the paper tray. Check that the guides are firmly in the slots. (1) (1) Windows® Parallel Windows NT® 4.0 Parallel Windows® Network Macintosh® USB Macintosh...
... lever (1), slide the adjusters to fit the paper size. Setting Up the machine Windows® USB 2 Load Paper in the Paper Tray 1 Pull the paper tray completely out of the machine. 3 Fan the stack of paper well to the lock position. (1) (2) 5 Put the paper...support flap (1) before you use the machine. (1) For details on supported paper specifications, see "Acceptable paper and other media" in Chapter 2 of the paper tray. Check that the guides are firmly in the slots. (1) (1) Windows® Parallel Windows NT® 4.0 Parallel Windows® Network Macintosh® USB Macintosh...
Quick Setup Guide - English
Page 35
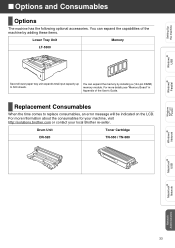
... You can expand the capabilities of the User's Guide. For more information about the consumables for your machine, visit http://solutions.brother.com or contact your local Brother re-seller. For more details,see "Memory Board" in Appendix of the machine by installing a (144-pin DIMM) memory ...module. You can expand the memory by adding these items. Lower Tray Unit Memory LT-5300 Second lower paper tray unit expands total input ...
... You can expand the capabilities of the User's Guide. For more information about the consumables for your machine, visit http://solutions.brother.com or contact your local Brother re-seller. For more details,see "Memory Board" in Appendix of the machine by installing a (144-pin DIMM) memory ...module. You can expand the memory by adding these items. Lower Tray Unit Memory LT-5300 Second lower paper tray unit expands total input ...
Users Manual - English
Page 4
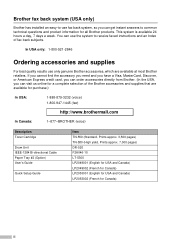
... for purchase.) In USA: 1-888-879-3232 (voice) 1-800-947-1445 (fax) http://www.brothermall.com In Canada: 1-877-BROTHER (voice) Description Toner Cartridge Drum Unit IEEE-1284 Bi-directional Cable Paper Tray #2 (Option) User's Guide Quick Setup Guide Item TN-550 (Standard, Prints approx. 3,500 pages) TN-580 (High yield, Prints...
... for purchase.) In USA: 1-888-879-3232 (voice) 1-800-947-1445 (fax) http://www.brothermall.com In Canada: 1-877-BROTHER (voice) Description Toner Cartridge Drum Unit IEEE-1284 Bi-directional Cable Paper Tray #2 (Option) User's Guide Quick Setup Guide Item TN-550 (Standard, Prints approx. 3,500 pages) TN-580 (High yield, Prints...

Users Manual - English
Page 10
... General 1 General information Using the documentation 2 Symbols and conventions used in the documentation 2 Accessing the complete User's Guide 3 Viewing documentation 3 Accessing Brother Support (For Windows 5 Control panel overview 6 Status LED indications 8 2 Loading documents and paper Loading documents 10 Using the ADF 10 Using the ... other media 15 Printable Area 16 3 General setup Paper settings ...17 Paper Type ...17 Paper Size ...17 Tray use in Copy mode 18 Tray use in Print mode 18 Volume Settings 19 Beeper volume 19 Ecology features 19 Toner save...19 Sleep time...19...
... General 1 General information Using the documentation 2 Symbols and conventions used in the documentation 2 Accessing the complete User's Guide 3 Viewing documentation 3 Accessing Brother Support (For Windows 5 Control panel overview 6 Status LED indications 8 2 Loading documents and paper Loading documents 10 Using the ADF 10 Using the ... other media 15 Printable Area 16 3 General setup Paper settings ...17 Paper Type ...17 Paper Size ...17 Tray use in Copy mode 18 Tray use in Print mode 18 Volume Settings 19 Beeper volume 19 Ecology features 19 Toner save...19 Sleep time...19...
Users Manual - English
Page 11
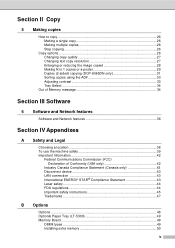
... reducing the image copied 28 Making N in 1 copies or a poster 29 Duplex (2-sided) copying (DCP-8065DN only 31 Sorting copies using the ADF 33 Adjusting contrast 33 Tray Select ...34 Out of Memory message 34 Section III Software 6 Software and Network features Software and Network ...FCC) Declaration of Conformity (USA only 42 Industry Canada Compliance Statement (Canada only 43 Disconnect device 43 LAN connection 43 International ENERGY STAR® Compliance Statement 43 Laser safety 44 FDA regulations 44 Important safety instructions 45 Trademarks 47 B Options Options ...48...
... reducing the image copied 28 Making N in 1 copies or a poster 29 Duplex (2-sided) copying (DCP-8065DN only 31 Sorting copies using the ADF 33 Adjusting contrast 33 Tray Select ...34 Out of Memory message 34 Section III Software 6 Software and Network features Software and Network ...FCC) Declaration of Conformity (USA only 42 Industry Canada Compliance Statement (Canada only 43 Disconnect device 43 LAN connection 43 International ENERGY STAR® Compliance Statement 43 Laser safety 44 FDA regulations 44 Important safety instructions 45 Trademarks 47 B Options Options ...48...

Users Manual - English
Page 18
... Sorts multiple copies using the ADF. Clear/Back Deletes entered data or lets you change which tray will flash and change the quality for the next copy. Chapter 1 Control panel overview DCP-8060 and DCP-8065DN have similar control keys. 1 1 2 1 Status LED (light emitting diode) The LED will...depending on both sides of the paper. a or b Scrolls through menu selections. Enlarge/Reduce Reduces or enlarges copies. Contrast/Quality (DCP-8065DN only) Lets you change the quality or contrast for the next copy. OK Selects a setting. Tray Select Lets you exit the menu.
... Sorts multiple copies using the ADF. Clear/Back Deletes entered data or lets you change which tray will flash and change the quality for the next copy. Chapter 1 Control panel overview DCP-8060 and DCP-8065DN have similar control keys. 1 1 2 1 Status LED (light emitting diode) The LED will...depending on both sides of the paper. a or b Scrolls through menu selections. Enlarge/Reduce Reduces or enlarges copies. Contrast/Quality (DCP-8065DN only) Lets you change the quality or contrast for the next copy. OK Selects a setting. Tray Select Lets you exit the menu.

Users Manual - English
Page 21
Replace the toner cartridge with a new one. General information Service error Red Cover open . Turn off or the machine is in the tray or clear the paper jam. Check that the scanner lock lever is off. 9 Check the LCD message. Note When the power switch is off ...switch. 1 2. If you cannot clear the error and you see the same service call indication after turning the machine back on, please call Brother Customer Service. (See Brother numbers on and try to print again. Close the cover. Check the LCD message. Put paper in Sleep mode, the LED is released. Wait...
Replace the toner cartridge with a new one. General information Service error Red Cover open . Turn off or the machine is in the tray or clear the paper jam. Check that the scanner lock lever is off. 9 Check the LCD message. Note When the power switch is off ...switch. 1 2. If you cannot clear the error and you see the same service call indication after turning the machine back on, please call Brother Customer Service. (See Brother numbers on and try to print again. Close the cover. Check the LCD message. Put paper in Sleep mode, the LED is released. Wait...
Users Manual - English
Page 25
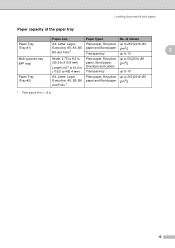
... 1 Plain paper, Recycled up to 250 [20 lb (80 paper and Bond paper g/m2)] 1 Folio size is 8 in. × 13 in. 2 2 13 of the paper tray Paper Tray (Tray #1) Multi-purpose tray (MP tray) Paper Tray (Tray #2) Paper size Paper types No.
... 1 Plain paper, Recycled up to 250 [20 lb (80 paper and Bond paper g/m2)] 1 Folio size is 8 in. × 13 in. 2 2 13 of the paper tray Paper Tray (Tray #1) Multi-purpose tray (MP tray) Paper Tray (Tray #2) Paper size Paper types No.
Users Manual - English
Page 26
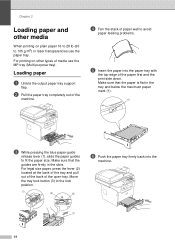
... problems. e Insert the paper into the machine. (1) 14 d Fan the stack of paper well to the lock position. (1) (2) (3) f Push the paper tray firmly back into the paper tray with the top edge of the paper first and the print side down. Make sure that the guides are firmly in the... paper mark (1). (1) c While pressing the blue paper-guide release lever (1), slide the paper guides to 105 g/m2) or laser transparencies use the MP tray (Multi-purpose tray). Make sure that the paper is flat in the slots. For legal size paper, press the lever (2) located at the back of the...
... problems. e Insert the paper into the machine. (1) 14 d Fan the stack of paper well to the lock position. (1) (2) (3) f Push the paper tray firmly back into the paper tray with the top edge of the paper first and the print side down. Make sure that the guides are firmly in the... paper mark (1). (1) c While pressing the blue paper-guide release lever (1), slide the paper guides to 105 g/m2) or laser transparencies use the MP tray (Multi-purpose tray). Make sure that the paper is flat in the slots. For legal size paper, press the lever (2) located at the back of the...

Users Manual - English
Page 27
CAUTION Do not use the following types of envelopes, as possible. 2 b Pull out the MP tray support. Loading documents and paper Loading envelopes and other media 2 Use the MP tray when printing envelopes, labels, and thick paper. Loading Envelopes 2 Before loading, press the corners and sides of a baggy construction. • That are embossed... have clasps or staples. • That are pre-printed on the inside. Glue Rounded Double Triangular 2 flap flap 2 flap 2 2 c Insert the media into the MP tray with the top edge first and the printing side face up. 15 a Open the MP...
CAUTION Do not use the following types of envelopes, as possible. 2 b Pull out the MP tray support. Loading documents and paper Loading envelopes and other media 2 Use the MP tray when printing envelopes, labels, and thick paper. Loading Envelopes 2 Before loading, press the corners and sides of a baggy construction. • That are embossed... have clasps or staples. • That are pre-printed on the inside. Glue Rounded Double Triangular 2 flap flap 2 flap 2 2 c Insert the media into the MP tray with the top edge first and the printing side face up. 15 a Open the MP...

Users Manual - English
Page 29
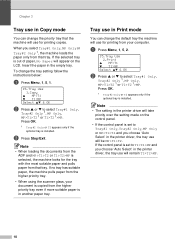
..., Executive, A5, A6, B5, B6, Folio or Any. a Choose one of the other available Paper Size selections for the MP tray. • A6 size is not available for the optional Tray #2. • You can choose Transparency only if A4, Letter, Legal or Folio size was chosen as the paper size. Note •...; Transparency is not available for the optional Tray #2. 17 Paper Size 3 You can fit the document on the page. c Press Stop/Exit. Press OK. You must choose MP Only for the...
..., Executive, A5, A6, B5, B6, Folio or Any. a Choose one of the other available Paper Size selections for the MP tray. • A6 size is not available for the optional Tray #2. • You can choose Transparency only if A4, Letter, Legal or Folio size was chosen as the paper size. Note •...; Transparency is not available for the optional Tray #2. 17 Paper Size 3 You can fit the document on the page. c Press Stop/Exit. Press OK. You must choose MP Only for the...
Users Manual - English
Page 30
... and you choose 'Auto Select' in the printer driver will remain T1>T2>MP. 18 a Press Menu, 1, 5, 2. 15.Tray Use 2.Print a MP>T1 b T1>MP Select ab & OK b Press a or b to select Tray#1 Only, Tray#2 Only 1, MP Only, MP>T1>T2 1 or T1>T2 1>MP. If the control panel is in the empty... 1, MP Only, MP>T1>T2 1 or T1>T2 1>MP. To change the priority tray that tray. c Press Stop/Exit. Press OK. 1 Tray#2 Only or T2 appears only if the optional tray is installed. Tray use for the tray with the most suitable paper and pulls paper from that the machine will use in the printer driver...
... and you choose 'Auto Select' in the printer driver will remain T1>T2>MP. 18 a Press Menu, 1, 5, 2. 15.Tray Use 2.Print a MP>T1 b T1>MP Select ab & OK b Press a or b to select Tray#1 Only, Tray#2 Only 1, MP Only, MP>T1>T2 1 or T1>T2 1>MP. If the control panel is in the empty... 1, MP Only, MP>T1>T2 1 or T1>T2 1>MP. To change the priority tray that tray. c Press Stop/Exit. Press OK. 1 Tray#2 Only or T2 appears only if the optional tray is installed. Tray use for the tray with the most suitable paper and pulls paper from that the machine will use in the printer driver...


