Network Users Manual - English
Page 90
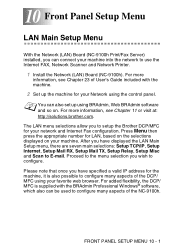
Proceed to the menu selection you to configure many aspects of the DCP/ MFC using your favorite web browser. For added flexibility, the DCP/ MFC is also possible to setup the Brother DCP/MFC for your network and Internet Fax configuration. For more information, see Chapter 23 of User's Guide included ... selections: Setup TCP/IP, Setup Internet, Setup Mail RX, Setup Mail TX, Setup Relay, Setup Misc and Scan to use the Internet FAX, Network Scanner and Network Printer. 1 Install the Network (LAN) Board (NC-9100h). FRONT PANEL SETUP MENU 10 - 1 After you can also set up the ...
Proceed to the menu selection you to configure many aspects of the DCP/ MFC using your favorite web browser. For added flexibility, the DCP/ MFC is also possible to setup the Brother DCP/MFC for your network and Internet Fax configuration. For more information, see Chapter 23 of User's Guide included ... selections: Setup TCP/IP, Setup Internet, Setup Mail RX, Setup Mail TX, Setup Relay, Setup Misc and Scan to use the Internet FAX, Network Scanner and Network Printer. 1 Install the Network (LAN) Board (NC-9100h). FRONT PANEL SETUP MENU 10 - 1 After you can also set up the ...

Users Manual - English
Page 11
WARNING ■ When you move the DCP, grasp the side handholds that you use a quality surge protection device on the AC power line, or unplug the line during a lightning storm. We recommend that are under the scanner. Caution ■ Lightning and power surges can damage this product ...near appliances that use this product! ix Do NOT carry the DCP by holding it at the bottom. ■ Install equipment with a power cord ...
WARNING ■ When you move the DCP, grasp the side handholds that you use a quality surge protection device on the AC power line, or unplug the line during a lightning storm. We recommend that are under the scanner. Caution ■ Lightning and power surges can damage this product ...near appliances that use this product! ix Do NOT carry the DCP by holding it at the bottom. ■ Install equipment with a power cord ...

Users Manual - English
Page 13
...Guide 1-1 On-line Registration (USA and Canada 1-2 DCP part names and operations 1-3 Control panel overview 1-6 Status LED indications 1-8 Inserting originals for copying (and scanning 1-10 Using the ADF (automatic document feeder 1-10 Using the scanner glass 1-12 2 Paper 2-1 About paper 2-1 ...or other media in the manual feed tray (For DCP-8020 2-7 To load paper or other media in the multi-purpose tray (MP tray) (For DCP-8025D 2-9 To use Automatic Duplexing for copy and print operations (For DCP-8025D 2-11 3 On-screen programming 3-1 User-friendly programming ...
...Guide 1-1 On-line Registration (USA and Canada 1-2 DCP part names and operations 1-3 Control panel overview 1-6 Status LED indications 1-8 Inserting originals for copying (and scanning 1-10 Using the ADF (automatic document feeder 1-10 Using the scanner glass 1-12 2 Paper 2-1 About paper 2-1 ...or other media in the manual feed tray (For DCP-8020 2-7 To load paper or other media in the multi-purpose tray (MP tray) (For DCP-8025D 2-9 To use Automatic Duplexing for copy and print operations (For DCP-8025D 2-11 3 On-screen programming 3-1 User-friendly programming ...

Users Manual - English
Page 14
...scanner glass........ 5-4 Out of Memory message 5-4 Using the copy keys (temporary settings 5-5 Enlarge/Reduce 5-6 Quality (type of original 5-8 Sorting copies using the ADF 5-8 Contrast 5-9 Tray Select 5-10 Duplex/N in 1 5-11 Duplex/N in 1 copy 5-12 N in 1 copy 5-12 Poster 5-13 Duplex (1 in 1) (For DCP-8025D 5-14 Duplex (2 in 1) and Duplex (4 in 1) (For DCP-8025D...)... 5-16 Changing the default copy settings 5-17 Quality 5-17 Contrast 5-17 Using the DCP as a printer 6-1 Using the Brother DCP-8020, DCP-8025D ...
...scanner glass........ 5-4 Out of Memory message 5-4 Using the copy keys (temporary settings 5-5 Enlarge/Reduce 5-6 Quality (type of original 5-8 Sorting copies using the ADF 5-8 Contrast 5-9 Tray Select 5-10 Duplex/N in 1 5-11 Duplex/N in 1 copy 5-12 N in 1 copy 5-12 Poster 5-13 Duplex (1 in 1) (For DCP-8025D 5-14 Duplex (2 in 1) and Duplex (4 in 1) (For DCP-8025D...)... 5-16 Changing the default copy settings 5-17 Quality 5-17 Contrast 5-17 Using the DCP as a printer 6-1 Using the Brother DCP-8020, DCP-8025D ...

Users Manual - English
Page 15
...Setting the Emulation Selection 6-17 Printing the Internal Font List 6-18 Printing the print configuration list 6-18 Restoring default settings 6-18 7 Printer driver settings 7-1 Printer driver settings 7-1 How to access the printer driver settings 7-1 Features in the Brother Native Driver 7-2 Basic tab 7-2 Paper ... Options 7-22 8 How to scan using Windows 8-1 Scanning a document 8-1 TWAIN compliant 8-1 How to access the Scanner 8-2 Scanning a document into the PC 8-3 Scanning a whole page 8-3 Pre-Scanning to crop a portion you want to scan .... 8-4 Settings ...
...Setting the Emulation Selection 6-17 Printing the Internal Font List 6-18 Printing the print configuration list 6-18 Restoring default settings 6-18 7 Printer driver settings 7-1 Printer driver settings 7-1 How to access the printer driver settings 7-1 Features in the Brother Native Driver 7-2 Basic tab 7-2 Paper ... Options 7-22 8 How to scan using Windows 8-1 Scanning a document 8-1 TWAIN compliant 8-1 How to access the Scanner 8-2 Scanning a document into the PC 8-3 Scanning a whole page 8-3 Pre-Scanning to crop a portion you want to scan .... 8-4 Settings ...

Users Manual - English
Page 16
... Scanning a document into the PC 8-11 Scanning a document using the ADF 8-11 Pre-Scanning to crop a portion you want to scan using the scanner glass 8-13 Brother Scanner Utility 8-15 Using the scan key (For USB or Parallel interface cable users 8-16 Scan to E-mail 8-17 Scan to Image 8-17 Scan to OCR...
... Scanning a document into the PC 8-11 Scanning a document using the ADF 8-11 Pre-Scanning to crop a portion you want to scan using the scanner glass 8-13 Brother Scanner Utility 8-15 Using the scan key (For USB or Parallel interface cable users 8-16 Scan to E-mail 8-17 Scan to Image 8-17 Scan to OCR...

Users Manual - English
Page 17
... To access the Copy Configurations screen 9-15 Scanner settings 9-15 Number of copies 9-15 10 Using the Windows®-Based Brother SmartUI Control Center (For Windows® XP 10-1 Brother SmartUI Control Center 10-1 AutoLoad the Brother Control Center 10-2 How to turn off Auto Load 10-2 Brother Control Center features 10-3 Auto Configuration 10...
... To access the Copy Configurations screen 9-15 Scanner settings 9-15 Number of copies 9-15 10 Using the Windows®-Based Brother SmartUI Control Center (For Windows® XP 10-1 Brother SmartUI Control Center 10-1 AutoLoad the Brother Control Center 10-2 How to turn off Auto Load 10-2 Brother Control Center features 10-3 Auto Configuration 10...
Users Manual - English
Page 18
...Scan Type..........10-28 3. Select Scan Settings 10-32 Using your DCP with a Macintosh 11-1 Setting up your USB-equipped Apple® Macintosh 11-1 Using the Brother printer driver with your Apple® Macintosh® (OS 8.6 - 9.2 11-2 Using the Brother Printer Driver with Your Apple® Macintosh® (Mac OS...into your Apple® Macintosh 11-7 For Mac OS 8.6 to 9.2 users 11-7 For Mac OS X users 11-11 Using the Brother TWAIN scanner driver with the DCP 12-1 Using the Scan key 12-5 Scan to Graphics application (example: Microsoft Paint 10-23 Copy 10-25 Custom: User-defined ...
...Scan Type..........10-28 3. Select Scan Settings 10-32 Using your DCP with a Macintosh 11-1 Setting up your USB-equipped Apple® Macintosh 11-1 Using the Brother printer driver with your Apple® Macintosh® (OS 8.6 - 9.2 11-2 Using the Brother Printer Driver with Your Apple® Macintosh® (Mac OS...into your Apple® Macintosh 11-7 For Mac OS 8.6 to 9.2 users 11-7 For Mac OS X users 11-11 Using the Brother TWAIN scanner driver with the DCP 12-1 Using the Scan key 12-5 Scan to Graphics application (example: Microsoft Paint 10-23 Copy 10-25 Custom: User-defined ...
Users Manual - English
Page 19
... 13-3 International ENERGY STAR® Compliance Statement 13-3 Laser safety 13-4 FDA regulations 13-4 Important safety instructions 13-6 Trademarks 13-8 14 Troubleshooting and routine maintenance 14-1 Troubleshooting 14-1 Error messages 14-1 Original jams 14-4 Original is jammed in the duplex tray (For DCP-8025D 14-9 If... you are having difficulty with your DCP 14-11 Improving the print quality 14-14 Packing and shipping the DCP 14-18 Routine maintenance 14-21 Cleaning the scanner 14-21 Cleaning the printer 14-22 Cleaning...
... 13-3 International ENERGY STAR® Compliance Statement 13-3 Laser safety 13-4 FDA regulations 13-4 Important safety instructions 13-6 Trademarks 13-8 14 Troubleshooting and routine maintenance 14-1 Troubleshooting 14-1 Error messages 14-1 Original jams 14-4 Original is jammed in the duplex tray (For DCP-8025D 14-9 If... you are having difficulty with your DCP 14-11 Improving the print quality 14-14 Packing and shipping the DCP 14-18 Routine maintenance 14-21 Cleaning the scanner 14-21 Cleaning the printer 14-22 Cleaning...

Users Manual - English
Page 20
... 100BASE-TX Ethernet Network 15-9 LED 15-9 TEST SWITCH 15-10 Paper Tray #2 15-11 G Glossary G-1 S Specifications S-1 Product description S-1 General S-1 Print media S-2 General (continued S-2 Copy S-3 Scanner S-3 Printer S-4 Interfaces S-4 Computer requirements S-5 Consumable items S-6 Network (LAN) board (NC-9100h S-7 16 Index I-1 xviii
... 100BASE-TX Ethernet Network 15-9 LED 15-9 TEST SWITCH 15-10 Paper Tray #2 15-11 G Glossary G-1 S Specifications S-1 Product description S-1 General S-1 Print media S-2 General (continued S-2 Copy S-3 Scanner S-3 Printer S-4 Interfaces S-4 Computer requirements S-5 Consumable items S-6 Network (LAN) board (NC-9100h S-7 16 Index I-1 xviii

Users Manual - English
Page 23
...to use the ADF unit. 7 ADF Document Output Support Flap Unfold to prevent the scanned pages from sliding off the DCP. 8 Document Cover Open to place the original on the scanner glass. 9 Power Switch Switch it on or off. 10 Front Cover Open to open the front cover. 3 ...Face-down Output Tray Support Flap with Extension 6 ADF Document Support Extension 7 ADF Document Output Support Flap 8 Document Cover 2 Front Cover Release Button 1 (DCP-8020) Manual Feed Tray (DCP-8025D) Multi...
...to use the ADF unit. 7 ADF Document Output Support Flap Unfold to prevent the scanned pages from sliding off the DCP. 8 Document Cover Open to place the original on the scanner glass. 9 Power Switch Switch it on or off. 10 Front Cover Open to open the front cover. 3 ...Face-down Output Tray Support Flap with Extension 6 ADF Document Support Extension 7 ADF Document Output Support Flap 8 Document Cover 2 Front Cover Release Button 1 (DCP-8020) Manual Feed Tray (DCP-8025D) Multi...
Users Manual - English
Page 25
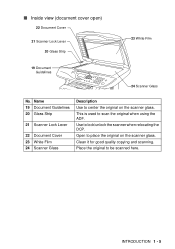
...Strip 21 Scanner Lock Lever 22 Document Cover 23 White Film 24 Scanner Glass Description Use to center the original on the scanner glass. Open to lock/unlock the scanner when relocating the DCP. INTRODUCTION 1 - 5 ■ Inside view (document cover open) 22 Document Cover 21 Scanner Lock ...Lever 20 Glass Strip 23 White Film 19 Document Guidelines 24 Scanner Glass No. This is used...
...Strip 21 Scanner Lock Lever 22 Document Cover 23 White Film 24 Scanner Glass Description Use to center the original on the scanner glass. Open to lock/unlock the scanner when relocating the DCP. INTRODUCTION 1 - 5 ■ Inside view (document cover open) 22 Document Cover 21 Scanner Lock ...Lever 20 Glass Strip 23 White Film 19 Document Guidelines 24 Scanner Glass No. This is used...

Users Manual - English
Page 29
... lever is released. (See Scanner Lock Lever on page 1-5.) Check the LCD message. (See Troubleshooting and routine maintenance on page 14-1.) Memory is open Toner empty Paper error Red Scan lock Others Out of memory Description Follow the steps below. 1. LED DCP status Service error Red Cover open . The cover is... Wait a few seconds, and then turn it back on page 14-1.) INTRODUCTION 1 - 9 If you cannot clear the error and see the same service call Brother Customer Service at: 1-800-284-4329 (in USA), 1-877-BROTHER (in Canada) or (514)685-6464 (in the tray or clear the paper jam.
... lever is released. (See Scanner Lock Lever on page 1-5.) Check the LCD message. (See Troubleshooting and routine maintenance on page 14-1.) Memory is open Toner empty Paper error Red Scan lock Others Out of memory Description Follow the steps below. 1. LED DCP status Service error Red Cover open . The cover is... Wait a few seconds, and then turn it back on page 14-1.) INTRODUCTION 1 - 9 If you cannot clear the error and see the same service call Brother Customer Service at: 1-800-284-4329 (in USA), 1-877-BROTHER (in Canada) or (514)685-6464 (in the tray or clear the paper jam.

Users Manual - English
Page 30
... can hold up , top edge first in the ADF until you put the documents face up to 50 pages, feeding each one individually through the DCP. DO NOT use curled, wrinkled, folded, or ripped paper, or paper with ink are completely dry. 1 Pull out the ADF document support ADF Document ...;F (20°C - 30°C) Humidity: 50% - 70% DO NOT use cardboard, newspaper, or fabric. (To copy or scan this kind of document, see Using the scanner glass on page 1-12.) Make sure originals written with staples paper clips, paste or tape attached. Support Flap 3 Fan the pages well and stagger them...
... can hold up , top edge first in the ADF until you put the documents face up to 50 pages, feeding each one individually through the DCP. DO NOT use curled, wrinkled, folded, or ripped paper, or paper with ink are completely dry. 1 Pull out the ADF document support ADF Document ...;F (20°C - 30°C) Humidity: 50% - 70% DO NOT use cardboard, newspaper, or fabric. (To copy or scan this kind of document, see Using the scanner glass on page 1-12.) Make sure originals written with staples paper clips, paste or tape attached. Support Flap 3 Fan the pages well and stagger them...

Users Manual - English
Page 32
... copy one page at a time, or pages of copies you want them sorted you may damage the DCP. 1 - 12 INTRODUCTION The DCP will start scanning the original. Originals are Face Down on the Scanner Glass 2 Using the document guidelines on the left, center the orignal face down on it or you... must be empty. To use the scanner glass to 99). 4 Press Start. You can use the scanner glass, the ...
... copy one page at a time, or pages of copies you want them sorted you may damage the DCP. 1 - 12 INTRODUCTION The DCP will start scanning the original. Originals are Face Down on the Scanner Glass 2 Using the document guidelines on the left, center the orignal face down on it or you... must be empty. To use the scanner glass to 99). 4 Press Start. You can use the scanner glass, the ...
Users Manual - English
Page 58
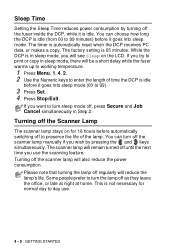
...If you try to 99). 3 Press Set. 4 Press Stop/Exit. Turning off the fuser inside the DCP, while it goes into sleep mode. If you wish by turning off the Scanner Lamp The scanner lamp stays on the LCD. Turning off regularly will be a short delay while the fuser warms up to...Job Cancel simultaneously in Step 2. The factory setting is automatically reset when the DCP receives PC data, or makes a copy. Sleep Time Setting the Sleep Time reduces power consumption by pressing the and keys simultaneously. The scanner lamp will remain turned off until the next time you will also reduce ...
...If you try to 99). 3 Press Set. 4 Press Stop/Exit. Turning off the fuser inside the DCP, while it goes into sleep mode. If you wish by turning off the Scanner Lamp The scanner lamp stays on the LCD. Turning off regularly will be a short delay while the fuser warms up to...Job Cancel simultaneously in Step 2. The factory setting is automatically reset when the DCP receives PC data, or makes a copy. Sleep Time Setting the Sleep Time reduces power consumption by pressing the and keys simultaneously. The scanner lamp will remain turned off until the next time you will also reduce ...

Users Manual - English
Page 62
These settings are temporary, and the DCP returns to use these temporary settings again, place the next original in 1 (For DCP-8025D). If you want to its default settings 1 minute after it finishes copying. Temporary Copy Keys 5 - 2 MAKING COPIES Temporary copy settings You can improve your copies by using the temporary copy keys (Copy): Enlarge/Reduce, Contrast, Quality, Tray Select, Sort and N in 1 (For DCP-8020) or Duplex/N in the ADF or on the scanner glass within that time.
These settings are temporary, and the DCP returns to use these temporary settings again, place the next original in 1 (For DCP-8025D). If you want to its default settings 1 minute after it finishes copying. Temporary Copy Keys 5 - 2 MAKING COPIES Temporary copy settings You can improve your copies by using the temporary copy keys (Copy): Enlarge/Reduce, Contrast, Quality, Tray Select, Sort and N in 1 (For DCP-8020) or Duplex/N in the ADF or on the scanner glass within that time.

Users Manual - English
Page 64
...on the scanner glass and close the document cover. 3 Using the numeric keys, enter the number of copies you want (up to increase the memory size, see Memory board on page 5-5.) 1 Lift the document cover. Use the Temporary Copy keys to consider increasing the memory size. The DCP will be...want to copy scanned pages. For example, press 3 8 for 38 copies. 4 Press Start. Single or multiple copies using the scanner glass You can make multiple copies using the scanner glass. Out of Memory message appears, press Stop/Exit to cancel or Start to sort multiple copies, use the ADF. (See...
...on the scanner glass and close the document cover. 3 Using the numeric keys, enter the number of copies you want (up to increase the memory size, see Memory board on page 5-5.) 1 Lift the document cover. Use the Temporary Copy keys to consider increasing the memory size. The DCP will be...want to copy scanned pages. For example, press 3 8 for 38 copies. 4 Press Start. Single or multiple copies using the scanner glass You can make multiple copies using the scanner glass. Out of Memory message appears, press Stop/Exit to cancel or Start to sort multiple copies, use the ADF. (See...

Users Manual - English
Page 66
...% (A4 → LTR) 97% (LTR → A4) 1 Place the original face up in the ADF, or face down on the scanner glass. 2 Use the numeric keys to 400%. Auto sets the DCP to calculate the ratio that fits the size of copies you to enter a ratio from 25% to enter the number...
...% (A4 → LTR) 97% (LTR → A4) 1 Place the original face up in the ADF, or face down on the scanner glass. 2 Use the numeric keys to 400%. Auto sets the DCP to calculate the ratio that fits the size of copies you to enter a ratio from 25% to enter the number...

Users Manual - English
Page 67
MAKING COPIES 5 - 7 Press Set. (For example, press 5 3 to select the enlargement or reduction ratio Press Set. -OR- 5 Press or you want. to enter 53%.) 6 Press Start. -OR- You can select Custom (25-400%) and press Set. Press other temporary copy keys for more settings. ■ Special Copy Options (2in1, 4in1 or Poster) are not available with Enlarge/Reduce. ■ Auto is not available with the scanner glass. Use the numeric keys to enter an enlargement or reduction ratio from 25% to 400%.
MAKING COPIES 5 - 7 Press Set. (For example, press 5 3 to select the enlargement or reduction ratio Press Set. -OR- 5 Press or you want. to enter 53%.) 6 Press Start. -OR- You can select Custom (25-400%) and press Set. Press other temporary copy keys for more settings. ■ Special Copy Options (2in1, 4in1 or Poster) are not available with Enlarge/Reduce. ■ Auto is not available with the scanner glass. Use the numeric keys to enter an enlargement or reduction ratio from 25% to 400%.


