
Advanced Users Manual - English
Page 3
... Toner Save ...1 Sleep Mode ...1 Deep Sleep mode 2 Toner Settings ...2 Toner Setting (Continue Mode 2 LCD Contrast ...3 User Settings List 3 Network Configuration List (DCP-7065DN / HL-2280DW 4 WLAN Report (HL-2280DW only 4 Scanning using a scanner driver 4 2 Making copies 5 Copy settings ...5 Stop copying...5 Using the Options...Copy (short edge flip 13 A Routine maintenance 14 Cleaning the machine 14 Cleaning the outside of the machine 14 Cleaning the scanner 15 Cleaning the corona wire 16 Cleaning the drum unit 17 Cleaning the paper pick-up rollers 22 Checking the machine ...
... Toner Save ...1 Sleep Mode ...1 Deep Sleep mode 2 Toner Settings ...2 Toner Setting (Continue Mode 2 LCD Contrast ...3 User Settings List 3 Network Configuration List (DCP-7065DN / HL-2280DW 4 WLAN Report (HL-2280DW only 4 Scanning using a scanner driver 4 2 Making copies 5 Copy settings ...5 Stop copying...5 Using the Options...Copy (short edge flip 13 A Routine maintenance 14 Cleaning the machine 14 Cleaning the outside of the machine 14 Cleaning the scanner 15 Cleaning the corona wire 16 Cleaning the drum unit 17 Cleaning the paper pick-up rollers 22 Checking the machine ...
Advanced Users Manual - English
Page 18
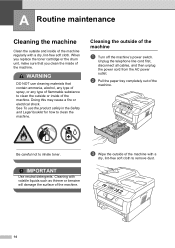
When you replace the toner cartridge or the drum unit, make sure that contain ammonia, alcohol, any type of spray, or any type of flammable substance to clean the machine. See To use cleaning materials that you clean the inside of the machine. b Pull the paper tray completely out of the...first, disconnect all cables, and then unplug the power cord from the AC power outlet. IMPORTANT Use neutral detergents. A Routine maintenance A Cleaning the machine A Clean the outside or inside of the machine. WARNING DO NOT use the product safely in the Safety and Legal booklet for how to...
When you replace the toner cartridge or the drum unit, make sure that contain ammonia, alcohol, any type of spray, or any type of flammable substance to clean the machine. See To use cleaning materials that you clean the inside of the machine. b Pull the paper tray completely out of the...first, disconnect all cables, and then unplug the power cord from the AC power outlet. IMPORTANT Use neutral detergents. A Routine maintenance A Cleaning the machine A Clean the outside or inside of the machine. WARNING DO NOT use the product safely in the Safety and Legal booklet for how to...
Advanced Users Manual - English
Page 20
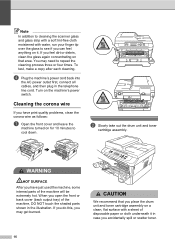
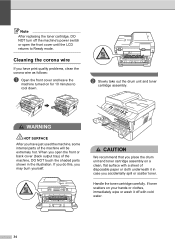
... corona wire A If you have just used the machine, some internal parts of the machine will be extremely hot. Note In addition to cleaning the scanner glass and glass strip with a soft lint-free cloth moistened with water, run your finger tip over the glass to see if you ... as follows: a Open the front cover and leave the machine turned on for 10 minutes to repeat the cleaning process three or four times. CAUTION We recommend that area. b Slowly take out the drum unit and toner cartridge assembly. If you do this, you open the front or back cover (back output...
... corona wire A If you have just used the machine, some internal parts of the machine will be extremely hot. Note In addition to cleaning the scanner glass and glass strip with a soft lint-free cloth moistened with water, run your finger tip over the glass to see if you ... as follows: a Open the front cover and leave the machine turned on for 10 minutes to repeat the cleaning process three or four times. CAUTION We recommend that area. b Slowly take out the drum unit and toner cartridge assembly. If you do this, you open the front or back cover (back output...
Advanced Users Manual - English
Page 21
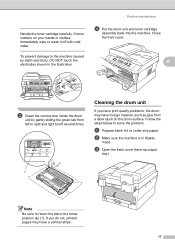
... output tray). 1 Note Be sure to return the tab to left several times. A c Clean the corona wire inside the drum unit by static electricity, DO NOT touch the electrodes shown in Ready mode. Cleaning the drum unit A If you do not, printed pages may have a vertical stripe. 17 Close the ...front cover. If you have print quality problems, the drum may have foreign material, such as glue from left to right ...
... output tray). 1 Note Be sure to return the tab to left several times. A c Clean the corona wire inside the drum unit by static electricity, DO NOT touch the electrodes shown in Ready mode. Cleaning the drum unit A If you do not, printed pages may have a vertical stripe. 17 Close the ...front cover. If you have print quality problems, the drum may have foreign material, such as glue from left to right ...
Advanced Users Manual - English
Page 22
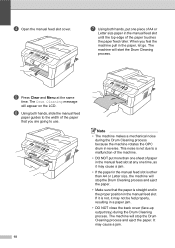
... the manual feed slot cover. When you are going to use. 18 Note • The machine makes a mechanical noise during the Drum Cleaning process. The Drum Cleaning message will stop the Drum Cleaning process and eject the paper. g Using both hands, slide the manual feed paper guides to a malfunction of the machine. •...of paper in a paper jam. • DO NOT close the back cover (face-up output tray) during the Drum Cleaning process because the machine rotates the OPC drum in the manual feed slot is not due to the width of the paper touches the paper feed roller. e Press...
... the manual feed slot cover. When you are going to use. 18 Note • The machine makes a mechanical noise during the Drum Cleaning process. The Drum Cleaning message will stop the Drum Cleaning process and eject the paper. g Using both hands, slide the manual feed paper guides to a malfunction of the machine. •...of paper in a paper jam. • DO NOT close the back cover (face-up output tray) during the Drum Cleaning process because the machine rotates the OPC drum in the manual feed slot is not due to the width of the paper touches the paper feed roller. e Press...
Advanced Users Manual - English
Page 23
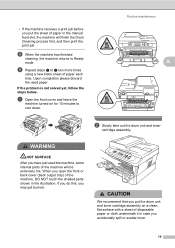
... to h two more times using a new blank sheet of the machine will finish the Drum Cleaning process first, and then print the print job. a Open the front cover and leave the machine turned on a clean, flat surface with a sheet of disposable paper or cloth underneath it in case you open... minutes to Ready mode. h When the machine has finished cleaning, the machine returns to cool down. Routine maintenance A b Slowly take out the drum unit and toner cartridge assembly. Upon completion please discard the used the machine, some internal parts of paper each time. If the problem is not...
... to h two more times using a new blank sheet of the machine will finish the Drum Cleaning process first, and then print the print job. a Open the front cover and leave the machine turned on a clean, flat surface with a sheet of disposable paper or cloth underneath it in case you open... minutes to Ready mode. h When the machine has finished cleaning, the machine returns to cool down. Routine maintenance A b Slowly take out the drum unit and toner cartridge assembly. Upon completion please discard the used the machine, some internal parts of paper each time. If the problem is not...
Advanced Users Manual - English
Page 25
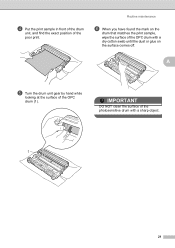
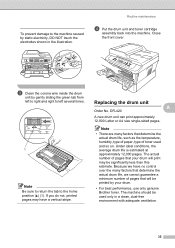
IMPORTANT DO NOT clean the surface of the OPC drum with a sharp object. 1 21 Routine maintenance f When you have found the mark on the drum that matches the print sample, wipe the surface of the photosensitive drum with a dry cotton swab until the dust or glue on the surface comes off. A e Turn the drum unit gear by hand while looking at the surface of the poor print. d Put the print sample in front of the drum unit, and find the exact position of the OPC drum (1).
IMPORTANT DO NOT clean the surface of the OPC drum with a sharp object. 1 21 Routine maintenance f When you have found the mark on the drum that matches the print sample, wipe the surface of the photosensitive drum with a dry cotton swab until the dust or glue on the surface comes off. A e Turn the drum unit gear by hand while looking at the surface of the poor print. d Put the print sample in front of the drum unit, and find the exact position of the OPC drum (1).
Advanced Users Manual - English
Page 26
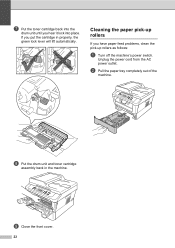
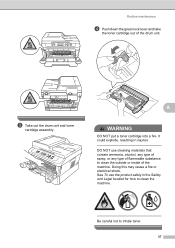
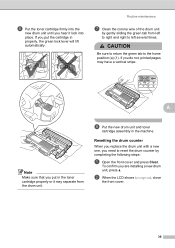
h Put the drum unit and toner cartridge assembly back in properly, the green lock lever will lift automatically. g Put the toner cartridge back into the drum unit until you have paper feed problems, clean the pick-up rollers as follows: a Turn off the machine's power switch. Unplug the power cord from the AC power outlet. i Close the front cover. 22 b Pull the paper tray completely out of the machine. Cleaning the paper pick-up rollers A If you hear it lock into place. If you put the cartridge in the machine.
h Put the drum unit and toner cartridge assembly back in properly, the green lock lever will lift automatically. g Put the toner cartridge back into the drum unit until you have paper feed problems, clean the pick-up rollers as follows: a Turn off the machine's power switch. Unplug the power cord from the AC power outlet. i Close the front cover. 22 b Pull the paper tray completely out of the machine. Cleaning the paper pick-up rollers A If you hear it lock into place. If you put the cartridge in the machine.
Advanced Users Manual - English
Page 32
... 5 N in 1 (page layout 10 Options key 6 quality 8 sort (ADF only 8 temporary settings 5 using ADF 8, 10 using scanner glass 10 D Deep Sleep mode 2 Drum unit checking (remaining life 24 cleaning 16, 17 Duplex copy 12 E Enlarge/Reduce 8 L LCD (liquid crystal display) contrast 3 M Machine information checking remaining life of parts 24 page counts 24...
... 5 N in 1 (page layout 10 Options key 6 quality 8 sort (ADF only 8 temporary settings 5 using ADF 8, 10 using scanner glass 10 D Deep Sleep mode 2 Drum unit checking (remaining life 24 cleaning 16, 17 Duplex copy 12 E Enlarge/Reduce 8 L LCD (liquid crystal display) contrast 3 M Machine information checking remaining life of parts 24 page counts 24...

Users Manual - English
Page 8
... against Brother for any failure of the MFC/Fax machine to you may not apply to operate properly. This limited Warranty does not include cleaning, consumables (including, without limitation, ink cartridges, print cartridges, print rolls, thermal paper rolls, toner cartridges, drum units,... (Canada only) Pursuant to the limited warranty of 1 year from the date of purchase for labour and parts, Brother International Corporation (Canada) Ltd. ("Brother"), or its Authorized Service Centres, Distributors, Dealers, Agents or employees, shall create another warranty or modify this warranty....
... against Brother for any failure of the MFC/Fax machine to you may not apply to operate properly. This limited Warranty does not include cleaning, consumables (including, without limitation, ink cartridges, print cartridges, print rolls, thermal paper rolls, toner cartridges, drum units,... (Canada only) Pursuant to the limited warranty of 1 year from the date of purchase for labour and parts, Brother International Corporation (Canada) Ltd. ("Brother"), or its Authorized Service Centres, Distributors, Dealers, Agents or employees, shall create another warranty or modify this warranty....
Users Manual - English
Page 12
... 28 Replacing the toner cartridge 29 Cleaning the corona wire 34 Replacing the drum unit 35 B Troubleshooting 40 Error and maintenance messages 40 Document Jams 43 Document is jammed in the top of the ADF unit (For DCP-7065DN 43 Document is jammed under the document cover (For DCP-7065DN) ..........43 Removing small documents jammed in...
... 28 Replacing the toner cartridge 29 Cleaning the corona wire 34 Replacing the drum unit 35 B Troubleshooting 40 Error and maintenance messages 40 Document Jams 43 Document is jammed in the top of the ADF unit (For DCP-7065DN 43 Document is jammed under the document cover (For DCP-7065DN) ..........43 Removing small documents jammed in...
Users Manual - English
Page 45
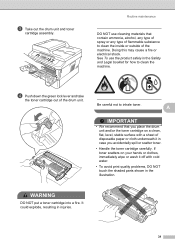
...disposable paper or cloth underneath it in the Safety and Legal booklet for how to clean the machine. Be careful not to clean the inside or outside of the machine. See To use cleaning materials that you accidentally spill or scatter toner. • Handle the toner cartridge ...carefully. It could explode, resulting in the illustration. c Take out the drum unit and toner cartridge assembly. If toner scatters on a clean, flat, level, stable surface with cold water. • To avoid print quality problems, DO NOT touch the shaded...
...disposable paper or cloth underneath it in the Safety and Legal booklet for how to clean the machine. Be careful not to clean the inside or outside of the machine. See To use cleaning materials that you accidentally spill or scatter toner. • Handle the toner cartridge ...carefully. It could explode, resulting in the illustration. c Take out the drum unit and toner cartridge assembly. If toner scatters on a clean, flat, level, stable surface with cold water. • To avoid print quality problems, DO NOT touch the shaded...
Users Manual - English
Page 47
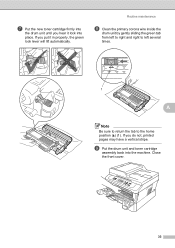
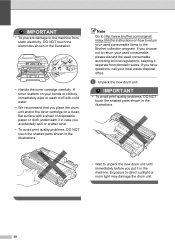
g Put the new toner cartridge firmly into the drum unit until you hear it in properly, the green lock lever will lift automatically. If you put it lock into the machine. i Put the drum unit and toner cartridge assembly back into place. Routine maintenance h Clean the primary corona wire inside the drum unit by gently sliding the green tab from left to right and right to left several times. 1 A Note Be sure to return the tab to the home position (a) (1). Close the front cover. 33 If you do not, printed pages may have a vertical stripe.
g Put the new toner cartridge firmly into the drum unit until you hear it in properly, the green lock lever will lift automatically. If you put it lock into the machine. i Put the drum unit and toner cartridge assembly back into place. Routine maintenance h Clean the primary corona wire inside the drum unit by gently sliding the green tab from left to right and right to left several times. 1 A Note Be sure to return the tab to the home position (a) (1). Close the front cover. 33 If you do not, printed pages may have a vertical stripe.
Users Manual - English
Page 48
... and toner cartridge assembly. WARNING HOT SURFACE After you place the drum unit and toner cartridge assembly on your hands or clothes, immediately wipe or wash it in case you have just used the machine, some internal parts of the machine, DO NOT touch the shaded parts shown in the illustration.... CAUTION We recommend that you have print quality problems, clean the corona wire as follows: a Open the front cover and leave the machine...
... and toner cartridge assembly. WARNING HOT SURFACE After you place the drum unit and toner cartridge assembly on your hands or clothes, immediately wipe or wash it in case you have just used the machine, some internal parts of the machine, DO NOT touch the shaded parts shown in the illustration.... CAUTION We recommend that you have print quality problems, clean the corona wire as follows: a Open the front cover and leave the machine...
Users Manual - English
Page 49
...we have a vertical stripe. The actual number of toner used only in the illustration. c Clean the corona wire inside the drum unit by static electricity, DO NOT touch the electrodes shown in a clean, dust-free environment with adequate ventilation. 35 If you do not, printed pages may have ...no control over the many factors that will print may be printed by your drum. • For best performance, use only genuine Brother toner. To prevent damage to...
...we have a vertical stripe. The actual number of toner used only in the illustration. c Clean the corona wire inside the drum unit by static electricity, DO NOT touch the electrodes shown in a clean, dust-free environment with adequate ventilation. 35 If you do not, printed pages may have ...no control over the many factors that will print may be printed by your drum. • For best performance, use only genuine Brother toner. To prevent damage to...
Users Manual - English
Page 50
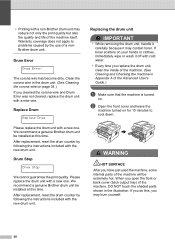
...just used the machine, some internal parts of the machine will be installed at this , you may contain toner. Replace Drum A Replace Drum Please replace the drum unit with a new one. We recommend a genuine Brother drum unit be installed at this time. If toner scatters on . Drum Error A Drum Error The corona wire has become...by the use of the machine itself. b Open the front cover and leave the machine turned on page 34.) If you replace the drum unit, clean the inside of the Advanced User's Guide.) a Make sure that the machine is turned on your hands or clothes, immediately wipe or ...
...just used the machine, some internal parts of the machine will be installed at this , you may contain toner. Replace Drum A Replace Drum Please replace the drum unit with a new one. We recommend a genuine Brother drum unit be installed at this time. If toner scatters on . Drum Error A Drum Error The corona wire has become...by the use of the machine itself. b Open the front cover and leave the machine turned on page 34.) If you replace the drum unit, clean the inside of the Advanced User's Guide.) a Make sure that the machine is turned on your hands or clothes, immediately wipe or ...
Users Manual - English
Page 51
... that contain ammonia, alcohol, any type of spray, or any type of flammable substance to clean the outside or inside of the drum unit. It could explode, resulting in the Safety and Legal booklet for how to inhale toner. 37 Doing this may cause a fire or electrical shock. ...Be careful not to clean the machine. A WARNING DO NOT put a toner cartridge into a fire. DO NOT use the product safely...
... that contain ammonia, alcohol, any type of spray, or any type of flammable substance to clean the outside or inside of the drum unit. It could explode, resulting in the Safety and Legal booklet for how to inhale toner. 37 Doing this may cause a fire or electrical shock. ...Be careful not to clean the machine. A WARNING DO NOT put a toner cartridge into a fire. DO NOT use the product safely...
Users Manual - English
Page 52
...clean, flat surface with cold water. • We recommend that you put it in the illustration. • Handle the toner cartridge carefully. IMPORTANT • To prevent damage to the machine from domestic waste. If toner scatters on how to return your used consumable according to the Brother collection program. e Unpack the new drum... unit. Exposure to http://www.brother.com/original/ index.html for instructions on your local waste disposal office. If ...
...clean, flat surface with cold water. • We recommend that you put it in the illustration. • Handle the toner cartridge carefully. IMPORTANT • To prevent damage to the machine from domestic waste. If toner scatters on how to return your used consumable according to the Brother collection program. e Unpack the new drum... unit. Exposure to http://www.brother.com/original/ index.html for instructions on your local waste disposal office. If ...
Users Manual - English
Page 53
... g Clean the corona wire of the drum unit by completing the following steps: a Open the front cover and press Clear. To confirm you are installing a new drum unit, press a. If you put in the toner cartridge properly or it lock into place. Resetting the drum counter A When you replace the drum unit with... do not, printed pages may have a vertical stripe. 1 A Note Make sure that you put the cartridge in the machine. h Put the new drum unit and toner cartridge assembly in properly, the green lock lever will lift automatically. f Put the toner cartridge firmly into the new...
... g Clean the corona wire of the drum unit by completing the following steps: a Open the front cover and press Clear. To confirm you are installing a new drum unit, press a. If you put in the toner cartridge properly or it lock into place. Resetting the drum counter A When you replace the drum unit with... do not, printed pages may have a vertical stripe. 1 A Note Make sure that you put the cartridge in the machine. h Put the new drum unit and toner cartridge assembly in properly, the green lock lever will lift automatically. f Put the toner cartridge firmly into the new...
Users Manual - English
Page 54
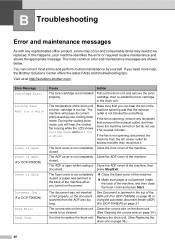
... be replaced. The corona wire on the drum unit Clean the corona wire on page 36.) 40 Replace the drum unit. (See Replacing the drum unit on the drum unit. B Troubleshooting B Error and maintenance...it for a while Cover is Open Cover is Open (For DCP-7065DN) Cover is Open Document Jam (For DCP-7065DN) Drum Error Drum Stop Cause Action The toner cartridge is too hot. The machine... consumable items may need more help, the Brother Solutions Center offers the latest FAQs and troubleshooting tips: Visit us at http://solutions.brother.com/. The most errors and perform routine ...
... be replaced. The corona wire on the drum unit Clean the corona wire on page 36.) 40 Replace the drum unit. (See Replacing the drum unit on the drum unit. B Troubleshooting B Error and maintenance...it for a while Cover is Open Cover is Open (For DCP-7065DN) Cover is Open Document Jam (For DCP-7065DN) Drum Error Drum Stop Cause Action The toner cartridge is too hot. The machine... consumable items may need more help, the Brother Solutions Center offers the latest FAQs and troubleshooting tips: Visit us at http://solutions.brother.com/. The most errors and perform routine ...


