
Quick Setup Guide - English
Page 5
...make sure: The paper is completely inserted into the machine. Make sure that it will cause paper jams. The side to be printed on must be face down. The paper guides touch the sides of paper well to avoid paper jams and misfeeds. Over filling the paper tray will feed properly. ...1 c Fan the stack of the paper so it is below the...
...make sure: The paper is completely inserted into the machine. Make sure that it will cause paper jams. The side to be printed on must be face down. The paper guides touch the sides of paper well to avoid paper jams and misfeeds. Over filling the paper tray will feed properly. ...1 c Fan the stack of the paper so it is below the...
Advanced Users Manual - English
Page 22
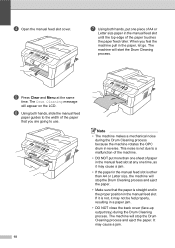
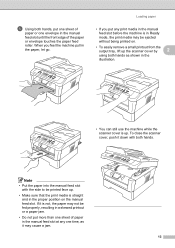
... slot until the top edge of the machine. • DO NOT put one time, as it may cause a jam. It may cause a jam. • If the paper in the manual feed slot is other than one sheet of the paper that the paper is not, it is straight and in the proper position in the... hands, put more than A4 or Letter size, the machine will start the Drum Cleaning process. If it may not be fed properly, resulting in a paper jam. • DO NOT close the back cover (face-up output tray) during the Drum Cleaning process because the machine rotates the OPC drum in the...
... slot until the top edge of the machine. • DO NOT put one time, as it may cause a jam. It may cause a jam. • If the paper in the manual feed slot is other than one sheet of the paper that the paper is not, it is straight and in the proper position in the... hands, put more than A4 or Letter size, the machine will start the Drum Cleaning process. If it may not be fed properly, resulting in a paper jam. • DO NOT close the back cover (face-up output tray) during the Drum Cleaning process because the machine rotates the OPC drum in the...
Users Manual - English
Page 12
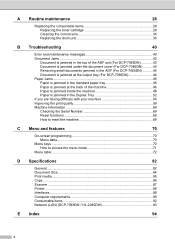
... DCP-7065DN 43 Document is jammed under the document cover (For DCP-7065DN) ..........43 Removing small documents jammed in the ADF (For DCP-7065DN 44 Document is jammed at the output tray (For DCP-7065DN 44 Paper Jams...45 Paper is jammed in the standard paper tray 45 Paper is jammed at the back of the machine 46 Paper is jammed inside the machine 48 Paper is jammed... 82 General ...82 Document Size ...84 Print media...85 Copy ...86 Scanner ...87 Printer ...88 Interfaces ...89 Computer requirements 90 Consumable items 92 Network (LAN) (DCP-7065DN / HL-2280DW 93 E Index 94 x
... DCP-7065DN 43 Document is jammed under the document cover (For DCP-7065DN) ..........43 Removing small documents jammed in the ADF (For DCP-7065DN 44 Document is jammed at the output tray (For DCP-7065DN 44 Paper Jams...45 Paper is jammed in the standard paper tray 45 Paper is jammed at the back of the machine 46 Paper is jammed inside the machine 48 Paper is jammed... 82 General ...82 Document Size ...84 Print media...85 Copy ...86 Scanner ...87 Printer ...88 Interfaces ...89 Computer requirements 90 Consumable items 92 Network (LAN) (DCP-7065DN / HL-2280DW 93 E Index 94 x
Users Manual - English
Page 23
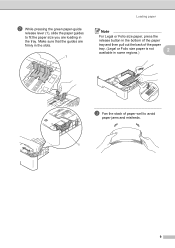
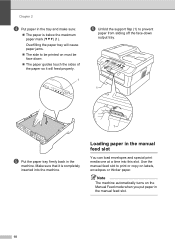
Make sure that the guides are firmly in the slots. 1 Loading paper Note For Legal or Folio size paper, press the release button in the bottom of the paper tray and then pull out the back of the paper tray. (Legal or Folio size paper is not available in some regions.) 2 c Fan the stack of paper well to fit the paper size you are loading in the tray. b While pressing the green paper-guide release lever (1), slide the paper guides to avoid paper jams and misfeeds. 1 9
Make sure that the guides are firmly in the slots. 1 Loading paper Note For Legal or Folio size paper, press the release button in the bottom of the paper tray and then pull out the back of the paper tray. (Legal or Folio size paper is not available in some regions.) 2 c Fan the stack of paper well to fit the paper size you are loading in the tray. b While pressing the green paper-guide release lever (1), slide the paper guides to avoid paper jams and misfeeds. 1 9
Users Manual - English
Page 24
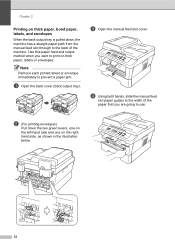
... copy on must be face down. The paper guides touch the sides of the paper so it is below the maximum paper mark (b b b) (1). Loading paper in the manual feed slot. 10 Make sure that it will cause paper jams. The side to prevent paper from sliding off the face-down output tray. 1... 1 e Put the paper tray firmly back in the tray and make sure: The paper is completely inserted into this slot. Note The machine ...
... copy on must be face down. The paper guides touch the sides of the paper so it is below the maximum paper mark (b b b) (1). Loading paper in the manual feed slot. 10 Make sure that it will cause paper jams. The side to prevent paper from sliding off the face-down output tray. 1... 1 e Put the paper tray firmly back in the tray and make sure: The paper is completely inserted into this slot. Note The machine ...
Users Manual - English
Page 26
.... hand side, as shown in the illustration below. 12 b (For printing envelopes) Pull down , the machine has a straight paper path from the manual feed slot through to prevent a paper jam. Chapter 2 Printing on thick paper, bond paper, labels, and envelopes 2 When the back output tray is pulled down the two green levers, one on the...
.... hand side, as shown in the illustration below. 12 b (For printing envelopes) Pull down , the machine has a straight paper path from the manual feed slot through to prevent a paper jam. Chapter 2 Printing on thick paper, bond paper, labels, and envelopes 2 When the back output tray is pulled down the two green levers, one on the...
Users Manual - English
Page 27
... mode, the print media may cause a jam. 13 When you put more than one time, as shown in the illustration. • You can still use the machine while the scanner cover is not, the paper may not be fed properly, resulting in a skewed printout or a paper jam. • Do not put any one... sheet of the paper or envelope touches the paper feed roller. If it down with the side to be ejected without being printed...
... mode, the print media may cause a jam. 13 When you put more than one time, as shown in the illustration. • You can still use the machine while the scanner cover is not, the paper may not be fed properly, resulting in a skewed printout or a paper jam. • Do not put any one... sheet of the paper or envelope touches the paper feed roller. If it down with the side to be ejected without being printed...
Users Manual - English
Page 30
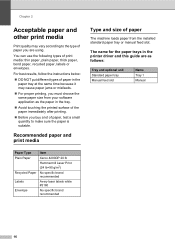
... are as follows: 2 Tray and optional unit Standard paper tray Manual feed slot Name Tray 1 Manual 16 Chapter 2 Acceptable paper and other print media 2 Print quality may cause paper jams or misfeeds. For proper printing, you must choose the same paper size from the installed standard paper tray or manual feed slot. For best results...
... are as follows: 2 Tray and optional unit Standard paper tray Manual feed slot Name Tray 1 Manual 16 Chapter 2 Acceptable paper and other print media 2 Print quality may cause paper jams or misfeeds. For proper printing, you must choose the same paper size from the installed standard paper tray or manual feed slot. For best results...
Users Manual - English
Page 32
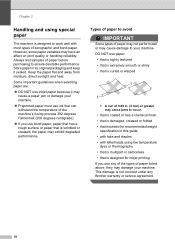
...(200 degrees centigrade). If you use any Brother warranty or service agreement. 18 This damage is not covered under any of the types of xerographic and bond paper. Types of paper to avoid 2 IMPORTANT Some types of paper may not perform well or may cause damage to your...or thermography • that is multipart or carbonless • that is designed for inkjet printing If you use bond paper, paper that has a rough surface or paper that is wrinkled or creased, the paper may damage your machine. However, some paper variables may cause a paper jam or damage your machine.
...(200 degrees centigrade). If you use any Brother warranty or service agreement. 18 This damage is not covered under any of the types of xerographic and bond paper. Types of paper to avoid 2 IMPORTANT Some types of paper may not perform well or may cause damage to your...or thermography • that is multipart or carbonless • that is designed for inkjet printing If you use bond paper, paper that has a rough surface or paper that is wrinkled or creased, the paper may damage your machine. However, some paper variables may cause a paper jam or damage your machine.
Users Manual - English
Page 34
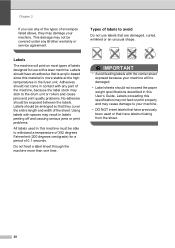
Labels 2 The machine will be covered under any Brother warranty or service agreement. Labels should be arranged so that are damaged, ...that have labels missing from the sheet. 20 Types of labels to your machine. Labels should not exceed the paper weight specifications described in this material is acrylic-based since this User's Guide. Labels exceeding this machine must be ...the machine, because the label stock may stick to the drum unit or rollers and cause jams and print quality problems. No adhesive should not come in contact with spaces may result in labels peeling off ...
Labels 2 The machine will be covered under any Brother warranty or service agreement. Labels should be arranged so that are damaged, ...that have labels missing from the sheet. 20 Types of labels to your machine. Labels should not exceed the paper weight specifications described in this material is acrylic-based since this User's Guide. Labels exceeding this machine must be ...the machine, because the label stock may stick to the drum unit or rollers and cause jams and print quality problems. No adhesive should not come in contact with spaces may result in labels peeling off ...
Users Manual - English
Page 35
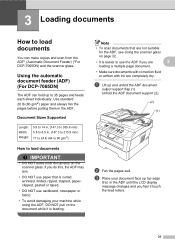
...can hold up to 35 pages and feeds each sheet individually. If you do this, the ADF may jam. • DO NOT use paper that are not suitable for the ADF, see Using the scanner glass on page 22. • It ...c Place your machine while using the ADF, DO NOT pull on the scanner glass. Use standard 20 lb (80 g/m2) paper and always fan the pages before putting them in . (147.3 to 215.9 mm) 17 to 24 lb (64 to 90... (2). (2) (1) b Fan the pages well. Using the automatic document feeder (ADF) (For DCP-7065DN) 3 The ADF can make copies and scan from the ADF* (Automatic Document Feeder) (*For...
...can hold up to 35 pages and feeds each sheet individually. If you do this, the ADF may jam. • DO NOT use paper that are not suitable for the ADF, see Using the scanner glass on page 22. • It ...c Place your machine while using the ADF, DO NOT pull on the scanner glass. Use standard 20 lb (80 g/m2) paper and always fan the pages before putting them in . (147.3 to 215.9 mm) 17 to 24 lb (64 to 90... (2). (2) (1) b Fan the pages well. Using the automatic document feeder (ADF) (For DCP-7065DN) 3 The ADF can make copies and scan from the ADF* (Automatic Document Feeder) (*For...
Users Manual - English
Page 54
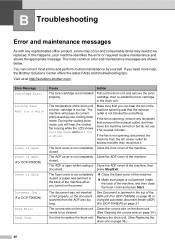
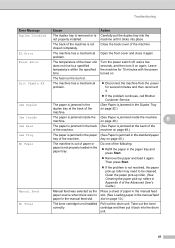
...may occur and consumable items may need more help, the Brother Solutions Center offers the latest FAQs and troubleshooting tips: Visit us at http://solutions.brother.com/. The front cover is too hot. needs to... AC power outlet for a while Cover is Open Cover is Open (For DCP-7065DN) Cover is Open Document Jam (For DCP-7065DN) Drum Error Drum Stop Cause Action The toner cartridge is open while loading... Wait for several minutes. If the fan is jammed in the back of the machine. Make sure paper is not completely closed or paper was too long. The ADF is not installed ...
...may occur and consumable items may need more help, the Brother Solutions Center offers the latest FAQs and troubleshooting tips: Visit us at http://solutions.brother.com/. The front cover is too hot. needs to... AC power outlet for a while Cover is Open Cover is Open (For DCP-7065DN) Cover is Open Document Jam (For DCP-7065DN) Drum Error Drum Stop Cause Action The toner cartridge is open while loading... Wait for several minutes. If the fan is jammed in the back of the machine. Make sure paper is not completely closed or paper was too long. The ADF is not installed ...
Users Manual - English
Page 55
The back of the machine. Leave the machine for several minutes and then reconnect it. If the problem continues, call Brother Customer Service. The fuser unit is too hot. machine on . tray on again. cartridge and then put the duplex tray into the not properly installed... has a mechanical problem. Disconnect the machine from the power for 15 minutes with the power turned on page 46.) Jam Tray The paper is jammed in the paper (See Paper is jammed in the Duplex Tray on page 10.) No Toner The toner cartridge is not installed Pull out the drum unit. on page...
The back of the machine. Leave the machine for several minutes and then reconnect it. If the problem continues, call Brother Customer Service. The fuser unit is too hot. machine on . tray on again. cartridge and then put the duplex tray into the not properly installed... has a mechanical problem. Disconnect the machine from the power for 15 minutes with the power turned on page 46.) Jam Tray The paper is jammed in the paper (See Paper is jammed in the Duplex Tray on page 10.) No Toner The toner cartridge is not installed Pull out the drum unit. on page...
Users Manual - English
Page 59
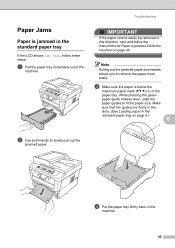
... page 8.) B 1 b Use both hands to slowly pull out the jammed paper. d Put the paper tray firmly back in this direction, stop and follow these steps: a Pull the paper tray completely out of the paper tray. Troubleshooting IMPORTANT If the paper cannot easily be removed in the machine. 45 Paper Jams B Paper is below the maximum paper mark (b b b) (1) of the machine.
... page 8.) B 1 b Use both hands to slowly pull out the jammed paper. d Put the paper tray firmly back in this direction, stop and follow these steps: a Pull the paper tray completely out of the paper tray. Troubleshooting IMPORTANT If the paper cannot easily be removed in the machine. 45 Paper Jams B Paper is below the maximum paper mark (b b b) (1) of the machine.

Users Manual - English
Page 60
b Slowly take out the drum unit and toner cartridge assembly. WARNING HOT SURFACE After you have just used the machine, some internal parts of the machine, DO NOT touch the shaded parts shown in the illustration. When you may burn yourself. 46 Follow these steps: a Open the front cover. Leave the machine turned on for 10 minutes to cool down. If you do this, you open the front or back cover (back output tray) of the machine will be extremely hot. Paper is jammed at the back of the machine B If the LCD shows Jam Rear, a paper jam occurred behind the back cover.
b Slowly take out the drum unit and toner cartridge assembly. WARNING HOT SURFACE After you have just used the machine, some internal parts of the machine, DO NOT touch the shaded parts shown in the illustration. When you may burn yourself. 46 Follow these steps: a Open the front cover. Leave the machine turned on for 10 minutes to cool down. If you do this, you open the front or back cover (back output tray) of the machine will be extremely hot. Paper is jammed at the back of the machine B If the LCD shows Jam Rear, a paper jam occurred behind the back cover.

Users Manual - English
Page 64
e Put the toner cartridge back into the drum unit until you were able to carefully pull the jammed paper up and out of the output tray opening. f If you hear it lock into the machine and close the front cover. If the machine does ..., press Start. Put the drum unit and toner cartridge assembly back into place. If you have cleared the paper jam. Use both hands to remove the drum unit and toner cartridge assembly and the jammed paper, you put the cartridge in properly, the green lock lever will lift automatically. g Lift the scanner cover. h Close...
e Put the toner cartridge back into the drum unit until you were able to carefully pull the jammed paper up and out of the output tray opening. f If you hear it lock into the machine and close the front cover. If the machine does ..., press Start. Put the drum unit and toner cartridge assembly back into place. If you have cleared the paper jam. Use both hands to remove the drum unit and toner cartridge assembly and the jammed paper, you put the cartridge in properly, the green lock lever will lift automatically. g Lift the scanner cover. h Close...
Users Manual - English
Page 65
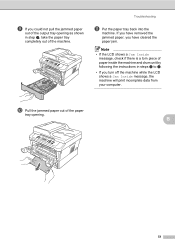
...print incomplete data from your computer. Troubleshooting k Put the paper tray back into the machine. B 51 If you have cleared the paper jam. Note • If the LCD shows a Jam Inside message, check if there is a torn piece of paper inside the machine and drum unit by following the instructions... in step g, take the paper tray completely out of the machine. i If ...
...print incomplete data from your computer. Troubleshooting k Put the paper tray back into the machine. B 51 If you have cleared the paper jam. Note • If the LCD shows a Jam Inside message, check if there is a torn piece of paper inside the machine and drum unit by following the instructions... in step g, take the paper tray completely out of the machine. i If ...
Users Manual - English
Page 70
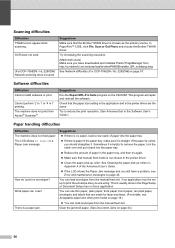
... chosen in the printer driver. Clean the paper pick-up roller. The LCD shows No Paper or a Paper Jam message. What paper can I print on page 57. If the paper is a paper jam. You can load envelopes from http://nj.newsoft.com.tw/download/brother/PM9SEInstaller_BR_multilang.dmg See Network difficulties (For DCP-7065DN / HL-2280DW) on envelopes? Try increasing...
... chosen in the printer driver. Clean the paper pick-up roller. The LCD shows No Paper or a Paper Jam message. What paper can I print on page 57. If the paper is a paper jam. You can load envelopes from http://nj.newsoft.com.tw/download/brother/PM9SEInstaller_BR_multilang.dmg See Network difficulties (For DCP-7065DN / HL-2280DW) on envelopes? Try increasing...
Users Manual - English
Page 108
...Brother numbers i Customer Service i FAQs (frequently asked questions i product support i service centers i Solutions Center i warranties iii, iv, vi C Cleaning corona wire 34 Consumable items 28 disposal 32 replacing 40 Control panel overview 6 Copy 24 keys 6 D Document how to load 21, 22 jams 43 Drum unit cleaning 34 replacing 35 Duplex key 6 paper jam..., 19 Error messages on LCD 40 Drum Error 36 Drum Stop 36 Duplex Disabled 41 Init Unable XX 41 Jam Duplex 41 No Paper 41 Out of Memory 42 Print Unable XX 42 Replace Drum 36 Replace Toner 29 Toner Ended 30 Toner Low...
...Brother numbers i Customer Service i FAQs (frequently asked questions i product support i service centers i Solutions Center i warranties iii, iv, vi C Cleaning corona wire 34 Consumable items 28 disposal 32 replacing 40 Control panel overview 6 Copy 24 keys 6 D Document how to load 21, 22 jams 43 Drum unit cleaning 34 replacing 35 Duplex key 6 paper jam..., 19 Error messages on LCD 40 Drum Error 36 Drum Stop 36 Duplex Disabled 41 Init Unable XX 41 Jam Duplex 41 No Paper 41 Out of Memory 42 Print Unable XX 42 Replace Drum 36 Replace Toner 29 Toner Ended 30 Toner Low...
Users Manual - English
Page 109
... scan 87 S Safety Instructions viii Scan 6, 26 Scanner glass using 22 Serial number how to load 8 in manual feed slot 10 in paper tray 8 jams 41, 45 recommended 16, 17 size 15, 17 tray capacity 17 type 15, 17 PaperPort™ 12SE with OCR See Software User's Guide... i T E Toner cartridge replacing 29 Troubleshooting 40 document jam 43, 44 error messages on LCD 40 if you are having difficulty copy quality 54 network 57 paper handling 56 print quality 57 printing 54 scanning 56 software 56 maintenance messages on LCD .......... 40 paper jam 45, 46, 48, 52 95
... scan 87 S Safety Instructions viii Scan 6, 26 Scanner glass using 22 Serial number how to load 8 in manual feed slot 10 in paper tray 8 jams 41, 45 recommended 16, 17 size 15, 17 tray capacity 17 type 15, 17 PaperPort™ 12SE with OCR See Software User's Guide... i T E Toner cartridge replacing 29 Troubleshooting 40 document jam 43, 44 error messages on LCD 40 if you are having difficulty copy quality 54 network 57 paper handling 56 print quality 57 printing 54 scanning 56 software 56 maintenance messages on LCD .......... 40 paper jam 45, 46, 48, 52 95


