Software Users Manual - English
Page 12
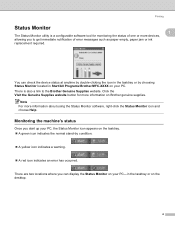
... Monitor utility is also a link to get immediate notification of one or more devices, allowing you can check the device status at anytime by double-clicking the icon in the tasktray or on Brother genuine supplies. There is a configurable software tool for more information... about using the Status Monitor software, right-click the Status Monitor icon and choose Help. Click the Visit the Genuine Supplies website button for monitoring the status of error messages such as paper empty, paper jam...
... Monitor utility is also a link to get immediate notification of one or more devices, allowing you can check the device status at anytime by double-clicking the icon in the tasktray or on Brother genuine supplies. There is a configurable software tool for more information... about using the Status Monitor software, right-click the Status Monitor icon and choose Help. Click the Visit the Genuine Supplies website button for monitoring the status of error messages such as paper empty, paper jam...
Software Users Manual - English
Page 165
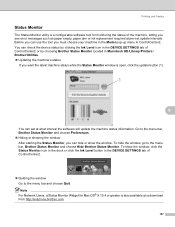
... the status of the machine, letting you want the latest machine status while the Status Monitor window is also available as paper empty, paper jam or ink replacement required at pre-set at what interval the software will update the machine status information. To show the window...You can check the device status by clicking the Ink Level icon in the DEVICE SETTINGS tab of ControlCenter2 or by choosing Brother Status Monitor located in Macintosh HD/Library/Printers/ Brother/Utilities. „ Updating the machine's status If you see error messages such as a download from http://solutions...
... the status of the machine, letting you want the latest machine status while the Status Monitor window is also available as paper empty, paper jam or ink replacement required at pre-set at what interval the software will update the machine status information. To show the window...You can check the device status by clicking the Ink Level icon in the DEVICE SETTINGS tab of ControlCenter2 or by choosing Brother Status Monitor located in Macintosh HD/Library/Printers/ Brother/Utilities. „ Updating the machine's status If you see error messages such as a download from http://solutions...
Software Users Manual - English
Page 170
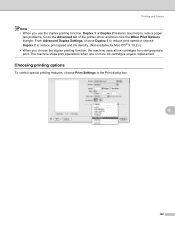
... the Print dialog box. 9 162 Printing and Faxing Note • When you use the duplex printing function, Duplex 1 or Duplex 2 features may help to reduce paper jam problems. Go to reduce print speed and ink density. (Not available for Mac OS® X 10.2.x) • When you choose the duplex printing function, the...
... the Print dialog box. 9 162 Printing and Faxing Note • When you use the duplex printing function, Duplex 1 or Duplex 2 features may help to reduce paper jam problems. Go to reduce print speed and ink density. (Not available for Mac OS® X 10.2.x) • When you choose the duplex printing function, the...

Users Manual - English
Page 12
... Routine Maintenance 68 Troubleshooting 68 If you are having difficulty with your machine 68 Error and Maintenance messages 73 Error animation 76 Printer jam or paper jam 76 Routine maintenance 78 Replacing the ink cartridges 78 Cleaning the outside of the machine 81 Cleaning the scanner 81 Cleaning the machine printer...media...104 Copy ...105 PhotoCapture Center 106 PictBridge ...107 Scanner ...108 Printer ...109 Interfaces ...110 Computer requirements 111 Consumable items 112 Network (LAN) (DCP-585CW only 113 Wireless one-push configuration 114 E Glossary 115 F Index 116 x
... Routine Maintenance 68 Troubleshooting 68 If you are having difficulty with your machine 68 Error and Maintenance messages 73 Error animation 76 Printer jam or paper jam 76 Routine maintenance 78 Replacing the ink cartridges 78 Cleaning the outside of the machine 81 Cleaning the scanner 81 Cleaning the machine printer...media...104 Copy ...105 PhotoCapture Center 106 PictBridge ...107 Scanner ...108 Printer ...109 Interfaces ...110 Computer requirements 111 Consumable items 112 Network (LAN) (DCP-585CW only 113 Wireless one-push configuration 114 E Glossary 115 F Index 116 x
Users Manual - English
Page 20
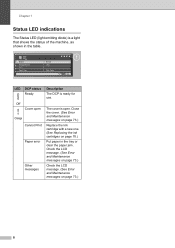
... or clear the paper jam. Check the LCD message. (See Error and Maintenance messages on page 73.) Check the LCD message. (See Error and Maintenance messages on page 78.) Put paper in the table. 01 Quality Enlarge/Reduce Ratio: Paper Type Normal 100% Plain Paper Mem. LED DCP status Ready Off ...Cover open . Close the cover. (See Error and Maintenance messages on page 73.) Replace the Ink cartridge with a new one. (See Replacing the ink ...
... or clear the paper jam. Check the LCD message. (See Error and Maintenance messages on page 73.) Check the LCD message. (See Error and Maintenance messages on page 78.) Put paper in the table. 01 Quality Enlarge/Reduce Ratio: Paper Type Normal 100% Plain Paper Mem. LED DCP status Ready Off ...Cover open . Close the cover. (See Error and Maintenance messages on page 73.) Replace the Ink cartridge with a new one. (See Replacing the ink ...
Users Manual - English
Page 22
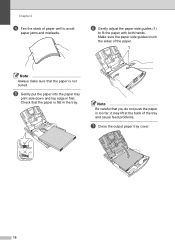
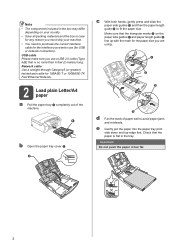
Check that you do not push the paper in too far; e Gently put the paper into the paper tray print side down and top edge in the tray. f Gently adjust the paper side guides (1) to avoid paper jams and misfeeds. Note Be careful that the paper is not curled. it may lift at the back of paper well to fit the paper with both hands. Chapter 2 d Fan the stack of the tray and cause feed problems. g Close the output paper tray cover. 10 Make sure the paper side guides touch the sides of the paper. 1 Note Always make sure that the paper is flat in first.
Check that you do not push the paper in too far; e Gently put the paper into the paper tray print side down and top edge in the tray. f Gently adjust the paper side guides (1) to avoid paper jams and misfeeds. Note Be careful that the paper is not curled. it may lift at the back of paper well to fit the paper with both hands. Chapter 2 d Fan the stack of the tray and cause feed problems. g Close the output paper tray cover. 10 Make sure the paper side guides touch the sides of the paper. 1 Note Always make sure that the paper is flat in first.
Users Manual - English
Page 28
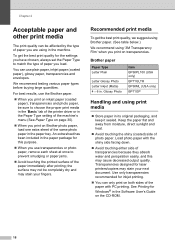
... inkjet printing. „ You can only print on both sides of the paper with the shiny side facing down. „ Avoid touching either side of transparencies because they absorb water and perspiration easily, and this purpose. „ When you print on Brother photo paper, load one extra sheet of the same photo paper in . Chapter 2 Acceptable paper...
... inkjet printing. „ You can only print on both sides of the paper with the shiny side facing down. „ Avoid touching either side of transparencies because they absorb water and perspiration easily, and this purpose. „ When you print on Brother photo paper, load one extra sheet of the same photo paper in . Chapter 2 Acceptable paper...

Users Manual - English
Page 34
... setting at once to prevent smudging or paper jams. Paper Size 3 You can use five sizes of paper for the type of the machine. d Press d or c to choose Plain Paper, Inkjet Paper, Brother BP71, Other Glossy or Transparency. Press OK. e Press Stop/Exit. e Press Stop/Exit. 22 3 General setup 3 Paper settings 3 Paper Type 3 To get the best print quality, set...
... setting at once to prevent smudging or paper jams. Paper Size 3 You can use five sizes of paper for the type of the machine. d Press d or c to choose Plain Paper, Inkjet Paper, Brother BP71, Other Glossy or Transparency. Press OK. e Press Stop/Exit. e Press Stop/Exit. 22 3 General setup 3 Paper settings 3 Paper Type 3 To get the best print quality, set...
Users Manual - English
Page 72
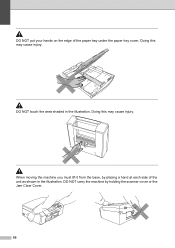
DO NOT touch the area shaded in the illustration. Doing this may cause injury. When moving the machine you must lift it from the base, by holding the scanner cover or the Jam Clear Cover. 60 DO NOT carry the machine by placing a hand at each side of the paper tray under the paper tray cover. Doing this may cause injury. DO NOT put your hands on the edge of the unit as shown in the illustration.
DO NOT touch the area shaded in the illustration. Doing this may cause injury. When moving the machine you must lift it from the base, by holding the scanner cover or the Jam Clear Cover. 60 DO NOT carry the machine by placing a hand at each side of the paper tray under the paper tray cover. Doing this may cause injury. DO NOT put your hands on the edge of the unit as shown in the illustration.
Users Manual - English
Page 81
... page 84.) Printed text or images are using Brother Original ink cartridges. Stains appear on page 9.) Make sure the Jam Clear Cover is dry. the page. 69 Printing appears dirty or ink seems Make sure you are using the paper support flap. (See Loading paper and other print media on the reverse side Make...
... page 84.) Printed text or images are using Brother Original ink cartridges. Stains appear on page 9.) Make sure the Jam Clear Cover is dry. the page. 69 Printing appears dirty or ink seems Make sure you are using the paper support flap. (See Loading paper and other print media on the reverse side Make...
Users Manual - English
Page 87
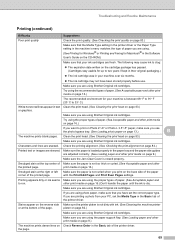
...the machine) and pull out the jammed paper by following the steps in progress Press Stop/Exit...Color Start. (See Loading paper and other operations in Printer jam B or paper jam on page 76. Remove the jammed paper by following : „ Refill the paper in the paper tray. Paper Jam Paper is jammed in the machine. Unplug the device from the USB direct interface. The paper is jammed in the machine. Open the Jam Clear Cover (at http://solutions.brother... Maintenance Error Message Cause Action No Paper Fed The machine is out of paper or paper is set to turn machine off ...
...the machine) and pull out the jammed paper by following the steps in progress Press Stop/Exit...Color Start. (See Loading paper and other operations in Printer jam B or paper jam on page 76. Remove the jammed paper by following : „ Refill the paper in the paper tray. Paper Jam Paper is jammed in the machine. Unplug the device from the USB direct interface. The paper is jammed in the machine. Open the Jam Clear Cover (at http://solutions.brother... Maintenance Error Message Cause Action No Paper Fed The machine is out of paper or paper is set to turn machine off ...
Users Manual - English
Page 88
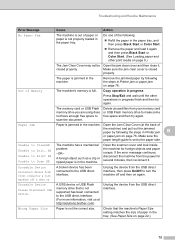
... Note You can read the steps at the back of the machine. 1 1 b Pull out the jammed paper (1) and press Stop/Exit. 1 76 a Pull the paper tray (1) out of the machine and then closing it is jammed in the machine. c Reset the machine by pressing c to see the next step and d to go...back to the next step. You can press d c or OK to pause the auto-animation and go to step-bystep mode. Printer jam or paper jam B Take out the jammed paper depending on the LCD after 1 minute the animation starts running automatically again. If you do not press a key, after you cannot remove...
... Note You can read the steps at the back of the machine. 1 1 b Pull out the jammed paper (1) and press Stop/Exit. 1 76 a Pull the paper tray (1) out of the machine and then closing it is jammed in the machine. c Reset the machine by pressing c to see the next step and d to go...back to the next step. You can press d c or OK to pause the auto-animation and go to step-bystep mode. Printer jam or paper jam B Take out the jammed paper depending on the LCD after 1 minute the animation starts running automatically again. If you do not press a key, after you cannot remove...
Users Manual - English
Page 89
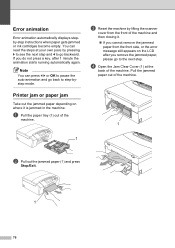
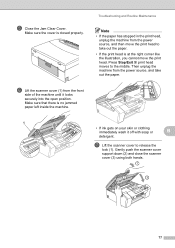
...close the scanner cover (3) using both hands. 1 2 3 77 Make sure that there is closed properly. Troubleshooting and Routine Maintenance Note • If the paper has stopped in the print head, unplug the machine from the power source, and then move the print head. Press Stop/Exit till print head... the right corner like the illustration, you cannot move the print head to take out the paper. e Close the Jam Clear Cover. g Lift the scanner cover to the middle. Make sure the cover is no jammed paper left inside the machine. 1 • If ink gets on your skin or clothing immediately...
...close the scanner cover (3) using both hands. 1 2 3 77 Make sure that there is closed properly. Troubleshooting and Routine Maintenance Note • If the paper has stopped in the print head, unplug the machine from the power source, and then move the print head. Press Stop/Exit till print head... the right corner like the illustration, you cannot move the print head to take out the paper. e Close the Jam Clear Cover. g Lift the scanner cover to the middle. Make sure the cover is no jammed paper left inside the machine. 1 • If ink gets on your skin or clothing immediately...
Users Manual - English
Page 94
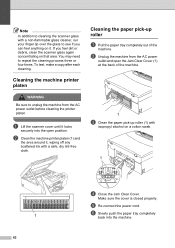
...locks securely into the machine. Cleaning the machine printer platen B WARNING Be sure to repeat the cleaning process three or four times. Cleaning the paper pick-up roller (1) with a safe, dry lint-free cloth. b Unplug the machine from the AC power outlet before cleaning the printer platen.... f Slowly push the paper tray completely back into the open the Jam Clear Cover (1) at the back of the machine. 1 c Clean the paper pick-up roller B a Pull the paper tray completely out of the machine. Make sure the cover is closed properly...
...locks securely into the machine. Cleaning the machine printer platen B WARNING Be sure to repeat the cleaning process three or four times. Cleaning the paper pick-up roller (1) with a safe, dry lint-free cloth. b Unplug the machine from the AC power outlet before cleaning the printer platen.... f Slowly push the paper tray completely back into the open the Jam Clear Cover (1) at the back of the machine. 1 c Clean the paper pick-up roller B a Pull the paper tray completely out of the machine. Make sure the cover is closed properly...
Users Manual - English
Page 129
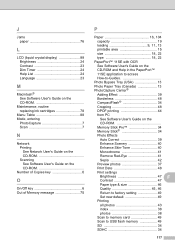
J Jams paper 76 L LCD (liquid crystal display 88 Brightness 24 Contrast 23 Dim Timer 24 Help List 24 ...-ROM and Help in the PaperPort™ 11SE application to access How-to-Guides Photo Bypass Tray (USA 13 Photo Paper Tray (Canada 13 PhotoCapture Center® Adding Effect 39 Borderless 48 CompactFlash 34 Cropping 48 DPOF printing 44 from PC...Monochrome 41 Remove Red-Eye 41 Sepia 42 Preview photos 37 Print Date 48 Print settings Brightness 47 F Contrast 47 Paper type & size 46 Quality 45, 46 Return to factory setting 49 Set new default 49 Printing all photos 43 ...
J Jams paper 76 L LCD (liquid crystal display 88 Brightness 24 Contrast 23 Dim Timer 24 Help List 24 ...-ROM and Help in the PaperPort™ 11SE application to access How-to-Guides Photo Bypass Tray (USA 13 Photo Paper Tray (Canada 13 PhotoCapture Center® Adding Effect 39 Borderless 48 CompactFlash 34 Cropping 48 DPOF printing 44 from PC...Monochrome 41 Remove Red-Eye 41 Sepia 42 Preview photos 37 Print Date 48 Print settings Brightness 47 F Contrast 47 Paper type & size 46 Quality 45, 46 Return to factory setting 49 Set new default 49 Printing all photos 43 ...
Users Manual - English
Page 130
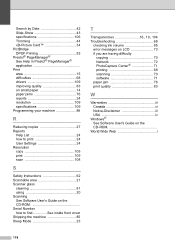
...PageManager® See Help in Presto!® PageManager® application Print area 15 difficulties 68 drivers 109 improving quality 83 on small paper 14 paper jams 76 reports 24 resolution 109 specifications 109 Programming your machine 88 R Reducing copies 27 Reports Help List 24 how to print 24 User... error messages on LCD 73 if you are having difficulty copying 70 Network 72 PhotoCapture Center 71 printing 68 scanning 70 software 71 paper jam 76 print quality 83 W Warranties iii Canada vi Notice-Disclaimer iii USA iv Windows® See Software User's Guide on the ...
...PageManager® See Help in Presto!® PageManager® application Print area 15 difficulties 68 drivers 109 improving quality 83 on small paper 14 paper jams 76 reports 24 resolution 109 specifications 109 Programming your machine 88 R Reducing copies 27 Reports Help List 24 how to print 24 User... error messages on LCD 73 if you are having difficulty copying 70 Network 72 PhotoCapture Center 71 printing 68 scanning 70 software 71 paper jam 76 print quality 83 W Warranties iii Canada vi Notice-Disclaimer iii USA iv Windows® See Software User's Guide on the ...
Quick Setup Guide - English
Page 2
... cable for the interface you are using. 1 3 2 3 d Fan the stack of the machine. 1 b Open the paper tray cover a. 1 c With both hands, gently press and slide the paper side guides a and then the paper length guide b to avoid paper jams and misfeeds. Make sure that the triangular marks c on your machine. • You need to purchase...
... cable for the interface you are using. 1 3 2 3 d Fan the stack of the machine. 1 b Open the paper tray cover a. 1 c With both hands, gently press and slide the paper side guides a and then the paper length guide b to avoid paper jams and misfeeds. Make sure that the triangular marks c on your machine. • You need to purchase...


