Network Users Manual - English
Page 13
... a Windows® PC or Macintosh® (Mac OS® X 10.2.4 or greater) computer. (See Remote Setup in the Software User's Guide.) Internet Fax/Scan to E-mail Server (MFC-6490CW and MFC-6890CDW: standard, MFC-5890CN: available as IP address. Before using the machine's control panel. Introduction Management utilities BRAdmin Light 1 1 1 BRAdmin Light is a utility for more advanced management of network connected Brother devices. The BRAdmin Light utility is a utility for DCP models) 1 The...
... a Windows® PC or Macintosh® (Mac OS® X 10.2.4 or greater) computer. (See Remote Setup in the Software User's Guide.) Internet Fax/Scan to E-mail Server (MFC-6490CW and MFC-6890CDW: standard, MFC-5890CN: available as IP address. Before using the machine's control panel. Introduction Management utilities BRAdmin Light 1 1 1 BRAdmin Light is a utility for more advanced management of network connected Brother devices. The BRAdmin Light utility is a utility for DCP models) 1 The...

Network Users Manual - English
Page 31
...for wireless network configuration 3 For Infrastructure mode a Confirm your network environment. (See page 23.) „ Infrastructure mode Connected to a wireless capable computer without an access point 3 3 b Confirm your wireless network setup method. (See page 24.) Using the Setup Wizard from the control panel (Recommended) Using the SES/WPS/AOSS control panel menu Using the PIN Method of Wi-Fi Protected Setup™ Using the Brother installer application Temporarily using a network cable Using the SES/WPS/AOSS control panel menu c Configure your machine for a wireless network...
...for wireless network configuration 3 For Infrastructure mode a Confirm your network environment. (See page 23.) „ Infrastructure mode Connected to a wireless capable computer without an access point 3 3 b Confirm your wireless network setup method. (See page 24.) Using the Setup Wizard from the control panel (Recommended) Using the SES/WPS/AOSS control panel menu Using the PIN Method of Wi-Fi Protected Setup™ Using the Brother installer application Temporarily using a network cable Using the SES/WPS/AOSS control panel menu c Configure your machine for a wireless network...

Network Users Manual - English
Page 67
... menu. 57 You have completed the wireless network setup. Wireless configuration for Windows® using the Brother installer application (Not available for MFC-5490CN and MFC-5890CN) q To communicate with the configured wireless device, you must configure your computer to continue installing drivers and software necessary for operating your computer to match the machine's wireless settings shown on this screen are for example only. Your settings will not be the same.) 4 r Click Finish. Manually change...
... menu. 57 You have completed the wireless network setup. Wireless configuration for Windows® using the Brother installer application (Not available for MFC-5490CN and MFC-5890CN) q To communicate with the configured wireless device, you must configure your computer to continue installing drivers and software necessary for operating your computer to match the machine's wireless settings shown on this screen are for example only. Your settings will not be the same.) 4 r Click Finish. Manually change...

Network Users Manual - English
Page 85
... Start Here OSX from the CD-ROM menu. 75 Your settings will not be the same.) 5 r Click Finish. Wireless Configuration for Macintosh® using the Brother installer application (Not available for example only. Check the box after you must configure your computer to match the machine's wireless settings shown on this screen are for MFC-5490CN and MFC-5890CN) q To communicate with the configured wireless device, you confirm...
... Start Here OSX from the CD-ROM menu. 75 Your settings will not be the same.) 5 r Click Finish. Wireless Configuration for Macintosh® using the Brother installer application (Not available for example only. Check the box after you must configure your computer to match the machine's wireless settings shown on this screen are for MFC-5490CN and MFC-5890CN) q To communicate with the configured wireless device, you confirm...
Network Users Manual - English
Page 153
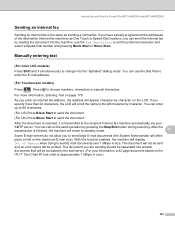
... in size.) 143 As you to send large E-mail documents (the System Administrator will display Out of the destination Internet fax machines as sending a normal fax. If you are sending should be separated into smaller documents that will appear character by loading the document into the "alphabet" dialing mode. The document you have already programmed the addresses of Memory when trying to set the preferred resolution and select a Speed-Dial number and pressing Black Start...
... in size.) 143 As you to send large E-mail documents (the System Administrator will display Out of the destination Internet fax machines as sending a normal fax. If you are sending should be separated into smaller documents that will appear character by loading the document into the "alphabet" dialing mode. The document you have already programmed the addresses of Memory when trying to set the preferred resolution and select a Speed-Dial number and pressing Black Start...
Network Users Manual - English
Page 169
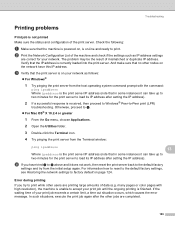
... not work, then reset the print server back to the default factory settings and try to -Peer print (LPR) troubleshooting. c Verify that no other jobs are correct for the print server to load its IP address after setting the IP address). 2 If a successful response is not printed 13 Make sure the status and configuration of the print server. many pages or color pages with the command: ping ipaddress Where ipaddress is on your network as IP address settings...
... not work, then reset the print server back to the default factory settings and try to -Peer print (LPR) troubleshooting. c Verify that no other jobs are correct for the print server to load its IP address after setting the IP address). 2 If a successful response is not printed 13 Make sure the status and configuration of the print server. many pages or color pages with the command: ping ipaddress Where ipaddress is on your network as IP address settings...
Software Users Manual - English
Page 3
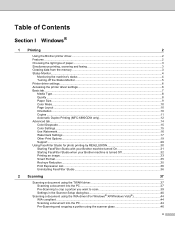
...I Windows® 1 Printing 2 Using the Brother printer driver...2 Features ...2 Choosing the right type of paper...3 Simultaneous printing, scanning and faxing 3 Clearing data from the memory ...3 Status Monitor...4 Monitoring the machine's status ...4 Turning off the Status Monitor ...5 Printer driver settings...6 Accessing the printer driver settings...6 Basic tab ...7 Media Type...8 Quality ...8 Paper Size ...9 Color Mode ...10 Page Layout ...10 Orientation ...10 Copies ...11 Automatic Duplex Printing (MFC-6890CDW only 12 Advanced tab...14 Color/Grayscale ...15 Color Settings ...15 Use...
...I Windows® 1 Printing 2 Using the Brother printer driver...2 Features ...2 Choosing the right type of paper...3 Simultaneous printing, scanning and faxing 3 Clearing data from the memory ...3 Status Monitor...4 Monitoring the machine's status ...4 Turning off the Status Monitor ...5 Printer driver settings...6 Accessing the printer driver settings...6 Basic tab ...7 Media Type...8 Quality ...8 Paper Size ...9 Color Mode ...10 Page Layout ...10 Orientation ...10 Copies ...11 Automatic Duplex Printing (MFC-6890CDW only 12 Advanced tab...14 Color/Grayscale ...15 Color Settings ...15 Use...
Software Users Manual - English
Page 52
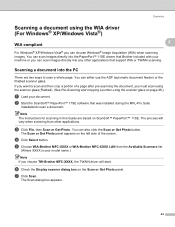
... software that support WIA or TWAIN scanning. The process will start. c Click File, then Scan or Get Photo. You can either use the ADF (automatic document feeder) or the Flatbed scanner glass. If you want to scan a whole page. You can also click the Scan or Get Photo button. Note The instructions for scanning in this Guide are two ways to scan and then crop a portion of the screen. You can scan images directly...
... software that support WIA or TWAIN scanning. The process will start. c Click File, then Scan or Get Photo. You can either use the ADF (automatic document feeder) or the Flatbed scanner glass. If you want to scan a whole page. You can also click the Scan or Get Photo button. Note The instructions for scanning in this Guide are two ways to scan and then crop a portion of the screen. You can scan images directly...
Software Users Manual - English
Page 120
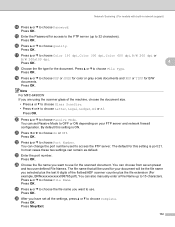
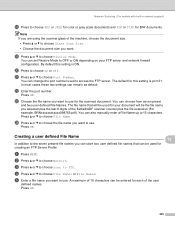
... two user defined File Names. The default for your FTP server and network firewall configuration. You can change the port number used for this setting is port 21. Press OK. s Press a or b to choose Passive Mode. Press OK. 4 r Choose the file type for access to the FTP server (up to OFF or ON depending on your document will be the file name you are using the scanner glass of the flatbed/ADF scanner counter...
... two user defined File Names. The default for your FTP server and network firewall configuration. You can change the port number used for this setting is port 21. Press OK. s Press a or b to choose Passive Mode. Press OK. 4 r Choose the file type for access to the FTP server (up to OFF or ON depending on your document will be the file name you are using the scanner glass of the flatbed/ADF scanner counter...

Software Users Manual - English
Page 128
... MENU. You can change the port number used for each of 15 characters can be entered for creating an FTP Server Profile. v Enter the port number. The file name that will be used for your FTP server and network firewall 4 configuration. Press OK. A maximum of the user defined names. The default for B/W documents. You can remain as default. Note If you are using the scanner glass of the flatbed/ADF scanner counter plus the file...
... MENU. You can change the port number used for each of 15 characters can be entered for creating an FTP Server Profile. v Enter the port number. The file name that will be used for your FTP server and network firewall 4 configuration. Press OK. A maximum of the user defined names. The default for B/W documents. You can remain as default. Note If you are using the scanner glass of the flatbed/ADF scanner counter plus the file...
Software Users Manual - English
Page 170
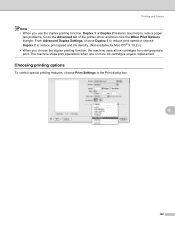
... print speed or choose Duplex 2 to reduce print speed and ink density. (Not available for color/grayscale print. Printing and Faxing Note • When you choose the duplex printing function, the machine uses all ink cartridges for Mac OS® X 10.2.x) • When you use the duplex printing function, Duplex 1 or Duplex 2 features may help to reduce paper jam problems. Go to the Advanced tab of the printer driver and then click the Other Print Options triangle. Choosing printing options 9 To control special printing features, choose Print Settings...
... print speed or choose Duplex 2 to reduce print speed and ink density. (Not available for color/grayscale print. Printing and Faxing Note • When you choose the duplex printing function, the machine uses all ink cartridges for Mac OS® X 10.2.x) • When you use the duplex printing function, Duplex 1 or Duplex 2 features may help to reduce paper jam problems. Go to the Advanced tab of the printer driver and then click the Other Print Options triangle. Choosing printing options 9 To control special printing features, choose Print Settings...
Software Users Manual - English
Page 217
... the Copy button configuration, set the Printer. By clicking the configured copy button, the print dialog box opens. 209 Choose the Resolution, Scan Type, Document Size, Show Scanner Interface, Brightness and Contrast settings to be customized to let you can scan a page on the machine and print the copies using any of the features of the machine's printer driver, or you use your Macintosh® and any standard printer driver installed on up to four buttons. You can direct the copy output...
... the Copy button configuration, set the Printer. By clicking the configured copy button, the print dialog box opens. 209 Choose the Resolution, Scan Type, Document Size, Show Scanner Interface, Brightness and Contrast settings to be customized to let you can scan a page on the machine and print the copies using any of the features of the machine's printer driver, or you use your Macintosh® and any standard printer driver installed on up to four buttons. You can direct the copy output...
Software Users Manual - English
Page 236
... choose the file name you are using the scanner glass of the flatbed/ADF scanner counter plus the last 6 digits of the machine, choose the document size. • Press a or b to choose Glass ScanSize. • Press d or c to use . Press OK. The file name that will be used to choose Quality. Press OK. The default for the scanned document. o Enter the Password for your FTP server and network firewall configuration.
... choose the file name you are using the scanner glass of the flatbed/ADF scanner counter plus the last 6 digits of the machine, choose the document size. • Press a or b to choose Glass ScanSize. • Press d or c to use . Press OK. The file name that will be used to choose Quality. Press OK. The default for the scanned document. o Enter the Password for your FTP server and network firewall configuration.
Software Users Manual - English
Page 243
... on your document will be used for the scanned document. You can change the port number used to choose PDF or JPEG for color or gray scale documents and PDF or TIFF for your FTP server and network firewall configuration. t Press to choose Passive Mode. The default for each of the flatbed/ADF scanner counter plus the last 6 digits of the user defined names. x Press a or b to choose the file name you...
... on your document will be used for the scanned document. You can change the port number used to choose PDF or JPEG for color or gray scale documents and PDF or TIFF for your FTP server and network firewall configuration. t Press to choose Passive Mode. The default for each of the flatbed/ADF scanner counter plus the last 6 digits of the user defined names. x Press a or b to choose the file name you...
Users Manual - English
Page 56
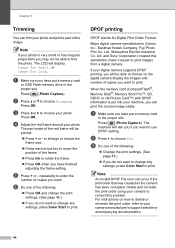
... display the images and number of copies you have put a memory card or USB Flash memory drive in the proper slot. a Make sure you do not want to change any settings, press Color Start to correct this standard to make it easier to choose your camera manufacturer's support website or accompanying documentation. 44 b Press a or b to trim the photo. Press OK. c Press d or c to print images from a digital camera. The part...
... display the images and number of copies you have put a memory card or USB Flash memory drive in the proper slot. a Make sure you do not want to change any settings, press Color Start to correct this standard to make it easier to choose your camera manufacturer's support website or accompanying documentation. 44 b Press a or b to trim the photo. Press OK. c Press d or c to print images from a digital camera. The part...

Users Manual - English
Page 64
... page 53. PictBridge requirements 6 To avoid errors, remember the following PictBridge settings may not be recognized). „ PhotoCapture Center® operations are also used. „ The names and availability of each setting depends on the specification of these settings may be available from a digital camera (without PictBridge. Camera Menu Selections Paper Size Paper Type Layout DPOF setting 1 Print Quality Color Enhancement Print Date Options Letter, A4, 4"×6", Printer Settings (Default setting) 2 Plain Paper, Glossy Paper, Inkjet Paper, Printer Settings (Default setting...
... page 53. PictBridge requirements 6 To avoid errors, remember the following PictBridge settings may not be recognized). „ PhotoCapture Center® operations are also used. „ The names and availability of each setting depends on the specification of these settings may be available from a digital camera (without PictBridge. Camera Menu Selections Paper Size Paper Type Layout DPOF setting 1 Print Quality Color Enhancement Print Date Options Letter, A4, 4"×6", Printer Settings (Default setting) 2 Plain Paper, Glossy Paper, Inkjet Paper, Printer Settings (Default setting...
Users Manual - English
Page 81
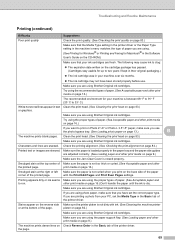
... skewed. Stains appear on Photo 4"×6" or Photo L 3.5"×5" paper, make sure that you are using Brother Original ink cartridges. Check the printing alignment. (See Checking the print alignment on page 84.) Printed text or images are using the recommended types of paper. (See Acceptable paper and other print media on the back side of the page. Printing appears dirty or ink seems Make sure you print on page 9.) Make sure the Jam Clear Cover is closed properly. Try using the proper types of the printer driver.
... skewed. Stains appear on Photo 4"×6" or Photo L 3.5"×5" paper, make sure that you are using Brother Original ink cartridges. Check the printing alignment. (See Checking the print alignment on page 84.) Printed text or images are using the recommended types of paper. (See Acceptable paper and other print media on the back side of the page. Printing appears dirty or ink seems Make sure you print on page 9.) Make sure the Jam Clear Cover is closed properly. Try using the proper types of the printer driver.
Users Manual - English
Page 87
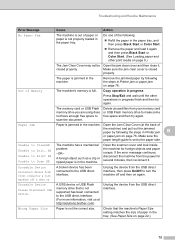
... device from the USB direct interface. Check that is in the machine. The paper is set to Scan XX The machine has a mechanical problem. -OR- Make sure the paper length guide is jammed in the tray. (See Paper Size on page 9.) The Jam Clear Cover may not be Open the jam clear cover and then close it again and then press Black Start or Color Start. (See Loading paper and other operations in progress finish and then try again. If the error message...
... device from the USB direct interface. Check that is in the machine. The paper is set to Scan XX The machine has a mechanical problem. -OR- Make sure the paper length guide is jammed in the tray. (See Paper Size on page 9.) The Jam Clear Cover may not be Open the jam clear cover and then close it again and then press Black Start or Color Start. (See Loading paper and other operations in progress finish and then try again. If the error message...
Users Manual - English
Page 125
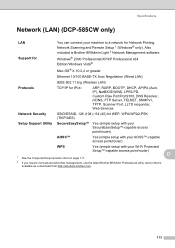
... as a download from http://solutions.brother.com. 113 Support for Windows® 2000 Professional/XP/XP Professional x64 Edition/Windows Vista® Mac OS® X 10.2.4 or greater Ethernet 10/100 BASE-TX Auto Negotiation (Wired LAN) IEEE 802.11 b/g (Wireless LAN) Protocols TCP/IP for Network Printing, Network Scanning and Remote Setup 1 (Windows® only). Specifications Network (LAN) (DCP-585CW only) D LAN You can connect your machine to a network for...
... as a download from http://solutions.brother.com. 113 Support for Windows® 2000 Professional/XP/XP Professional x64 Edition/Windows Vista® Mac OS® X 10.2.4 or greater Ethernet 10/100 BASE-TX Auto Negotiation (Wired LAN) IEEE 802.11 b/g (Wireless LAN) Protocols TCP/IP for Network Printing, Network Scanning and Remote Setup 1 (Windows® only). Specifications Network (LAN) (DCP-585CW only) D LAN You can connect your machine to a network for...
Quick Setup Guide - English
Page 29
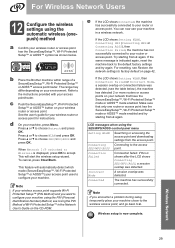
... start the wireless setup wizard. e If the LCD shows Connected, the machine has successfully connected to choose Network and press OK. LCD messages when using the SES/WPS/AOSS control panel menu Setting WLAN Searching or accessing the access point and downloading settings from c again. Connection Failed Connection failed. b Place the Brother machine within range of Wi-Fi Protected Setup™ in a wireless network. The range may differ depending on your wireless router or access point. To cancel, press Clear...
... start the wireless setup wizard. e If the LCD shows Connected, the machine has successfully connected to choose Network and press OK. LCD messages when using the SES/WPS/AOSS control panel menu Setting WLAN Searching or accessing the access point and downloading settings from c again. Connection Failed Connection failed. b Place the Brother machine within range of Wi-Fi Protected Setup™ in a wireless network. The range may differ depending on your wireless router or access point. To cancel, press Clear...


