

Users Manual - English
Page 4
...2768 (voice) Description Toner Drum IEEE-1284 Bi-directional Cable Paper Cassette #2 (Option) Owner's Manual Item TN-430 (Able to print 3000 pages) TN-460 (Able to print 6000 pages) DR-400 F2A046-10 LT-400 LE7096001 Product Registration (For USA Only) To Complete Your DCP-1400 Registration On-Line: 1... Insert the MFL Pro Suite CD-ROM into your CD-ROM drive. 2 Click On-Line Registration to register your product from Brother. (In the USA, you purchased the...
...2768 (voice) Description Toner Drum IEEE-1284 Bi-directional Cable Paper Cassette #2 (Option) Owner's Manual Item TN-430 (Able to print 3000 pages) TN-460 (Able to print 6000 pages) DR-400 F2A046-10 LT-400 LE7096001 Product Registration (For USA Only) To Complete Your DCP-1400 Registration On-Line: 1... Insert the MFL Pro Suite CD-ROM into your CD-ROM drive. 2 Click On-Line Registration to register your product from Brother. (In the USA, you purchased the...
Users Manual - English
Page 6
...exchange is given only to the first enduse purchaser of the accompanying product (referred to a Brother Authorized Service Center. BROTHER THREE YEAR LIMITED HARDWARE WARRANTY and EXCHANGE SERVICE FOR DCP-1400 (For USA Only) This warranty gives you certain rights and you may also have been ...sale). The refurbished or remanufactured Product you must return the original Product in the same shipping carton in this warranty as Toner, Drums, Print Heads, Ink Cartridges, etc. Follow the return instructions. What to the manufacturer's specifications for consumable items, such as "...
...exchange is given only to the first enduse purchaser of the accompanying product (referred to a Brother Authorized Service Center. BROTHER THREE YEAR LIMITED HARDWARE WARRANTY and EXCHANGE SERVICE FOR DCP-1400 (For USA Only) This warranty gives you certain rights and you may also have been ...sale). The refurbished or remanufactured Product you must return the original Product in the same shipping carton in this warranty as Toner, Drums, Print Heads, Ink Cartridges, etc. Follow the return instructions. What to the manufacturer's specifications for consumable items, such as "...

Users Manual - English
Page 8
...for the name and location of such damages. For laser products: Failure to remove the Toner Cartridge (and Toner Drum Unit on applicable models) during shipping. Damage to your print head resulting from packing without limitation, print cartridges, print head, toner... not remove the ink cartridges during shipping will cause severe damage to the DCP/Facsimile and will VOID your warranty. (Refer to operate properly. Internet support: support@brother.ca or browse Brother's Web Site: www.brother.com Brother International Corporation (Canada) Ltd. 1 Rue Hôtel de Ville Dollard-Des-...
...for the name and location of such damages. For laser products: Failure to remove the Toner Cartridge (and Toner Drum Unit on applicable models) during shipping. Damage to your print head resulting from packing without limitation, print cartridges, print head, toner... not remove the ink cartridges during shipping will cause severe damage to the DCP/Facsimile and will VOID your warranty. (Refer to operate properly. Internet support: support@brother.ca or browse Brother's Web Site: www.brother.com Brother International Corporation (Canada) Ltd. 1 Rue Hôtel de Ville Dollard-Des-...

Users Manual - English
Page 9
...to Know Your Digital Copier/Printer 1-1 Using This Manual 1-1 Finding Information 1-1 Conventions Used in This Manual 1-1 DCP-1400 Control Panel Overview 1-2 Inserting Originals for Copying 1-4 Using the ADF (Automatic Document Feeder 1-4 Using the Scanner ... and Connections 2-1 Packing List 2-1 Choosing a Location 2-2 Important Safety Instructions 2-3 Release the Scanner Lock 2-3 Assembly 2-4 Installing the Drum Unit Assembly (with Toner Cartridge 2-4 Paper 2-5 Acceptable Paper 2-5 Paper Capacity of Paper Cassette 2-5 Paper Specifications for the Cassette 2-5...
...to Know Your Digital Copier/Printer 1-1 Using This Manual 1-1 Finding Information 1-1 Conventions Used in This Manual 1-1 DCP-1400 Control Panel Overview 1-2 Inserting Originals for Copying 1-4 Using the ADF (Automatic Document Feeder 1-4 Using the Scanner ... and Connections 2-1 Packing List 2-1 Choosing a Location 2-2 Important Safety Instructions 2-3 Release the Scanner Lock 2-3 Assembly 2-4 Installing the Drum Unit Assembly (with Toner Cartridge 2-4 Paper 2-5 Acceptable Paper 2-5 Paper Capacity of Paper Cassette 2-5 Paper Specifications for the Cassette 2-5...
Users Manual - English
Page 15
...in the Paper Cassette 14-4 Paper is Jammed near the Drum Unit 14-5 Paper is Jammed in the Fuser Unit 14-5 If You Are Having Difficulty with Your DCP 14-6 Packing and Shipping the DCP 14-11 Lock the Scanner Lock 14-11 Routine Maintenance 14...Drum Unit 14-19 15 Important Information 15-1 Regulations and warnings 15-1 Laser Safety 15-1 FDA Regulations 15-1 Federal Communications Commission (FCC) Declaration of Conformity (For USA Only 15-2 Important 15-3 Industry Canada Compliance Statement (For Canada Only 15-3 Important - About the Interface Cable 15-3 Warranty 15-3 International...
...in the Paper Cassette 14-4 Paper is Jammed near the Drum Unit 14-5 Paper is Jammed in the Fuser Unit 14-5 If You Are Having Difficulty with Your DCP 14-6 Packing and Shipping the DCP 14-11 Lock the Scanner Lock 14-11 Routine Maintenance 14...Drum Unit 14-19 15 Important Information 15-1 Regulations and warnings 15-1 Laser Safety 15-1 FDA Regulations 15-1 Federal Communications Commission (FCC) Declaration of Conformity (For USA Only 15-2 Important 15-3 Industry Canada Compliance Statement (For Canada Only 15-3 Important - About the Interface Cable 15-3 Warranty 15-3 International...
Users Manual - English
Page 22
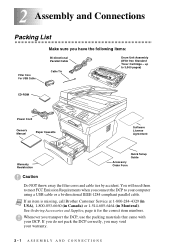
... Connections 2 Packing List Filter Core For USB Cable Make sure you may void your warranty. 2-1 ASSEMBLY AND CONNECTIONS Note If an item is missing, call Brother Customer Service at 1-800-284-4329 (in USA), 1-800-853-6660 (in Canada) or 1-514-685-6464 (in Montreal). If you do not pack... the DCP correctly, you have the following items: Bi-directional Parallel Cable Cable Tie Drum Unit Assembly (With free Standard Toner Cartridge - up to meet FCC Emission Requirements when you transport the...
... Connections 2 Packing List Filter Core For USB Cable Make sure you may void your warranty. 2-1 ASSEMBLY AND CONNECTIONS Note If an item is missing, call Brother Customer Service at 1-800-284-4329 (in USA), 1-800-853-6660 (in Canada) or 1-514-685-6464 (in Montreal). If you do not pack... the DCP correctly, you have the following items: Bi-directional Parallel Cable Cable Tie Drum Unit Assembly (With free Standard Toner Cartridge - up to meet FCC Emission Requirements when you transport the...

Users Manual - English
Page 25
ASSEMBLY AND CONNECTIONS 2-4 To prevent damage to the drum, do not expose it from side to side five or six times to light for longer than a few minutes. 2 Open the front cover of the DCP. 3 Insert the drum unit assembly into the DCP. 4 Close the front cover. Assembly Installing the Drum Unit Assembly (with Toner Cartridge) 1 Unpack the drum unit assembly including the toner cartridge, and gently rock it to distribute the toner evenly inside the cartridge.
ASSEMBLY AND CONNECTIONS 2-4 To prevent damage to the drum, do not expose it from side to side five or six times to light for longer than a few minutes. 2 Open the front cover of the DCP. 3 Insert the drum unit assembly into the DCP. 4 Close the front cover. Assembly Installing the Drum Unit Assembly (with Toner Cartridge) 1 Unpack the drum unit assembly including the toner cartridge, and gently rock it to distribute the toner evenly inside the cartridge.

Users Manual - English
Page 110
... scanner lock lever, and then press Stop. During the cooling down mode. The table below explains the most problems by yourself. If this happens, your DCP often identifies the problem and displays an error message. Error Messages As with a new one. 1. Press 1 to cool. 14 - 1 T R O U B L E S H O O T I N G A N D R O U T I N E M A ..., you must call the Brother fax-back system. Calls must be made from within that country. The drum counter was not reset. Action Use the drum unit until you purchased the printer. then replace the drum unit with any sophisticated office...
... scanner lock lever, and then press Stop. During the cooling down mode. The table below explains the most problems by yourself. If this happens, your DCP often identifies the problem and displays an error message. Error Messages As with a new one. 1. Press 1 to cool. 14 - 1 T R O U B L E S H O O T I N G A N D R O U T I N E M A ..., you must call the Brother fax-back system. Calls must be made from within that country. The drum counter was not reset. Action Use the drum unit until you purchased the printer. then replace the drum unit with any sophisticated office...

Users Manual - English
Page 111
... cartridge. -OR- CHECK ORIGINAL Originals were not inserted or fed properly, or original scanned from ADF was not completely Close the front cover for the drum closed. Replace the toner cartridge with a new one. (See page 14-17.) TONER LOW If the LCD shows TONER LOW, you see any jammed ...paper or other item, gently pull it back on. If the error message remains, open and close the front cover. Please call Brother Customer Service and tell them the DCP Error number at: In USA: 1-800-284-4329 In Canada: 1-800-853-6660 In Montreal: 1-514-685-6464 PAPER JAM The ...
... cartridge. -OR- CHECK ORIGINAL Originals were not inserted or fed properly, or original scanned from ADF was not completely Close the front cover for the drum closed. Replace the toner cartridge with a new one. (See page 14-17.) TONER LOW If the LCD shows TONER LOW, you see any jammed ...paper or other item, gently pull it back on. If the error message remains, open and close the front cover. Please call Brother Customer Service and tell them the DCP Error number at: In USA: 1-800-284-4329 In Canada: 1-800-853-6660 In Montreal: 1-514-685-6464 PAPER JAM The ...
Users Manual - English
Page 114
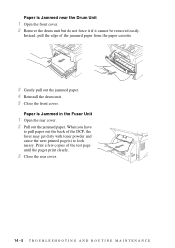
... until the pages print clearly. 3 Close the rear cover. 14 - 5 T R O U B L E S H O O T I N G A N D R O U T I N E M A I N T E N A N C E Paper is Jammed near the Drum Unit 1 Open the front cover. 2 Remove the drum unit but do not force it if it cannot be removed easily. Print a few copies of the jammed paper from the paper... cassette. 3 Gently pull out the jammed paper. 4 Reinstall the drum unit. 5 Close the front cover. Paper is Jammed in the Fuser Unit 1 Open the rear cover. 2 Pull out the jammed paper. When...
... until the pages print clearly. 3 Close the rear cover. 14 - 5 T R O U B L E S H O O T I N G A N D R O U T I N E M A I N T E N A N C E Paper is Jammed near the Drum Unit 1 Open the front cover. 2 Remove the drum unit but do not force it if it cannot be removed easily. Print a few copies of the jammed paper from the paper... cassette. 3 Gently pull out the jammed paper. 4 Reinstall the drum unit. 5 Close the front cover. Paper is Jammed in the Fuser Unit 1 Open the rear cover. 2 Pull out the jammed paper. When...

Users Manual - English
Page 115
...the electrical cord and plug it back in . (See page 2-8.) • The toner cartridge and drum unit are installed properly. (See page 2-4.) • The interface cable is securely connected between the DCP and computer. (See Quick Setup Guide.) • Check to see if LCD is showing an ..., leaves 62 printable lines. Either the scanner or the primary corona wire for this. correctly. The DCP cannot print full pages of pages correctly, then some full signal. Make sure the Brother TWAIN Driver is dirty. The DCP prints first couple Your computer is set up when I N T E N A N C E 14 - ...
...the electrical cord and plug it back in . (See page 2-8.) • The toner cartridge and drum unit are installed properly. (See page 2-4.) • The interface cable is securely connected between the DCP and computer. (See Quick Setup Guide.) • Check to see if LCD is showing an ..., leaves 62 printable lines. Either the scanner or the primary corona wire for this. correctly. The DCP cannot print full pages of pages correctly, then some full signal. Make sure the Brother TWAIN Driver is dirty. The DCP prints first couple Your computer is set up when I N T E N A N C E 14 - ...
Users Manual - English
Page 118
..., page 84.) Printouts are curled. Conditions such as high humidity may cause this situation to occur. 14 - 9 T R O U B L E S H O O T I N G A N D R O U T I N E M A I N T E N A N C E Remove the drum unit and clean the DCP's interior. (See Routine Maintenance and Cleaning the Drum Unit, on pages 14-14 and 14-16.) Make sure that you select the Paper Type that meets the specifications...
..., page 84.) Printouts are curled. Conditions such as high humidity may cause this situation to occur. 14 - 9 T R O U B L E S H O O T I N G A N D R O U T I N E M A I N T E N A N C E Remove the drum unit and clean the DCP's interior. (See Routine Maintenance and Cleaning the Drum Unit, on pages 14-14 and 14-16.) Make sure that you select the Paper Type that meets the specifications...

Users Manual - English
Page 119
... conditions such as it is scratched. Make sure the DCP is printed black. Remove the drum unit with a new one . T R O U B L E S H O O T I N G A N D R O U T I N E M A I N T E N A N C E 14 - 10 Black Page Clean the DCP's interior and the primary corona wire of the drum is necessary to light. Nothing printed on printed pages....if the printed pages are still black or the LCD shows CHANGE DRUM SOON, replace the drum unit with a new one . You must then replace the drum unit with a new one . You may occur if the DCP has not been used for a long time. Ghost Images Adjust...
... conditions such as it is scratched. Make sure the DCP is printed black. Remove the drum unit with a new one . T R O U B L E S H O O T I N G A N D R O U T I N E M A I N T E N A N C E 14 - 10 Black Page Clean the DCP's interior and the primary corona wire of the drum is necessary to light. Nothing printed on printed pages....if the printed pages are still black or the LCD shows CHANGE DRUM SOON, replace the drum unit with a new one . You must then replace the drum unit with a new one . You may occur if the DCP has not been used for a long time. Ghost Images Adjust...

Users Manual - English
Page 121
4 Open the front cover. 5 Remove the drum unit. Leave the toner cartridge installed in the original carton box with the original packing material. T R O U B L E S H O O T I N G A N D R O U T I N E M A I N T E N A N C E 14 - 12 Caution Remove the drum unit and toner cartridge assembly. Fold down the front output bin extension. 8 Wrap the DCP in the plastic bag and place it in the drum unit. 6 Place the drum unit and toner cartridge assembly into the plastic bag and seal the bag. 7 Close the front cover.
4 Open the front cover. 5 Remove the drum unit. Leave the toner cartridge installed in the original carton box with the original packing material. T R O U B L E S H O O T I N G A N D R O U T I N E M A I N T E N A N C E 14 - 12 Caution Remove the drum unit and toner cartridge assembly. Fold down the front output bin extension. 8 Wrap the DCP in the plastic bag and place it in the drum unit. 6 Place the drum unit and toner cartridge assembly into the plastic bag and seal the bag. 7 Close the front cover.
Users Manual - English
Page 122
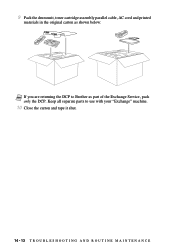
9 Pack the drum unit, toner cartridge assembly parallel cable, AC cord and printed materials in the original carton as shown below: Note If you are returning the DCP to use with your "Exchange" machine. 10 Close the carton and tape it shut. 14 - 13 T R O U B L E S H O O T I N G A N D R O U T I N E M A I N T E N A N C E Keep all separate parts to Brother as part of the Exchange Service, pack only the DCP.
9 Pack the drum unit, toner cartridge assembly parallel cable, AC cord and printed materials in the original carton as shown below: Note If you are returning the DCP to use with your "Exchange" machine. 10 Close the carton and tape it shut. 14 - 13 T R O U B L E S H O O T I N G A N D R O U T I N E M A I N T E N A N C E Keep all separate parts to Brother as part of the Exchange Service, pack only the DCP.
Users Manual - English
Page 124
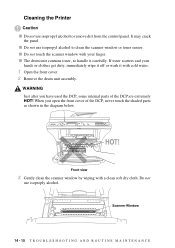
... or clothes get dirty, immediately wipe it off or wash it carefully. When you have used the DCP, some internal parts of the DCP, never touch the shaded parts as shown in the diagram below. I The drum unit contains toner, so handle it with a clean soft dry cloth. If toner scatters and your finger...
... or clothes get dirty, immediately wipe it off or wash it carefully. When you have used the DCP, some internal parts of the DCP, never touch the shaded parts as shown in the diagram below. I The drum unit contains toner, so handle it with a clean soft dry cloth. If toner scatters and your finger...

Users Manual - English
Page 125
... so toner powder does not spill out of them separate from right to left several times. 2 Return the tab and snap it into the DCP. (See Replacing the Drum Unit, page 14-19.) 4 Close the front cover. 5 Plug in the power cord. Note It is not at Home position ( ), ...). Discard the used toner cartridges, keep a new toner cartridge ready for use when you replace the toner cartridge. Replacing the Toner Cartridge The DCP can print up to 6,000 pages using a high yield toner cartridge. Cleaning the Drum Unit We recommend placing the drum unit on your local Sanitation Department.
... so toner powder does not spill out of them separate from right to left several times. 2 Return the tab and snap it into the DCP. (See Replacing the Drum Unit, page 14-19.) 4 Close the front cover. 5 Plug in the power cord. Note It is not at Home position ( ), ...). Discard the used toner cartridges, keep a new toner cartridge ready for use when you replace the toner cartridge. Replacing the Toner Cartridge The DCP can print up to 6,000 pages using a high yield toner cartridge. Cleaning the Drum Unit We recommend placing the drum unit on your local Sanitation Department.
Users Manual - English
Page 126
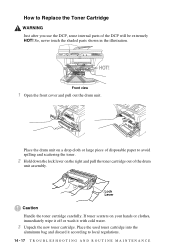
.... Place the used toner cartridge into the aluminum bag and discard it with cold water. 3 Unpack the new toner cartridge. Place the drum unit on a drop cloth or large piece of disposable paper to avoid spilling and scattering the toner. 2 Hold down the lock lever ... to local regulations. 14 - 17 T R O U B L E S H O O T I N G A N D R O U T I N E M A I N T E N A N C E If toner scatters on the right and pull the toner cartridge out of the DCP will be extremely HOT! So, never touch the shaded parts shown in the illustration. How to Replace the Toner Cartridge WARNING Just after you use...
.... Place the used toner cartridge into the aluminum bag and discard it with cold water. 3 Unpack the new toner cartridge. Place the drum unit on a drop cloth or large piece of disposable paper to avoid spilling and scattering the toner. 2 Hold down the lock lever ... to local regulations. 14 - 17 T R O U B L E S H O O T I N G A N D R O U T I N E M A I N T E N A N C E If toner scatters on the right and pull the toner cartridge out of the DCP will be extremely HOT! So, never touch the shaded parts shown in the illustration. How to Replace the Toner Cartridge WARNING Just after you use...

Users Manual - English
Page 127
... the DCP. Warranty coverage does not apply to problems caused by gently sliding the blue tab from side to side five or six times to distribute the toner evenly inside the drum unit by the use only a genuine Brother toner cartridge... I N G A N D R O U T I N E M A I You can use of 3rd party Toner, 3rd party Toner Cartridge or 3rd party Drum unit. 4 Gently rock the toner cartidge from right to left unpacked for a long period of toner cartridge may void your DCP's warranty. If a toner cartridge is specially formulated to ensure top print quality. I N T E N A N C E 14 - 18 Caution...
... the DCP. Warranty coverage does not apply to problems caused by gently sliding the blue tab from side to side five or six times to distribute the toner evenly inside the drum unit by the use only a genuine Brother toner cartridge... I N G A N D R O U T I N E M A I You can use of 3rd party Toner, 3rd party Toner Cartridge or 3rd party Drum unit. 4 Gently rock the toner cartidge from right to left unpacked for a long period of toner cartridge may void your DCP's warranty. If a toner cartridge is specially formulated to ensure top print quality. I N T E N A N C E 14 - 18 Caution...
Users Manual - English
Page 128
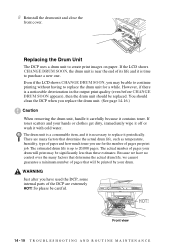
...is near the end of pages your drum will be printed by your hands or clothes get dirty, immediately wipe it off or wash it periodically. Because we have used the DCP, some internal parts of the DCP are many factors that determine the actual drum life, we cannot guarantee a minimum... number of pages that determine the actual drum life, such as temperature, humidity, type of pages per print job....
...is near the end of pages your drum will be printed by your hands or clothes get dirty, immediately wipe it off or wash it periodically. Because we have used the DCP, some internal parts of the DCP are many factors that determine the actual drum life, we cannot guarantee a minimum... number of pages that determine the actual drum life, such as temperature, humidity, type of pages per print job....


