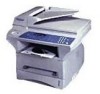

Users Manual - English
Page 4
... online for a complete selection of Brother accessories and supplies available for purchase.) USA: 1-888-879-3232 (voice) 1-800-947-1445 (fax) http://www.brothermall.com From within 1-800-668-2768 (voice) Canada: Description Laser Toner Cartridge Laser Drum Unit * 8 MB Memory ...Expansion Board * 16 MB Memory Expansion Board IEEE-1284 Bi-directional Cable Multi-purpose Paper Cassette #2 Surge Protection Device (2 outlets) Surge Protection Device (8 outlets) Owner's Manual Bundled DCP 1200 Printer and Scanner Drivers are...
... online for a complete selection of Brother accessories and supplies available for purchase.) USA: 1-888-879-3232 (voice) 1-800-947-1445 (fax) http://www.brothermall.com From within 1-800-668-2768 (voice) Canada: Description Laser Toner Cartridge Laser Drum Unit * 8 MB Memory ...Expansion Board * 16 MB Memory Expansion Board IEEE-1284 Bi-directional Cable Multi-purpose Paper Cassette #2 Surge Protection Device (2 outlets) Surge Protection Device (8 outlets) Owner's Manual Bundled DCP 1200 Printer and Scanner Drivers are...

Users Manual - English
Page 6
... and performs as well as "this Product has been serviced, modified or tampered with by the balance of the Consumable item, whichever is covered: Brother warrants to a Brother Authorized Service Center. that there are not covered by the limited warranty; (iii) the proper packaging iv C o p i e r / P r... (1) you did not purchase this Product from an authorized Brother reseller within five (5) business days; (ii) the malfunctions of purchase, and provides for consumable items, such as Toner, Drums, Ribbons, etc. BROTHER THREE YEAR LIMITED HARDWARE WARRANTY (For USA Only) This warranty...
... and performs as well as "this Product has been serviced, modified or tampered with by the balance of the Consumable item, whichever is covered: Brother warrants to a Brother Authorized Service Center. that there are not covered by the limited warranty; (iii) the proper packaging iv C o p i e r / P r... (1) you did not purchase this Product from an authorized Brother reseller within five (5) business days; (ii) the malfunctions of purchase, and provides for consumable items, such as Toner, Drums, Ribbons, etc. BROTHER THREE YEAR LIMITED HARDWARE WARRANTY (For USA Only) This warranty...

Users Manual - English
Page 8
...laser products: Failure to remove the Toner Cartridge (and Toner Drum Unit on applicable models) during shipping. No oral or written information, advice or representation provided by accident, neglect, misuse or improper installation or operation, any failure of the Copier/Printer to operate properly. Neither Brother nor anyone other rights which vary from Providence to a "Brother...of supplies or consumable items that are non-Brother products. Internet support: support@brother.ca or browse Brother's Web Site: www.brother.com Brother International Corporation (Canada) Ltd. 1 Rue Hô...
...laser products: Failure to remove the Toner Cartridge (and Toner Drum Unit on applicable models) during shipping. No oral or written information, advice or representation provided by accident, neglect, misuse or improper installation or operation, any failure of the Copier/Printer to operate properly. Neither Brother nor anyone other rights which vary from Providence to a "Brother...of supplies or consumable items that are non-Brother products. Internet support: support@brother.ca or browse Brother's Web Site: www.brother.com Brother International Corporation (Canada) Ltd. 1 Rue Hô...

Users Manual - English
Page 9
...Printer 1-1 Using this Manual 1-1 Finding Information 1-1 DCP-1200 Control Panel Overview 1-2 Inserting Originals for Copying (and Scanning 1-4 Using the ADF (Automatic Document Feeder 1-4 Using the Scanner Glass 1-5 Table of Options 1-6 2 Assembly 2-1 Packing List 2-1 Make sure you have the following items 2-1 Choosing a Location 2-2 Release the Scanner Lock 2-3 Assembly 2-4 Installing the Drum Unit Assembly (with Toner... Volume 2-8 Setting the Sleep Mode 2-8 Setting the Print Density 2-9 Toner Save 2-9 Checking the Drum Life 2-9 Turning On Cassette #2 2-10...
...Printer 1-1 Using this Manual 1-1 Finding Information 1-1 DCP-1200 Control Panel Overview 1-2 Inserting Originals for Copying (and Scanning 1-4 Using the ADF (Automatic Document Feeder 1-4 Using the Scanner Glass 1-5 Table of Options 1-6 2 Assembly 2-1 Packing List 2-1 Make sure you have the following items 2-1 Choosing a Location 2-2 Release the Scanner Lock 2-3 Assembly 2-4 Installing the Drum Unit Assembly (with Toner... Volume 2-8 Setting the Sleep Mode 2-8 Setting the Print Density 2-9 Toner Save 2-9 Checking the Drum Life 2-9 Turning On Cassette #2 2-10...

Users Manual - English
Page 14
...Machine 11-6 Routine Maintenance 11-12 Cleaning the Scanner 11-12 Cleaning the Printer 11-13 Cleaning the Drum Unit 11-14 Replacing the Toner Cartridge 11-14 Toner Empty Indicator 11-15 How to Replace the Toner Cartridge 11-15 Replacing the Drum Unit 11-17 Checking the Drum Life 11...-19 12 Specifications 12-1 Product Description 12-1 Paper 12-1 Paper Cassette (and Cassette #2 Accessory 12-1 Manual Feed Slot 12-1 Consumable Items 12-1 Machine 12-2 Printer 12-2 True Type Fonts ...
...Machine 11-6 Routine Maintenance 11-12 Cleaning the Scanner 11-12 Cleaning the Printer 11-13 Cleaning the Drum Unit 11-14 Replacing the Toner Cartridge 11-14 Toner Empty Indicator 11-15 How to Replace the Toner Cartridge 11-15 Replacing the Drum Unit 11-17 Checking the Drum Life 11...-19 12 Specifications 12-1 Product Description 12-1 Paper 12-1 Paper Cassette (and Cassette #2 Accessory 12-1 Manual Feed Slot 12-1 Consumable Items 12-1 Machine 12-2 Printer 12-2 True Type Fonts ...

Users Manual - English
Page 17
...place them in process and ejects the printout. 16 Menu Each key press shows the next Menu option: 1.INITIAL SETUP, 2.PRINT OPTIONS, and 3.RESET PRINTER. ScanSoft™ TextBridge® will be set up automatically as Microsoft Outlook or Netscape. Choose from seven degrees of print media. 11 Contrast (Temporary ...: 15 Job Cancel Terminates a print job in this key to select the size of light to automatically fit the original on and off when toner is low, so you set up and operate your E-mail application, such as an attachment. 13 Scan/OCR; You will be able to type...
...place them in process and ejects the printout. 16 Menu Each key press shows the next Menu option: 1.INITIAL SETUP, 2.PRINT OPTIONS, and 3.RESET PRINTER. ScanSoft™ TextBridge® will be set up automatically as Microsoft Outlook or Netscape. Choose from seven degrees of print media. 11 Contrast (Temporary ...: 15 Job Cancel Terminates a print job in this key to select the size of light to automatically fit the original on and off when toner is low, so you set up and operate your E-mail application, such as an attachment. 13 Scan/OCR; You will be able to type...
Users Manual - English
Page 20
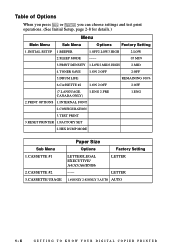
....LOW3.HIGH 2.LOW 2.SLEEP MODE ---- 05 MIN 3.PRINT DENSITY 1.LOW2.MID3.HIGH 2.MID 4.TONER SAVE 1.ON 2.OFF 2.OFF 5.DRUM LIFE REMAINING 100% 6.CASSETTE #2 1.ON 2.OFF 2.OFF (7.LANGUAGE, 1.ENG 2.FRE CANADA ONLY) 1.ENG 2.PRINT OPTIONS 1.INTERNAL FONT 2.CONFIGURATION 3.TEST PRINT 3.RESET PRINTER 1.FACTORY SET 2.HEX DUMP MODE Sub Menu 1.CASSETTE #1 2.CASSETTE #2 3.CASSETTE USAGE Paper...
....LOW3.HIGH 2.LOW 2.SLEEP MODE ---- 05 MIN 3.PRINT DENSITY 1.LOW2.MID3.HIGH 2.MID 4.TONER SAVE 1.ON 2.OFF 2.OFF 5.DRUM LIFE REMAINING 100% 6.CASSETTE #2 1.ON 2.OFF 2.OFF (7.LANGUAGE, 1.ENG 2.FRE CANADA ONLY) 1.ENG 2.PRINT OPTIONS 1.INTERNAL FONT 2.CONFIGURATION 3.TEST PRINT 3.RESET PRINTER 1.FACTORY SET 2.HEX DUMP MODE Sub Menu 1.CASSETTE #1 2.CASSETTE #2 3.CASSETTE USAGE Paper...
Users Manual - English
Page 21
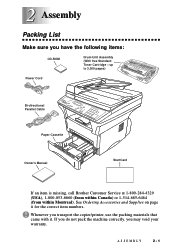
2 Assembly Packing List Make sure you transport the copier/printer, use the packing materials that came with it. up to 3,000 pages) Power Cord Bi-directional Parallel Cable Paper Cassette Owner's Manual StartCard If an item is missing, call Brother Customer Service at 1-800-284-4329 (USA), 1-800-...853-6660 (from within Canada) or 1-514-685-6464 (from within Montreal). Whenever you have the following items: CD-ROM Drum Unit Assembly (With free Standard Toner Cartridge - See Ordering Accessories and ...
2 Assembly Packing List Make sure you transport the copier/printer, use the packing materials that came with it. up to 3,000 pages) Power Cord Bi-directional Parallel Cable Paper Cassette Owner's Manual StartCard If an item is missing, call Brother Customer Service at 1-800-284-4329 (USA), 1-800-...853-6660 (from within Canada) or 1-514-685-6464 (from within Montreal). Whenever you have the following items: CD-ROM Drum Unit Assembly (With free Standard Toner Cartridge - See Ordering Accessories and ...
Users Manual - English
Page 24
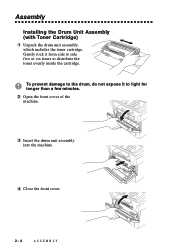
Assembly Installing the Drum Unit Assembly (with Toner Cartridge) 1 Unpack the drum unit assembly, which includes the toner cartridge. Gently rock it to distribute the toner evenly inside the cartridge. To prevent damage to the drum, do not expose it from side to side five or six times to light for longer than a few minutes. 2 Open the front cover of the machine. 3 Insert the drum unit assembly into the machine. 4 Close the front cover. 2-4 ASSEMBLY
Assembly Installing the Drum Unit Assembly (with Toner Cartridge) 1 Unpack the drum unit assembly, which includes the toner cartridge. Gently rock it to distribute the toner evenly inside the cartridge. To prevent damage to the drum, do not expose it from side to side five or six times to light for longer than a few minutes. 2 Open the front cover of the machine. 3 Insert the drum unit assembly into the machine. 4 Close the front cover. 2-4 ASSEMBLY

Users Manual - English
Page 29
... SETUP. 2 Press 1 on the numeric keys to select it. 3 Press Menu until you see 4.TONER SAVE. 4 Press 4 on the numeric keys to select it. 5 Press a numeric key to select the option you ...want. 6 Press Stop to exit. 4.TONER SAVE 100% 1.ON 2.OFF 100% Checking the Drum Life You can see the percentage of the drum's...key to select the option you want. 6 Press Stop to exit. 3.PRINT DENSITY 100% 1.LOW2.MID3.HIGH 100% Toner Save You can adjust print density, making your printed originals lighter or darker. 1 Press Menu until you see 1.INITIAL...
... SETUP. 2 Press 1 on the numeric keys to select it. 3 Press Menu until you see 4.TONER SAVE. 4 Press 4 on the numeric keys to select it. 5 Press a numeric key to select the option you ...want. 6 Press Stop to exit. 4.TONER SAVE 100% 1.ON 2.OFF 100% Checking the Drum Life You can see the percentage of the drum's...key to select the option you want. 6 Press Stop to exit. 3.PRINT DENSITY 100% 1.LOW2.MID3.HIGH 100% Toner Save You can adjust print density, making your printed originals lighter or darker. 1 Press Menu until you see 1.INITIAL...
Users Manual - English
Page 66
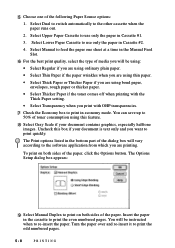
...; Select Thick Paper or Thicker Paper if you are printing. You can save up to 50% of toner consumption using bond paper, envelopes, rough paper or thicker paper. • Select Thicker Paper if the toner comes off when printing with the Thick Paper setting. • Select Transparency when you print with OHP...
...; Select Thick Paper or Thicker Paper if you are printing. You can save up to 50% of toner consumption using bond paper, envelopes, rough paper or thicker paper. • Select Thicker Paper if the toner comes off when printing with the Thick Paper setting. • Select Transparency when you print with OHP...
Users Manual - English
Page 114
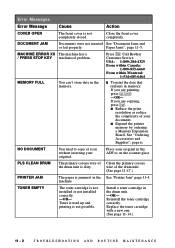
... Supplies", page ii. machine. Reinstall the toner cartridge correctly. s Expand the printer memory by ordering a Memory Expansion Board. If you are copying, press Stop . Install a toner cartridge in the memory. Place your original. TONER EMPTY The toner cartridge is not completely closed. NO DOCUMENT... You tried to copy or scan without inserting your original in memory: If you are printing, press Job Cancel . -OR- Close the front cover completely. Call Brother Customer Service....
... Supplies", page ii. machine. Reinstall the toner cartridge correctly. s Expand the printer memory by ordering a Memory Expansion Board. If you are copying, press Stop . Install a toner cartridge in the memory. Place your original. TONER EMPTY The toner cartridge is not completely closed. NO DOCUMENT... You tried to copy or scan without inserting your original in memory: If you are printing, press Job Cancel . -OR- Close the front cover completely. Call Brother Customer Service....
Users Manual - English
Page 115
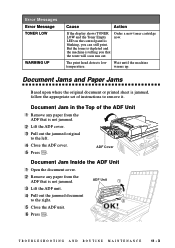
... of instructions to remove it. ADF Cover Document Jam Inside the ADF Unit 1 Open the document cover. 2 Remove any paper from the ADF that the toner will soon run out. Document Jams and Paper Jams Based upon where the original document or printed sheet is telling you can still print. But... the toner is depleted and the machine is jammed, follow the appropriate set of the ADF Unit 1 Remove any paper from the ADF that is not jammed...
... of instructions to remove it. ADF Cover Document Jam Inside the ADF Unit 1 Open the document cover. 2 Remove any paper from the ADF that the toner will soon run out. Document Jams and Paper Jams Based upon where the original document or printed sheet is telling you can still print. But... the toner is depleted and the machine is jammed, follow the appropriate set of the ADF Unit 1 Remove any paper from the ADF that is not jammed...

Users Manual - English
Page 116
... you can clear a printer jam error, you use force to pull the jammed paper from the paper tray because you may damage the machine and cause toner to flatten it in the paper cassette. 5 Reinstall the paper cassette. 11 - 4 TROUBLESHOOTING AND ROUTINE MAINTENANCE See the following diagram. HOT! Front ...shaded parts shown in the Multi-purpose Paper Cassette 1 Pull the paper cassette out of paper jams. WARNING Do not use the machine, some internal parts are extremely HOT! After you must find out where the paper is Jammed in the following three types of the machine. 2 Remove any...
... you can clear a printer jam error, you use force to pull the jammed paper from the paper tray because you may damage the machine and cause toner to flatten it in the paper cassette. 5 Reinstall the paper cassette. 11 - 4 TROUBLESHOOTING AND ROUTINE MAINTENANCE See the following diagram. HOT! Front ...shaded parts shown in the Multi-purpose Paper Cassette 1 Pull the paper cassette out of paper jams. WARNING Do not use the machine, some internal parts are extremely HOT! After you must find out where the paper is Jammed in the following three types of the machine. 2 Remove any...

Users Manual - English
Page 117
... in the Fuser Unit 1 Open the rear cover. 2 Pull out jammed paper. Instead, pull the edge of the machine, the fuser may get dirty with toner powder causing the next few copies of the test page until the pages print clearly. 3 Close the rear cover. Paper is Jammed near the Drum...
... in the Fuser Unit 1 Open the rear cover. 2 Pull out jammed paper. Instead, pull the edge of the machine, the fuser may get dirty with toner powder causing the next few copies of the test page until the pages print clearly. 3 Close the rear cover. Paper is Jammed near the Drum...
Users Manual - English
Page 118
... following: • The machine is plugged in. (See page 2-7.) • The toner cartridge and drum unit are using Windows® 3.1x, Windows® 95/98 or Windows NT® Workstation Version 4.0 with the supplied printer driver, see the "Windows® Setup Printing Problems" section. • Try to .... The machine cannot print full pages of font sizes within your document and try again. A MEMORY FULL message occurs. • Reduce the printer resolution. Please make sure it back in several ways: • If you may see if LCD is probably not your machine. If You ...
... following: • The machine is plugged in. (See page 2-7.) • The toner cartridge and drum unit are using Windows® 3.1x, Windows® 95/98 or Windows NT® Workstation Version 4.0 with the supplied printer driver, see the "Windows® Setup Printing Problems" section. • Try to .... The machine cannot print full pages of font sizes within your document and try again. A MEMORY FULL message occurs. • Reduce the printer resolution. Please make sure it back in several ways: • If you may see if LCD is probably not your machine. If You ...

Users Manual - English
Page 122
... is at the home position. Make sure that the toner cartridge is printed black. conditions such as it will cause this condition to Routine Maintenance, Cleaning the Printer and Cleaning the Drum Unit, on the page. The... not empty. Rough surface or thick media can text and graphic areas. Scattering Toner Adjust the print conditions by setting the Print Density function. Remove the drum unit and clean the machine's interior. (See Routine Maintenance, Cleaning the Printer and Cleaning the Drum Unit, on the scanner window. 11 - 10 T R O U B L E S H O O T I N G A N D R O U ...
... is at the home position. Make sure that the toner cartridge is printed black. conditions such as it will cause this condition to Routine Maintenance, Cleaning the Printer and Cleaning the Drum Unit, on the page. The... not empty. Rough surface or thick media can text and graphic areas. Scattering Toner Adjust the print conditions by setting the Print Density function. Remove the drum unit and clean the machine's interior. (See Routine Maintenance, Cleaning the Printer and Cleaning the Drum Unit, on the scanner window. 11 - 10 T R O U B L E S H O O T I N G A N D R O U ...

Users Manual - English
Page 123
... clear this case, replace the drum unit with the toner cartridge installed. In this problem. may disappear by wiping the scanner windows with a clean soft cloth. (See Routine Maintenance, Cleaning the Printer and Cleaning the Drum Unit, on pages 11-12 ... placed on printed page. Blurred Page Ghost images appear on a flat, horizontal surface. A possible cause is that you select the appropriate media type in the printer driver. T R O U B L E S H O O T I N G A N D R O U T I N E M A I N T E N A N C E 11 - 11 Adjust the print conditions by excessive exposure to occur. Rough ...
... clear this case, replace the drum unit with the toner cartridge installed. In this problem. may disappear by wiping the scanner windows with a clean soft cloth. (See Routine Maintenance, Cleaning the Printer and Cleaning the Drum Unit, on pages 11-12 ... placed on printed page. Blurred Page Ghost images appear on a flat, horizontal surface. A possible cause is that you select the appropriate media type in the printer driver. T R O U B L E S H O O T I N G A N D R O U T I N E M A I N T E N A N C E 11 - 11 Adjust the print conditions by excessive exposure to occur. Rough ...

Users Manual - English
Page 125
...HOT! It may crack the panel. s The drum unit contains toner, so handle it off with a clean soft dry cloth. If toner scatters and your finger. When you have used the machine, some internal parts of the machine, never touch the shaded parts as shown... the scanner window by wiping with cold water. 1 Open the front cover. 2 Remove the drum unit assembly. Cleaning the Printer Caution s Do not use isopropyl alcohol to clean the scanner window or toner sensor. Scanner Window T R O U B L E S H O O T I N G A N D R O U T I N E M A I N T E N A N C E 11 - 13 s Do not touch the scanner ...
...HOT! It may crack the panel. s The drum unit contains toner, so handle it off with a clean soft dry cloth. If toner scatters and your finger. When you have used the machine, some internal parts of the machine, never touch the shaded parts as shown... the scanner window by wiping with cold water. 1 Open the front cover. 2 Remove the drum unit assembly. Cleaning the Printer Caution s Do not use isopropyl alcohol to clean the scanner window or toner sensor. Scanner Window T R O U B L E S H O O T I N G A N D R O U T I N E M A I N T E N A N C E 11 - 13 s Do not touch the scanner ...
Users Manual - English
Page 126
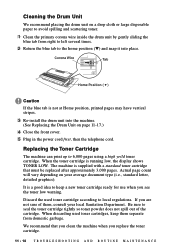
... 3,000 pages. Cleaning the Drum Unit We recommend placing the drum unit on a drop cloth or large disposable paper to avoid spilling and scattering toner. 1 Clean the primary corona wire inside the drum unit by gently sliding the blue tab from domestic garbage. If you are not sure of ...the cartridge. When the toner cartridge is a good idea to seal the toner cartridge tightly so toner powder does not spill out of them separate from right to left several times. 2 Return the blue tab to ...
... 3,000 pages. Cleaning the Drum Unit We recommend placing the drum unit on a drop cloth or large disposable paper to avoid spilling and scattering toner. 1 Clean the primary corona wire inside the drum unit by gently sliding the blue tab from domestic garbage. If you are not sure of ...the cartridge. When the toner cartridge is a good idea to seal the toner cartridge tightly so toner powder does not spill out of them separate from right to left several times. 2 Return the blue tab to ...


