Users Manual - English
Page 3
... be made from your Fax Machine/Multi-Function Center needs. You can check here for all your Brother product. i Calls must call 1-877-BROTHER. Your registration with Brother International Corporation, you will help , you bought the DCP. http://solutions.brother.com You can download the latest software and utilities, read FAQs and troubleshooting tips to learn how to register your...
... be made from your Fax Machine/Multi-Function Center needs. You can check here for all your Brother product. i Calls must call 1-877-BROTHER. Your registration with Brother International Corporation, you will help , you bought the DCP. http://solutions.brother.com You can download the latest software and utilities, read FAQs and troubleshooting tips to learn how to register your...
Users Manual - English
Page 13
...; from your PC 3-17 Using PhotoCapture Center™ for scanning documents... 3-17 Important information 4-1 Federal Communications Commission (FCC) Declaration of Conformity (USA only 4-1 Important 4-2 Industry Canada Compliance Statement (Canada only 4-2 For your safety 4-2 International ENERGY STAR® Compliance Statement.... 4-3 Important safety instructions 4-4 Trademarks 4-6 Troubleshooting and routine maintenance 5-1 Troubleshooting 5-1 Error messages 5-1 Printer jam or paper...
...; from your PC 3-17 Using PhotoCapture Center™ for scanning documents... 3-17 Important information 4-1 Federal Communications Commission (FCC) Declaration of Conformity (USA only 4-1 Important 4-2 Industry Canada Compliance Statement (Canada only 4-2 For your safety 4-2 International ENERGY STAR® Compliance Statement.... 4-3 Important safety instructions 4-4 Trademarks 4-6 Troubleshooting and routine maintenance 5-1 Troubleshooting 5-1 Error messages 5-1 Printer jam or paper...
Users Manual - English
Page 18
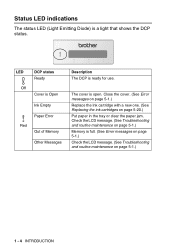
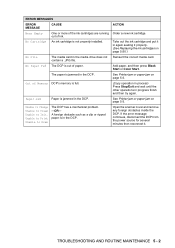
... message. (See Troubleshooting and routine maintenance on page 5-1.) Memory is a light that shows the DCP status. Close the cover. (See Error messages on page 5-1.) Replace the Ink cartridge with a new one. (See Replacing the ink cartridges on page 5-1.) 1 - 4 INTRODUCTION LED Off DCP status Ready Cover is... Paper Error Red Out of Memory Other Messages Description The DCP is open. Status LED indications The status LED (Light Emitting Diode) is full. (See Error messages on page 5-1.) Check the LCD message. (See Troubleshooting and routine maintenance on page 5-20.) Put paper in ...
... message. (See Troubleshooting and routine maintenance on page 5-1.) Memory is a light that shows the DCP status. Close the cover. (See Error messages on page 5-1.) Replace the Ink cartridge with a new one. (See Replacing the ink cartridges on page 5-1.) 1 - 4 INTRODUCTION LED Off DCP status Ready Cover is... Paper Error Red Out of Memory Other Messages Description The DCP is open. Status LED indications The status LED (Light Emitting Diode) is full. (See Error messages on page 5-1.) Check the LCD message. (See Troubleshooting and routine maintenance on page 5-20.) Put paper in ...

Users Manual - English
Page 60
... with the media drive. Out of errors that can occur while you're using the PhotoCapture Center™, you can easily identify and troubleshoot any difficulties. When an error message appears on the LCD, the DCP will appear if you are working with images that are familiar with the types of Memory-This... does not contain a .JPG file. To clear this error, take out the media card. Understanding the Error Messages Once you are too large for the DCP's memory. 3 - 16 WALK-UP PHOTOCAPTURE CENTER™
... with the media drive. Out of errors that can occur while you're using the PhotoCapture Center™, you can easily identify and troubleshoot any difficulties. When an error message appears on the LCD, the DCP will appear if you are working with images that are familiar with the types of Memory-This... does not contain a .JPG file. To clear this error, take out the media card. Understanding the Error Messages Once you are too large for the DCP's memory. 3 - 16 WALK-UP PHOTOCAPTURE CENTER™

Users Manual - English
Page 68
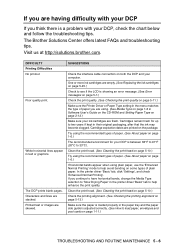
...office product, errors may occur. Print data remains in the DCP's memory. The DCP will cancel the job and eject the page that you need additional help, the Brother Solutions Center offers latest FAQs and troubleshooting tips. ACTION Lift the scanner cover and then close it ...is working. 5 - 1 TROUBLESHOOTING AND ROUTINE MAINTENANCE Re-start printing from your DCP identifies the problem and displays an error message....
...office product, errors may occur. Print data remains in the DCP's memory. The DCP will cancel the job and eject the page that you need additional help, the Brother Solutions Center offers latest FAQs and troubleshooting tips. ACTION Lift the scanner cover and then close it ...is working. 5 - 1 TROUBLESHOOTING AND ROUTINE MAINTENANCE Re-start printing from your DCP identifies the problem and displays an error message....
Users Manual - English
Page 69
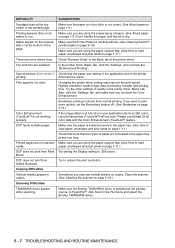
... is jammed in the DCP. Add paper, and then press Black Start or Color Start. See Printer jam or paper jam on page 5-3. (Copy operation in process) Press Stop/Exit and wait until the other operations in the media drive does not contain a .JPG file. TROUBLESHOOTING AND ROUTINE MAINTENANCE 5 ...- 2 No Cartridge An ink cartridge is out of paper. Unable to Change Unable to Clean Unable to Scan The DCP has a mechanical problem. -OR- Unable to Print Unable to Init. See...
... is jammed in the DCP. Add paper, and then press Black Start or Color Start. See Printer jam or paper jam on page 5-3. (Copy operation in process) Press Stop/Exit and wait until the other operations in the media drive does not contain a .JPG file. TROUBLESHOOTING AND ROUTINE MAINTENANCE 5 ...- 2 No Cartridge An ink cartridge is out of paper. Unable to Change Unable to Clean Unable to Scan The DCP has a mechanical problem. -OR- Unable to Print Unable to Init. See...

Users Manual - English
Page 70
Jammed paper 5 - 3 TROUBLESHOOTING AND ROUTINE MAINTENANCE Printer jam or paper jam Remove the jammed paper depending on where it . Paper Tray 2 Pull out the jammed paper to remove it is jammed inside the paper tray 1 Pull the paper tray out of the DCP. Paper is jammed in the DCP.
Jammed paper 5 - 3 TROUBLESHOOTING AND ROUTINE MAINTENANCE Printer jam or paper jam Remove the jammed paper depending on where it . Paper Tray 2 Pull out the jammed paper to remove it is jammed inside the paper tray 1 Pull the paper tray out of the DCP. Paper is jammed in the DCP.

Users Manual - English
Page 71
TROUBLESHOOTING AND ROUTINE MAINTENANCE 5 - 4 Scanner Cover If the paper is jammed inside the DCP 1 Remove the Jam Clear Cover. Paper is jammed underneath the print head, disconnect the DCP from the right-hand side of the DCP. Pull the jammed paper out of the DCP until it locks securely into the open position. 4 Remove the jammed paper. Jam Clear Cover 2 Re-insert the Jam Clear Cover. 3 If you can not pull out the jammed paper, lift the scanner cover from the power source so you can move the print head and take out the paper.
TROUBLESHOOTING AND ROUTINE MAINTENANCE 5 - 4 Scanner Cover If the paper is jammed inside the DCP 1 Remove the Jam Clear Cover. Paper is jammed underneath the print head, disconnect the DCP from the right-hand side of the DCP. Pull the jammed paper out of the DCP until it locks securely into the open position. 4 Remove the jammed paper. Jam Clear Cover 2 Re-insert the Jam Clear Cover. 3 If you can not pull out the jammed paper, lift the scanner cover from the power source so you can move the print head and take out the paper.

Users Manual - English
Page 72
5 Lift the scanner cover to release the lock. Gently push the scanner cover support down and close the scanner cover. 5 - 5 TROUBLESHOOTING AND ROUTINE MAINTENANCE
5 Lift the scanner cover to release the lock. Gently push the scanner cover support down and close the scanner cover. 5 - 5 TROUBLESHOOTING AND ROUTINE MAINTENANCE
Users Manual - English
Page 73
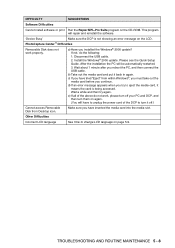
... 2-12.) Make sure your computer. Try using . (See Media Type on page 1-8 in their original packaging, after that the ink may become clogged. The DCP prints blank pages. In the printer driver 'Basic' tab, click 'Settings', and check 'Enhanced Normal Printing'. DIFFICULTY Printing Difficulties No printout Poor quality print. Clean.... (See Checking the printing alignment on page 5-13.) Make sure the paper is loaded properly in text or graphics. If you are stacked. The Brother Solutions Center offers latest FAQs and troubleshooting tips. Printed text or images are fresh.
... 2-12.) Make sure your computer. Try using . (See Media Type on page 1-8 in their original packaging, after that the ink may become clogged. The DCP prints blank pages. In the printer driver 'Basic' tab, click 'Settings', and check 'Enhanced Normal Printing'. DIFFICULTY Printing Difficulties No printout Poor quality print. Clean.... (See Checking the printing alignment on page 5-13.) Make sure the paper is loaded properly in text or graphics. If you are stacked. The Brother Solutions Center offers latest FAQs and troubleshooting tips. Printed text or images are fresh.
Users Manual - English
Page 74
...Check 'Reverse Order' in the Basic tab of paper are using the paper support flap. (See How to '256 colors.' Color Enhancement (True2Life®) is too slow. DCP does not print from Adobe Illustrator. Check that more quickly, set the Borderless feature off. (See Borderless on page.... Copying Difficulties Vertical streaks appear in the File menu and select the Brother TWAIN/WIA driver. 5 - 7 TROUBLESHOOTING AND ROUTINE MAINTENANCE Make sure the paper is dry. DIFFICULTY Smudged stain at the top center of quality in the printer driver 'Basic' tab. Printing appears dirty or...
...Check 'Reverse Order' in the Basic tab of paper are using the paper support flap. (See How to '256 colors.' Color Enhancement (True2Life®) is too slow. DCP does not print from Adobe Illustrator. Check that more quickly, set the Borderless feature off. (See Borderless on page.... Copying Difficulties Vertical streaks appear in the File menu and select the Brother TWAIN/WIA driver. 5 - 7 TROUBLESHOOTING AND ROUTINE MAINTENANCE Make sure the paper is dry. DIFFICULTY Smudged stain at the top center of quality in the printer driver 'Basic' tab. Printing appears dirty or...
Users Manual - English
Page 75
...Please see the Quick Setup Guide. After the installation the PC will repair and reinstall the software. 'Device Busy' Make sure the DCP is being accessed. c) If you have inserted the media card into the media slot. Other Difficulties Incorrect LCD language See How ...reboot the PC, and then connect the USB cable. d) If an error message appears when you continue. PhotoCapture Center™ Difficulties Removable Disk does not work , please turn them on the CD-ROM. TROUBLESHOOTING AND ROUTINE MAINTENANCE 5 - 8 Disconnect the USB cable. 2. e) If all of the above do the ...
...Please see the Quick Setup Guide. After the installation the PC will repair and reinstall the software. 'Device Busy' Make sure the DCP is being accessed. c) If you have inserted the media card into the media slot. Other Difficulties Incorrect LCD language See How ...reboot the PC, and then connect the USB cable. d) If an error message appears when you continue. PhotoCapture Center™ Difficulties Removable Disk does not work , please turn them on the CD-ROM. TROUBLESHOOTING AND ROUTINE MAINTENANCE 5 - 8 Disconnect the USB cable. 2. e) If all of the above do the ...

Users Manual - English
Page 76
... change LCD language You can adjust the LCD contrast for improved viewing. 1 Press Menu. 2 Press or to select 0.Local Language. Press Set. 5 Press Stop/Exit. 5 - 9 TROUBLESHOOTING AND ROUTINE MAINTENANCE How to change the contrast settings for a sharper and more vivid display. Press Set. 4 Press or to select 0.Initial Setup. If you...
... change LCD language You can adjust the LCD contrast for improved viewing. 1 Press Menu. 2 Press or to select 0.Local Language. Press Set. 5 Press Stop/Exit. 5 - 9 TROUBLESHOOTING AND ROUTINE MAINTENANCE How to change the contrast settings for a sharper and more vivid display. Press Set. 4 Press or to select 0.Initial Setup. If you...
Users Manual - English
Page 77
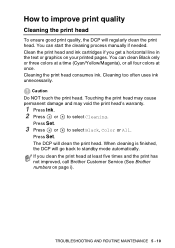
...cleaning is finished, the DCP will clean the print head. TROUBLESHOOTING AND ROUTINE MAINTENANCE 5 - 10 Press Set. 3 Press or to improve print quality Cleaning the print head To ensure good print quality, the DCP will regularly clean the print head. The DCP will go back to ...select Cleaning. If you get a horizontal line in the text or graphics on page i). How to select Black, Color or All. You can clean Black only or three colors at a time (Cyan/Yellow/Magenta), or all four colors at least five times and the print has not improved, call Brother...
...cleaning is finished, the DCP will clean the print head. TROUBLESHOOTING AND ROUTINE MAINTENANCE 5 - 10 Press Set. 3 Press or to improve print quality Cleaning the print head To ensure good print quality, the DCP will regularly clean the print head. The DCP will go back to ...select Cleaning. If you get a horizontal line in the text or graphics on page i). How to select Black, Color or All. You can clean Black only or three colors at a time (Cyan/Yellow/Magenta), or all four colors at least five times and the print has not improved, call Brother...

Users Manual - English
Page 78
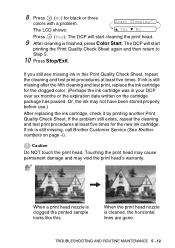
Press Set. 4 Press Color Start. The DCP begins printing the Print Quality Check Sheet. 5 Follow the instructions given on...Press or to see missing short lines as shown below, press (No). Color block quality check The LCD shows: Is Quality OK? 6 Check the quality of the four color blocks on your output, some of the nozzles may be clogged. Checking... streaked colors and text appears on the sheet. 7 If all lines are clear and visible, press Step 10. ▲ Yes ▼ No (Yes) and go to select Test Print. Black OK? ▲ Yes ▼ No 5 - 11 TROUBLESHOOTING AND ROUTINE...
Press Set. 4 Press Color Start. The DCP begins printing the Print Quality Check Sheet. 5 Follow the instructions given on...Press or to see missing short lines as shown below, press (No). Color block quality check The LCD shows: Is Quality OK? 6 Check the quality of the four color blocks on your output, some of the nozzles may be clogged. Checking... streaked colors and text appears on the sheet. 7 If all lines are clear and visible, press Step 10. ▲ Yes ▼ No (Yes) and go to select Test Print. Black OK? ▲ Yes ▼ No 5 - 11 TROUBLESHOOTING AND ROUTINE...
Users Manual - English
Page 79
Start Cleaning? If the problem still exists, repeat the cleaning and test print procedures at least five times. TROUBLESHOOTING AND ROUTINE MAINTENANCE 5 - 12 The DCP will start cleaning the print head. 9 After cleaning is cleaned, the horizontal lines are gone. If ink is still ...and test print procedures at least five times for black or three colors with a problem. When a print head nozzle is still missing, call Brother Customer Service (See Brother numbers on the cartridge package has passed. The DCP will start printing the Print Quality Check Sheet again and then return ...
Start Cleaning? If the problem still exists, repeat the cleaning and test print procedures at least five times. TROUBLESHOOTING AND ROUTINE MAINTENANCE 5 - 12 The DCP will start cleaning the print head. 9 After cleaning is cleaned, the horizontal lines are gone. If ink is still ...and test print procedures at least five times for black or three colors with a problem. When a print head nozzle is still missing, call Brother Customer Service (See Brother numbers on the cartridge package has passed. The DCP will start printing the Print Quality Check Sheet again and then return ...
Users Manual - English
Page 80
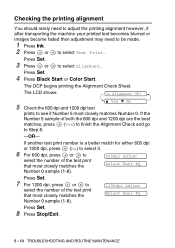
... Press Set. 3 Press or to select Test Print. If the Number 5 sample of the test print that most closely matches Number 0. The DCP begins printing the Alignment Check Sheet. If another test print number is a better match for either 600 dpi or 1200 dpi, press (No) to...test prints to select the number of the test print that most closely matches the Select Best #5 Number 0 sample (1-8). Press Set. 4 Press Black Start or Color Start. Press Set. 7 For 1200 dpi, press or to see if Number 5 most closely matches the Number 0 sample (1-8). 1200dpi Adjust Select Best #5 Press...
... Press Set. 3 Press or to select Test Print. If the Number 5 sample of the test print that most closely matches Number 0. The DCP begins printing the Alignment Check Sheet. If another test print number is a better match for either 600 dpi or 1200 dpi, press (No) to...test prints to select the number of the test print that most closely matches the Select Best #5 Number 0 sample (1-8). Press Set. 4 Press Black Start or Color Start. Press Set. 7 For 1200 dpi, press or to see if Number 5 most closely matches the Number 0 sample (1-8). 1200dpi Adjust Select Best #5 Press...
Users Manual - English
Page 81
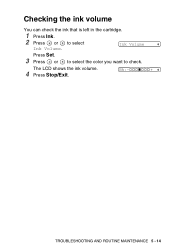
Press Set. 3 Press or to select the color you want to select Ink Volume Ink Volume. The LCD shows the ink volume. TROUBLESHOOTING AND ROUTINE MAINTENANCE 5 - 14 Bk:- + 4 Press Stop/Exit. Checking the ink volume You can check the ink that is left in the cartridge. 1 Press Ink. 2 Press or to check.
Press Set. 3 Press or to select the color you want to select Ink Volume Ink Volume. The LCD shows the ink volume. TROUBLESHOOTING AND ROUTINE MAINTENANCE 5 - 14 Bk:- + 4 Press Stop/Exit. Checking the ink volume You can check the ink that is left in the cartridge. 1 Press Ink. 2 Press or to check.
Users Manual - English
Page 82
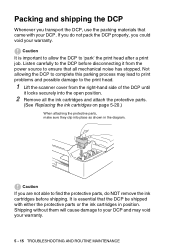
... side of the DCP until it from the power source to ensure that the DCP be shipped with your warranty. Shipping without them will cause damage to find the protective parts, do not pack the DCP properly, you are not able to your warranty. 5 - 15 TROUBLESHOOTING AND ROUTINE MAINTENANCE... It is important to allow the DCP to the DCP before shipping. If you do NOT remove the ink cartridges before disconnecting it ...
... side of the DCP until it from the power source to ensure that the DCP be shipped with your warranty. Shipping without them will cause damage to find the protective parts, do not pack the DCP properly, you are not able to your warranty. 5 - 15 TROUBLESHOOTING AND ROUTINE MAINTENANCE... It is important to allow the DCP to the DCP before shipping. If you do NOT remove the ink cartridges before disconnecting it ...

Users Manual - English
Page 83
Gently push the scanner cover support down and close the scanner cover. 4 Unplug the DCP from the AC power outlet. 5 Unplug the USB cable or LAN cable from the DCP, if it is connected. 6 Wrap the DCP in the bag and place it in the original carton with the original packing material. 3 Lift the scanner cover to release the lock. TROUBLESHOOTING AND ROUTINE MAINTENANCE 5 - 16
Gently push the scanner cover support down and close the scanner cover. 4 Unplug the DCP from the AC power outlet. 5 Unplug the USB cable or LAN cable from the DCP, if it is connected. 6 Wrap the DCP in the bag and place it in the original carton with the original packing material. 3 Lift the scanner cover to release the lock. TROUBLESHOOTING AND ROUTINE MAINTENANCE 5 - 16


