
Users Manual - English
Page 4
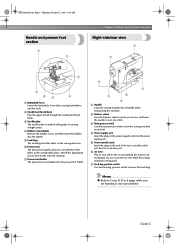
... while you to raise and lower the needle to sew one stitch. 3 Main power switch Use the main power switch to turn the sewing machine on and off. 4 Power supply jack Insert the plug on the power supply cord into the power supply jack. 5 Foot controller jack Insert the plug on the end of Machine Parts...
... while you to raise and lower the needle to sew one stitch. 3 Main power switch Use the main power switch to turn the sewing machine on and off. 4 Power supply jack Insert the plug on the power supply cord into the power supply jack. 5 Foot controller jack Insert the plug on the end of Machine Parts...
Users Manual - English
Page 14
...case and machine, and should never be used. 3. up lever, needle, or other hot objects. 2. Remember to turn off the power switch and unplug the cord when: • Operation is completed • Replacing or removing the needle or any assemblies, the presser feet, needle, or other... occurs during use extension cords. When storing this machine, avoid direct sunlight and high humidity locations. If the problem persists, please consult your eye on the foot controller. 4. Be sure to keep your local authorized Brother dealer. Do not use • Maintaining the machine • Leaving...
...case and machine, and should never be used. 3. up lever, needle, or other hot objects. 2. Remember to turn off the power switch and unplug the cord when: • Operation is completed • Replacing or removing the needle or any assemblies, the presser feet, needle, or other... occurs during use extension cords. When storing this machine, avoid direct sunlight and high humidity locations. If the problem persists, please consult your eye on the foot controller. 4. Be sure to keep your local authorized Brother dealer. Do not use • Maintaining the machine • Leaving...

Users Manual - English
Page 16
...turn the sewing machine on and off. G Do not allow the power cord to heat. Do not subject the cord to be used for a long period of time. G Do not touch the plug with many other power sources may damage the cord, or lead to fire or electric shock. These things may result. ...wet hands. Using other appliances plugged in fire, electric shock, or damage to them. Pulling on the cord. Do not place heavy objects on the cord may result in to the machine. G Unplug the power cord if the machine is damaged, take the machine to observe the following circumstances: • When you ...
...turn the sewing machine on and off. G Do not allow the power cord to heat. Do not subject the cord to be used for a long period of time. G Do not touch the plug with many other power sources may damage the cord, or lead to fire or electric shock. These things may result. ...wet hands. Using other appliances plugged in fire, electric shock, or damage to them. Pulling on the cord. Do not place heavy objects on the cord may result in to the machine. G Unplug the power cord if the machine is damaged, take the machine to observe the following circumstances: • When you ...
Users Manual - English
Page 17
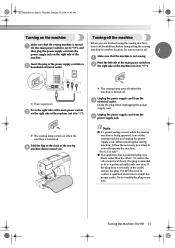
... The sewing lamp comes on when the machine is turned on the right side of the machine (set it to "O"), and then plug the power supply cord into a 2 household electrical outlet. When restarting the sewing machine, follow the necessary procedure to install the proper outlet. Do not modify the...set to "|"). Fold the flap at the front of the machine. Unplug the power supply cord from the 4 power supply jack. Grasp the plug when unplugging the power supply cord. Press the left side of the main power switch on the right side of the sewing 4 machine down toward you are ...
... The sewing lamp comes on when the machine is turned on the right side of the machine (set it to "O"), and then plug the power supply cord into a 2 household electrical outlet. When restarting the sewing machine, follow the necessary procedure to install the proper outlet. Do not modify the...set to "|"). Fold the flap at the front of the machine. Unplug the power supply cord from the 4 power supply jack. Grasp the plug when unplugging the power supply cord. Press the left side of the main power switch on the right side of the sewing 4 machine down toward you are ...
Users Manual - English
Page 106
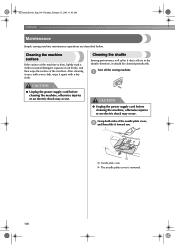
...is dirty, lightly soak a cloth in the shuttle; Cleaning the machine surface If the surface of the machine is removed. 100 CAUTION G Unplug the power supply cord before cleaning the machine, otherwise injuries or an electric shock may occur. Grasp both sides of the machine. S2_brotherE.book Page 100 Thursday, February 13...operations are described below. After cleaning it once with a wet cloth, wipe it should be cleaned periodically. Turn off the sewing machine. 1 CAUTION G Unplug the power supply cord before cleaning the machine, otherwise injuries or an electric shock may occur.
...is dirty, lightly soak a cloth in the shuttle; Cleaning the machine surface If the surface of the machine is removed. 100 CAUTION G Unplug the power supply cord before cleaning the machine, otherwise injuries or an electric shock may occur. Grasp both sides of the machine. S2_brotherE.book Page 100 Thursday, February 13...operations are described below. After cleaning it once with a wet cloth, wipe it should be cleaned periodically. Turn off the sewing machine. 1 CAUTION G Unplug the power supply cord before cleaning the machine, otherwise injuries or an electric shock may occur.

