
Quick Setup Guide - English
Page 2
...The software may be copied, photocopied, reproduced, translated, or reduced to change without the manufacturer's written permission. Commercial or industrial use of trademark and copyrighted works (For example, books, paintings, drawings, photos, fanciful characters, and so forth) owned by other ...subject to any electronic medium or machine-readable form without notice. No part of their respective manufacturers. ii Pacesetter BES Lettering Instruction Manual Copyright © Copyright 2009 Pulse Microsystems Ltd. This Installation Guide is furnished under a license agreement and/or...
...The software may be copied, photocopied, reproduced, translated, or reduced to change without the manufacturer's written permission. Commercial or industrial use of trademark and copyrighted works (For example, books, paintings, drawings, photos, fanciful characters, and so forth) owned by other ...subject to any electronic medium or machine-readable form without notice. No part of their respective manufacturers. ii Pacesetter BES Lettering Instruction Manual Copyright © Copyright 2009 Pulse Microsystems Ltd. This Installation Guide is furnished under a license agreement and/or...
Quick Setup Guide - English
Page 6
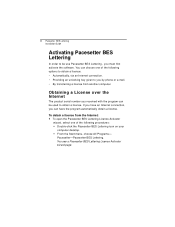
... serial number you received with the program can have an Internet connection, you can be use Pacesetter BES Lettering, you must first activate the software. Pacesetter-Pacesetter BES Lettering. 8 Pacesetter BES Lettering Installation Guide Activating Pacesetter BES Lettering In order to be used to you by phone or e-mail. • By transferring a license from another computer...
... serial number you received with the program can have an Internet connection, you can be use Pacesetter BES Lettering, you must first activate the software. Pacesetter-Pacesetter BES Lettering. 8 Pacesetter BES Lettering Installation Guide Activating Pacesetter BES Lettering In order to be used to you by phone or e-mail. • By transferring a license from another computer...
Quick Setup Guide - English
Page 8
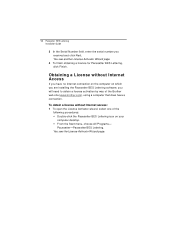
...wizard, select one of the Brother web site (www.brother.com), using a computer that does have no Internet connection on the computer on your computer desktop. Š From the Start menu, choose All Programs- Pacesetter-Pacesetter BES Lettering. 10 Pacesetter BES Lettering Installation Guide 3 In the...to obtain a license activation by way of the following procedures: Š Double-click the Pacesetter BES Lettering icon on which you are installing the Pacesetter BES Lettering software, you received and click Next. To obtain a license without Internet Access If you have a ...
...wizard, select one of the Brother web site (www.brother.com), using a computer that does have no Internet connection on the computer on your computer desktop. Š From the Start menu, choose All Programs- Pacesetter-Pacesetter BES Lettering. 10 Pacesetter BES Lettering Installation Guide 3 In the...to obtain a license activation by way of the following procedures: Š Double-click the Pacesetter BES Lettering icon on which you are installing the Pacesetter BES Lettering software, you received and click Next. To obtain a license without Internet Access If you have a ...
Quick Setup Guide - English
Page 14
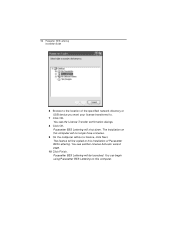
You can begin using Pacesetter BES Lettering on this computer will be launched. You see the License Transfer confirmation dialogs. 8 Click OK. You see another License Activator wizard page. 10 Click Finish. ... device you want your license transferred to this computer. The license will no longer have a license. 9 On the computer without a license, click Next. Pacesetter BES Lettering will shut down. Pacesetter BES Lettering will be copied to . 7 Click OK. 16 Pacesetter BES Lettering Installation Guide 6 Browse to the location of Pacesetter BES...
You can begin using Pacesetter BES Lettering on this computer will be launched. You see the License Transfer confirmation dialogs. 8 Click OK. You see another License Activator wizard page. 10 Click Finish. ... device you want your license transferred to this computer. The license will no longer have a license. 9 On the computer without a license, click Next. Pacesetter BES Lettering will shut down. Pacesetter BES Lettering will be copied to . 7 Click OK. 16 Pacesetter BES Lettering Installation Guide 6 Browse to the location of Pacesetter BES...
Users Manual - English
Page 2
...in this document is subject to change without permission is furnished under a license agreement and/or nondisclosure agreement. Commercial or industrial use of trademark and copyrighted works (For example, books, paintings, drawings, photos, fanciful characters, and so forth) owned by the... their respective holders. European Patent Nos. 0545773. The software may be used or copied only in accordance with the terms of embroidery patterns without notice. ii Pacesetter BES Lettering Instruction Manual Copyright © Copyright 2009 Pulse Microsystems Ltd. All other ...
...in this document is subject to change without permission is furnished under a license agreement and/or nondisclosure agreement. Commercial or industrial use of trademark and copyrighted works (For example, books, paintings, drawings, photos, fanciful characters, and so forth) owned by the... their respective holders. European Patent Nos. 0545773. The software may be used or copied only in accordance with the terms of embroidery patterns without notice. ii Pacesetter BES Lettering Instruction Manual Copyright © Copyright 2009 Pulse Microsystems Ltd. All other ...
Users Manual - English
Page 3
... 12 Extra Tools 13 Ribbon Tools 13 Tools on the Arrange Tab 15 The View Tab 16 Simulator 17 Status Line 19 Color Palette 19 Using Scrollbars 20 Correcting Mistakes 20 Setting up your Workspace Environment 21 Changing Machine Format Properties 22 Adjusting the View of your Workspace 23 Magnifying and... Displaying a Hoop While Designing 26 Viewing and Hiding the Embroidery Hoop 27 Selecting a Hoop 27 Creating a Custom Hoop 28 Help 29 Opening the Help 29 Using the Contents 29 Using the Index 30 Using Search 30 Saving Favorite Help Topics 31 Printing Help topics 31
... 12 Extra Tools 13 Ribbon Tools 13 Tools on the Arrange Tab 15 The View Tab 16 Simulator 17 Status Line 19 Color Palette 19 Using Scrollbars 20 Correcting Mistakes 20 Setting up your Workspace Environment 21 Changing Machine Format Properties 22 Adjusting the View of your Workspace 23 Magnifying and... Displaying a Hoop While Designing 26 Viewing and Hiding the Embroidery Hoop 27 Selecting a Hoop 27 Creating a Custom Hoop 28 Help 29 Opening the Help 29 Using the Contents 29 Using the Index 30 Using Search 30 Saving Favorite Help Topics 31 Printing Help topics 31

Users Manual - English
Page 4
an Overview 42 Adjusting Size of a Text Segment 42 Adjusting the Width of Text 43 Adjusting the Corners of Text Segments 43 Using the Envelope Handles 44 Rotating Text 44 Adjusting the Slant of Text 45 Adjusting the Size of Text in the Circle Frame ...Width in the Circle Frame 46 Changing the Diameter of the Circle Frame 47 Working with Individual Letters 48 Adjusting the Space between Letters (Kerning 48 Moving Individual Letters 49 Resizing Individual Letters 49 Rotating Individual Letters 50 Working with Color 51 Changing the Color of a Text Segment 51 Creating Multi-color ...
an Overview 42 Adjusting Size of a Text Segment 42 Adjusting the Width of Text 43 Adjusting the Corners of Text Segments 43 Using the Envelope Handles 44 Rotating Text 44 Adjusting the Slant of Text 45 Adjusting the Size of Text in the Circle Frame ...Width in the Circle Frame 46 Changing the Diameter of the Circle Frame 47 Working with Individual Letters 48 Adjusting the Space between Letters (Kerning 48 Moving Individual Letters 49 Resizing Individual Letters 49 Rotating Individual Letters 50 Working with Color 51 Changing the Color of a Text Segment 51 Creating Multi-color ...
Users Manual - English
Page 7
Topics covered in the workspace, and create your own customized hoop. • Find out how to access the Pacesetter BES Lettering help. CHAPTER 1: Learning about the Workspace Before you start using the software, we recommend that you understand the Pacesetter BES Lettering design workspace and learn a few of the basic components outlined in this chapter: • Learn the basics of how to set up the design workspace environment. • Learn how to show a hoop in this section.
Topics covered in the workspace, and create your own customized hoop. • Find out how to access the Pacesetter BES Lettering help. CHAPTER 1: Learning about the Workspace Before you start using the software, we recommend that you understand the Pacesetter BES Lettering design workspace and learn a few of the basic components outlined in this chapter: • Learn the basics of how to set up the design workspace environment. • Learn how to show a hoop in this section.
Users Manual - English
Page 8
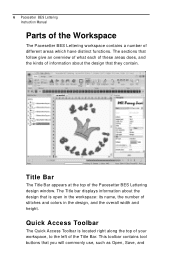
... the overall width and height. This toolbar contains tool buttons that they contain. The Title bar displays information about the design that you will commonly use, such as Open, Save, and Quick Access Toolbar The Quick Access Toolbar is open in the workspace: its name, the number of the Title Bar.... Title Bar The Title Bar appears at the top of different areas which have distinct functions. 6 Pacesetter BES Lettering Instruction Manual Parts of the Workspace The Pacesetter BES...
... the overall width and height. This toolbar contains tool buttons that they contain. The Title bar displays information about the design that you will commonly use, such as Open, Save, and Quick Access Toolbar The Quick Access Toolbar is open in the workspace: its name, the number of the Title Bar.... Title Bar The Title Bar appears at the top of different areas which have distinct functions. 6 Pacesetter BES Lettering Instruction Manual Parts of the Workspace The Pacesetter BES...

Users Manual - English
Page 9
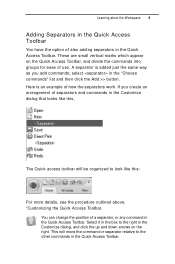
... toolbar. Customizing the Quick Access Toolbar One important advantage of the Quick Access toolbar is that it is accessed by way of the Pacesetter BES Lettering toolbars and add them to select tools from any of the Customize function, which is fully customizable, meaning that you personally... use most often, for easy access. See "Customizing the Quick Access toolbar". You see a menu. 2 Click on the Quick Access toolbar: New, Open, Save, Direct Print, ...
... toolbar. Customizing the Quick Access Toolbar One important advantage of the Quick Access toolbar is that it is accessed by way of the Pacesetter BES Lettering toolbars and add them to select tools from any of the Customize function, which is fully customizable, meaning that you personally... use most often, for easy access. See "Customizing the Quick Access toolbar". You see a menu. 2 Click on the Quick Access toolbar: New, Open, Save, Direct Print, ...
Users Manual - English
Page 11
... added just the same way as you create an arrangement of also adding separators in the Quick Access Toolbar. You can change the position of use. This will be organized to look like this, The Quick access toolbar will move the command or separator relative to the right in the Customize...
... added just the same way as you create an arrangement of also adding separators in the Quick Access Toolbar. You can change the position of use. This will be organized to look like this, The Quick access toolbar will move the command or separator relative to the right in the Customize...
Users Manual - English
Page 12
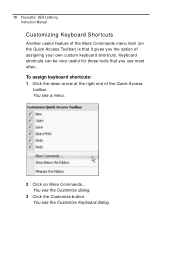
To assign keyboard shortcuts: 1 Click the down arrow at the right end of assigning your own custom keyboard shortcuts. You see the Customize Keyboard dialog. 10 Pacesetter BES Lettering Instruction Manual Customizing Keyboard Shortcuts Another useful feature of the More Commands menu item (on More Commands... You see a menu. 2 Click on the Quick Access Toolbar) is that you the option of the Quick Access toolbar. You see the Customize dialog. 3 Click the Customize button. Keyboard shortcuts can be very useful for those tools that it gives you use most often.
To assign keyboard shortcuts: 1 Click the down arrow at the right end of assigning your own custom keyboard shortcuts. You see the Customize Keyboard dialog. 10 Pacesetter BES Lettering Instruction Manual Customizing Keyboard Shortcuts Another useful feature of the More Commands menu item (on More Commands... You see a menu. 2 Click on the Quick Access Toolbar) is that you the option of the Quick Access toolbar. You see the Customize dialog. 3 Click the Customize button. Keyboard shortcuts can be very useful for those tools that it gives you use most often.
Users Manual - English
Page 13
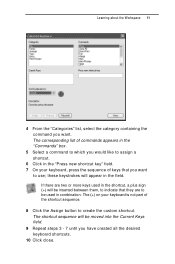
...sequence of the shortcut sequence. 8 Click the Assign button to create the custom shortcut. The shortcut sequence will appear in combination. these keystrokes will be used in the shortcut, a plus sign (+) will be inserted between them, to indicate that you would like to assign a shortcut. 6 Click in the.... Learning about the Workspace 11 4 From the "Categories" list, select the category containing the command you want to use; If there are two or more keys used in the field. The corresponding list of commands appears in the "Press new shortcut key" field. 7 On your keyboard...
...sequence of the shortcut sequence. 8 Click the Assign button to create the custom shortcut. The shortcut sequence will appear in combination. these keystrokes will be used in the shortcut, a plus sign (+) will be inserted between them, to indicate that you would like to assign a shortcut. 6 Click in the.... Learning about the Workspace 11 4 From the "Categories" list, select the category containing the command you want to use; If there are two or more keys used in the field. The corresponding list of commands appears in the "Press new shortcut key" field. 7 On your keyboard...

Users Manual - English
Page 14
Note that you can access the tools available in Pacesetter BES Lettering through the various tool bars. Pacesetter Menu Tools Tool What it as. Print: Opens the printer dialog on your printer and adjust the printer's properties. ... into the current design Save: Saves the current design. The tables below show the buttons, grouped by function. 12 Pacesetter BES Lettering Instruction Manual Toolbar and Ribbon Buttons You can use to choose a new recipe and machine format. Merge: Opens the Merge Design dialog, which in turn will let you to save...
Note that you can access the tools available in Pacesetter BES Lettering through the various tool bars. Pacesetter Menu Tools Tool What it as. Print: Opens the printer dialog on your printer and adjust the printer's properties. ... into the current design Save: Saves the current design. The tables below show the buttons, grouped by function. 12 Pacesetter BES Lettering Instruction Manual Toolbar and Ribbon Buttons You can use to choose a new recipe and machine format. Merge: Opens the Merge Design dialog, which in turn will let you to save...
Users Manual - English
Page 16
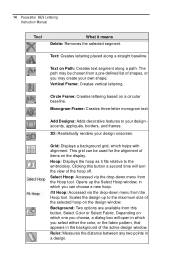
...Delete: Removes the selected segment. Background: Two options are available from the Hoop tool. Text on a circular baseline. Monogram Frame: Creates three-letter monogram text. Grid: Displays a background grid, which you select either the color, or the fabric pattern, that appears in a design. ...lettering based on Path: Creates text segment along a straight baseline. This grid can choose a new hoop. /fit Hoop: Accessed via the drop-down menu from this button a second time will open in which one you choose, a dialog box will turn the view of shapes, or you may be used...
...Delete: Removes the selected segment. Background: Two options are available from the Hoop tool. Text on a circular baseline. Monogram Frame: Creates three-letter monogram text. Grid: Displays a background grid, which you select either the color, or the fabric pattern, that appears in a design. ...lettering based on Path: Creates text segment along a straight baseline. This grid can choose a new hoop. /fit Hoop: Accessed via the drop-down menu from this button a second time will open in which one you choose, a dialog box will turn the view of shapes, or you may be used...
Users Manual - English
Page 17
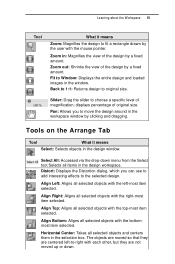
... all selected objects with the bottommost item selected. The objects are moved so that they are centered left -most item selected. Pan: Allows you can use to add interesting effects to move the design around in the workspace window by a fixed amount. Learning about the Workspace 15 Tool What it means...
... all selected objects with the bottommost item selected. The objects are moved so that they are centered left -most item selected. Pan: Allows you can use to add interesting effects to move the design around in the workspace window by a fixed amount. Learning about the Workspace 15 Tool What it means...
Users Manual - English
Page 19
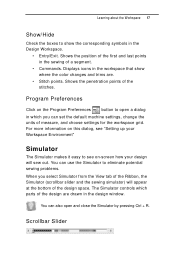
... penetration points of a segment. • Commands. Displays icons in the workspace that show the corresponding symbols in the Design Workspace. • Entry/Exit. You can use the Simulator to eliminate potential sewing problems. When you can also open and close the Simulator by pressing Ctrl + R.
... penetration points of a segment. • Commands. Displays icons in the workspace that show the corresponding symbols in the Design Workspace. • Entry/Exit. You can use the Simulator to eliminate potential sewing problems. When you can also open and close the Simulator by pressing Ctrl + R.

Users Manual - English
Page 20
... the design by one stitch. Pause/Stop: Pause or stop , sew forward and sew backwards. Simulate Sewing (backward): Move backward through the design. Using the Simulator The following table explains how to see the specified thread color being sewn in the opened design. When you play or resume sewing... design draw on the arrows at the ends of the scrollbar will continue from the location of the last stitch. 18 Pacesetter BES Lettering Instruction Manual The length of the scrollbar slider represents all of the stitches in the design. Clicking on a stitch-by dragging it to...
... the design by one stitch. Pause/Stop: Pause or stop , sew forward and sew backwards. Simulate Sewing (backward): Move backward through the design. Using the Simulator The following table explains how to see the specified thread color being sewn in the opened design. When you play or resume sewing... design draw on the arrows at the ends of the scrollbar will continue from the location of the last stitch. 18 Pacesetter BES Lettering Instruction Manual The length of the scrollbar slider represents all of the stitches in the design. Clicking on a stitch-by dragging it to...
Users Manual - English
Page 21
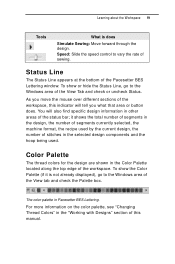
As you what that area or button does. The color palette in the design, the number of segments currently selected, the machine format, the recipe used . Speed: Slide the speed control to vary the rate of the workspace, this manual. You will tell you move the mouse over different sections of ... in the "Working with Designs" section of the workspace. To show or hide the Status Line, go to the Windows area of the Pacesetter BES Lettering window. Learning about the Workspace 19 Tools What is not already displayed), go to the Windows area of the View tab and check the Palette...
As you what that area or button does. The color palette in the design, the number of segments currently selected, the machine format, the recipe used . Speed: Slide the speed control to vary the rate of the workspace, this manual. You will tell you move the mouse over different sections of ... in the "Working with Designs" section of the workspace. To show or hide the Status Line, go to the Windows area of the Pacesetter BES Lettering window. Learning about the Workspace 19 Tools What is not already displayed), go to the Windows area of the View tab and check the Palette...
Users Manual - English
Page 22
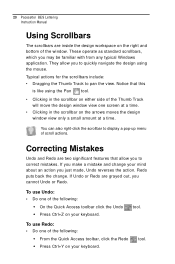
... time. • Clicking in the scrollbar on either side of scroll actions. If you make a mistake and change . 20 Pacesetter BES Lettering Instruction Manual Using Scrollbars The scrollbars are inside the design workspace on the right and bottom of the following : Š On the Quick Access toolbar click ...the Undo tool. Š Press Ctrl+Z on your keyboard. They allow you to quickly navigate the design using the Pan tool. • Clicking in the scrollbar on the arrows moves the design window view only a small amount at a time. These operate ...
... time. • Clicking in the scrollbar on either side of scroll actions. If you make a mistake and change . 20 Pacesetter BES Lettering Instruction Manual Using Scrollbars The scrollbars are inside the design workspace on the right and bottom of the following : Š On the Quick Access toolbar click ...the Undo tool. Š Press Ctrl+Z on your keyboard. They allow you to quickly navigate the design using the Pan tool. • Clicking in the scrollbar on the arrows moves the design window view only a small amount at a time. These operate ...


