
Quick Setup Guide - English
Page 2
... publication and the software may be copied, photocopied, reproduced, translated, or reduced to change without the manufacturer's written permission. All rights reserved. ii Pacesetter BES Lettering Instruction Manual Copyright © Copyright 2009 Pulse Microsystems Ltd.
... publication and the software may be copied, photocopied, reproduced, translated, or reduced to change without the manufacturer's written permission. All rights reserved. ii Pacesetter BES Lettering Instruction Manual Copyright © Copyright 2009 Pulse Microsystems Ltd.
Quick Setup Guide - English
Page 3
This Installation Guide gives you some basic information about Pacesetter BES Lettering (such as the minimum systems requirements) and also instructions on how to the Pacesetter BES Lettering system for embroidery machines. Getting Started Welcome to install and activate the program.
This Installation Guide gives you some basic information about Pacesetter BES Lettering (such as the minimum systems requirements) and also instructions on how to the Pacesetter BES Lettering system for embroidery machines. Getting Started Welcome to install and activate the program.

Quick Setup Guide - English
Page 4
... Guide Getting Started Pacesetter BES Lettering: System Requirements Specifications are subject to change without prior notice. Recommended System Requirements: • Genuine Intel Pentium IV, 2GHz PC computer (or higher) with a CD-...
... Guide Getting Started Pacesetter BES Lettering: System Requirements Specifications are subject to change without prior notice. Recommended System Requirements: • Genuine Intel Pentium IV, 2GHz PC computer (or higher) with a CD-...

Quick Setup Guide - English
Page 5
... on each screen; the InstallShield Wizard will now appear on your desktop. The Pacesetter BES Lettering icon your computer. You see the InstallShield introductory screen. 4 Click Next to install Pacesetter BES Lettering. Getting Started 7 Installing Pacesetter BES Lettering You must be running Windows® XP/Vista to proceed with the installation. You see...
... on each screen; the InstallShield Wizard will now appear on your desktop. The Pacesetter BES Lettering icon your computer. You see the InstallShield introductory screen. 4 Click Next to install Pacesetter BES Lettering. Getting Started 7 Installing Pacesetter BES Lettering You must be running Windows® XP/Vista to proceed with the installation. You see...
Quick Setup Guide - English
Page 6
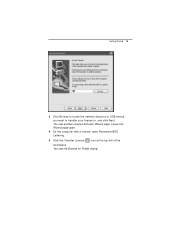
...Internet The product serial number you received with the program can be use Pacesetter BES Lettering, you can choose one of the following procedures: Š Double-click the Pacesetter BES Lettering icon on your computer desktop. Š From the Start menu, choose All Programs...connection, you must first activate the software. You see a Pacesetter BES Lettering License Activator wizard page. If you have the program automatically obtain a license. 8 Pacesetter BES Lettering Installation Guide Activating Pacesetter BES Lettering In order to be used to you by phone or e-mail. •...
...Internet The product serial number you received with the program can be use Pacesetter BES Lettering, you can choose one of the following procedures: Š Double-click the Pacesetter BES Lettering icon on your computer desktop. Š From the Start menu, choose All Programs...connection, you must first activate the software. You see a Pacesetter BES Lettering License Activator wizard page. If you have the program automatically obtain a license. 8 Pacesetter BES Lettering Installation Guide Activating Pacesetter BES Lettering In order to be used to you by phone or e-mail. •...

Quick Setup Guide - English
Page 7
You see another License Activator Wizard page. Getting Started 9 2 Select I received a serial number & I have an internet connection on this machine and click Next.
You see another License Activator Wizard page. Getting Started 9 2 Select I received a serial number & I have an internet connection on this machine and click Next.
Quick Setup Guide - English
Page 8
...need to obtain a license activation by way of the following procedures: Š Double-click the Pacesetter BES Lettering icon on which you are installing the Pacesetter BES Lettering software, you received and click Next. Obtaining a License without Internet access: 1 To open the License Activator... wizard, select one of the Brother web site (www.brother.com), using a computer that does have a connection. To obtain a ...
...need to obtain a license activation by way of the following procedures: Š Double-click the Pacesetter BES Lettering icon on which you are installing the Pacesetter BES Lettering software, you received and click Next. Obtaining a License without Internet access: 1 To open the License Activator... wizard, select one of the Brother web site (www.brother.com), using a computer that does have a connection. To obtain a ...
Quick Setup Guide - English
Page 9
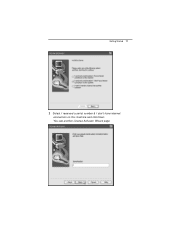
You see another License Activator Wizard page. Getting Started 11 2 Select I received a serial number & I don't have internet connection on this machine and click Next.
You see another License Activator Wizard page. Getting Started 11 2 Select I received a serial number & I don't have internet connection on this machine and click Next.
Quick Setup Guide - English
Page 10
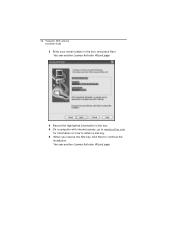
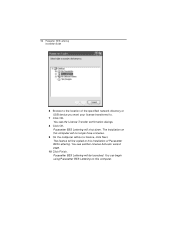
You see another License Activator Wizard page. You see another License Activator Wizard page. 4 Record the highlighted information in the box, and press Next. 12 Pacesetter BES Lettering Installation Guide 3 Enter your serial number in the box. 5 On a computer with internet access, go to www.brother.com for information on how to obtain a site key. 6 When you receive the Site key, click Next to continue the installation.
You see another License Activator Wizard page. You see another License Activator Wizard page. 4 Record the highlighted information in the box, and press Next. 12 Pacesetter BES Lettering Installation Guide 3 Enter your serial number in the box. 5 On a computer with internet access, go to www.brother.com for information on how to obtain a site key. 6 When you receive the Site key, click Next to continue the installation.
Quick Setup Guide - English
Page 11
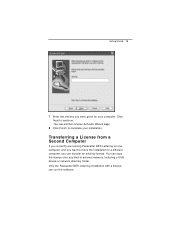
... page. 8 Click Finish to a different computer, you can transfer an existing license. You can run the software. Only the Pacesetter BES Lettering installation with a license can copy the license onto any kind of external memory, including a USB device or network directory folder. Transferring a ...License from a Second Computer If you currently are running Pacesetter BES Lettering on one computer, and you want to move the installation to complete your computer. Click Next to continue. Getting Started 13 7 Enter...
... page. 8 Click Finish to a different computer, you can transfer an existing license. You can run the software. Only the Pacesetter BES Lettering installation with a license can copy the license onto any kind of external memory, including a USB device or network directory folder. Transferring a ...License from a Second Computer If you currently are running Pacesetter BES Lettering on one computer, and you want to move the installation to complete your computer. Click Next to continue. Getting Started 13 7 Enter...
Quick Setup Guide - English
Page 12
14 Pacesetter BES Lettering Installation Guide To transfer a license to transfer a license from a second computer and click Next. You see another License Activator Wizard page. You see the Pacesetter BES Lettering License Activator wizard. 2 Select I want to a network directory or USB device: 1 On the computer without a license, open Pacesetter BES Lettering.
14 Pacesetter BES Lettering Installation Guide To transfer a license to transfer a license from a second computer and click Next. You see another License Activator Wizard page. You see the Pacesetter BES Lettering License Activator wizard. 2 Select I want to a network directory or USB device: 1 On the computer without a license, open Pacesetter BES Lettering.
Quick Setup Guide - English
Page 13
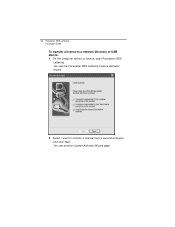
Getting Started 15 3 Click Browse to locate the network directory or USB device you want to transfer your license to, and click Next. You see another License Activator Wizard page. You see the Browse for Folder dialog. Leave this Wizard page open. 4 On the computer with a license, open Pacesetter BES Lettering. 5 Click the Transfer License icon at the top-left of the workspace.
Getting Started 15 3 Click Browse to locate the network directory or USB device you want to transfer your license to, and click Next. You see another License Activator Wizard page. You see the Browse for Folder dialog. Leave this Wizard page open. 4 On the computer with a license, open Pacesetter BES Lettering. 5 Click the Transfer License icon at the top-left of the workspace.
Quick Setup Guide - English
Page 14
...computer without a license, click Next. You see the License Transfer confirmation dialogs. 8 Click OK. You can begin using Pacesetter BES Lettering on this computer will be launched. The installation on this installation of the specified network directory or USB device you want your license... transferred to. 7 Click OK. Pacesetter BES Lettering will shut down. 16 Pacesetter BES Lettering Installation Guide 6 Browse to the location of Pacesetter BES Lettering. You see another License Activator wizard page. 10 Click Finish. Pacesetter BES...
...computer without a license, click Next. You see the License Transfer confirmation dialogs. 8 Click OK. You can begin using Pacesetter BES Lettering on this computer will be launched. The installation on this installation of the specified network directory or USB device you want your license... transferred to. 7 Click OK. Pacesetter BES Lettering will shut down. 16 Pacesetter BES Lettering Installation Guide 6 Browse to the location of Pacesetter BES Lettering. You see another License Activator wizard page. 10 Click Finish. Pacesetter BES...
Quick Setup Guide - English
Page 15
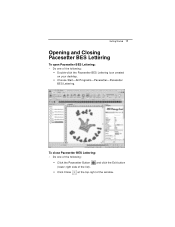
and click the Exit button Š Click Close at the top-right of the window. To close Pacesetter BES Lettering: • Do one of the following : Š Click the Pacesetter Button (lower-right side of the list). Getting Started 17 Opening and Closing Pacesetter BES Lettering To open Pacesetter BES Lettering: • Do one of the following : Š Double-click the Pacesetter BES Lettering icon created on your desktop. Š Choose Start-All Programs-Pacesetter-Pacesetter BES Lettering.
and click the Exit button Š Click Close at the top-right of the window. To close Pacesetter BES Lettering: • Do one of the following : Š Click the Pacesetter Button (lower-right side of the list). Getting Started 17 Opening and Closing Pacesetter BES Lettering To open Pacesetter BES Lettering: • Do one of the following : Š Double-click the Pacesetter BES Lettering icon created on your desktop. Š Choose Start-All Programs-Pacesetter-Pacesetter BES Lettering.

Users Manual - English
Page 1
Pacesetter BES Lettering Instruction Manual
Pacesetter BES Lettering Instruction Manual
Users Manual - English
Page 2
..., reproduced, translated, or reduced to change without notice. The software may be used or copied only in either criminal or civil liability. ii Pacesetter BES Lettering Instruction Manual Copyright © Copyright 2009 Pulse Microsystems Ltd. All rights reserved. All computer and software names identified by the developer of those agreements. All...
..., reproduced, translated, or reduced to change without notice. The software may be used or copied only in either criminal or civil liability. ii Pacesetter BES Lettering Instruction Manual Copyright © Copyright 2009 Pulse Microsystems Ltd. All rights reserved. All computer and software names identified by the developer of those agreements. All...
Users Manual - English
Page 3
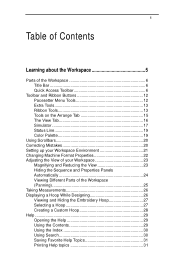
1 Table of Contents Learning about the Workspace 5 Parts of the Workspace 6 Title Bar 6 Quick Access Toolbar 6 Toolbar and Ribbon Buttons 12 Pacesetter Menu Tools 12 Extra Tools 13 Ribbon Tools 13 Tools on the Arrange Tab 15 The View Tab 16 Simulator 17 Status Line 19 Color Palette 19 Using Scrollbars 20 Correcting Mistakes 20 Setting up your Workspace Environment 21 Changing Machine Format Properties 22 Adjusting the View of your Workspace 23 Magnifying and Reducing the View 23 Hiding the Sequence and Properties Panels Automatically 24 Viewing Different Parts of the ...
1 Table of Contents Learning about the Workspace 5 Parts of the Workspace 6 Title Bar 6 Quick Access Toolbar 6 Toolbar and Ribbon Buttons 12 Pacesetter Menu Tools 12 Extra Tools 13 Ribbon Tools 13 Tools on the Arrange Tab 15 The View Tab 16 Simulator 17 Status Line 19 Color Palette 19 Using Scrollbars 20 Correcting Mistakes 20 Setting up your Workspace Environment 21 Changing Machine Format Properties 22 Adjusting the View of your Workspace 23 Magnifying and Reducing the View 23 Hiding the Sequence and Properties Panels Automatically 24 Viewing Different Parts of the ...

Users Manual - English
Page 4
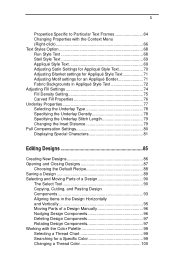
... Circle Frame 46 Changing the Diameter of the Circle Frame 47 Working with Individual Letters 48 Adjusting the Space between Letters (Kerning 48 Moving Individual Letters 49 Resizing Individual Letters 49 Rotating Individual Letters 50 Working with Color 51 Changing the Color of a Text Segment 51 Creating...Changing Font Spacing 62 Width Percentage 62 Changing the Slant Setting 63 Applying an Envelope 64 2 Pacesetter BES Lettering Instruction Manual Creating Lettering 33 Creating Lettering 34 Normal Text Tool 34 Path Text Tool 35 Custom Shapes for Text on a Path 37 Vertical Text...
... Circle Frame 46 Changing the Diameter of the Circle Frame 47 Working with Individual Letters 48 Adjusting the Space between Letters (Kerning 48 Moving Individual Letters 49 Resizing Individual Letters 49 Rotating Individual Letters 50 Working with Color 51 Changing the Color of a Text Segment 51 Creating...Changing Font Spacing 62 Width Percentage 62 Changing the Slant Setting 63 Applying an Envelope 64 2 Pacesetter BES Lettering Instruction Manual Creating Lettering 33 Creating Lettering 34 Normal Text Tool 34 Path Text Tool 35 Custom Shapes for Text on a Path 37 Vertical Text...
Users Manual - English
Page 5
3 Properties Specific to Particular Text Frames 64 Changing Properties with the Context Menu (Right-click 66 Text Styles Option 68 Run Style Text 68 Steil Style Text 69 Appliqué Style Text 69 Adjusting Satin Settings for Appliqué Style Text 70 Adjusting Blanket settings for Appliqué Style Text 71 Adjusting Motif settings for an Appliqué Border 71 Fabric Backgrounds in Appliqué Style Text 72 Adjusting Fill Settings 74 Fill Density Setting 75 Carved Fill Properties 76 Underlay Properties 77 Selecting the Underlay Type 78 Specifying the Underlay Density 78...
3 Properties Specific to Particular Text Frames 64 Changing Properties with the Context Menu (Right-click 66 Text Styles Option 68 Run Style Text 68 Steil Style Text 69 Appliqué Style Text 69 Adjusting Satin Settings for Appliqué Style Text 70 Adjusting Blanket settings for Appliqué Style Text 71 Adjusting Motif settings for an Appliqué Border 71 Fabric Backgrounds in Appliqué Style Text 72 Adjusting Fill Settings 74 Fill Density Setting 75 Carved Fill Properties 76 Underlay Properties 77 Selecting the Underlay Type 78 Specifying the Underlay Density 78...
Users Manual - English
Page 6
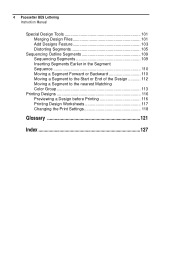
4 Pacesetter BES Lettering Instruction Manual Special Design Tools 101 Merging Design Files 101 Add Designs Feature 103 Distorting Segments 105 Sequencing Outline Segments 109 Sequencing Segments 109 Inserting Segments Earlier in the Segment Sequence 110 Moving a Segment Forward or Backward 110 Moving a Segment to the Start or End of the Design 112 Moving a Segment to the nearest Matching Color Group 113 Printing Designs 116 Previewing a Design before Printing 116 Printing Design Worksheets 117 Changing the Print Settings 118 Glossary 121 Index 127
4 Pacesetter BES Lettering Instruction Manual Special Design Tools 101 Merging Design Files 101 Add Designs Feature 103 Distorting Segments 105 Sequencing Outline Segments 109 Sequencing Segments 109 Inserting Segments Earlier in the Segment Sequence 110 Moving a Segment Forward or Backward 110 Moving a Segment to the Start or End of the Design 112 Moving a Segment to the nearest Matching Color Group 113 Printing Designs 116 Previewing a Design before Printing 116 Printing Design Worksheets 117 Changing the Print Settings 118 Glossary 121 Index 127