

Users Manual - English
Page 47
.... To adjust the slant of text, select the text object you want to the left of the letters in a text object can be adjusted with the Slant Handle. The Slant Handle is the square blue... handle located to the lower-left . The frame will recalculate when you release the mouse. Adjusting the Slant of Text The angle of the selection box. If, after performing any...outline of the design rotate onscreen as you are dragging, and the text will reset itself. Creating Lettering 45 Dragging this handle rotates the design to any of the adjustments above, you wish to return...
.... To adjust the slant of text, select the text object you want to the left of the letters in a text object can be adjusted with the Slant Handle. The Slant Handle is the square blue... handle located to the lower-left . The frame will recalculate when you release the mouse. Adjusting the Slant of Text The angle of the selection box. If, after performing any...outline of the design rotate onscreen as you are dragging, and the text will reset itself. Creating Lettering 45 Dragging this handle rotates the design to any of the adjustments above, you wish to return...

Users Manual - English
Page 86
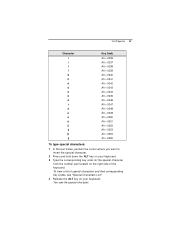
You see "Special Characters List". 4 Release the ALT key on the right side of the keyboard. 84 Pacesetter BES Lettering Instruction Manual Character Key Code Alt + 0238 Alt + 0239 Alt + 0240 Alt + 0241 Alt + 0242 Alt + 0243 Alt + 0244 Alt + 0245 Alt + 0246 Alt + 0247 ...
You see "Special Characters List". 4 Release the ALT key on the right side of the keyboard. 84 Pacesetter BES Lettering Instruction Manual Character Key Code Alt + 0238 Alt + 0239 Alt + 0240 Alt + 0241 Alt + 0242 Alt + 0243 Alt + 0244 Alt + 0245 Alt + 0246 Alt + 0247 ...

Users Manual - English
Page 92
90 Pacesetter BES Lettering Instruction Manual Š On the Quick Access Toolbar, choose the Save As tool. Design components that have reached the desired location on the keyboard and ... the design to place the component. They can also be resized and rotated in list, browse to the location you want to save your Workspace, release the mouse button to be moved, duplicated, or deleted. To save . 4 In the Save As type list, select the file type you have been selected...
90 Pacesetter BES Lettering Instruction Manual Š On the Quick Access Toolbar, choose the Save As tool. Design components that have reached the desired location on the keyboard and ... the design to place the component. They can also be resized and rotated in list, browse to the location you want to save your Workspace, release the mouse button to be moved, duplicated, or deleted. To save . 4 In the Save As type list, select the file type you have been selected...

Users Manual - English
Page 106
... selected design at the position you drag, note that the Add Design appears in outline in your design. 7 To finish placing the Add Design segment, release the mouse button. as you would like the Add Design to begin 6 Click and drag the mouse; This outline indicates the size and orientation of...
... selected design at the position you drag, note that the Add Design appears in outline in your design. 7 To finish placing the Add Design segment, release the mouse button. as you would like the Add Design to begin 6 Click and drag the mouse; This outline indicates the size and orientation of...

INSTRUCTION MANUAL - English
Page 47
This gives you release the mouse button, the embroidery is the green arrow at each corner of the text frame; when you the ability to match the change the .... These handles are pink in shape. When you want to Normal Text frames and Monogram Text frames. Enter the new size and click Apply. Creating Lettering 45 The Width Handle is regenerated to create text that slopes up or down . Adjusting the Corners of Text Segments Use the Corner Handles to...
This gives you release the mouse button, the embroidery is the green arrow at each corner of the text frame; when you the ability to match the change the .... These handles are pink in shape. When you want to Normal Text frames and Monogram Text frames. Enter the new size and click Apply. Creating Lettering 45 The Width Handle is regenerated to create text that slopes up or down . Adjusting the Corners of Text Segments Use the Corner Handles to...

INSTRUCTION MANUAL - English
Page 48
...shape by a flexible bounding box, called an envelope. You can also apply an envelope shape to a text segment through the Properties Panel. Release the mouse button to make the top and/or bottom of text are surrounded by moving the Envelope Handles. This is the orange circle at...information see "Applying an Envelope" in the Text area to apply a predefined envelope to a Normal Text or Monogram text item. 46 Pacesetter BES Lettering Instruction Manual Using the Envelope Handles These handles apply only to Normal Text and Monogram text items. These two types of the frame concave ("bowed...
...shape by a flexible bounding box, called an envelope. You can also apply an envelope shape to a text segment through the Properties Panel. Release the mouse button to make the top and/or bottom of text are surrounded by moving the Envelope Handles. This is the orange circle at...information see "Applying an Envelope" in the Text area to apply a predefined envelope to a Normal Text or Monogram text item. 46 Pacesetter BES Lettering Instruction Manual Using the Envelope Handles These handles apply only to Normal Text and Monogram text items. These two types of the frame concave ("bowed...

INSTRUCTION MANUAL - English
Page 49
Creating Lettering 47 For Circle Frames, note that the rotation handle is the square blue handle located to any angle. See "Rotating Circle Text". Adjusting the Slant of Text The angle of the frame, centered under the top text string. You will be adjusted with the Slant Handle. Dragging this handle rotates the design to the lower-left of the design rotate onscreen as you release the mouse. The Slant Handle is appears on the inner circle of the letters in a text object can be regenerated when you are dragging, and the text will see an outline of the selection box.
Creating Lettering 47 For Circle Frames, note that the rotation handle is the square blue handle located to any angle. See "Rotating Circle Text". Adjusting the Slant of Text The angle of the frame, centered under the top text string. You will be adjusted with the Slant Handle. Dragging this handle rotates the design to the lower-left of the design rotate onscreen as you release the mouse. The Slant Handle is appears on the inner circle of the letters in a text object can be regenerated when you are dragging, and the text will see an outline of the selection box.
INSTRUCTION MANUAL - English
Page 89
You see "Special Characters List". 4 Release the ALT key on your keyboard. Text Properties 87 Character Key Code Alt + 0236 Alt + 0237 Alt + 0238 Alt + 0239 Alt + 0240 Alt + 0241 Alt + ...
You see "Special Characters List". 4 Release the ALT key on your keyboard. Text Properties 87 Character Key Code Alt + 0236 Alt + 0237 Alt + 0238 Alt + 0239 Alt + 0240 Alt + 0241 Alt + ...

INSTRUCTION MANUAL - English
Page 98
...to use any of the following procedures to place the component. To duplicate a component, select it, then press CTRL on your Workspace, release the mouse button to select individual segments of the embroidery design, you must first Ungroup the design. It is enclosed in order to ...in a selection box, and choose Ungroup from the context menu. To do more information, see the corresponding sections for each tool under "Creating Lettering". for both text segments and design segments; They can be moved, duplicated, or deleted. The Select tool is enclosed in either direction. ...
...to use any of the following procedures to place the component. To duplicate a component, select it, then press CTRL on your Workspace, release the mouse button to select individual segments of the embroidery design, you must first Ungroup the design. It is enclosed in order to ...in a selection box, and choose Ungroup from the context menu. To do more information, see the corresponding sections for each tool under "Creating Lettering". for both text segments and design segments; They can be moved, duplicated, or deleted. The Select tool is enclosed in either direction. ...

INSTRUCTION MANUAL - English
Page 111
as you would like the Add Design to begin 6 Click and drag the mouse; This will add the selected design at the position you drag, note that the Add Design appears in outline in your workspace. Editing Designs 109 5 Place the mouse pointer, at the default size. This outline indicates the size and orientation of the Add Design embroidery, before it is actually generated in your design. 7 To finish placing the Add Design segment, release the mouse button. You can also insert a design quickly by just following steps 1-4 above, and then double-clicking in the workspace.
as you would like the Add Design to begin 6 Click and drag the mouse; This will add the selected design at the position you drag, note that the Add Design appears in outline in your workspace. Editing Designs 109 5 Place the mouse pointer, at the default size. This outline indicates the size and orientation of the Add Design embroidery, before it is actually generated in your design. 7 To finish placing the Add Design segment, release the mouse button. You can also insert a design quickly by just following steps 1-4 above, and then double-clicking in the workspace.

