
Users Manual - English
Page 3
... Workspace (Panning 25 Taking Measurements 26 Displaying a Hoop While Designing 26 Viewing and Hiding the Embroidery Hoop 27 Selecting a Hoop 27 Creating a Custom Hoop 28 Help 29 Opening the Help 29 Using the Contents 29 Using the Index 30 Using Search 30 Saving Favorite...
... Workspace (Panning 25 Taking Measurements 26 Displaying a Hoop While Designing 26 Viewing and Hiding the Embroidery Hoop 27 Selecting a Hoop 27 Creating a Custom Hoop 28 Help 29 Opening the Help 29 Using the Contents 29 Using the Index 30 Using Search 30 Saving Favorite...
Users Manual - English
Page 7
Topics covered in this chapter: • Learn the basics of the basic components outlined in the workspace, and create your own customized hoop. • Find out how to show a hoop in this section. CHAPTER 1: Learning about the Workspace Before you start using the software, we recommend that you understand the Pacesetter BES Lettering design workspace and learn a few of how to set up the design workspace environment. • Learn how to access the Pacesetter BES Lettering help.
Topics covered in this chapter: • Learn the basics of the basic components outlined in the workspace, and create your own customized hoop. • Find out how to show a hoop in this section. CHAPTER 1: Learning about the Workspace Before you start using the software, we recommend that you understand the Pacesetter BES Lettering design workspace and learn a few of how to set up the design workspace environment. • Learn how to access the Pacesetter BES Lettering help.
Users Manual - English
Page 16
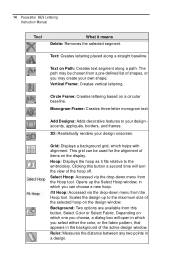
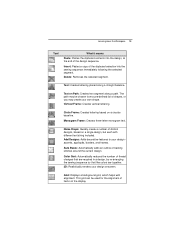
...Text on a circular baseline. Select Hoop: Accessed via the drop-down menu from the Hoop tool. Vertical Frame: Creates vertical lettering. Monogram Frame: Creates three-letter monogram text. Clicking this button, Select Color or Select Fabric. Opens up to your design accents, appliqués, borders, and ... to the embroidery. Text: Creates lettering placed along a path. Add Designs: Adds decorative features to the maximum size of the selected hoop on which one you can be chosen from this button a second time will open in which helps with alignment. Hoop: Displays the ...
...Text on a circular baseline. Select Hoop: Accessed via the drop-down menu from the Hoop tool. Vertical Frame: Creates vertical lettering. Monogram Frame: Creates three-letter monogram text. Clicking this button, Select Color or Select Fabric. Opens up to your design accents, appliqués, borders, and ... to the embroidery. Text: Creates lettering placed along a path. Add Designs: Adds decorative features to the maximum size of the selected hoop on which one you can be chosen from this button a second time will open in which helps with alignment. Hoop: Displays the ...
Users Manual - English
Page 28
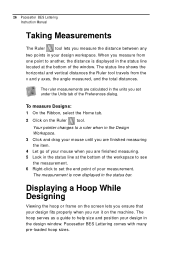
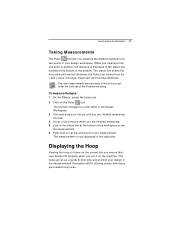
..., the angle measured, and the total distances. To measure Designs: 1 On the Ribbon, select the Home tab. 2 Click on the machine. Your pointer changes to help size and position your design in the status line at the bottom of the window. When you run it on the Ruler tool. The ruler... measurements are finished measuring. 5 Look in the design window. 26 Pacesetter BES Lettering Instruction Manual Taking Measurements The Ruler tool lets you set the end point of your measurement. Pacesetter BES...
..., the angle measured, and the total distances. To measure Designs: 1 On the Ribbon, select the Home tab. 2 Click on the machine. Your pointer changes to help size and position your design in the status line at the bottom of the window. When you run it on the Ruler tool. The ruler... measurements are finished measuring. 5 Look in the design window. 26 Pacesetter BES Lettering Instruction Manual Taking Measurements The Ruler tool lets you set the end point of your measurement. Pacesetter BES...
Users Manual - English
Page 31
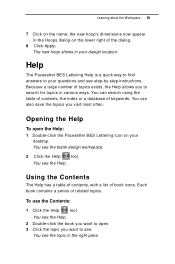
... You can search using the table of contents, the index or a database of keywords. Opening the Help To open . 3 Click the topic you want to open the Help: 1 Double-click the Pacesetter BES Lettering icon on your questions and see the topic in the Hoops dialog on the name; Using the Contents... The Help has a table of contents, with a list of related topics. To use the Contents: 1 Click the Help tool. You can also ...
... You can search using the table of contents, the index or a database of keywords. Opening the Help To open . 3 Click the topic you want to open the Help: 1 Double-click the Pacesetter BES Lettering icon on your questions and see the topic in the Hoops dialog on the name; Using the Contents... The Help has a table of contents, with a list of related topics. To use the Contents: 1 Click the Help tool. You can also ...
Users Manual - English
Page 32
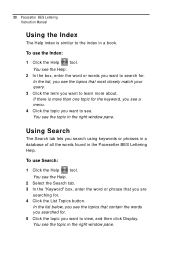
To use the Index: 1 Click the Help tool. 30 Pacesetter BES Lettering Instruction Manual Using the Index The Help index is more about. In the list, you see the topics ... right window pane. You see the topic in a book. You see the topic in the Pacesetter BES Lettering Help. In the list below, you see the topics that most closely match your query. 3 Click the term you...to search for . 4 Click the List Topics button. Using Search The Search tab lets you want to see the Help. 2 In the box, enter the word or words you search using keywords or phrases in a database of all...
To use the Index: 1 Click the Help tool. 30 Pacesetter BES Lettering Instruction Manual Using the Index The Help index is more about. In the list, you see the topics ... right window pane. You see the topic in a book. You see the topic in the Pacesetter BES Lettering Help. In the list below, you see the topics that most closely match your query. 3 Click the term you...to search for . 4 Click the List Topics button. Using Search The Search tab lets you want to see the Help. 2 In the box, enter the word or words you search using keywords or phrases in a database of all...
Users Manual - English
Page 33
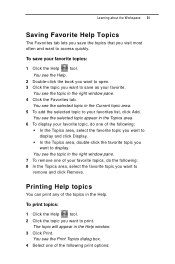
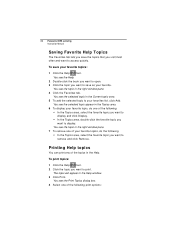
... window pane. 7 To remove one of the topics in the Current topic area. 5 To add the selected topic to your favorites list, click Add. Printing Help topics You can print any of the following : 8 In the Topics area, select the favorite topic you want to display. To save your favorite topic... and click Display. Š In the Topics area, double-click the favorite topic you want to remove and click Remove. To print topics: 1 Click the Help tool. 2 Click the topic you visit most often and want to access quickly. The topic will appear in the Topics area. 6 To display your favorite...
... window pane. 7 To remove one of the topics in the Current topic area. 5 To add the selected topic to your favorites list, click Add. Printing Help topics You can print any of the following : 8 In the Topics area, select the favorite topic you want to display. To save your favorite topic... and click Display. Š In the Topics area, double-click the favorite topic you want to remove and click Remove. To print topics: 1 Click the Help tool. 2 Click the topic you visit most often and want to access quickly. The topic will appear in the Topics area. 6 To display your favorite...
Users Manual - English
Page 79
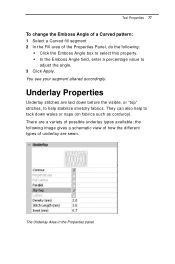
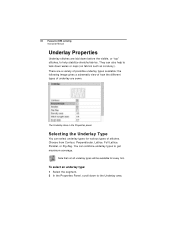
...variety of underlay are laid down wales or naps (on fabrics such as corduroy). The Underlay Area in the Properties panel. They can also help to tack down before the visible, or "top" stitches, to adjust the angle. 3 Click Apply. the following : Š Click the Emboss... Angle box to select this property. Š In the Emboss Angle field, enter a percentage value to help stabilize stretchy fabrics. Underlay Properties Underlay stitches are sewn. Text Properties 77 To change the Emboss Angle of a Carved pattern: 1 Select a Carved fill segment...
...variety of underlay are laid down wales or naps (on fabrics such as corduroy). The Underlay Area in the Properties panel. They can also help to tack down before the visible, or "top" stitches, to adjust the angle. 3 Click Apply. the following : Š Click the Emboss... Angle box to select this property. Š In the Emboss Angle field, enter a percentage value to help stabilize stretchy fabrics. Underlay Properties Underlay stitches are sewn. Text Properties 77 To change the Emboss Angle of a Carved pattern: 1 Select a Carved fill segment...
Users Manual - English
Page 127
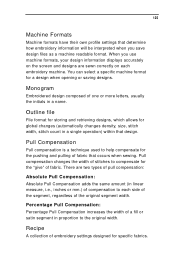
... for the pushing and pulling of fabric that occurs when sewing. Monogram Embroidered design composed of one or more letters, usually the initials in linear measure, i.e., inches or mm.) of compensation to help compensate for a design when opening or saving designs. There are sewn correctly on the screen and designs are two...
... for the pushing and pulling of fabric that occurs when sewing. Monogram Embroidered design composed of one or more letters, usually the initials in linear measure, i.e., inches or mm.) of compensation to help compensate for a design when opening or saving designs. There are sewn correctly on the screen and designs are two...

Users Manual - English
Page 130
128 Pacesetter BES Lettering Instruction Manual F File Tools 13 Fill density 75 Fill patterns customizing Carved Fill 76 Fill stitches 78 Underlay types 78 Fit Hoop 14 Flip Horizontal tool 16 Flip Vertical tool 16 Font spacing 62 Font type 58 Frames, text mode 66 G Grid tool 14 H Handles 123 Help 29-32... units 21 Modify Tools 15 Monogram properties 64 Monogram Text 41 Monogram Text tool 14 Move First command 112 Move Last command 112 Moving Individual Letters 49 Moving segments 110, 112 N New Design tool 12 New designs 86 New tool 12 Normal Frame 66 Normal Text 34 Nudging segments 96 O Open...
128 Pacesetter BES Lettering Instruction Manual F File Tools 13 Fill density 75 Fill patterns customizing Carved Fill 76 Fill stitches 78 Underlay types 78 Fit Hoop 14 Flip Horizontal tool 16 Flip Vertical tool 16 Font spacing 62 Font type 58 Frames, text mode 66 G Grid tool 14 H Handles 123 Help 29-32... units 21 Modify Tools 15 Monogram properties 64 Monogram Text 41 Monogram Text tool 14 Move First command 112 Move Last command 112 Moving Individual Letters 49 Moving segments 110, 112 N New Design tool 12 New designs 86 New tool 12 Normal Frame 66 Normal Text 34 Nudging segments 96 O Open...
Users Manual - English
Page 131
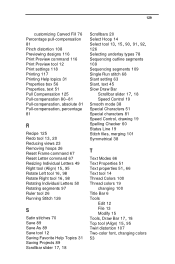
...Percentage pull-compensation 81 Pinch distortion 108 Previewing designs 116 Print Preview command 116 Print Preview tool 12 Print settings 118 Printing 117 Printing Help topics 31 Properties box 56 Properties, text 51 Pull Compensation 125 Pull-compensation 80-81 Pull-compensation, absolute 81 Pull-compensation, percentage ... Left tool 16, 98 Rotate Right tool 16, 98 Rotating Individual Letters 50 Rotating segments 97 Ruler tool 26 Running Stitch 126 S Satin stitches 70 Save 89 Save As 89 Save tool 12 Saving Favorite Help Topics 31 Saving Projects 89 Scrollbar slider 17, 18 Scrollbars 20 Select...
...Percentage pull-compensation 81 Pinch distortion 108 Previewing designs 116 Print Preview command 116 Print Preview tool 12 Print settings 118 Printing 117 Printing Help topics 31 Properties box 56 Properties, text 51 Pull Compensation 125 Pull-compensation 80-81 Pull-compensation, absolute 81 Pull-compensation, percentage ... Left tool 16, 98 Rotate Right tool 16, 98 Rotating Individual Letters 50 Rotating segments 97 Ruler tool 26 Running Stitch 126 S Satin stitches 70 Save 89 Save As 89 Save tool 12 Saving Favorite Help Topics 31 Saving Projects 89 Scrollbar slider 17, 18 Scrollbars 20 Select...
INSTRUCTION MANUAL - English
Page 3
... the Workspace (Panning 26 Taking Measurements 27 Displaying the Hoop 27 Viewing and Hiding the Hoop 28 Selecting a Hoop 28 Creating a Custom Hoop 29 Getting Help 30 Opening the Help 30 Using the Contents 30 Using the Index 31 Using Search 31 Saving Favorite...
... the Workspace (Panning 26 Taking Measurements 27 Displaying the Hoop 27 Viewing and Hiding the Hoop 28 Selecting a Hoop 28 Creating a Custom Hoop 29 Getting Help 30 Opening the Help 30 Using the Contents 30 Using the Index 31 Using Search 31 Saving Favorite...
INSTRUCTION MANUAL - English
Page 7
Topics covered in this chapter: • Setting up the design workspace environment. • Showing a hoop in this section. CHAPTER 1: Learning about the Workspace Before you start using the software, we recommend that you understand the Pacesetter BES Lettering design workspace and learn a few of the basic components outlined in the workspace, and choosing the size of hoop to be displayed • Creating your own customized hoop. • Using the Pacesetter BES Lettering help.
Topics covered in this chapter: • Setting up the design workspace environment. • Showing a hoop in this section. CHAPTER 1: Learning about the Workspace Before you start using the software, we recommend that you understand the Pacesetter BES Lettering design workspace and learn a few of the basic components outlined in the workspace, and choosing the size of hoop to be displayed • Creating your own customized hoop. • Using the Pacesetter BES Lettering help.
INSTRUCTION MANUAL - English
Page 17
... that like colors are together. 3D: Realistically renders your design accents, appliqués, borders, and frames. Grid: Displays a background grid, which helps with different text string included. Insert: Pastes a copy of the clipboard selection into the design, at the end of items on Path: Creates... the Workspace 15 Tool What it means Paste: Pastes the clipboard contents into the sewing sequence immediately following the selected segment. Text: Creates lettering placed along a path. This grid can be chosen from a pre-defined list of shapes, or you may be used for the alignment...
... that like colors are together. 3D: Realistically renders your design accents, appliqués, borders, and frames. Grid: Displays a background grid, which helps with different text string included. Insert: Pastes a copy of the clipboard selection into the design, at the end of items on Path: Creates... the Workspace 15 Tool What it means Paste: Pastes the clipboard contents into the sewing sequence immediately following the selected segment. Text: Creates lettering placed along a path. This grid can be chosen from a pre-defined list of shapes, or you may be used for the alignment...
INSTRUCTION MANUAL - English
Page 29
... under the Units tab of your design in the status line at the bottom of the workspace to see the measurement. 6 Right-click to help size and position your measurement. The ruler measurements are finished measuring. 5 Look in the design window. Displaying the Hoop Viewing the hoop or... y axes, the angle measured, and the total distances. When you measure the distance between any two points in the status bar. Pacesetter BES Lettering comes with many pre-loaded hoop sizes. The status line shows the horizontal and vertical distances the Ruler tool travels from one point to another...
... under the Units tab of your design in the status line at the bottom of the workspace to see the measurement. 6 Right-click to help size and position your measurement. The ruler measurements are finished measuring. 5 Look in the design window. Displaying the Hoop Viewing the hoop or... y axes, the angle measured, and the total distances. When you measure the distance between any two points in the status bar. Pacesetter BES Lettering comes with many pre-loaded hoop sizes. The status line shows the horizontal and vertical distances the Ruler tool travels from one point to another...

INSTRUCTION MANUAL - English
Page 32
You can also save the topics you want to open the Help: 1 Double-click the Pacesetter BES Lettering icon on the name; 30 Pacesetter BES Lettering Instruction Manual 7 Click on your design location. The new hoop shows in document form (PDF).To view or print the ...number of topics exists, the Help allows you to your questions and see the Help. 2 Double-click the book you visit most often. Opening the Help To open . You see the Help. You see the blank design workspace. 2 Click the Help tool. Getting Help The Pacesetter BES Lettering Help is also available in your ...
You can also save the topics you want to open the Help: 1 Double-click the Pacesetter BES Lettering icon on the name; 30 Pacesetter BES Lettering Instruction Manual 7 Click on your design location. The new hoop shows in document form (PDF).To view or print the ...number of topics exists, the Help allows you to your questions and see the Help. 2 Double-click the book you visit most often. Opening the Help To open . You see the Help. You see the blank design workspace. 2 Click the Help tool. Getting Help The Pacesetter BES Lettering Help is also available in your ...

INSTRUCTION MANUAL - English
Page 33
... use Search: 1 Click the Help tool. Using Search The Search tab lets you search using keywords or phrases in a database of all the words found in the right window pane. You see the topic in the right window pane. You see the topic in the Pacesetter BES Lettering Help. You see . To use... the Index: 1 Click the Help tool. In the list below, you are searching for. 4 Click the List Topics button. You see the topics that you see...
... use Search: 1 Click the Help tool. Using Search The Search tab lets you search using keywords or phrases in a database of all the words found in the right window pane. You see the topic in the right window pane. You see the topic in the Pacesetter BES Lettering Help. You see . To use... the Index: 1 Click the Help tool. In the list below, you are searching for. 4 Click the List Topics button. You see the topics that you see...
INSTRUCTION MANUAL - English
Page 34
...in the Topics area. 6 To display your favorite. To print topics: 1 Click the Help tool. 2 Click the topic you want to access quickly. 32 Pacesetter BES Lettering Instruction Manual Saving Favorite Help Topics The Favorites tab lets you save your favorite topics, do one of your favorite topics...: 1 Click the Help tool. To save the topics that you want to remove and ...
...in the Topics area. 6 To display your favorite. To print topics: 1 Click the Help tool. 2 Click the topic you want to access quickly. 32 Pacesetter BES Lettering Instruction Manual Saving Favorite Help Topics The Favorites tab lets you save your favorite topics, do one of your favorite topics...: 1 Click the Help tool. To save the topics that you want to remove and ...
INSTRUCTION MANUAL - English
Page 82
... laid down wales or naps (on fabrics such as corduroy). Selecting the Underlay Type You can also help stabilize stretchy fabrics. You can combine underlay types to help to the Underlay area. 80 Pacesetter BES Lettering Instruction Manual Underlay Properties Underlay stitches are sewn. To select an underlay type: 1 Select the segment. 2 In...
... laid down wales or naps (on fabrics such as corduroy). Selecting the Underlay Type You can also help stabilize stretchy fabrics. You can combine underlay types to help to the Underlay area. 80 Pacesetter BES Lettering Instruction Manual Underlay Properties Underlay stitches are sewn. To select an underlay type: 1 Select the segment. 2 In...
INSTRUCTION MANUAL - English
Page 120
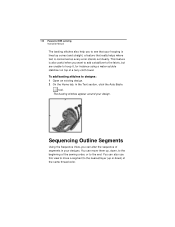
...To add basting stitches to the end. You can move a segment to see that your hooping is lined up correct and straight, a feature that really helps where text is also useful when you want to add a stabilizer to the fabric, but are unable to hoop it, for instance using a water-soluble ... segments in the Text section, click the Auto Baste tool. You can alter the sequence of a terry-cloth towel. 118 Pacesetter BES Lettering Instruction Manual The basting stitches also help you to the nearest layer (up or down , to the beginning of the sewing order, or to designs: 1 Open an existing ...
...To add basting stitches to the end. You can move a segment to see that your hooping is lined up correct and straight, a feature that really helps where text is also useful when you want to add a stabilizer to the fabric, but are unable to hoop it, for instance using a water-soluble ... segments in the Text section, click the Auto Baste tool. You can alter the sequence of a terry-cloth towel. 118 Pacesetter BES Lettering Instruction Manual The basting stitches also help you to the nearest layer (up or down , to the beginning of the sewing order, or to designs: 1 Open an existing ...


