Users Manual - English and Spanish
Page 2
... the sewing machine and foot controller free from the electrical outlet when removing covers, lubricating, or when making any air openings blocked. Do not operate where aerosol (spray) products are replacing or removing the needle or any other moving parts. To unplug, grasp the plug, not the cord. 10. Switch the sewing machine to the symbol "O" position when making any other ) to reduce the risk of lint, dust, and loose...
... the sewing machine and foot controller free from the electrical outlet when removing covers, lubricating, or when making any air openings blocked. Do not operate where aerosol (spray) products are replacing or removing the needle or any other moving parts. To unplug, grasp the plug, not the cord. 10. Switch the sewing machine to the symbol "O" position when making any other ) to reduce the risk of lint, dust, and loose...

Users Manual - English and Spanish
Page 3
... mental capabilities, or lack of replacing the plug fuse, use plugs with this machine in direct sunlight or in high humidity conditions. Do not store this equipment, you should be removed from the socket-outlet. To repair or adjust the machine If the machine breaks down or needs adjustment, first follow the troubleshooting table to make sure you replace or fit the presser foot, needle, or any other hot...
... mental capabilities, or lack of replacing the plug fuse, use plugs with this machine in direct sunlight or in high humidity conditions. Do not store this equipment, you should be removed from the socket-outlet. To repair or adjust the machine If the machine breaks down or needs adjustment, first follow the troubleshooting table to make sure you replace or fit the presser foot, needle, or any other hot...
Users Manual - English and Spanish
Page 5
... INSTRUCTIONS I WARNING LABELS ...III Contents ...1 Chapter 1: Names of parts and their functions 2 Accessories ...3 Powering the machine ...4 Turning direction of hand wheel 4 Opening/ Closing front cover 4 Attaching/ Removing presser foot 4 Trim trap ...5 Free-arm sewing (removing bed extension 5 Wide table ...5 Retracting knife ...6 Stitch length ...6 Stitch width ...6 Differential feed ...7 Adjusting the presser foot pressure 7 Tension adjustment dial ...8 Chart of thread tension adjustment, Two needle (Four-thread 9 Chart of thread tension adjustment, One needle (Three-thread...
... INSTRUCTIONS I WARNING LABELS ...III Contents ...1 Chapter 1: Names of parts and their functions 2 Accessories ...3 Powering the machine ...4 Turning direction of hand wheel 4 Opening/ Closing front cover 4 Attaching/ Removing presser foot 4 Trim trap ...5 Free-arm sewing (removing bed extension 5 Wide table ...5 Retracting knife ...6 Stitch length ...6 Stitch width ...6 Differential feed ...7 Adjusting the presser foot pressure 7 Tension adjustment dial ...8 Chart of thread tension adjustment, Two needle (Four-thread 9 Chart of thread tension adjustment, One needle (Three-thread...

Users Manual - English and Spanish
Page 6
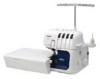
...openings (on the back) Thread change assembly, Needle set, Hexagonal driver 2 Bed extension compartment The removed stitch fingers can be stored in this compartment. (See CHAPTER 5 "Narrow overlock/Rolled hemming stitch". CHAPTER 1 NAMES OF PARTS AND THEIR FUNCTIONS 1 2 1 Thread tree 2 Presser foot pressure adjustment screw 3 Spool pin 4 Spool support 5 Thread take-up cover 6 Needles 7 Bed extension 8 Presser foot 9 Material plate cover 0 Left needle thread tension dial A Right needle thread tension dial B Upper looper thread tension dial C Lower looper thread tension...
...openings (on the back) Thread change assembly, Needle set, Hexagonal driver 2 Bed extension compartment The removed stitch fingers can be stored in this compartment. (See CHAPTER 5 "Narrow overlock/Rolled hemming stitch". CHAPTER 1 NAMES OF PARTS AND THEIR FUNCTIONS 1 2 1 Thread tree 2 Presser foot pressure adjustment screw 3 Spool pin 4 Spool support 5 Thread take-up cover 6 Needles 7 Bed extension 8 Presser foot 9 Material plate cover 0 Left needle thread tension dial A Right needle thread tension dial B Upper looper thread tension dial C Lower looper thread tension...

Users Manual - English and Spanish
Page 7
English Accessories Included accessory 1 Soft cover: X77871000 2 Accessory bag: 122991052 3 Tweezers: XB1618001 4 Thread net (4): X75904000 5 Thread spool cap (4): X77260000 6 Cleaning brush: X75906001 7 Hexagonal driver: XB0393001 8 Needle set (SCHMETZ 130/705H): X75917001 #80: 2 pcs., #90: 2 pcs. 9 Foot controller: XC7359021 (120V Area) XC7438321 (230V Area) XC7456321 (U.K.) XD0112121 (Argentina) XD0852021 (Korea) XD0105021 (China) XE0629001 (Australia, New Zealand) XE3414001 (Brazil) 0 Instruction DVD: XB2007001 (NTSC) XB2014001 (PAL) A Thread change assembly: XB1991001 B Trim trap:...
English Accessories Included accessory 1 Soft cover: X77871000 2 Accessory bag: 122991052 3 Tweezers: XB1618001 4 Thread net (4): X75904000 5 Thread spool cap (4): X77260000 6 Cleaning brush: X75906001 7 Hexagonal driver: XB0393001 8 Needle set (SCHMETZ 130/705H): X75917001 #80: 2 pcs., #90: 2 pcs. 9 Foot controller: XC7359021 (120V Area) XC7438321 (230V Area) XC7456321 (U.K.) XD0112121 (Argentina) XD0852021 (Korea) XD0105021 (China) XE0629001 (Australia, New Zealand) XE3414001 (Brazil) 0 Instruction DVD: XB2007001 (NTSC) XB2014001 (PAL) A Thread change assembly: XB1991001 B Trim trap:...
Users Manual - English and Spanish
Page 11
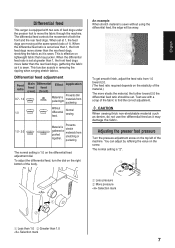
... dial on the right bottom of feed dogs under the presser foot to find the correct adjustment. When the differential feed ratio is set at 1, the feed dogs are moving at less than 1, the front feed dogs move the fabric through the machine. CAUTION When sewing thick non-stretchable material such as denim, do not use the differential feed as it is sewn. When set at the same speed...
... dial on the right bottom of feed dogs under the presser foot to find the correct adjustment. When the differential feed ratio is set at 1, the feed dogs are moving at less than 1, the front feed dogs move the fabric through the machine. CAUTION When sewing thick non-stretchable material such as denim, do not use the differential feed as it is sewn. When set at the same speed...

Users Manual - English and Spanish
Page 17
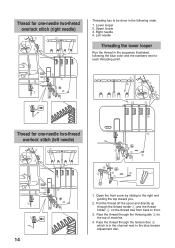
English CHAPTER 3 THREADING Thread for two-needle four-thread overlock stitch 3 4 left needle right needle 1 2 3 4 6 7 5 7 Thread for one-needle three-thread overlock stitch (right needle) 3 1 2 4 3 4 6 7 5 7 Thread for one-needle three-thread overlock stitch (left needle) 3 1 2 4 3 4 6 7 5 7 13
English CHAPTER 3 THREADING Thread for two-needle four-thread overlock stitch 3 4 left needle right needle 1 2 3 4 6 7 5 7 Thread for one-needle three-thread overlock stitch (right needle) 3 1 2 4 3 4 6 7 5 7 Thread for one-needle three-thread overlock stitch (left needle) 3 1 2 4 3 4 6 7 5 7 13
Users Manual - English and Spanish
Page 18
... thread holder 1 and the thread holder 2 on the top of machine. 4. Right needle 4. Pass the thread through the tension disc 4 which is in the channel next to the right and guiding the top toward you. 2. Lower looper 2. Open the front cover by sliding to the blue tension adjustment dial. Thread for one-needle two-thread overlock stitch (right needle) 3 1 2 4 3 4 6 7 5 7 Threading has to be done in the following the blue color and the numbers...
... thread holder 1 and the thread holder 2 on the top of machine. 4. Right needle 4. Pass the thread through the tension disc 4 which is in the channel next to the right and guiding the top toward you. 2. Lower looper 2. Open the front cover by sliding to the blue tension adjustment dial. Thread for one-needle two-thread overlock stitch (right needle) 3 1 2 4 3 4 6 7 5 7 Threading has to be done in the following the blue color and the numbers...
Users Manual - English and Spanish
Page 21
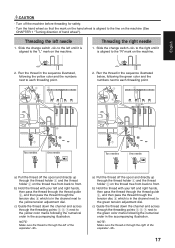
... the numbers next to each threading point. 3 1 2 4 3 4 6 7 5 7 Two needles One needle a) Pull the thread off the spool and directly up through the left of the separater . 17 English CAUTION · Turn off the machine before threading for safety. · Turn the hand wheel so that the mark on the hand wheel is aligned to the yellow tension adjustment dial. NOTE: Make sure the thread is...
... the numbers next to each threading point. 3 1 2 4 3 4 6 7 5 7 Two needles One needle a) Pull the thread off the spool and directly up through the left of the separater . 17 English CAUTION · Turn off the machine before threading for safety. · Turn the hand wheel so that the mark on the hand wheel is aligned to the yellow tension adjustment dial. NOTE: Make sure the thread is...
Users Manual - English and Spanish
Page 24
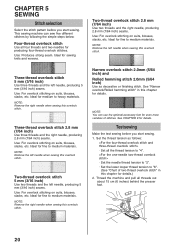
... four-thread overlock stitches. Thread the machine and pull all the thread tension to "4". · Set the needle thread tension to "2". · Set the lower looper thread tension to "6". (See "Chart of stitches. NOTE: Remove the right needle when sewing this overlock stitch. Three-thread overlock stitch 2.8 mm (7/64 inch) Use three threads and the right needle, producing 2.8 mm (7/64 inch) seams. Use: For overlock stitching on suits, blouses, slacks, etc. Test sewing Make the test sewing before you start sewing. This sewing machine can use the optional accessory foot...
... four-thread overlock stitches. Thread the machine and pull all the thread tension to "4". · Set the needle thread tension to "2". · Set the lower looper thread tension to "6". (See "Chart of stitches. NOTE: Remove the right needle when sewing this overlock stitch. Three-thread overlock stitch 2.8 mm (7/64 inch) Use three threads and the right needle, producing 2.8 mm (7/64 inch) seams. Use: For overlock stitching on suits, blouses, slacks, etc. Test sewing Make the test sewing before you start sewing. This sewing machine can use the optional accessory foot...
Users Manual - English and Spanish
Page 25
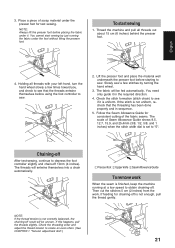
... the threading order and adjust the thread tension to depress the foot controller slightly and chain-off is not uniform, recheck that the threads entwine themselves into a chain automatically. 3 2 1 1 Presser foot 2 Upper knife 3 Seam Allowance Guide To remove work . Place a piece of Seam Allowance Guide shows 9.5, 12.7, 15.9, and 25.4mm (3/8, 1/2, 5/8, and 1 inches) when the stitch width dial is finished, keep the machine running the fabric under the presser foot for test sewing. Then...
... the threading order and adjust the thread tension to depress the foot controller slightly and chain-off is not uniform, recheck that the threads entwine themselves into a chain automatically. 3 2 1 1 Presser foot 2 Upper knife 3 Seam Allowance Guide To remove work . Place a piece of Seam Allowance Guide shows 9.5, 12.7, 15.9, and 25.4mm (3/8, 1/2, 5/8, and 1 inches) when the stitch width dial is finished, keep the machine running the fabric under the presser foot for test sewing. Then...
Users Manual - English and Spanish
Page 27
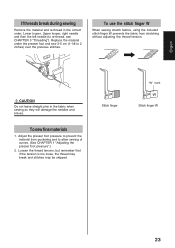
... straight pins in the correct order, Lower looper, Upper looper, right needle and then the left needle (to allow sewing of curves. (See CHAPTER 1 "Adjusting the presser foot pressure".) 2. Replace the material under the presser foot and sew 3-5 cm (1-1/8 to prevent the material from stretching without adjusting the thread tension. Loosen the thread tension, but remember that if the tension is too loose, the thread may break and stitches may be skipped. To use the stitch finger W When sewing stretch fabrics, using...
... straight pins in the correct order, Lower looper, Upper looper, right needle and then the left needle (to allow sewing of curves. (See CHAPTER 1 "Adjusting the presser foot pressure".) 2. Replace the material under the presser foot and sew 3-5 cm (1-1/8 to prevent the material from stretching without adjusting the thread tension. Loosen the thread tension, but remember that if the tension is too loose, the thread may break and stitches may be skipped. To use the stitch finger W When sewing stretch fabrics, using...
Users Manual - English and Spanish
Page 29
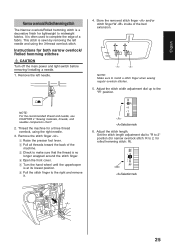
... main power and light switch before removing/ installing a needle. 1. Adjust the stitch length. It is at its lowest position. 6 Pull the stitch finger to midweight fabrics. Instructions for a three thread overlock, using the 3-thread overlock stitch. NOTE: For the recommended thread and needle, see CHAPTER 4 "Sewing materials, threads, and needles comparison chart". 2. Adjust the stitch width adjustment dial up to complete the edge of the bed extension. Remove the stitch finger . 1 Raise the presser foot lever. 2 Pull all threads toward the back of the machine...
... main power and light switch before removing/ installing a needle. 1. Adjust the stitch length. It is at its lowest position. 6 Pull the stitch finger to midweight fabrics. Instructions for a three thread overlock, using the 3-thread overlock stitch. NOTE: For the recommended thread and needle, see CHAPTER 4 "Sewing materials, threads, and needles comparison chart". 2. Adjust the stitch width adjustment dial up to complete the edge of the bed extension. Remove the stitch finger . 1 Raise the presser foot lever. 2 Pull all threads toward the back of the machine...
Users Manual - English and Spanish
Page 31
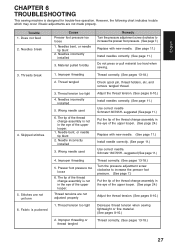
... of the thread change assembly is not in the eye of the upper looper. Thread tensions are not adjusted properly Thread correctly. (See pages 13-18.) Turn the pressure adjustment screw clockwise to increase the presser foot pressure. (See page 7.) Replace with new needle. (See page 11.) Install needle correctly. (See page 11.) Use correct needle. Does not feed 2. Fabric is designed for trouble-free operation. Thread tangled Check spool pin, thread holders, etc. Thread tension too tight 4. Wrong needle used Adjust the thread tension. (See pages 8-10.) Install needles correctly...
... of the thread change assembly is not in the eye of the upper looper. Thread tensions are not adjusted properly Thread correctly. (See pages 13-18.) Turn the pressure adjustment screw clockwise to increase the presser foot pressure. (See page 7.) Replace with new needle. (See page 11.) Install needle correctly. (See page 11.) Use correct needle. Does not feed 2. Fabric is designed for trouble-free operation. Thread tangled Check spool pin, thread holders, etc. Thread tension too tight 4. Wrong needle used Adjust the thread tension. (See pages 8-10.) Install needles correctly...
Users Manual - English and Spanish
Page 33
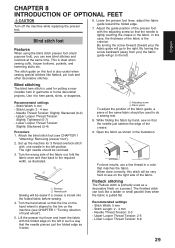
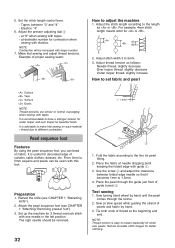
.... Recommended settings - Stitch Length: 2 - 4 mm - Lower the presser foot lever, adjust the fabric guide toward you) the fabric guide will be easier if a crease is ironed into the folded fabric before sewing. 4. Stitch Width: 5 mm - Set up the machine for putting a near invisible hem in a color that the line on this case, the thickness of the crease. 9. The right needle should be removed. 3. Needle Thread Tension: 0-3 - The stitch guide on the hand wheel is used for 3 thread overlock stitch with...
.... Recommended settings - Stitch Length: 2 - 4 mm - Lower the presser foot lever, adjust the fabric guide toward you) the fabric guide will be easier if a crease is ironed into the folded fabric before sewing. 4. Stitch Width: 5 mm - Set up the machine for putting a near invisible hem in a color that the line on this case, the thickness of the crease. 9. The right needle should be removed. 3. Needle Thread Tension: 0-3 - The stitch guide on the hand wheel is used for 3 thread overlock stitch with...
Users Manual - English and Spanish
Page 34
... CHAPTER 5 "Narrow overlock/Rolled hemming stitch".) 3. Lift the presser foot lever and insert the fabric with an iron. 1 Making lines 2 Fold in the upper looper adds an accent to the left . Set up the machine for pin tuck placement. Attach the blind stitch foot (see CHAPTER 1 "Attaching/Removing presser foot"). 2. By turning the screw backward the fabric guide will go to your project. Procedure 1. Set up the machine for thin fabrics. To adjust the position of the fabric guide, a piece of...
... CHAPTER 5 "Narrow overlock/Rolled hemming stitch".) 3. Lift the presser foot lever and insert the fabric with an iron. 1 Making lines 2 Fold in the upper looper adds an accent to the left . Set up the machine for pin tuck placement. Attach the blind stitch foot (see CHAPTER 1 "Attaching/Removing presser foot"). 2. By turning the screw backward the fabric guide will go to your project. Procedure 1. Set up the machine for thin fabrics. To adjust the position of the fabric guide, a piece of...
Users Manual - English and Spanish
Page 35
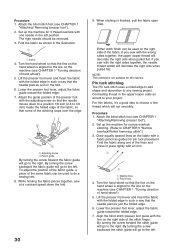
... that the line on the hand wheel is very useful for sewing cuffs, necklines, etc. - 2 needle 4 thread overlock - 1 needle 3 thread overlock (Either needle can be set the presser adjusting dial 2 at "5". 31 Test sewing Usage of the elastic Usage of tapes / elastics. " 3 Adjusting screw 4 Fabric guide 9. Lift the presser foot lever. 2. Correct minor contractions by hand. Attach the taping foot (see CHAPTER 1 "Turning direction of stitch): ! Flip open the tape guide 1, then set at the lefthand side of the tape 5 1.
... that the line on the hand wheel is very useful for sewing cuffs, necklines, etc. - 2 needle 4 thread overlock - 1 needle 3 thread overlock (Either needle can be set the presser adjusting dial 2 at "5". 31 Test sewing Usage of the elastic Usage of tapes / elastics. " 3 Adjusting screw 4 Fabric guide 9. Lift the presser foot lever. 2. Correct minor contractions by hand. Attach the taping foot (see CHAPTER 1 "Turning direction of stitch): ! Flip open the tape guide 1, then set at the lefthand side of the tape 5 1.
Users Manual - English and Spanish
Page 36
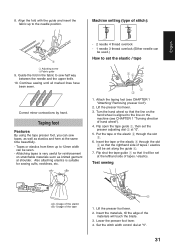
... stitch length control lever. - Adjust the presser adjusting dial 2 - Adjust stitch width 3 to adjust the machine 1. It is useful for 3 thread overlock stitch with tapes. Set up the machine for decorated edge of curtains, table clothes, dresses, etc. Sew turning hand wheel by hand until the pearl comes through the guide just front of pearls and fabric by hand. 3. Retract movable stitch tongue for pearl fitting. 2. at needle dropping point keeping the folded edge with guide 1. 3. Adjust the stitch length...
... stitch length control lever. - Adjust the presser adjusting dial 2 - Adjust stitch width 3 to adjust the machine 1. It is useful for 3 thread overlock stitch with tapes. Set up the machine for decorated edge of curtains, table clothes, dresses, etc. Sew turning hand wheel by hand until the pearl comes through the guide just front of pearls and fabric by hand. 3. Retract movable stitch tongue for pearl fitting. 2. at needle dropping point keeping the folded edge with guide 1. 3. Adjust the stitch length...
Users Manual - English and Spanish
Page 37
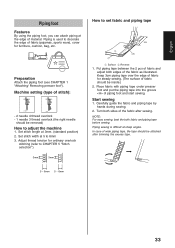
.... Set stitch width at 3mm. (standard position) 2. Piping sewing is used to set fabric and piping tape 3cm 2 1 1 Surface 2 Reverse 1. Preparation Attach the piping foot (see CHAPTER 1 "Attaching/ Removing presser foot"). Adjust thread tension for ordinary overlock stitching (refer to CHAPTER 5 "Stitch selection"). 3mm 3mm How to decorate the edge of fabric (pajamas, sports ware), cover for steady sewing. (The surface of material. Carefully guide the fabric and piping tape by hands during sewing. 2. LP English Piping foot...
.... Set stitch width at 3mm. (standard position) 2. Piping sewing is used to set fabric and piping tape 3cm 2 1 1 Surface 2 Reverse 1. Preparation Attach the piping foot (see CHAPTER 1 "Attaching/ Removing presser foot"). Adjust thread tension for ordinary overlock stitching (refer to CHAPTER 5 "Stitch selection"). 3mm 3mm How to decorate the edge of fabric (pajamas, sports ware), cover for steady sewing. (The surface of material. Carefully guide the fabric and piping tape by hands during sewing. 2. LP English Piping foot...
Users Manual - English and Spanish
Page 38
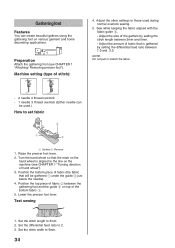
... direction of stitch): LG 4. Raise the presser foot lever. 2. Sew while keeping the fabric aligned with the fabric guide 3. - Machine setting (type of hand wheel"). 3. Turn the hand wheel so that the mark on top of the gathers by setting the differential feed ratio between 2mm and 5mm. - Test sewing 1. NOTE: Do not pull or stretch the fabric. - 2 needle 4 thread overlock - 1 needle 3 thread overlock (Either needle can create beautiful gathers using the gathering foot on the machine (see CHAPTER 1 "Attaching/ Removing presser foot"). Adjust the...
... direction of stitch): LG 4. Raise the presser foot lever. 2. Sew while keeping the fabric aligned with the fabric guide 3. - Machine setting (type of hand wheel"). 3. Turn the hand wheel so that the mark on top of the gathers by setting the differential feed ratio between 2mm and 5mm. - Test sewing 1. NOTE: Do not pull or stretch the fabric. - 2 needle 4 thread overlock - 1 needle 3 thread overlock (Either needle can create beautiful gathers using the gathering foot on the machine (see CHAPTER 1 "Attaching/ Removing presser foot"). Adjust the...


