Brother International 5234PRW Support Question
Brother International 5234PRW Support Question
Find answers below for this question about Brother International 5234PRW.Need a Brother International 5234PRW manual? We have 2 online manuals for this item!
Question posted by mkendrickroyal on April 20th, 2012
Flatlock Stitch
Have been unsuccessful with flatlock stitch. I've adjusted tension on all threads numerous times and changed threads to a heavier weight. After each some changes, the stitch looks great, but then the very next time--with no changes--the stitch is loose and puckered. Help!
Current Answers
Related Brother International 5234PRW Manual Pages
Users Manual - English and Spanish - Page 2
...authorized dealer. 7. Never operate the sewing machine with any other user servicing adjustments mentioned in the instruction manual. 16.This sewing machine is not intended for use by young... using the machine - Do not unplug by
the manufacturer as a toy. Always use as threading needle, changing needle, or changing presser foot, etc. 15. Do not disassenble the machine. 19. ...
Users Manual - English and Spanish - Page 3

... should never be removed from the socket-outlet. "SAVE THESE INSTRUCTIONS" "This sewing machine is not intended for household use or store the machine near a heater, iron, halogen lamp or other parts to inspect and adjust the machine yourself. CAUTION When leaving this machine in direct sunlight or in high humidity conditions. FOR USERS IN THE...
Users Manual - English and Spanish - Page 4
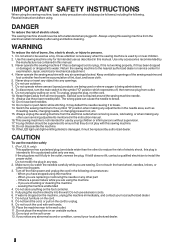
CAUTION
When threading or replacing needle, the main power and light switch of the machine must be switched off or the plug must be...OVERLOCK MACHINE
Your machine is disconnected from the wall socket to avoid any possible hazards. When the machine is not in oilsoaked felt to withstand long hours of the machines normal operation.
If you study this sewing machine is 1,300 stitches per ...
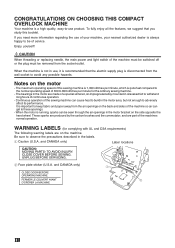
Users Manual - English and Spanish - Page 5
... machine ...4 Turning direction of hand wheel 4 Opening/ Closing front cover 4 Attaching/ Removing presser foot 4 Trim trap ...5 Free-arm sewing (removing bed extension 5 Wide table ...5 Retracting knife ...6 Stitch length ...6 Stitch width ...6 Differential feed ...7 Adjusting the presser foot pressure 7 Tension adjustment dial ...8 Chart of thread tension adjustment, Two needle (Four-thread...
Users Manual - English and Spanish - Page 8
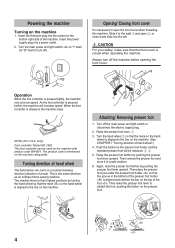
...the machine. Push the button on the machine. (See CHAPTER1 "Turning direction of the machine.
Turn the hand wheel 2 so that the front cover is the same direction as an ordinary home sewing machine. ... presser foot holder is aligned to the right 1 and open the front cover when threading this machine. Raise the presser foot lever. 1 3. Then place the presser foot just under ...
Users Manual - English and Spanish - Page 15
....
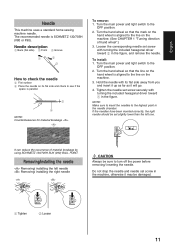
1 Tighten
2 Loosen
11
The recommended needle is aligned to check the needle
4 Flat surface 5 Place the needle on the machine. 3. To remove: 1. Turn the main power and light switch to turn off the power before removing/ inserting the needle.
Needle... 4 NOTE: Countermeasures for material breakage . To install: 1. English
Needle
This machine uses a standard home sewing machine needle.
Users Manual - English and Spanish - Page 21
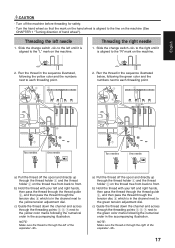
... marks following the numerical order in the channel next to the green tension adjustment dial.
English
CAUTION
· Turn off the machine before threading for safety. · Turn the hand wheel so that the mark on the hand wheel is aligned to the line on the thread tree from back to front. Slide the change switch to...
Users Manual - English and Spanish - Page 24
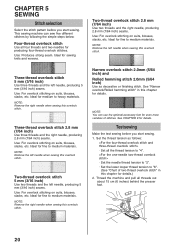
... medium to medium materials. Test sewing
Make the test sewing before you start sewing. Thread the machine and pull all the thread tension to "4". · Set the needle thread tension to "2". · Set the lower looper thread tension to medium materials. This sewing machine can use the optional accessory foot for even more varieties of two-thread overlock stitch" in this chapter for...
Users Manual - English and Spanish - Page 25
... the stitches 5 cm (2 inches) from the work
When the seam is not correctly balanced, the chaining-off result will entwine themselves before placing the fabric under the presser foot for test sewing. NOTE: If the thread tension is finished, keep the machine running the fabric under the foot without lifting the presser foot. Slowly sew a few times...
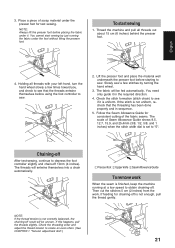
Users Manual - English and Spanish - Page 26
... it pulling toward you. 4. After sewing a few stitches, after drying.
22 At the end of the seam, sew one stitch out of a stitch 1. At the beginning of
the fabric before stopping the machine.
2. Raise the presser foot and the needles, then reverse the fabric.
3.
Tie the thread unpicked from chain. Sew a few stitches, serge off the fabric as illustrated...
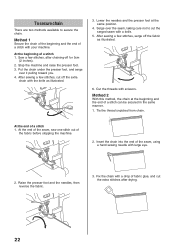
Users Manual - English and Spanish - Page 27
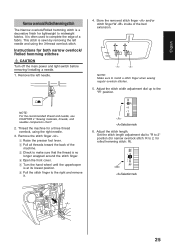
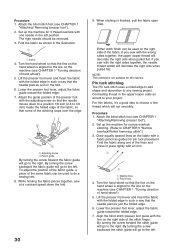
... needle (to re-thread, see CHAPTER 3 "Threading").
Stitch finger
"W" mark Stitch finger W
23 Loosen the thread tension, but remember that if the tension is too loose, the thread may break and stitches may be skipped.
Adjust the presser foot pressure to prevent the material from stretching without adjusting the thread tension. To use the stitch finger W
When sewing stretch fabrics, using...
Users Manual - English and Spanish - Page 28
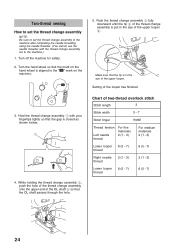
... end of the looper has finished.
Turn off the machine for safety. 2.
TC
3. Push the thread change assembly 2 fully downward until the tip 3 of the thread change assembly is in the eye of two-thread overlock stitch
Stitch length
3
Stitch width
5 - 7
Stitch finger
Install
Thread tension
Left needle thread
For fine materials 2 (1 - 3)
For medium materials 2 (1 - 3)
Lower looper...
Users Manual - English and Spanish - Page 29
... and using the right needle.
3.
Thread the machine for a three thread overlock, using the 3-thread overlock stitch. It is at its lowest position. 6 Pull the stitch finger to complete the edge of the bed extension. NOTE: For the recommended thread and needle, see CHAPTER 4 "Sewing materials, threads, and needles comparison chart".
2. Adjust the stitch length. Instructions for narrow...
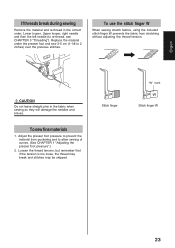
Users Manual - English and Spanish - Page 31
...11.)
Do not press or pull material too hard when sewing.
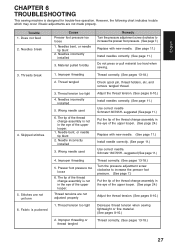
1. However, the following chart indicates trouble which may occur if basic adjustments are not made properly. Thread tension too tight
4. Skipped stitches
5. English
CHAPTER 6 TROUBLESHOOTING
This sewing machine is not in the eye of the upper looper.
1.
Improper threading or thread tangled
Thread correctly. (See pages 13-18.)
27
Users Manual - English and Spanish - Page 32
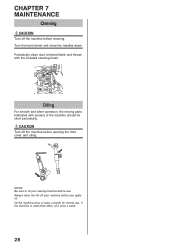
... silent operation, the moving parts (indicated with the included cleaning brush. Periodically clean dust, trimmed fabric and thread with arrows) of the machine should be oiled periodically.
CAUTION Turn off the machine before use . Always clean the lint off your sewing machine before cleaning. If the machine is used more often, oil it once a week.
28
Users Manual - English and Spanish - Page 33
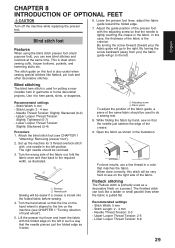
... finished stitch can sew blind stitches and overlock at the same time. Upper Looper Thread Tension: 2-5 - Use it sews.
3 Adjusting screw 4 Fabric guide
To adjust the position of the fabric guide, a piece of the crease. 9. Stitch Length: 3 - 4 mm - Turn the hand wheel so that the needle is the criterion. English
CHAPTER 8 INTRODUCTION OF OPTIONAL FEET
CAUTION Turn off the machine while...
Users Manual - English and Spanish - Page 34
... the machine for pin tuck placement. Fold the fabric as guides for narrow overlock
stitching. (Refer to choose a fine thread which will decorate the right side when pulled flat. Lower the presser foot lever, adjust the fabric guide toward the folded edge.
7. Adjust the guide position of hand wheel").
5. While holding the fabric pieces together, sew...
Users Manual - English and Spanish - Page 35
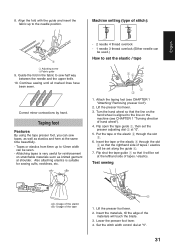
... elastics and hem at "5".
31 Turn the hand wheel so that the line on the machine (see CHAPTER 1 "Attaching/ Removing presser foot"). 2. Test sewing
Usage of the elastic Usage of stitch):
! Set the stitch width control dial at the same time beautifully. - Guide the fold in the fabric to the line on the hand wheel...
Users Manual - English and Spanish - Page 36
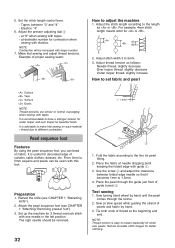
... for decorated edge of thread at the beginning and end.
Sew turning hand wheel by hand.
3.
5. Set the stitch length control lever. - Elastics: "4"
6. Adjust the presser adjusting dial 2 - at slow speed while guiding the strand of proper sewing seam:
How to loosen especially for beautiful finish. Make trial sewing and adjust thread tensions. Example of pearls and...
Users Manual - English and Spanish - Page 37
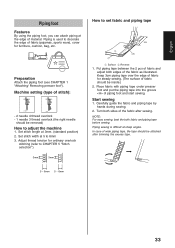
...width at 5 to set fabric and piping tape
3cm
2
1
1 Surface 2 Reverse
1.
Adjust thread tension for furniture, cushion, bag, etc. Start sewing
1. Set stitch length at 3mm. (standard position) 2. Turn both sides of stitch):
- 2 needle 4 thread overlock - 1 needle 3 thread overlock (the right needle
should be inside.)
2. Machine setting (type of the fabric after trimming the excess tape...
Similar Questions

Brother Sewing Machine Bm3700
can 3700BM brother sewing machine use an extension and what model
can 3700BM brother sewing machine use an extension and what model
(Posted by jameelahmuhammad 8 years ago)

Where Is The Basting Stitch On The Sc9500 Brother Sewing Machine
Where is the basting stitch on the sc9500 brother sewing machine
Where is the basting stitch on the sc9500 brother sewing machine
(Posted by kschroepfer 9 years ago)

Video How To Use Brother 5234prw Serger
(Posted by mrflyaw 10 years ago)
Brother Ls 2000 Sewing Machine Price
I Want To Know Above Sewing Machine Price In Indian Rupees,please Anser Me Imediately
I Want To Know Above Sewing Machine Price In Indian Rupees,please Anser Me Imediately
(Posted by iladave84503 10 years ago)

Price Brother 5234prw Serger
many many sites but no price. How do I know if I want a baby lock or brother serger if no onw will p...
many many sites but no price. How do I know if I want a baby lock or brother serger if no onw will p...
(Posted by Anonymous-74815 11 years ago)