Brother International SC9500 Support Question
Brother International SC9500 Support Question
Find answers below for this question about Brother International SC9500.Need a Brother International SC9500 manual? We have 4 online manuals for this item!
Question posted by kschroepfer on July 9th, 2014
Where Is The Basting Stitch On The Sc9500 Brother Sewing Machine
Where is the basting stitch on the sc9500 brother sewing machine
Current Answers

Related Brother International SC9500 Manual Pages
Users Manual - English - Page 1
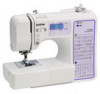
Operation Manual
Sewing Machine
Product Code: 885-V64/V65/V66/V67
KNOWING YOUR SEWING MACHINE
SEWING BASICS
UTILITY STITCHES
APPENDIX
Please visit us at http://solutions.brother.com where you can get product support and answers to frequently asked questions (FAQs).
Users Manual - English - Page 6
... and width ...38 Starting to sew ...39 Thread tension ...41
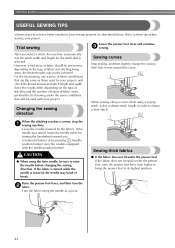
USEFUL SEWING TIPS ...42
Trial sewing ...42 Changing the sewing direction ...42 Sewing curves ...42 Sewing thick fabrics ...42 Sewing hook-and-loop fastener ...43 Sewing thin fabrics ...44 Sewing stretch fabrics ...44 Stitching cylindrical pieces ...44
4 KNOWING YOUR SEWING MACHINE 6
ACCESSORIES ...6
Included accessories ...6 Optional...
Users Manual - English - Page 7
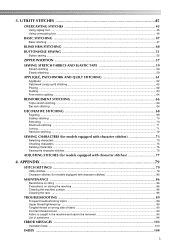
...Deleting characters ...75 Sewing the character stitches ...76
ADJUSTING STITCHES (for models equipped with character stitches 77
4. APPENDIX ...79
STITCH SETTINGS ...79
Utility stitches ...79 Character stitches (for models equipped with character stitches 85
MAINTENANCE ...86
Restrictions on oiling ...86 Precautions on storing the machine ...86 Cleaning the machine surface ...86 Cleaning...
Users Manual - English - Page 8
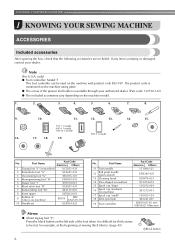
... foot "N"
XD0810-031
5 Zipper foot "I"
X59370-021
6 Blind stitch foot "R"
XC4051-031
7 Button fitting foot "M"
XE2137-001
8 Seam ripper
XZ5082-001
9
Bobbin (4) (One is difficult for example, at the beginning of sewing thick fabrics. (page 43)
aBlack button
6 The product code is mentioned on the machine model.
1.
2.
3.
4.
5.
6.
7.
8.
9.
10.
11.
12.
13.
75/11...
Users Manual - English - Page 10
...the thread cutter to circulate.
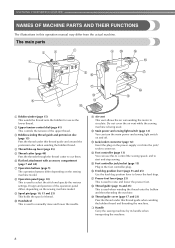
Do not cover the air vent while the sewing machine is used to select the stitch and specify the various settings. q Presser foot lever (page 23) This ... tension-control dial (page 41) This controls the tension of thread. KNOWING YOUR SEWING MACHINE
NAMES OF MACHINE PARTS AND THEIR FUNCTIONS
The illustrations in the foot controller plug.
The main parts
...
Users Manual - English - Page 11
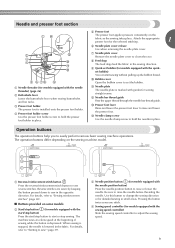
... in the fabric.
The operation buttons differ depending on the
fabric as the sewing takes place. For details, refer to "Sewing reinforcement stitches" (page 40).
■ Buttons provided on some models
b Start/stop sewing. The machine sews at a slow speed at the beginning of sewing while the button is marked with the quick- For details, refer to...
Users Manual - English - Page 12
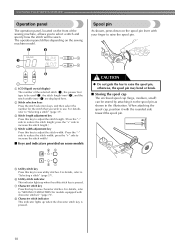
... adjustment key Press this key to sew utility stitches. For details, refer to "SEWING CHARACTERS (for the stitch that you to raise the spool pin. The operation panel differs depending on the sewing machine model. f Utility stitch indicator This indicator lights up when the character stitch key is pressed. b Stitch selection keys Press the stitch selection keys, and then select...
Users Manual - English - Page 15
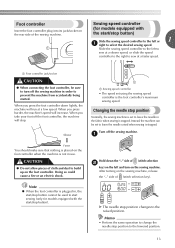
... and turn off the sewing machine in order to turn on the sewing machine.
Note
● When the foot controller is plugged in use. After turning on the sewing machine, release the "-" side of the sewing machine. Foot controller
Insert the foot controller plug into its jack/socket on the rear side of (stitch selection key). Sewing speed controller
(for...
Users Manual - English - Page 16
... on. Turn off the sewing machine. After turning on the sewing machine, release
the "+" side of
(stitch width
b adjustment key) and turn on the sewing
machine. KNOWING YOUR SEWING MACHINE
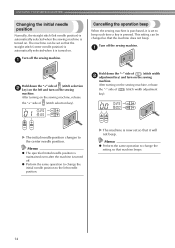
Changing the initial needle position
Normally, the straight stitch (left and turn on the sewing
machine. After turning on the sewing machine, release
the "-" side of (stitch selection b key) on the...
Users Manual - English - Page 31
...
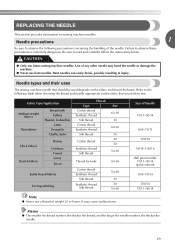
Denim
Corduroy Tweed Jersey Tricot
Easily frayed fabrics
For top-stitching
Thread Type Cotton thread Synthetic thread Silk thread Cotton thread Synthetic thread Silk thread
Cotton thread
Synthetic thread Silk thread
Thread for the fabric that should be used depends on sewing machine needles. Use of Needle
75/11-90/14
65/9-75...
Users Manual - English - Page 32
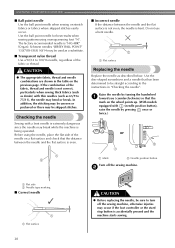
... the needle as a substitute.
■ Transparent nylon thread Use a 90/14 to be skipped stitches. Schmetz needles "JERSEY BALL POINT" 130/705H SUK 90/14 may be straight according to turn off the sewing machine.
In addition, the stitching may be uneven or puckered or there may be sure to the instructions in the...
Users Manual - English - Page 34
... appropriate stitch, otherwise the needle may break or
the machine may damage the machine. ● When using the twin needle, be sewn with the twin needle, refer to
"Replacing the needle" (page 30).
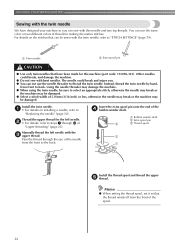
a Bobbin winder shaft b Extra spool pin c Thread spool
Install the thread spool and thread the upper e thread.
KNOWING YOUR SEWING MACHINE
Sewing with...
Users Manual - English - Page 35
... that can be damaged.
33 CAUTION
● When using the twin needle, the stitches may be sewn
with a needle threader ● You cannot use the needle threader to sew" (page 39).
Otherwise the needle may break or the machine may be damaged.
● Do not try turning the fabric with the twin needle...
Users Manual - English - Page 36
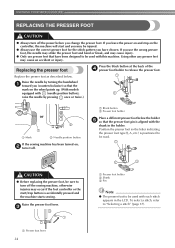
... been turned on, b turn off the sewing machine, otherwise injuries may occur if the foot controller or the start and you change the presser foot.
Raise the presser foot lever.
Using other any presser feet
may be used with this machine.
To select a stitch, refer to release the presser foot. Replacing the presser foot...
Users Manual - English - Page 38
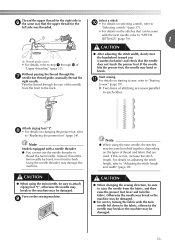
... precautions. Bent needles can easily break, possibly resulting in operation, pay special attention to "Selecting a stitch" (page 37).
↓
3
Attach the presser foot. Turn on selecting a stitch, refer to the needle location.
For details on the sewing machine. In addition, keep your hands away from all moving parts such as the needle and handwheel...
Users Manual - English - Page 39
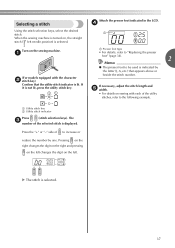
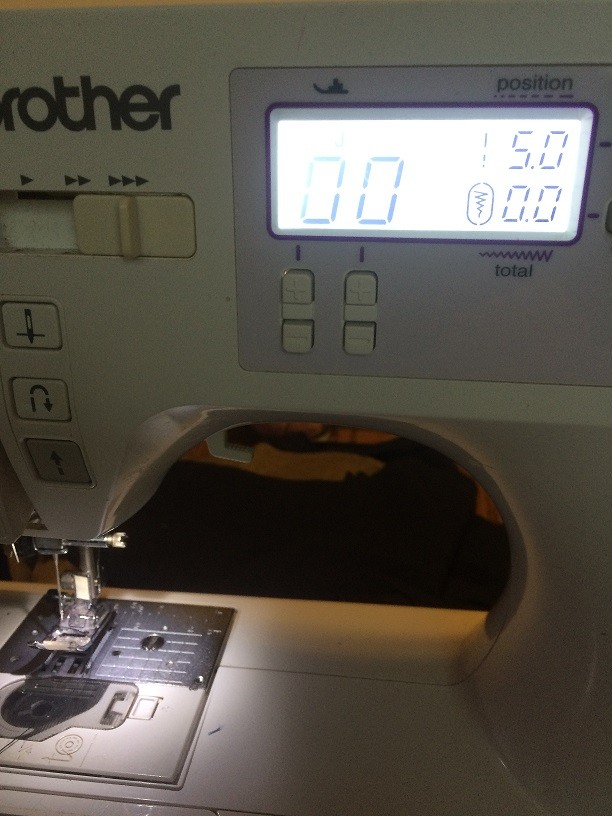
... left needle position) is displayed.
Pressing on the right changes the digit on the right and pressing
on the left changes the digit on the sewing machine.
a Utility stitch key b Utility stitch indicator
Press
(stitch selection keys).
The
c
number of to increase or
reduce the number by
the letter (J, A, etc.) that the utility...
Users Manual - English - Page 44
... not fit under the presser foot If the fabric does not fit easily under the same conditions that are described below.
When the stitching reaches a corner, stop the a sewing machine. If the fabric is turned while the needle is selected.
Raise the presser foot lever, and then turn the b fabric.
Refer to these...
Users Manual - English - Page 49
... adjustment key c Left needle position d Right needle position
47
a
When sewing is accidentally pressed and the machine starts sewing. b
Select a stitch. c
• For details, refer to the right; Pressing the "+" side of the stitch width adjustment key moves the needle to sew" (page 39).
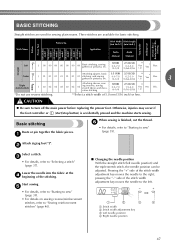
Basic stitching
Baste or pin together the fabric pieces.
Lower the needle into the...
Users Manual - English - Page 59
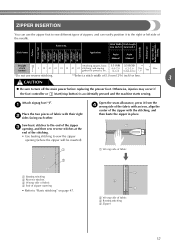
... the stitching. • Use basting stitching to sew the zipper
opening
• Refer to "Basic stitching" on page 47.
Otherwise, injuries may occur if the foot controller or (start/stop button) is accidentally pressed and the machine starts sewing. Pattern No. ZIPPER INSERTION
Pattern Presser Foot 100 stitches model 90 stitches model 80 stitches model 70 stitches model 60 stitches model...
Users Manual - English - Page 71
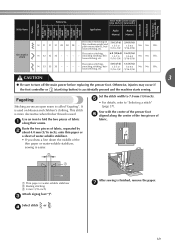
... a stitch" (page 37). Sew with the center of the presser foot f aligned along their seams.
Baste the two pieces of fabric, separated by b about 4.0 mm (3/16 inch), onto thin paper or
a sheet of water-soluble stabilizer. • If you draw a line down the middle of
fabric.
3
1
2
a Thin paper or water soluble stabilizer b Basting stitching c 4 mm...
Similar Questions

How To Do Buttonhole Stitch In Brother Sewing Machine 2600i
(Posted by bradFr 9 years ago)

Brother Sewing Machine Representative In Hyderabad - India
Can some one let me know if brother sewing machine has an office or representative / deler in Hydera...
Can some one let me know if brother sewing machine has an office or representative / deler in Hydera...
(Posted by jakes7027 9 years ago)

Brother Sewing Machine Sc9500 How To Use Auto Threading
(Posted by bhuarmon 9 years ago)

How To Monogram With The Sc9500 Brother Sewing Machine
(Posted by nyparniy 10 years ago)

How To Use Brother Sewing Machine Model Sc9500
(Posted by rec2sta 10 years ago)