Users Manual - English and Spanish
Page 2
...is a power failure while you notice any way. 2. Always use the machine safely 1. (For U.S.A. Switch the sewing machine to ensure that they do not play with this sewing machine from the accumulation of the sewing machine and foot controller free from the electrical outlet immediately after using and before using... the risk of burns, fire, electric shock, or injury to fit in the needle area, such as a toy. Always unplug the sewing machine from the electrical outlet when removing covers, lubricating, or when making any object into the wall. Do not modify the plug in this ...
...is a power failure while you notice any way. 2. Always use the machine safely 1. (For U.S.A. Switch the sewing machine to ensure that they do not play with this sewing machine from the accumulation of the sewing machine and foot controller free from the electrical outlet immediately after using and before using... the risk of burns, fire, electric shock, or injury to fit in the needle area, such as a toy. Always unplug the sewing machine from the electrical outlet when removing covers, lubricating, or when making any object into the wall. Do not modify the plug in this ...

Users Manual - English and Spanish
Page 3
... FOR USERS IN AC INPUT 220-240V COUNTRIES AND MEXICO This appliance is not intended for their safety. II Do not store this sewing machine unattended, the main power and light switch of experience and knowledge, unless they do not play with the fuse cover omitted. - Do...first follow the troubleshooting table to clean the case. carrying the mark, rating as marked on plug. - When servicing the sewing machine, or when removing covers, the machine or the electrical set must be disconnected from the supply by persons (including children) with reduced physical, sensory or mental ...
... FOR USERS IN AC INPUT 220-240V COUNTRIES AND MEXICO This appliance is not intended for their safety. II Do not store this sewing machine unattended, the main power and light switch of experience and knowledge, unless they do not play with the fuse cover omitted. - Do...first follow the troubleshooting table to clean the case. carrying the mark, rating as marked on plug. - When servicing the sewing machine, or when removing covers, the machine or the electrical set must be disconnected from the supply by persons (including children) with reduced physical, sensory or mental ...
Users Manual - English and Spanish
Page 4
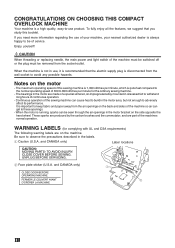
..., which is important to keep fabric and paper away from the wall socket to avoid any possible hazards. WARNING LABELS (for the ordinary sewing machine. - Be sure to observe the precautions described in use, it is recommended that you need more information regarding the use product. CONGRATULATIONS...get to adversely affect its performance. The bearings in the motor area, but not enough to these openings. - If you study this sewing machine is 1,300 stitches per minute for complying with UL and CSA requirements) The following warning labels are on the motor - and CANADA only...
..., which is important to keep fabric and paper away from the wall socket to avoid any possible hazards. WARNING LABELS (for the ordinary sewing machine. - Be sure to observe the precautions described in use, it is recommended that you need more information regarding the use product. CONGRATULATIONS...get to adversely affect its performance. The bearings in the motor area, but not enough to these openings. - If you study this sewing machine is 1,300 stitches per minute for complying with UL and CSA requirements) The following warning labels are on the motor - and CANADA only...
Users Manual - English and Spanish
Page 5
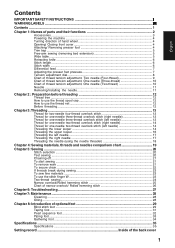
... Contents ...1 Chapter 1: Names of parts and their functions 2 Accessories ...3 Powering the machine ...4 Turning direction of hand wheel 4 Opening/ Closing front cover 4 Attaching/ Removing presser foot 4 Trim trap ...5 Free-arm sewing (removing bed extension 5 Wide table ...5 Retracting knife ...6 Stitch length ...6 Stitch width... the needle (using the needle threader 18 Chapter 4: Sewing materials, threads and needles comparison chart 19 Chapter 5: Sewing ...20 Stitch selection ...20 Test sewing ...20 Chaining-off ...21 To start sewing ...21 To remove work ...21 To secure chain ...22...
... Contents ...1 Chapter 1: Names of parts and their functions 2 Accessories ...3 Powering the machine ...4 Turning direction of hand wheel 4 Opening/ Closing front cover 4 Attaching/ Removing presser foot 4 Trim trap ...5 Free-arm sewing (removing bed extension 5 Wide table ...5 Retracting knife ...6 Stitch length ...6 Stitch width... the needle (using the needle threader 18 Chapter 4: Sewing materials, threads and needles comparison chart 19 Chapter 5: Sewing ...20 Stitch selection ...20 Test sewing ...20 Chaining-off ...21 To start sewing ...21 To remove work ...21 To secure chain ...22...
Users Manual - English and Spanish
Page 8
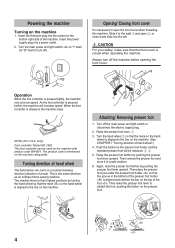
...to the line on the machine rating plate. Then remove the presser foot and store it to attatch the foot, pushing the button on the bottom right side of the presser foot holder is the same direction as an ordinary home sewing machine. As the foot controller ...is closed when operating the machine. Turn off ). Insert the three-pin plug into a power outlet. 2. Slide it in a counterclockwise direction (direction...
...to the line on the machine rating plate. Then remove the presser foot and store it to attatch the foot, pushing the button on the bottom right side of the presser foot holder is the same direction as an ordinary home sewing machine. As the foot controller ...is closed when operating the machine. Turn off ). Insert the three-pin plug into a power outlet. 2. Slide it in a counterclockwise direction (direction...
Users Manual - English and Spanish
Page 9
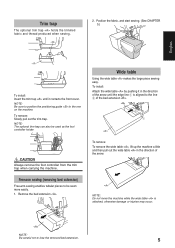
...bed extension. 5 Remove the bed extension . English Trim trap The optional trim trap holds the trimmed fabric and thread produced when sewing. 2. Position the fabric, and start sewing. (See CHAPTER 5.) To install: Insert the trim trap until it in the direction of the arrow until the edge line 1... trim trap can also be sewn more easily. 1. Free-arm sewing (removing bed extension) Free-arm sewing enables tubular pieces to the line 2 of the bed extension . 2 1 To remove: To remove the wide table , lift up the machine a little and then pull out the wide table in the direction...
...bed extension. 5 Remove the bed extension . English Trim trap The optional trim trap holds the trimmed fabric and thread produced when sewing. 2. Position the fabric, and start sewing. (See CHAPTER 5.) To install: Insert the trim trap until it in the direction of the arrow until the edge line 1... trim trap can also be sewn more easily. 1. Free-arm sewing (removing bed extension) Free-arm sewing enables tubular pieces to the line 2 of the bed extension . 2 1 To remove: To remove the wide table , lift up the machine a little and then pull out the wide table in the direction...
Users Manual - English and Spanish
Page 11
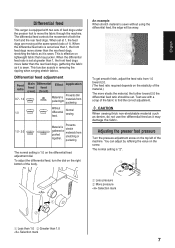
... feed adjustment dial. When the differential feed ratio is set at less than 1, the front feed dogs move the fabric through the machine. This is sewn. This function assists in removing the rippling when serging stretch fabrics. Adjusting the presser foot pressure Turn the pressure... adjustment screw on the right bottom of the machine. When the differential feed ratio is gathered or pushed together. Test sew with two sets of the material.) The more elastic the material, the further toward 2.0. (The ...
... feed adjustment dial. When the differential feed ratio is set at less than 1, the front feed dogs move the fabric through the machine. This is sewn. This function assists in removing the rippling when serging stretch fabrics. Adjusting the presser foot pressure Turn the pressure... adjustment screw on the right bottom of the machine. When the differential feed ratio is gathered or pushed together. Test sew with two sets of the material.) The more elastic the material, the further toward 2.0. (The ...
Users Manual - English and Spanish
Page 15
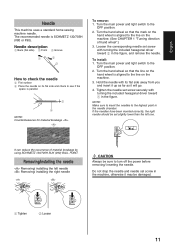
English Needle This machine uses a standard home sewing machine needle. Turn the main power and light switch to the ...lower than the left needle Removing/ installing the right needle 1 2 1 2 CAUTION Always be sure to the line on the machine. (See CHAPTER 1 "Turning direction of material breakage by using SCHIMETZ 130/705H SUK (#90) BALL POINT. Needle description 1...To remove: 1. Tighten the needle set screw with its flat side and check to the line on the machine. 3. It can reduce the occurrence of hand wheel".) 3. The recommended needle is aligned to turn off ...
English Needle This machine uses a standard home sewing machine needle. Turn the main power and light switch to the ...lower than the left needle Removing/ installing the right needle 1 2 1 2 CAUTION Always be sure to the line on the machine. (See CHAPTER 1 "Turning direction of material breakage by using SCHIMETZ 130/705H SUK (#90) BALL POINT. Needle description 1...To remove: 1. Tighten the needle set screw with its flat side and check to the line on the machine. 3. It can reduce the occurrence of hand wheel".) 3. The recommended needle is aligned to turn off ...
Users Manual - English and Spanish
Page 16
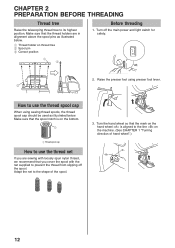
... net to use the thread net If you cover the spool with the net supplied to its highest position. Raise the presser foot using sewing thread spools, the thread spool cap should be used as illustrated below . CHAPTER 2 PREPARATION BEFORE THREADING Thread tree Raise the telescoping thread tree... loosely spun nylon thread, we recommend that the thread holders are in alignment above the spool pins as illustrated below . 1 Thread holder on the machine. (See CHAPTER 1 "Turning direction of the spool. 3. Make sure that the mark on the hand wheel is on the bottom. 1 Thread spool ...
... net to use the thread net If you cover the spool with the net supplied to its highest position. Raise the presser foot using sewing thread spools, the thread spool cap should be used as illustrated below . CHAPTER 2 PREPARATION BEFORE THREADING Thread tree Raise the telescoping thread tree... loosely spun nylon thread, we recommend that the thread holders are in alignment above the spool pins as illustrated below . 1 Thread holder on the machine. (See CHAPTER 1 "Turning direction of the spool. 3. Make sure that the mark on the hand wheel is on the bottom. 1 Thread spool ...
Users Manual - English and Spanish
Page 19
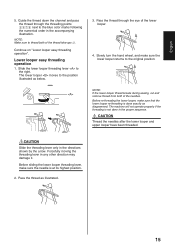
...to the blue color marks following the numerical order in any other direction may damage it. NOTE: If the lower looper thread breaks during sewing, cut and remove thread from both of the needles. CAUTION Slide the threading lever only in the proper sequence. Pass the thread through.... CAUTION Thread the needles after the lower looper and upper looper have been threaded. 15 English 5. Lower looper easy threading operation 1. The machine will not operate properly if the threading is not done in the directions shown by the arrow. NOTE: Make sure to the position illustrated ...
...to the blue color marks following the numerical order in any other direction may damage it. NOTE: If the lower looper thread breaks during sewing, cut and remove thread from both of the needles. CAUTION Slide the threading lever only in the proper sequence. Pass the thread through.... CAUTION Thread the needles after the lower looper and upper looper have been threaded. 15 English 5. Lower looper easy threading operation 1. The machine will not operate properly if the threading is not done in the directions shown by the arrow. NOTE: Make sure to the position illustrated ...
Users Manual - English and Spanish
Page 20
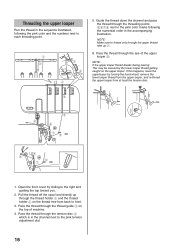
... lower looper thread from the upper looper, and re-thread the upper looper from back to front. 3. NOTE: If the upper looper thread breaks during sewing: This may be caused by the lower looper thread getting caught on the thread tree from at least the tension disc. 4 5 9 8 76 8 9 6 7 1.... Pass the thread through the eye of machine. 4. If this happens, lower the upperlooper by sliding to the right and guiding the top toward you. 2. Pass the thread through the upper thread take...
... lower looper thread from the upper looper, and re-thread the upper looper from back to front. 3. NOTE: If the upper looper thread breaks during sewing: This may be caused by the lower looper thread getting caught on the thread tree from at least the tension disc. 4 5 9 8 76 8 9 6 7 1.... Pass the thread through the eye of machine. 4. If this happens, lower the upperlooper by sliding to the right and guiding the top toward you. 2. Pass the thread through the upper thread take...
Users Manual - English and Spanish
Page 24
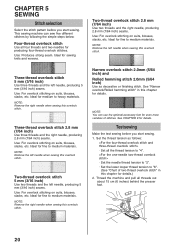
...mm (3/16 inch) Use two threads and the left needle when sewing this chapter for details. NOTE: Remove the right needle when sewing this overlock stitch. Set the thread tension as decorative or finishing stitch. This sewing machine can use the optional accessory foot for medium to heavy materials. Ideal...thread overlock stitch Use all threads out about 15 cm (6 inches) behind the presser foot. 20 Thread the machine and pull all four threads and two needles for sewing knits and wovens. Ideal for even more varieties of two-thread overlock stitch" in this overlock stitch. NOTE: ...
...mm (3/16 inch) Use two threads and the left needle when sewing this chapter for details. NOTE: Remove the right needle when sewing this overlock stitch. Set the thread tension as decorative or finishing stitch. This sewing machine can use the optional accessory foot for medium to heavy materials. Ideal...thread overlock stitch Use all threads out about 15 cm (6 inches) behind the presser foot. 20 Thread the machine and pull all four threads and two needles for sewing knits and wovens. Ideal for even more varieties of two-thread overlock stitch" in this overlock stitch. NOTE: ...
Users Manual - English and Spanish
Page 25
...has been done properly and in the required direction. 4. To start sewing by turning the hand wheel. 3. English 4. Then cut the stitches 5 cm (2 inches) from the work When the seam is finished, keep the machine running the fabric under the presser foot for chaining-off 10cm (4 ...inches). NOTE: Always lift the presser foot before starting to "5". If feeding for test sewing. Place a piece of Seam Allowance Guide shows 9.5, 12.7, 15.9,...
...has been done properly and in the required direction. 4. To start sewing by turning the hand wheel. 3. English 4. Then cut the stitches 5 cm (2 inches) from the work When the seam is finished, keep the machine running the fabric under the presser foot for chaining-off 10cm (4 ...inches). NOTE: Always lift the presser foot before starting to "5". If feeding for test sewing. Place a piece of Seam Allowance Guide shows 9.5, 12.7, 15.9,...
Users Manual - English and Spanish
Page 26
... 5cm (2 inches). 2. Serge over it pulling toward you. 4. After sewing a few stitches, after drying. 22 Fix the chain with your machine. Sew a few stitches, serge off the fabric as illustrated. 3. At the end of the seam, sew one stitch out of a stitch 1. At the beginning of the fabric... before stopping the machine. 2. Method 2 With this method, the chain at the same position. 4. Stop the machine and raise the presser foot. 3. Put the chain under ...
... 5cm (2 inches). 2. Serge over it pulling toward you. 4. After sewing a few stitches, after drying. 22 Fix the chain with your machine. Sew a few stitches, serge off the fabric as illustrated. 3. At the end of the seam, sew one stitch out of a stitch 1. At the beginning of the fabric... before stopping the machine. 2. Method 2 With this method, the chain at the same position. 4. Stop the machine and raise the presser foot. 3. Put the chain under ...
Users Manual - English and Spanish
Page 28
... materials 2 (1 - 3) Lower looper thread 6 (5 - 7) 6 (5 - 7) Right needle thread 2 (1 - 3) 2 (1 - 3) Lower looper thread 6 (5 - 7) 6 (5 - 7) 24 Two-thread sewing How to set the thread change assembly NOTE: Be sure to set to the machine.) 1. Turn the hand wheel so that the gap is put in the eye of the looper has finished... (You cannot use the needle threader with the thread change assembly 1 with your fingertips tightly so that the mark on the machine. Hold the thread change assembly set the thread change assembly to the " TC " mark on the hand wheel is in ...
... materials 2 (1 - 3) Lower looper thread 6 (5 - 7) 6 (5 - 7) Right needle thread 2 (1 - 3) 2 (1 - 3) Lower looper thread 6 (5 - 7) 6 (5 - 7) 24 Two-thread sewing How to set the thread change assembly NOTE: Be sure to set to the machine.) 1. Turn the hand wheel so that the gap is put in the eye of the looper has finished... (You cannot use the needle threader with the thread change assembly 1 with your fingertips tightly so that the mark on the machine. Hold the thread change assembly set the thread change assembly to the " TC " mark on the hand wheel is in ...
Users Manual - English and Spanish
Page 29
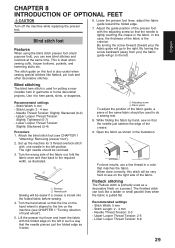
...Rolled hemming stitch is a decorative finish for lightweight to the "R" position. NOTE: For the recommended thread and needle, see CHAPTER 4 "Sewing materials, threads, and needles comparison chart". 2. Instructions for a three thread overlock, using the 3-thread overlock stitch. Selection mark 6. ... its lowest position. 6 Pull the stitch finger to install a stitch finger when sewing regular overlock stitches. 5. Store the removed stitch finger and/or stitch finger W inside of the machine. 3 Check to make sure that the thread is no longer wrapped around the ...
...Rolled hemming stitch is a decorative finish for lightweight to the "R" position. NOTE: For the recommended thread and needle, see CHAPTER 4 "Sewing materials, threads, and needles comparison chart". 2. Instructions for a three thread overlock, using the 3-thread overlock stitch. Selection mark 6. ... its lowest position. 6 Pull the stitch finger to install a stitch finger when sewing regular overlock stitches. 5. Store the removed stitch finger and/or stitch finger W inside of the machine. 3 Check to make sure that the thread is no longer wrapped around the ...
Users Manual - English and Spanish
Page 31
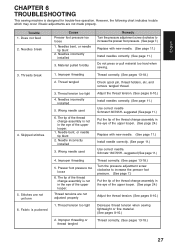
... Improper threading Thread correctly. (See pages 13-18.) 2. Improper threading 5. Thread tension too tight Decrease thread tension when sewing lightweight or fine material. (See pages 8-10.) 2. Does not feed 2. Needle incorrectly installed 3. The tip of the... if basic adjustments are not uniform 6. Threads break 4. Wrong needle used 6. suggested (See page 11.) 4. English CHAPTER 6 TROUBLESHOOTING This sewing machine is puckered Cause Presser foot pressure too loose 1. and remove tangled thread. 3. Needle bent, or needle tip blunt 2. Schmetz 130/705H...
... Improper threading Thread correctly. (See pages 13-18.) 2. Improper threading 5. Thread tension too tight Decrease thread tension when sewing lightweight or fine material. (See pages 8-10.) 2. Does not feed 2. Needle incorrectly installed 3. The tip of the... if basic adjustments are not uniform 6. Threads break 4. Wrong needle used 6. suggested (See page 11.) 4. English CHAPTER 6 TROUBLESHOOTING This sewing machine is puckered Cause Presser foot pressure too loose 1. and remove tangled thread. 3. Needle bent, or needle tip blunt 2. Schmetz 130/705H...
Users Manual - English and Spanish
Page 32
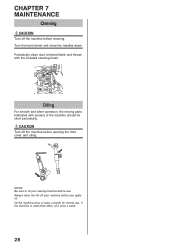
...included cleaning brush. CAUTION Turn off the machine before cleaning. CHAPTER 7 MAINTENANCE Cleaning CAUTION Turn off the machine before opening the front cover and oiling. Oil the machine once or twice a month for normal use . Always clean the lint off your sewing machine before you apply oil. NOTE: Be sure... to oil your machine before use . If the machine is used more often, oil it once a week. 28 Turn the hand wheel and move the needles down. ...
...included cleaning brush. CAUTION Turn off the machine before cleaning. CHAPTER 7 MAINTENANCE Cleaning CAUTION Turn off the machine before opening the front cover and oiling. Oil the machine once or twice a month for normal use . Always clean the lint off your sewing machine before you apply oil. NOTE: Be sure... to oil your machine before use . If the machine is used more often, oil it once a week. 28 Turn the hand wheel and move the needles down. ...
Users Manual - English and Spanish
Page 33
... presser foot. Set up the machine for putting a near invisible hem in a color that matches the fabric. Open the fabric as a decorative finish on the hand wheel is the criterion. Recommended settings - Adjust the guide position of the same fabric should be very hard to do a sewing test. 8. Lower Looper Thread Tension...
... presser foot. Set up the machine for putting a near invisible hem in a color that matches the fabric. Open the fabric as a decorative finish on the hand wheel is the criterion. Recommended settings - Adjust the guide position of the same fabric should be very hard to do a sewing test. 8. Lower Looper Thread Tension...
Users Manual - English and Spanish
Page 34
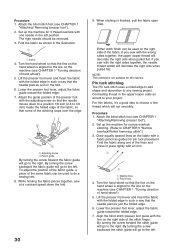
... stitch finish can be removed. 3. If you sew with the folded edge in such a way that the needle moves down the fold. 30 9. NOTE: This method is aligned to the line on the right side of hand wheel"). 5. Set up the machine for pin tuck placement. By turning the screw ... 6. Procedure 1. Turn the hand wheel so that the needle pierces just on the machine (see CHAPTER 1 "Turning direction of the fabric. Fold the fabric along one needle in the upper looper adds an accent to any sewing project. By turning the screw backward the fabric guide will go to the left...
... stitch finish can be removed. 3. If you sew with the folded edge in such a way that the needle moves down the fold. 30 9. NOTE: This method is aligned to the line on the right side of hand wheel"). 5. Set up the machine for pin tuck placement. By turning the screw ... 6. Procedure 1. Turn the hand wheel so that the needle pierces just on the machine (see CHAPTER 1 "Turning direction of the fabric. Fold the fabric along one needle in the upper looper adds an accent to any sewing project. By turning the screw backward the fabric guide will go to the left...


