Users Manual - English
Page 67
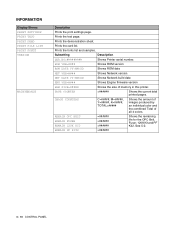
...SIZE=###MB Shows the size of all 4 colors. IMAGE COUNTERS C=#####, M=#####, Y=#####, K=#####, TOTAL=##### Shows the amount of images produced by an individual color and the combined Total of memory in this printer. REMAIN OPC BELT REMAIN FUSER REMAIN 120K KIT Shows the remaining life for ...the OPC Belt, Fuser, 120K Kit and PF Kit2. PAGE COUNTER =###### Shows the current...
...SIZE=###MB Shows the size of all 4 colors. IMAGE COUNTERS C=#####, M=#####, Y=#####, K=#####, TOTAL=##### Shows the amount of images produced by an individual color and the combined Total of memory in this printer. REMAIN OPC BELT REMAIN FUSER REMAIN 120K KIT Shows the remaining life for ...the OPC Belt, Fuser, 120K Kit and PF Kit2. PAGE COUNTER =###### Shows the current...
Users Manual - English
Page 74
... buttons. CONTROL PANEL 3 - 17 BI-DIR =ON/OFF Turns bi-directional parallel communications on or off . Description Resets the printer and restores all printer default settings (including command settings) to the factory settings. FUSER UNIT Resets the Fusing Unit parts life. HIGH SPEED =ON/OFF Turns high-speed USB2.0 communications on or off...
... buttons. CONTROL PANEL 3 - 17 BI-DIR =ON/OFF Turns bi-directional parallel communications on or off . Description Resets the printer and restores all printer default settings (including command settings) to the factory settings. FUSER UNIT Resets the Fusing Unit parts life. HIGH SPEED =ON/OFF Turns high-speed USB2.0 communications on or off...
Users Manual - English
Page 107
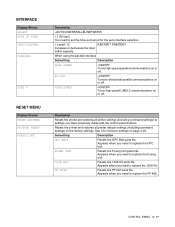
..., three colors => 3 images, four colors => 4 images. 5 - 2 ROUTINE MAINTENANCE These messages advise you will need to replace each of the consumable items as soon as possible, since the consumable item's end of pages: actual output page number. Call your dealer or Brother Customer Service for a replacement.... The following are maintenance messages that you that appear alternatively with this printer, are starter toners. WT-4CL OPC belt cartridge 60,000 images *3 See 5-10 REPLACE OPC BELT (Continuously printed) REPLACE FUSER Fusing unit 60,000 pages *1 See 5-13 OP-4CL FP-4CL ...
..., three colors => 3 images, four colors => 4 images. 5 - 2 ROUTINE MAINTENANCE These messages advise you will need to replace each of the consumable items as soon as possible, since the consumable item's end of pages: actual output page number. Call your dealer or Brother Customer Service for a replacement.... The following are maintenance messages that you that appear alternatively with this printer, are starter toners. WT-4CL OPC belt cartridge 60,000 images *3 See 5-10 REPLACE OPC BELT (Continuously printed) REPLACE FUSER Fusing unit 60,000 pages *1 See 5-13 OP-4CL FP-4CL ...
Users Manual - English
Page 118
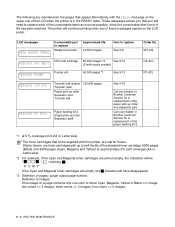
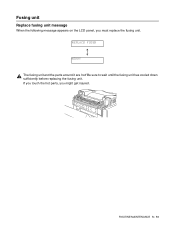
If you touch the hot parts, you must replace the fusing unit. ROUTINE MAINTENANCE 5 - 13 Be sure to wait until the fusing unit has cooled down sufficiently before replacing the fusing unit. REPLACE FUSER READY The fusing unit and the parts around it are hot! Fusing unit Replace fusing unit message When the following message appears on the LCD panel, you might get injured.
If you touch the hot parts, you must replace the fusing unit. ROUTINE MAINTENANCE 5 - 13 Be sure to wait until the fusing unit has cooled down sufficiently before replacing the fusing unit. REPLACE FUSER READY The fusing unit and the parts around it are hot! Fusing unit Replace fusing unit message When the following message appears on the LCD panel, you might get injured.
Users Manual - English
Page 120
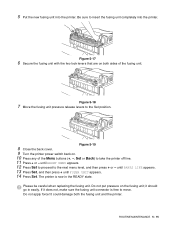
... when replacing the fusing unit. It could damage both sides of the Menu buttons (+, -, Set or Back) to insert the fusing unit completely into the printer. If it should go in the READY state. Do not put pressure on . 10 Press any of the fusing unit. Figure 5-17 6 Secure the fusing... 5-18 7 Move the fusing unit pressure release levers to the next menu level, and then press + or - until FUSER UNIT appears. 14 Press Set. Be sure to take the printer off line. 11 Press + or - until PARTS LIFE appears. 13 Press Set, and then press + until RESET MENU appears. 12 Press Set...
... when replacing the fusing unit. It could damage both sides of the Menu buttons (+, -, Set or Back) to insert the fusing unit completely into the printer. If it should go in the READY state. Do not put pressure on . 10 Press any of the fusing unit. Figure 5-17 6 Secure the fusing... 5-18 7 Move the fusing unit pressure release levers to the next menu level, and then press + or - until FUSER UNIT appears. 14 Press Set. Be sure to take the printer off line. 11 Press + or - until PARTS LIFE appears. 13 Press Set, and then press + until RESET MENU appears. 12 Press Set...
Users Manual - English
Page 136
... Be ready to replace the toner cartridges when the toner is almost full. Replace it when the toner becomes empty. Call your dealer or Brother Customer Service for a replacement of the paper feeding kit 2. The waste toner pack is nearly empty. When the toner becomes empty, the ...K C M Y REPLACE OPC BELT REPLACE FUSER REPLACE 120K KIT REPLACE PF KIT2 NEAR WASTE TONER Meaning Action When the mark blinks ( ), the indicated color toner is time to replace the OPC belt Replace the OPC belt cartridge. Call your dealer or Brother Customer Service to replace the paper feeding kit...
... Be ready to replace the toner cartridges when the toner is almost full. Replace it when the toner becomes empty. Call your dealer or Brother Customer Service for a replacement of the paper feeding kit 2. The waste toner pack is nearly empty. When the toner becomes empty, the ...K C M Y REPLACE OPC BELT REPLACE FUSER REPLACE 120K KIT REPLACE PF KIT2 NEAR WASTE TONER Meaning Action When the mark blinks ( ), the indicated color toner is time to replace the OPC belt Replace the OPC belt cartridge. Call your dealer or Brother Customer Service to replace the paper feeding kit...

Users Manual - English
Page 139
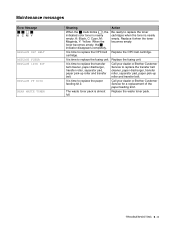
... it on again. Wait 15 minutes, and then turn it on again. Fuser temperature low error Turn off the printer. Wait a few seconds, and then turn it on again. Laser power error Turn off the printer. Duplex controller hardware error 2 Turn off the printer. Wait 15 minutes, and then turn it on again. HVU connection...
... it on again. Wait 15 minutes, and then turn it on again. Fuser temperature low error Turn off the printer. Wait a few seconds, and then turn it on again. Laser power error Turn off the printer. Duplex controller hardware error 2 Turn off the printer. Wait 15 minutes, and then turn it on again. HVU connection...


