Users Manual - English
Page 9
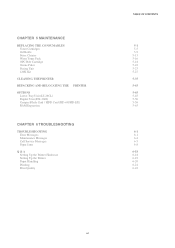
CHAPTER 5 MAINTENANCE REPLACING THE CONSUMABLES Toner Cartridges Oil Bottle Fuser Cleaner Waste Toner Pack OPC Belt Cartridge Ozone Filter Fusing Unit 120K Kit CLEANING THE PRINTER REPACKING AND RELOCATING THE PRINTER OPTIONS Lower Tray Unit (LT-26CL) Duplex Unit (DX-2600) CompactFlash Card / HDD Card (HD-6G/HD-EX) RAM Expansion CHAPTER 6 TROUBLESHOOTING TROUBLESHOOTING Error Messages Maintenance...
CHAPTER 5 MAINTENANCE REPLACING THE CONSUMABLES Toner Cartridges Oil Bottle Fuser Cleaner Waste Toner Pack OPC Belt Cartridge Ozone Filter Fusing Unit 120K Kit CLEANING THE PRINTER REPACKING AND RELOCATING THE PRINTER OPTIONS Lower Tray Unit (LT-26CL) Duplex Unit (DX-2600) CompactFlash Card / HDD Card (HD-6G/HD-EX) RAM Expansion CHAPTER 6 TROUBLESHOOTING TROUBLESHOOTING Error Messages Maintenance...
Users Manual - English
Page 102
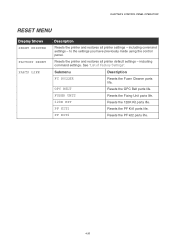
including command settings. FUSER UNIT Resets the Fixing Unit parts life. 120K KIT Resets the 120K Kit parts life. PF KIT2 Resets the PF kit2 parts life. 4-33 OPC BELT ...the control panel. CHAPTER 4 CONTROL PANEL OPERATION RESET MENU DDiissppllaayy SShhoowwss RESET PRINTER FACTORY RESET PARTS LIFE DDeessccrriippttiioonn Resets the printer and restores all printer default settings - including command settings - See "List of Factory Settings". Resets the printer and restores all printer settings - Submenu Description FC ROLLER Resets the Fuser Cleaner parts life.
including command settings. FUSER UNIT Resets the Fixing Unit parts life. 120K KIT Resets the 120K Kit parts life. PF KIT2 Resets the PF kit2 parts life. 4-33 OPC BELT ...the control panel. CHAPTER 4 CONTROL PANEL OPERATION RESET MENU DDiissppllaayy SShhoowwss RESET PRINTER FACTORY RESET PARTS LIFE DDeessccrriippttiioonn Resets the printer and restores all printer default settings - including command settings - See "List of Factory Settings". Resets the printer and restores all printer settings - Submenu Description FC ROLLER Resets the Fuser Cleaner parts life.
Users Manual - English
Page 115
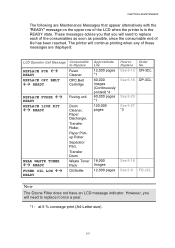
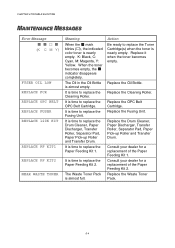
READY NEAR WASTE TONER !" READY FUSER OIL LOW !" at 5 % coverage print (A4-Letter size). 5-3 READY Fusing unit Drum Cleaner, Paper Discharger, Transfer Roller, Paper Pickup Roller Separator Pad, Transfer... any of these messages are displayed: LCD Operator Call Message REPLACE FCR !" The printer will need to replace each of the consumables as soon as possible, since the consumable end of the LCD... when the printer is in the READY state. READY REPLACE 120K KIT !" However, you that appear alternatively with...
READY NEAR WASTE TONER !" READY FUSER OIL LOW !" at 5 % coverage print (A4-Letter size). 5-3 READY Fusing unit Drum Cleaner, Paper Discharger, Transfer Roller, Paper Pickup Roller Separator Pad, Transfer... any of these messages are displayed: LCD Operator Call Message REPLACE FCR !" The printer will need to replace each of the consumables as soon as possible, since the consumable end of the LCD... when the printer is in the READY state. READY REPLACE 120K KIT !" However, you that appear alternatively with...

Users Manual - English
Page 126
Press the Power button to wait until it are HOT! Open the Top Cover. 3. Release the Oil Bottle Lock Levers on both sides as shown: Fig. 5-8 5-14 CHAPTER 5 MAINTENANCE Replacing the Fuser Cleaner ! If you touch the HOT parts, you might get injured. 1. Be sure to turn the printer off, and then wait until the Fusing Unit has cooled sufficiently before replacing the Fuser Cleaner. Warning The Fusing unit and the parts around it has cooled down sufficiently. 2.
Press the Power button to wait until it are HOT! Open the Top Cover. 3. Release the Oil Bottle Lock Levers on both sides as shown: Fig. 5-8 5-14 CHAPTER 5 MAINTENANCE Replacing the Fuser Cleaner ! If you touch the HOT parts, you might get injured. 1. Be sure to turn the printer off, and then wait until the Fusing Unit has cooled sufficiently before replacing the Fuser Cleaner. Warning The Fusing unit and the parts around it has cooled down sufficiently. 2.

Users Manual - English
Page 127
... "FC ROLLER" appears. 13. Take the Fuser Cleaner out of the Fusing Unit by holding the handle of the Menu buttons (+, - , Set or Back) to turn the printer On. 9. Press the Power button to take the printer Off Line. 10. Press Set, and then press +. The printer is now in the READY state. 5-15... 4. Press any of the Fuser Cleaner as shown:...
... "FC ROLLER" appears. 13. Take the Fuser Cleaner out of the Fusing Unit by holding the handle of the Menu buttons (+, - , Set or Back) to turn the printer On. 9. Press the Power button to take the printer Off Line. 10. Press Set, and then press +. The printer is now in the READY state. 5-15... 4. Press any of the Fuser Cleaner as shown:...

Users Manual - English
Page 135
Warning The Fusing Unit and the parts around it are HOT! If you touch the HOT parts, you must replace the Fusing Unit: REPLACE FUSER !" Be sure to circulate. 5-23 Warning After replacing the Fusing Unit, wait for approximately 30 minutes before you print to allow the fusing oil to wait until the Fusing Unit has cooled down sufficiently before replacing the Fusing Unit. READY ! CHAPTER 5 MAINTENANCE FUUSSIINNGG UNNIITT Fusing Unit When the following message appears on the LCD panel, you might get injured. !
Warning The Fusing Unit and the parts around it are HOT! If you touch the HOT parts, you must replace the Fusing Unit: REPLACE FUSER !" Be sure to circulate. 5-23 Warning After replacing the Fusing Unit, wait for approximately 30 minutes before you print to allow the fusing oil to wait until the Fusing Unit has cooled down sufficiently before replacing the Fusing Unit. READY ! CHAPTER 5 MAINTENANCE FUUSSIINNGG UNNIITT Fusing Unit When the following message appears on the LCD panel, you might get injured. !

Users Manual - English
Page 137
...inside the printer. 5. Install the new Fusing Unit into the AC outlet. 5-25 Plug the printer into the printer. Caution When removing the Fusing Unit from the Fusing Unit. 6. Be sure to keep the Fusing Unit flat, so oil will not spill. Fig. 5-22 Fig. 5-23 8. Install the Fuser Cleaner ...and the Oil Bottle into the printer. 7. Close the Top Cover...
...inside the printer. 5. Install the new Fusing Unit into the AC outlet. 5-25 Plug the printer into the printer. Caution When removing the Fusing Unit from the Fusing Unit. 6. Be sure to keep the Fusing Unit flat, so oil will not spill. Fig. 5-22 Fig. 5-23 8. Install the Fuser Cleaner ...and the Oil Bottle into the printer. 7. Close the Top Cover...

Users Manual - English
Page 138
..., Set or Back) to turn on the Fusing Unit; Please refer to the next menu level, and then press + or - Partially used Oil Bottles can be careful when replacing the Fusing Unit. Press Set, and then press + until "FUSER UNIT" appears. 16. The printer is now in easily. it does not, make ...sure the Fusing Unit connector is poor, we recommend that you replace the Fuser Cleaner at the same time as the Fusing...
..., Set or Back) to turn on the Fusing Unit; Please refer to the next menu level, and then press + or - Partially used Oil Bottles can be careful when replacing the Fusing Unit. Press Set, and then press + until "FUSER UNIT" appears. 16. The printer is now in easily. it does not, make ...sure the Fusing Unit connector is poor, we recommend that you replace the Fuser Cleaner at the same time as the Fusing...

Users Manual - English
Page 163
We recommend removing those caps with a coin or a screwdriver. 3. Fig. 5-62 4. Fig. 5-63 Fig. 5-64 5-51 CHAPTER 5 MAINTENANCE 1. Remove the Back caps (2 pieces) of the Lower Tray Unit. Remove the left handside cover of the Lower Tray Unit. Remove the Rear Caps (2 pieces) from the AC outlet. 2. Remove the Fuser Cover that is located at the rear top of the printer to remove them. Turn the printer off and unplug the power cord from the fuser unit. Push down lightly on the caps and then slide them to the rear of the printer.
We recommend removing those caps with a coin or a screwdriver. 3. Fig. 5-62 4. Fig. 5-63 Fig. 5-64 5-51 CHAPTER 5 MAINTENANCE 1. Remove the Back caps (2 pieces) of the Lower Tray Unit. Remove the left handside cover of the Lower Tray Unit. Remove the Rear Caps (2 pieces) from the AC outlet. 2. Remove the Fuser Cover that is located at the rear top of the printer to remove them. Turn the printer off and unplug the power cord from the fuser unit. Push down lightly on the caps and then slide them to the rear of the printer.
Users Manual - English
Page 182
...M: Magenta, Y: Yellow. It is time to replace the Fusing Unit. It is time to replace the Paper Feeding Kit 2. Replace the Cleaning Roller. Consult your dealer for a replacement of the Paper Feeding Kit 2. mark blinks ("), the indicated color toner is almost empty. It is time to replace the OPC Belt...It is time to replace the Paper Feeding Kit 1. Replace it when the toner becomes empty. " ! (K C M Y) FUSER OIL LOW REPLACE FCR REPLACE OPC BELT REPLACE FUSER REPLACE 120K KIT REPLACE PF KIT1 REPLACE PF KIT2 NEAR WASTE TONER Meaning When the ! It is time to replace the...
...M: Magenta, Y: Yellow. It is time to replace the Fusing Unit. It is time to replace the Paper Feeding Kit 2. Replace the Cleaning Roller. Consult your dealer for a replacement of the Paper Feeding Kit 2. mark blinks ("), the indicated color toner is almost empty. It is time to replace the OPC Belt...It is time to replace the Paper Feeding Kit 1. Replace it when the toner becomes empty. " ! (K C M Y) FUSER OIL LOW REPLACE FCR REPLACE OPC BELT REPLACE FUSER REPLACE 120K KIT REPLACE PF KIT1 REPLACE PF KIT2 NEAR WASTE TONER Meaning When the ! It is time to replace the...

Users Manual - English
Page 184
... solenoid error Drum cleaning clutch error Fuser unit clutch error Belt marker sensor error Erase LED error Cooling fan error Ozone fan error Fuser fan error Charger HV unit error Fuser thermistor error Fuser temperature 2 error Fuser temperature 3 error Turn off the printer. Turn off the printer. Turn off the printer. Turn off the printer. Wait a few seconds, and then turn...
... solenoid error Drum cleaning clutch error Fuser unit clutch error Belt marker sensor error Erase LED error Cooling fan error Ozone fan error Fuser fan error Charger HV unit error Fuser thermistor error Fuser temperature 2 error Fuser temperature 3 error Turn off the printer. Turn off the printer. Turn off the printer. Turn off the printer. Wait a few seconds, and then turn...

Users Manual - English
Page 224
...Lever BRAdmin professional BR-SCRIPT BR-Script 3 mode 4-2, 4-14 5-19 2-15 4-30 4-36 C Cassette Feed 3-12 charging wire 5-30 Color Advanced Photoscale Technology 1-6 communications parameters 3-3 consumable 5-1 D Data Compression date and time setting delete storage Device Drum Cover duplex 1-8 4-34 4-25...emulation mode 4-36 Emulation Mode 1-8 Envelopes 3-10 EPSON FX-850 mode 4-37 F factory setting 2-21 factory settings 4-38 Fuser Cleaner 5-13 Fusing Unit 5-23 G Go switch 4-2 H High Resolution Control 1-6 HP LaserJet mode 4-36 HP-GL mode 4-37 I IBM ...
...Lever BRAdmin professional BR-SCRIPT BR-Script 3 mode 4-2, 4-14 5-19 2-15 4-30 4-36 C Cassette Feed 3-12 charging wire 5-30 Color Advanced Photoscale Technology 1-6 communications parameters 3-3 consumable 5-1 D Data Compression date and time setting delete storage Device Drum Cover duplex 1-8 4-34 4-25...emulation mode 4-36 Emulation Mode 1-8 Envelopes 3-10 EPSON FX-850 mode 4-37 F factory setting 2-21 factory settings 4-38 Fuser Cleaner 5-13 Fusing Unit 5-23 G Go switch 4-2 H High Resolution Control 1-6 HP LaserJet mode 4-36 HP-GL mode 4-37 I IBM ...

Quick Setup Guide - English
Page 1
...the fuser cleaner into the AC power button. Please purchase the appropriate interface cable for printer maintenance. Save all your network printer settings referring to the reverse side of Information on the reverse. Macintosh® Brother Solutions Center The Brother Solutions Center (http://solutions.brother.... in PDF format. Open the top cover. 2 Move the fusing unit pressure release levers to the Windows® Driver Installation Guide or Macintosh® Driver Installation Guide. Color Laser Printer HL-2600CN series Quick Setup Guide Read the "Safety Sheet" first to ensure ...
...the fuser cleaner into the AC power button. Please purchase the appropriate interface cable for printer maintenance. Save all your network printer settings referring to the reverse side of Information on the reverse. Macintosh® Brother Solutions Center The Brother Solutions Center (http://solutions.brother.... in PDF format. Open the top cover. 2 Move the fusing unit pressure release levers to the Windows® Driver Installation Guide or Macintosh® Driver Installation Guide. Color Laser Printer HL-2600CN series Quick Setup Guide Read the "Safety Sheet" first to ensure ...


