Users Manual - English
Page 21
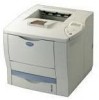
CHAPTER 1 ABOUT THIS PRINTER What is included in the Carton Carton Components When you unpack the printer, check to see that you have all of the following parts. ➀ ➃ ➄ ➂ ➅ ➁ Fig. 1-1 1 Toner cartridge 2 Documents (Quick setup guide & Safety sheet) 3 CD-ROM 4 Printer 5 AC power cord 6 Paper cassette 1-1
CHAPTER 1 ABOUT THIS PRINTER What is included in the Carton Carton Components When you unpack the printer, check to see that you have all of the following parts. ➀ ➃ ➄ ➂ ➅ ➁ Fig. 1-1 1 Toner cartridge 2 Documents (Quick setup guide & Safety sheet) 3 CD-ROM 4 Printer 5 AC power cord 6 Paper cassette 1-1
Users Manual - English
Page 64
...Normal 600 dpi Fine HQ1200: Brother HQ1200 technology provides the best print quality while printing at full engine speed. • With the Print setting set to install the optional Duplex unit onto your documents. ♦ Print Quality Select the Resolution, Toner save running costs by turning ... print options. 2-4 Six types of duplex binding directions are available for making duplex settings appears. If you like on the Toner Save mode, which reduces the printer density. ♦ Duplex To use a bitmap file as a watermark, you can place a watermarked logo or text into your...
...Normal 600 dpi Fine HQ1200: Brother HQ1200 technology provides the best print quality while printing at full engine speed. • With the Print setting set to install the optional Duplex unit onto your documents. ♦ Print Quality Select the Resolution, Toner save running costs by turning ... print options. 2-4 Six types of duplex binding directions are available for making duplex settings appears. If you like on the Toner Save mode, which reduces the printer density. ♦ Duplex To use a bitmap file as a watermark, you can place a watermarked logo or text into your...

Users Manual - English
Page 72
Toner Save Mode Sleep Mode Media Type HRC setting Collate (only when an HDD or CompactFlash card is installed) Job spooling 2 Select the installed options from the list. 2-12 c Device Options tab 1 2 1 You can change settings by clicking the setting and then selecting a new value in the Change Settings box.
Toner Save Mode Sleep Mode Media Type HRC setting Collate (only when an HDD or CompactFlash card is installed) Job spooling 2 Select the installed options from the list. 2-12 c Device Options tab 1 2 1 You can change settings by clicking the setting and then selecting a new value in the Change Settings box.

Users Manual - English
Page 111
... STACK/ MX SORT c QUALITY DDiissppllaayy SShhoowwss RESOLUTION HRC TONER SAVE DENSITY DDeessccrriippttiioonn =300/600/HQ1200 You can choose a print resolution of 300, 600 or HQ1200. =OFF/LIGHT/MEDIUM/DARK HRC: High Resolution Control offers improved print quality of characters and graphics that conventional laser printers cannot attain with a resolution of paper you loaded...
... STACK/ MX SORT c QUALITY DDiissppllaayy SShhoowwss RESOLUTION HRC TONER SAVE DENSITY DDeessccrriippttiioonn =300/600/HQ1200 You can choose a print resolution of 300, 600 or HQ1200. =OFF/LIGHT/MEDIUM/DARK HRC: High Resolution Control offers improved print quality of characters and graphics that conventional laser printers cannot attain with a resolution of paper you loaded...

Users Manual - English
Page 112
...199;AIS /... PASS NO.=### REPRINT =ON/OFF PAGE PROTECTION PROTECT = AUTO AUTO, OFF, LETTER, A4 OR LEGAL EMULATION =AUTO(EPSON)/AUTO(IBM)/HP LASER JET/.... KEEP PCL =OFF/ON RAMDISK SIZE =0/1/2/...MB RESTART? 3-27 AUTO CONTINUE =OFF/ON LOCK PANEL =OFF/ON Turn on/off the lock panel... function. STOP: Stop printing if the "TONER EMPTY" error occurs. LOWER LCD =NONE/PAGE COUNTER/JOB NAME LCD DENSITY =0/1/2 POWER SAVE TIME =1MIN:99MIN TONER LOW =CONTINUE/STOP CONT: Continue printing even if...
...199;AIS /... PASS NO.=### REPRINT =ON/OFF PAGE PROTECTION PROTECT = AUTO AUTO, OFF, LETTER, A4 OR LEGAL EMULATION =AUTO(EPSON)/AUTO(IBM)/HP LASER JET/.... KEEP PCL =OFF/ON RAMDISK SIZE =0/1/2/...MB RESTART? 3-27 AUTO CONTINUE =OFF/ON LOCK PANEL =OFF/ON Turn on/off the lock panel... function. STOP: Stop printing if the "TONER EMPTY" error occurs. LOWER LCD =NONE/PAGE COUNTER/JOB NAME LCD DENSITY =0/1/2 POWER SAVE TIME =1MIN:99MIN TONER LOW =CONTINUE/STOP CONT: Continue printing even if...
Users Manual - English
Page 127
Effective modes are subject to the emulation mode. MMOODDEE PAPER QUALITY MMEENNUU SOURCE MP FIRST MP SIZE MANUAL FEED DUPLEX OUTPUT RESOLUTION HRC TONER SAVE DENSITY FFaaccttoorryy SSeettttiinngg =AUTO =OFF =A4/LETTER =OFF =OFF =STANDARD =600 =MEDIUM =OFF 0 3-42 If you want to reset the print server... Test button on the Network board (NC-4100h) for display messages. • The COPY setting is always restored to the factory setting when the printer is turned off and on again. • It is not possible to reset the NETWORK settings using the control panel. c List of Factory settings...
Effective modes are subject to the emulation mode. MMOODDEE PAPER QUALITY MMEENNUU SOURCE MP FIRST MP SIZE MANUAL FEED DUPLEX OUTPUT RESOLUTION HRC TONER SAVE DENSITY FFaaccttoorryy SSeettttiinngg =AUTO =OFF =A4/LETTER =OFF =OFF =STANDARD =600 =MEDIUM =OFF 0 3-42 If you want to reset the print server... Test button on the Network board (NC-4100h) for display messages. • The COPY setting is always restored to the factory setting when the printer is turned off and on again. • It is not possible to reset the NETWORK settings using the control panel. c List of Factory settings...

Users Manual - English
Page 155
Fig. 5-1 5-1 CHAPTER 5 MAINTENANCE Replacing the Toner Cartridge Toner cartridge (TN-9500) The toner cartridge is set at about 5% coverage (if the print density is in a bag inside the toner cartridge carton. A new toner cartridge contains enough toner to print up to approximately 11,000 A4/Letter-size single-sided pages at level 0).
Fig. 5-1 5-1 CHAPTER 5 MAINTENANCE Replacing the Toner Cartridge Toner cartridge (TN-9500) The toner cartridge is set at about 5% coverage (if the print density is in a bag inside the toner cartridge carton. A new toner cartridge contains enough toner to print up to approximately 11,000 A4/Letter-size single-sided pages at level 0).

Users Manual - English
Page 156
... because it until immediately before you change the print density setting for a long time. • Do not expose the toner cartridge to direct light. • Do not stand the toner cartridge on its end or turn it upside down. • Do not open it might cause serious damage, resulting in... poor print quality. • Do not touch the shaded parts shown below. • Toner consumption varies according to the image coverage on the page and the print density setting. • The greater the image coverage, the greater the...
... because it until immediately before you change the print density setting for a long time. • Do not expose the toner cartridge to direct light. • Do not stand the toner cartridge on its end or turn it upside down. • Do not open it might cause serious damage, resulting in... poor print quality. • Do not touch the shaded parts shown below. • Toner consumption varies according to the image coverage on the page and the print density setting. • The greater the image coverage, the greater the...

Users Manual - English
Page 157
... chapter. ✒ Note To ensure optimum print quality, be sure to use quality toner cartridges. For more information on the LCD panel, remove the Toner cartridge, and rock it gently several times to distribute the toner evenly inside of the printer. TONER EMPTY message CHAPTER 5 MAINTENANCE You will need to clean the inside the cartridge...
... chapter. ✒ Note To ensure optimum print quality, be sure to use quality toner cartridges. For more information on the LCD panel, remove the Toner cartridge, and rock it gently several times to distribute the toner evenly inside of the printer. TONER EMPTY message CHAPTER 5 MAINTENANCE You will need to clean the inside the cartridge...

Users Manual - English
Page 158
Hold the toner cartridge with both hands. To replace the toner cartridge, follow these steps: ☛ 1. Unpack the new toner cartridge. ☛ 4. Transfer roller ☛ 3. This distributes the toner evenly inside the cartridge. 45¡ 45¡ Fig. 5-2 5-4 Remove the toner cartridge. ✒ Note Never touch or clean the transfer roller, or print quality may deteriorate. Open the top cover of the printer. ☛ 2. Rock it gently several times at a 45° angle.
Hold the toner cartridge with both hands. To replace the toner cartridge, follow these steps: ☛ 1. Unpack the new toner cartridge. ☛ 4. Transfer roller ☛ 3. This distributes the toner evenly inside the cartridge. 45¡ 45¡ Fig. 5-2 5-4 Remove the toner cartridge. ✒ Note Never touch or clean the transfer roller, or print quality may deteriorate. Open the top cover of the printer. ☛ 2. Rock it gently several times at a 45° angle.

Users Manual - English
Page 159
Fig. 5-4 ☛ 7. Hold the tab firmly and pull it until it is detached from the toner cartridge. Fig. 5-5 ☛ 8. Close the top cover of the printer. 5-5 ☛ 5. Fig. 5-3 ☛ 6. Install the new toner cartridge firmly into the printer. CHAPTER 5 MAINTENANCE Bend the tab up and down several times until the sealing tape comes out all the way.
Fig. 5-4 ☛ 7. Hold the tab firmly and pull it until it is detached from the toner cartridge. Fig. 5-5 ☛ 8. Close the top cover of the printer. 5-5 ☛ 5. Fig. 5-3 ☛ 6. Install the new toner cartridge firmly into the printer. CHAPTER 5 MAINTENANCE Bend the tab up and down several times until the sealing tape comes out all the way.

Users Manual - English
Page 160
When you replace the Toner cartridge, be sure to clean the printer interior. Turn off the printer power switch, and then unplug the power cord. ☛ 2. Pull the paper cassette out of the printer. ☛ 3. Cleaning Clean the printer exterior and interior periodically with a dry soft cloth. Open the multi-purpose tray. 5-6 Cleaning the printer exterior Clean the printer exterior as follows: ☛ 1. If printed pages are stained with toner, clean the printer interior with a dry soft cloth.
When you replace the Toner cartridge, be sure to clean the printer interior. Turn off the printer power switch, and then unplug the power cord. ☛ 2. Pull the paper cassette out of the printer. ☛ 3. Cleaning Clean the printer exterior and interior periodically with a dry soft cloth. Open the multi-purpose tray. 5-6 Cleaning the printer exterior Clean the printer exterior as follows: ☛ 1. If printed pages are stained with toner, clean the printer interior with a dry soft cloth.

Users Manual - English
Page 162
Open the top cover. ☛ 3. Remove the toner cartridge. 5-8 Turn off the toner with a dry cloth and immediately wash the clothes in cold water to avoid stains. • Never touch the hot fuser. • Never touch or clean ...the transfer roller, or print quality may be adversely affected. • Be careful not to the following: • If your clothes are smeared with toner, wipe off the printer power switch, and then unplug the power cord. ☛ 2. Fuser is HOT! Transfer Roller Clean the...
Open the top cover. ☛ 3. Remove the toner cartridge. 5-8 Turn off the toner with a dry cloth and immediately wash the clothes in cold water to avoid stains. • Never touch the hot fuser. • Never touch or clean ...the transfer roller, or print quality may be adversely affected. • Be careful not to the following: • If your clothes are smeared with toner, wipe off the printer power switch, and then unplug the power cord. ☛ 2. Fuser is HOT! Transfer Roller Clean the...

Users Manual - English
Page 163
When you have just used the printer, some internal parts of the printer, never touch the fuser and fixing roller. Metal plate Fig. 5-8 5-9 Wipe off toner and paper dust from the metal plate in the printer with a dry, soft cloth. Fuser is HOT! Inside the printer Open the face up output tray ☛ 4. CHAPTER 5 MAINTENANCE Warning After you open the top cover of the printer are extremely hot.
When you have just used the printer, some internal parts of the printer, never touch the fuser and fixing roller. Metal plate Fig. 5-8 5-9 Wipe off toner and paper dust from the metal plate in the printer with a dry, soft cloth. Fuser is HOT! Inside the printer Open the face up output tray ☛ 4. CHAPTER 5 MAINTENANCE Warning After you open the top cover of the printer are extremely hot.
Users Manual - English
Page 164
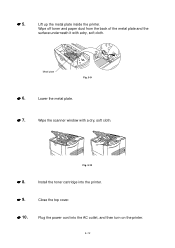
Lower the metal plate. ☛ 7. Plug the power cord into the printer. ☛ 9. Wipe the scanner window with adry, soft cloth. Metal plate Fig. 5-9 ☛ 6. Install the toner cartridge into the AC outlet, and then turn on the printer. 5-10 Lift up the metal plate inside the printer. Close the top cover. ☛ 10. Fig. 5-10 ☛ 8. ☛ 5. Wipe off toner and paper dust from the back of the metal plate and the surface underneath it with a dry, soft cloth.
Lower the metal plate. ☛ 7. Plug the power cord into the printer. ☛ 9. Wipe the scanner window with adry, soft cloth. Metal plate Fig. 5-9 ☛ 6. Install the toner cartridge into the AC outlet, and then turn on the printer. 5-10 Lift up the metal plate inside the printer. Close the top cover. ☛ 10. Fig. 5-10 ☛ 8. ☛ 5. Wipe off toner and paper dust from the back of the metal plate and the surface underneath it with a dry, soft cloth.
Users Manual - English
Page 166
...multi-purpose tray, and then press the Go switch. Install the paper cassette into the indicated tray. Close the rear cover of the printer. LCD messages CHAPTER 6 TROUBLESHOOTING ✒ Note The paper trays and LCD panel descriptions in this manual are named as shown below. ... MP tray Optional Lower tray Tray 2/3/4 Optional Duplex unit for DX Duplex printing Optional Mailbox unit MX Error messages EErrrroorr MMeessssaaggee TONER EMPTY NO TONER NO PAPER XXX NO TRAY XXX COVER OPEN FACE UP OPEN JAM XXX STACKER FULL SIZE MISMATCH TOO MANY TRAYS AAccttiioonn Replace...
...multi-purpose tray, and then press the Go switch. Install the paper cassette into the indicated tray. Close the rear cover of the printer. LCD messages CHAPTER 6 TROUBLESHOOTING ✒ Note The paper trays and LCD panel descriptions in this manual are named as shown below. ... MP tray Optional Lower tray Tray 2/3/4 Optional Duplex unit for DX Duplex printing Optional Mailbox unit MX Error messages EErrrroorr MMeessssaaggee TONER EMPTY NO TONER NO PAPER XXX NO TRAY XXX COVER OPEN FACE UP OPEN JAM XXX STACKER FULL SIZE MISMATCH TOO MANY TRAYS AAccttiioonn Replace...

Users Manual - English
Page 178
Fig. 6-5 Fig. 6-6 6-13 Open the top cover of the printer. ☛ 2. Lift up the metal plate inside the printer) JAM INSIDE ☛ 1. CHAPTER 6 TROUBLESHOOTING JAM INSIDE (inside the printer. Remove the toner cartridge. ☛ 3.
Fig. 6-5 Fig. 6-6 6-13 Open the top cover of the printer. ☛ 2. Lift up the metal plate inside the printer) JAM INSIDE ☛ 1. CHAPTER 6 TROUBLESHOOTING JAM INSIDE (inside the printer. Remove the toner cartridge. ☛ 3.
Users Manual - English
Page 179
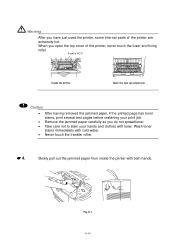
... out the jammed paper from inside the printer with cold water. • Never touch the transfer roller. ☛ 4. Wash toner stains immediately with both hands. Caution • After having removed the jammed paper, if the printed page has toner stains, print several test pages before restarting... your hands and clothes with toner. Fuser is HOT! Warning After you have just used the printer, some internal parts of the printer, never touch the fuser and fixing roller.
... out the jammed paper from inside the printer with cold water. • Never touch the transfer roller. ☛ 4. Wash toner stains immediately with both hands. Caution • After having removed the jammed paper, if the printed page has toner stains, print several test pages before restarting... your hands and clothes with toner. Fuser is HOT! Warning After you have just used the printer, some internal parts of the printer, never touch the fuser and fixing roller.

Users Manual - English
Page 180
CHAPTER 6 TROUBLESHOOTING ☛ 6. Close the top cover of the printer. ✒ Note If a paper jam occurs when using A6 size paper, remove the jammed paper, turn over the stack of the paper in the paper cassette, and print it again. 6-15 Push the metal plate down. Install the toner cartridge firmly into the printer. ☛ 7. ☛ 5.
CHAPTER 6 TROUBLESHOOTING ☛ 6. Close the top cover of the printer. ✒ Note If a paper jam occurs when using A6 size paper, remove the jammed paper, turn over the stack of the paper in the paper cassette, and print it again. 6-15 Push the metal plate down. Install the toner cartridge firmly into the printer. ☛ 7. ☛ 5.
Users Manual - English
Page 191
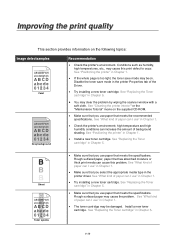
... of paper can increase the amount of paper can I use paper that you select the appropriate media type in Chapter 5. See "Replacing the Toner cartridge" in the printer driver. Improving the print quality This section provides information on the following topics: IImmaaggee ddeeffeeccttssaammpplleess ABCDEFGH abcdefghijk ABCD abcde 01234 Faint ABCDEFGH abcdefghijk ABCD...
... of paper can increase the amount of paper can I use paper that you select the appropriate media type in Chapter 5. See "Replacing the Toner cartridge" in the printer driver. Improving the print quality This section provides information on the following topics: IImmaaggee ddeeffeeccttssaammpplleess ABCDEFGH abcdefghijk ABCD abcde 01234 Faint ABCDEFGH abcdefghijk ABCD...


