
Users Manual - English
Page 4
... according to clean the inside the vacuum cleaner, potentially starting a fire. Doing this might cause the toner dust to clean up scattered toner. Doing this may cause a fire or electrical shock. Cleaning with a dry, lint-free cloth and dispose of the printer. • DO NOT use cleaning materials that you have unplugged the...
... according to clean the inside the vacuum cleaner, potentially starting a fire. Doing this might cause the toner dust to clean up scattered toner. Doing this may cause a fire or electrical shock. Cleaning with a dry, lint-free cloth and dispose of the printer. • DO NOT use cleaning materials that you have unplugged the...
Users Manual - English
Page 7
Toner cartridge ...61 Drum unit ...68 Cleaning ...73 Cleaning the outside of the printer...73 Cleaning the inside of Conformity ...121 vi for your safety ...120 EC Declaration of the printer...74 Cleaning the corona ...HL-2150N / HL-2170W only) ...110 Print bar codes or expanded characters 110 B Appendix (for Europe and Other Countries) 117 Brother numbers ...117 Important information: regulations ...118 Radio interference (220 to 240 volt model only 118 International ENERGY STAR® Compliance Statement 118 IEC 60825-1 specification (220 to 240 volt model only 118 Internal laser...
Toner cartridge ...61 Drum unit ...68 Cleaning ...73 Cleaning the outside of the printer...73 Cleaning the inside of Conformity ...121 vi for your safety ...120 EC Declaration of the printer...74 Cleaning the corona ...HL-2150N / HL-2170W only) ...110 Print bar codes or expanded characters 110 B Appendix (for Europe and Other Countries) 117 Brother numbers ...117 Important information: regulations ...118 Radio interference (220 to 240 volt model only 118 International ENERGY STAR® Compliance Statement 118 IEC 60825-1 specification (220 to 240 volt model only 118 Internal laser...
Users Manual - English
Page 9
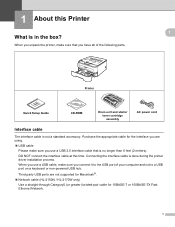
... Setup Guide CD-ROM Drum unit and starter toner cartridge assembly AC power cord Interface cable 1 The interface cable is done during the printer driver installation process. Third party USB ports are not supported for Macintosh®. „ Network cable (HL-2150N / HL-2170W only) Use a straight-through Category5 (or greater) twisted-pair cable for...
... Setup Guide CD-ROM Drum unit and starter toner cartridge assembly AC power cord Interface cable 1 The interface cable is done during the printer driver installation process. Third party USB ports are not supported for Macintosh®. „ Network cable (HL-2150N / HL-2170W only) Use a straight-through Category5 (or greater) twisted-pair cable for...
Users Manual - English
Page 36
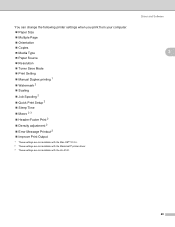
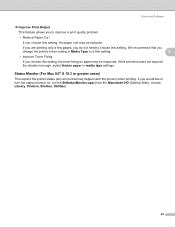
You can change the following printer settings when you print from your computer. „ Paper Size „ Multiple Page „ Orientation „ Copies „ Media Type „ Paper Source „ Resolution „ Toner Save Mode „ Print Setting „ Manual Duplex printing 1 „ Watermark 2 „ Scaling „ Job Spooling 2 „ ...„ Improve Print Output 1 These settings are not available with the Mac OS® 10.2.4. 2 These settings are not available with the Macintosh® printer driver. 3 These settings are not available with the HL-2140. Driver and Software 3 28
You can change the following printer settings when you print from your computer. „ Paper Size „ Multiple Page „ Orientation „ Copies „ Media Type „ Paper Source „ Resolution „ Toner Save Mode „ Print Setting „ Manual Duplex printing 1 „ Watermark 2 „ Scaling „ Job Spooling 2 „ ...„ Improve Print Output 1 These settings are not available with the Mac OS® 10.2.4. 2 These settings are not available with the Macintosh® printer driver. 3 These settings are not available with the HL-2140. Driver and Software 3 28
Users Manual - English
Page 39
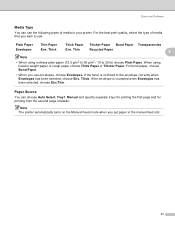
... the envelope is not fixed to 25 lb) choose Plain Paper. If the toner is crumpled when Envelopes has been selected, choose Env.Thin. Note The printer automatically turns on the Manual Feed mode when you put paper in your printer. When using ordinary plain paper (72.5 g/m2 to 95 g/m2 / 19 to...
... the envelope is not fixed to 25 lb) choose Plain Paper. If the toner is crumpled when Envelopes has been selected, choose Env.Thin. Note The printer automatically turns on the Manual Feed mode when you put paper in your printer. When using ordinary plain paper (72.5 g/m2 to 95 g/m2 / 19 to...
Users Manual - English
Page 40
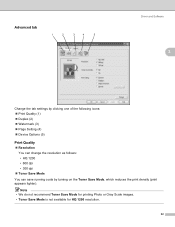
... Mode for printing Photo or Gray Scale images. • Toner Save Mode is not available for HQ 1200 resolution. 32 Advanced tab 1 2 3 4 5 Driver and Software 3 3 Change the tab settings by clicking one of the following ... Setting (4) „ Device Options (5) Print Quality 3 „ Resolution You can change the resolution as follows: • HQ 1200 • 600 dpi • 300 dpi „ Toner Save Mode You can save running costs by turning on the Toner Save Mode, which reduces the print density (print appears lighter).
... Mode for printing Photo or Gray Scale images. • Toner Save Mode is not available for HQ 1200 resolution. 32 Advanced tab 1 2 3 4 5 Driver and Software 3 3 Change the tab settings by clicking one of the following ... Setting (4) „ Device Options (5) Print Quality 3 „ Resolution You can change the resolution as follows: • HQ 1200 • 600 dpi • 300 dpi „ Toner Save Mode You can save running costs by turning on the Toner Save Mode, which reduces the print density (print appears lighter).
Users Manual - English
Page 43
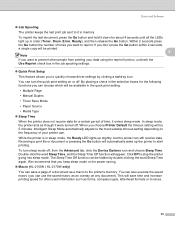
... print setting. • Multiple Page • Manual Duplex • Toner Save Mode • Paper Source • Media Type „ Sleep Time When the printer does not receive data for power saving. „ Macro (HL-2150N / HL-2170W only) You can save time and increase printing speed for often used ...The Sleep Time Off function can choose which will be available in memory. Intelligent Sleep Mode automatically adjusts to reprint. While the printer is in order (Toner, Drum, Error, Ready), and then release the Go button. Double-click the word Sleep Time, and the Sleep Time Off...
... print setting. • Multiple Page • Manual Duplex • Toner Save Mode • Paper Source • Media Type „ Sleep Time When the printer does not receive data for power saving. „ Macro (HL-2150N / HL-2170W only) You can save time and increase printing speed for often used ...The Sleep Time Off function can choose which will be available in memory. Intelligent Sleep Mode automatically adjusts to reprint. While the printer is in order (Toner, Drum, Error, Ready), and then release the Go button. Double-click the word Sleep Time, and the Sleep Time Off...

Users Manual - English
Page 44
...a few pages, you do not need to choose this setting. We recommend that you change the printer driver setting in Media Type to a thin setting. • Improve Toner Fixing If you choose this setting, the toner fixing on paper may be improved. Driver and Software „ Header-Footer Print When this feature is...user name or the text you select Custom and enter the text in Media type settings. 36 By clicking Setting, you can choose whether the printer reports problems by printing an error page. If you entered. Note The Density adjustment is enabled, it will print the date and time on ...
...a few pages, you do not need to choose this setting. We recommend that you change the printer driver setting in Media Type to a thin setting. • Improve Toner Fixing If you choose this setting, the toner fixing on paper may be improved. Driver and Software „ Header-Footer Print When this feature is...user name or the text you select Custom and enter the text in Media type settings. 36 By clicking Setting, you can choose whether the printer reports problems by printing an error page. If you entered. Note The Density adjustment is enabled, it will print the date and time on ...
Users Manual - English
Page 50
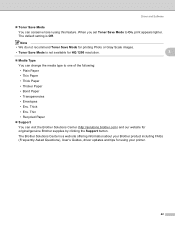
.... Thin • Recycled Paper „ Support You can visit the Brother Solutions Center (http://solutions.brother.com) and our website for HQ 1200 resolution. 3 „ Media Type You can conserve toner using your printer. 42 The Brother Solutions Center is Off. When you set Toner Save Mode to one of the following: • Plain Paper •...
.... Thin • Recycled Paper „ Support You can visit the Brother Solutions Center (http://solutions.brother.com) and our website for HQ 1200 resolution. 3 „ Media Type You can conserve toner using your printer. 42 The Brother Solutions Center is Off. When you set Toner Save Mode to one of the following: • Plain Paper •...
Users Manual - English
Page 52
...improve a print quality problem. • Reduce Paper Curl If you choose this setting, the toner fixing on , run the BrStatusMonitor.app (from the Macintosh HD (Startup Disk), choose Library, Printers, Brother, Utilities). 44 We recommend that may be improved. If you are printing only a few ...pages, you do not need to a thin setting. 3 • Improve Toner Fixing If you change the printer driver setting in media type settings. Status...
...improve a print quality problem. • Reduce Paper Curl If you choose this setting, the toner fixing on , run the BrStatusMonitor.app (from the Macintosh HD (Startup Disk), choose Library, Printers, Brother, Utilities). 44 We recommend that may be improved. If you are printing only a few ...pages, you do not need to a thin setting. 3 • Improve Toner Fixing If you change the printer driver setting in media type settings. Status...
Users Manual - English
Page 56
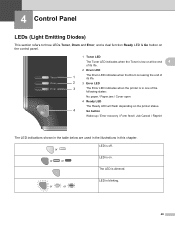
... LED 3 The Error LED indicates when the printer is off. 4 Control Panel 4 LEDs (Light Emitting Diodes) 4 This section refers to three LEDs Toner, Drum and Error, and a dual function Ready LED & Go button on the control panel. 1 Toner LED The Toner LED indicates when the Toner is low or at the end 4 of its.../ Paper jam / Cover open 4 Ready LED The Ready LED will flash depending on . or or or LED is dimmed. The LED is on the printer status. 4 Go button Wake-up / Error recovery / Form feed / Job Cancel / Reprint The LED indications shown in the table below are used in...
... LED 3 The Error LED indicates when the printer is off. 4 Control Panel 4 LEDs (Light Emitting Diodes) 4 This section refers to three LEDs Toner, Drum and Error, and a dual function Ready LED & Go button on the control panel. 1 Toner LED The Toner LED indicates when the Toner is low or at the end 4 of its.../ Paper jam / Cover open 4 Ready LED The Ready LED will flash depending on . or or or LED is dimmed. The LED is on the printer status. 4 Go button Wake-up / Error recovery / Form feed / Job Cancel / Reprint The LED indications shown in the table below are used in...
Users Manual - English
Page 58
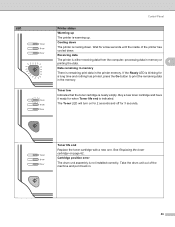
... Data remaining in memory There is warming up The printer is remaining print data in the printer memory. Take the drum unit out of the printer has cooled down. LED Control Panel Printer status Warming up . See Replacing the toner cartridge on for 2 seconds and off for a ... is blinking for when Toner life end is not installed correctly. Wait for 3 seconds. Toner life end Replace the toner cartridge with a new one. Cooling down . Toner low Indicates that the toner cartridge is cooling down The printer is nearly empty. Buy a new toner cartridge and have it ...
... Data remaining in memory There is warming up The printer is remaining print data in the printer memory. Take the drum unit out of the printer has cooled down. LED Control Panel Printer status Warming up . See Replacing the toner cartridge on for 2 seconds and off for a ... is blinking for when Toner life end is not installed correctly. Wait for 3 seconds. Toner life end Replace the toner cartridge with a new one. Cooling down . Toner low Indicates that the toner cartridge is cooling down The printer is nearly empty. Buy a new toner cartridge and have it ...
Users Manual - English
Page 61
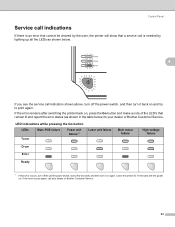
... the table below . 4 If you see the service call your dealer or Brother Customer Service. If the error remains after switching the printer back on again. LED indications while pressing the Go button LEDs Toner Main PCB failure Fuser unit failure 1 Laser unit failure Main motor failure High voltage failure Drum Error Ready 1 If...
... the table below . 4 If you see the service call your dealer or Brother Customer Service. If the error remains after switching the printer back on again. LED indications while pressing the Go button LEDs Toner Main PCB failure Fuser unit failure 1 Laser unit failure Main motor failure High voltage failure Drum Error Ready 1 If...
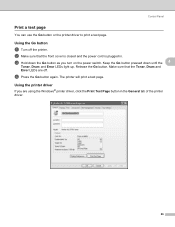
Users Manual - English
Page 64
Control Panel Print a test page 4 You can use the Go button or the printer driver to print a test page. c Hold down until the 4 Toner, Drum and Error LEDs light up. d Press the Go button again. Make sure that the front cover is closed and the power cord is plugged ... down the Go button as you are off the printer. Release the Go button. Using the Go button 4 a Turn off . b Make sure that the Toner, Drum and Error LEDs are using the Windows® printer driver, click the Print Test Page button in . Using the printer driver 4 If you turn on the power switch...
Control Panel Print a test page 4 You can use the Go button or the printer driver to print a test page. c Hold down until the 4 Toner, Drum and Error LEDs light up. d Press the Go button again. Make sure that the front cover is closed and the power cord is plugged ... down the Go button as you are off the printer. Release the Go button. Using the Go button 4 a Turn off . b Make sure that the Toner, Drum and Error LEDs are using the Windows® printer driver, click the Print Test Page button in . Using the printer driver 4 If you turn on the power switch...
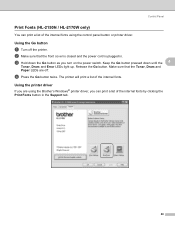
Users Manual - English
Page 66
... print a list of the internal fonts using the Brother's Windows® printer driver, you turn on the power switch. Control Panel Print Fonts (HL-2150N / HL-2170W only) 4 You can print a list of the internal fonts by clicking the Print Fonts button in . Using the Go button 4 a Turn off . Keep ...Go button twice. b Make sure that the Toner, Drum and Paper LEDs are using the control panel button or printer driver. c Hold down until the 4 Toner, Drum and Error LEDs light up. Using the printer driver 4 If you are off the printer. Make sure that the front cover is closed...
... print a list of the internal fonts using the Brother's Windows® printer driver, you turn on the power switch. Control Panel Print Fonts (HL-2150N / HL-2170W only) 4 You can print a list of the internal fonts by clicking the Print Fonts button in . Using the Go button 4 a Turn off . Keep ...Go button twice. b Make sure that the Toner, Drum and Paper LEDs are using the control panel button or printer driver. c Hold down until the 4 Toner, Drum and Error LEDs light up. Using the printer driver 4 If you are off the printer. Make sure that the front cover is closed...
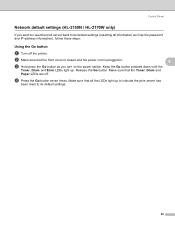
Users Manual - English
Page 67
...and the power cord is plugged in. 4 c Hold down until the Toner, Drum and Error LEDs light up to indicate the print server has been reset to its default settings. 59 Control Panel Network default settings (HL-2150N / HL-2170W only) 4 If you want to reset the print server back to ...its default settings (resetting all information such as you turn on the power switch. Release the Go button. d Press the Go button seven times. b Make sure that the Toner, Drum and Paper LEDs are off the printer.
...and the power cord is plugged in. 4 c Hold down until the Toner, Drum and Error LEDs light up to indicate the print server has been reset to its default settings. 59 Control Panel Network default settings (HL-2150N / HL-2170W only) 4 If you want to reset the print server back to ...its default settings (resetting all information such as you turn on the power switch. Release the Go button. d Press the Go button seven times. b Make sure that the Toner, Drum and Paper LEDs are off the printer.
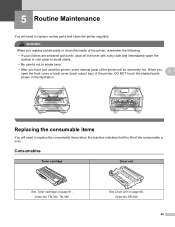
Users Manual - English
Page 68
...machine indicates that the life of the consumable is over. Order No. Order No.DR-360 60 When you have just used the printer, some internal parts of the printer, DO NOT touch the shaded parts 5 shown in the illustration. TN-330, TN-360 See Drum unit on page 61. ...Consumables 5 Toner cartridge Drum unit See Toner cartridge on page 68. WARNING When you replace certain parts or clean the inside of the printer, remember the following: •...
...machine indicates that the life of the consumable is over. Order No. Order No.DR-360 60 When you have just used the printer, some internal parts of the printer, DO NOT touch the shaded parts 5 shown in the illustration. TN-330, TN-360 See Drum unit on page 61. ...Consumables 5 Toner cartridge Drum unit See Toner cartridge on page 68. WARNING When you replace certain parts or clean the inside of the printer, remember the following: •...
Users Manual - English
Page 69
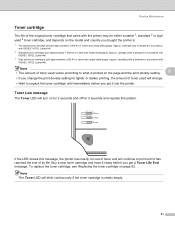
...If you change the print density setting for 3 seconds and repeats this message, the printer has nearly run out of toner and will continue to unpack the toner cartridge until it ready before you get a Toner Life End message. cartridge yield is declared in accordance with ISO/IEC 19752. (... LED shows this pattern. Routine Maintenance Toner cartridge 5 The life of the original toner cartridge that came with the printer may be either a starter 1, standard 2 or high yield 3 toner cartridge, and depends on the model and country you bought the printer in accordance with ISO/IEC 19752. ...
...If you change the print density setting for 3 seconds and repeats this message, the printer has nearly run out of toner and will continue to unpack the toner cartridge until it ready before you get a Toner Life End message. cartridge yield is declared in accordance with ISO/IEC 19752. (... LED shows this pattern. Routine Maintenance Toner cartridge 5 The life of the original toner cartridge that came with the printer may be either a starter 1, standard 2 or high yield 3 toner cartridge, and depends on the model and country you bought the printer in accordance with ISO/IEC 19752. ...

Users Manual - English
Page 70
... Cleaning on . Open the front cover. a Make sure that the printer is turned on page 73. When you want to buy toner cartridges, call your dealer or Brother Customer Service. • We recommend that you use only genuine Brother toner cartridges. Routine Maintenance 5 5 Replacing the toner cartridge 5 Note • To ensure high quality printing, we recommend...
... Cleaning on . Open the front cover. a Make sure that the printer is turned on page 73. When you want to buy toner cartridges, call your dealer or Brother Customer Service. • We recommend that you use only genuine Brother toner cartridges. Routine Maintenance 5 5 Replacing the toner cartridge 5 Note • To ensure high quality printing, we recommend...
Users Manual - English
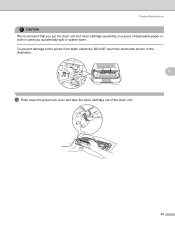
Page 71
Routine Maintenance CAUTION We recommend that you accidentally spill or scatter toner. To prevent damage to the printer from static electricity, DO NOT touch the electrodes shown in the illustration. 5 c Push down the green lock lever and take the toner cartridge out of disposable paper or cloth in case you put the drum unit and toner cartridge assembly on a piece of the drum unit. 63
Routine Maintenance CAUTION We recommend that you accidentally spill or scatter toner. To prevent damage to the printer from static electricity, DO NOT touch the electrodes shown in the illustration. 5 c Push down the green lock lever and take the toner cartridge out of disposable paper or cloth in case you put the drum unit and toner cartridge assembly on a piece of the drum unit. 63


