
Installation guide
Page 2
...Batteries Batteries Please dispose of used batteries properly, following any part of procedures other than those specified herein may be placed on your LIFESTYLE® media center and Acoustimass® module enclosures: The lightning flash with liquids, such as marked on the Important Safety Information...NE SE TROUVE ÀL'INTÉRIEURAUCUNE PIÈCE POUVANT ÊTRE RÉPARÉE PARL'USAGER. Class 1 laser product The DVD player contained within the system enclosure that may result in the shipping carton. CLASS 1 KLASSE 1 LUOKAN 1 KLASS 1 LASER PRODUCT LASER PRODUKT ...
...Batteries Batteries Please dispose of used batteries properly, following any part of procedures other than those specified herein may be placed on your LIFESTYLE® media center and Acoustimass® module enclosures: The lightning flash with liquids, such as marked on the Important Safety Information...NE SE TROUVE ÀL'INTÉRIEURAUCUNE PIÈCE POUVANT ÊTRE RÉPARÉE PARL'USAGER. Class 1 laser product The DVD player contained within the system enclosure that may result in the shipping carton. CLASS 1 KLASSE 1 LUOKAN 1 KLASS 1 LASER PRODUCT LASER PRODUKT ...
Installation guide
Page 5
This book shows you for your purchase of a Bose® LIFESTYLE® DVD home entertainment system. Your Operating Guide offers information on other aspects of the use of your system. • How to power up the system and ... media center, cube speakers, and Acoustimass® module. You will identify and connect the cables that are four different systems, the LIFESTYLE® 18 Series II, LIFESTYLE® 28 Series II, LIFESTYLE® 38, and the LIFESTYLE® 48 systems. All include multiple room connections, most include the AdaptiQ® audio calibration system, and the...
This book shows you for your purchase of a Bose® LIFESTYLE® DVD home entertainment system. Your Operating Guide offers information on other aspects of the use of your system. • How to power up the system and ... media center, cube speakers, and Acoustimass® module. You will identify and connect the cables that are four different systems, the LIFESTYLE® 18 Series II, LIFESTYLE® 28 Series II, LIFESTYLE® 38, and the LIFESTYLE® 48 systems. All include multiple room connections, most include the AdaptiQ® audio calibration system, and the...
Installation guide
Page 6
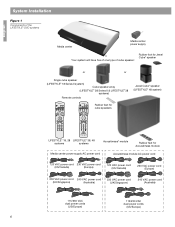
...or or Single cube speaker (LIFESTYLE® 18 Series II system) Cube speaker array (LIFESTYLE® 28 Series II & LIFESTYLE® 38 systems) Remote controls Jewel Cube® speaker (LIFESTYLE® 48 system) On Off Mute All Mute CD·DVD FM·AM AUX TV...Off Library Settings ENTER DVD Menu Guide System Track Chapter Preset Channel Exit Volume Seek Shuffle Repeat 1 2 3 4 5 6 7 8 9 Info Last 0 uMusic Rating Similar Whole CD CD # Playlist Rubber feet for cube speakers LIFESTYLE® 18, 28 LIFESTYLE® 38, 48 systems systems Acoustimass®...
...or or Single cube speaker (LIFESTYLE® 18 Series II system) Cube speaker array (LIFESTYLE® 28 Series II & LIFESTYLE® 38 systems) Remote controls Jewel Cube® speaker (LIFESTYLE® 48 system) On Off Mute All Mute CD·DVD FM·AM AUX TV...Off Library Settings ENTER DVD Menu Guide System Track Chapter Preset Channel Exit Volume Seek Shuffle Repeat 1 2 3 4 5 6 7 8 9 Info Last 0 uMusic Rating Similar Whole CD CD # Playlist Rubber feet for cube speakers LIFESTYLE® 18, 28 LIFESTYLE® 38, 48 systems systems Acoustimass®...
Installation guide
Page 11
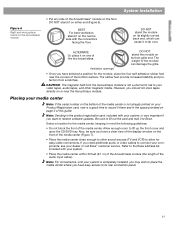
...in the product registration card, included with your Product Registration card, now is very important if you want to the Bose address list included with the connectors facing the floor. Refer to receive software updates. DO NOT stand it there and ... can cause it on or near the corners of the bottom surface. ALTERNATE Or, place it to your dealer or call Bose® customer service. However, you have selected a position for the module, place the four self-adhesive rubber feet near...; Place the media center close enough to lift up the front cover and open the CD/DVD tray.
...in the product registration card, included with your Product Registration card, now is very important if you want to the Bose address list included with the connectors facing the floor. Refer to receive software updates. DO NOT stand it there and ... can cause it on or near the corners of the bottom surface. ALTERNATE Or, place it to your dealer or call Bose® customer service. However, you have selected a position for the module, place the four self-adhesive rubber feet near...; Place the media center close enough to lift up the front cover and open the CD/DVD tray.
Installation guide
Page 12
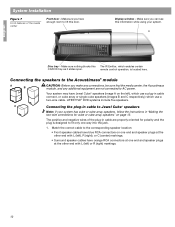
..., follow the instructions in cable connect, or cube array or single cube speakers (images B and C respectively,) which enables certain CD/DVD tray as it slides open. English System Installation Figure 7 Front features of the plug-in cable are not connected to fit only one... (left ), which use a two-wire cable. Make sure nothing blocks this door. The positive and negative wires of the media center Front door - LIFESTYLE® DVD systems include five speakers. Make sure you have orange RCA connectors at the other end with L (left), R (right), or C (center) markings. ...
..., follow the instructions in cable connect, or cube array or single cube speakers (images B and C respectively,) which enables certain CD/DVD tray as it slides open. English System Installation Figure 7 Front features of the plug-in cable are not connected to fit only one... (left ), which use a two-wire cable. Make sure nothing blocks this door. The positive and negative wires of the media center Front door - LIFESTYLE® DVD systems include five speakers. Make sure you have orange RCA connectors at the other end with L (left), R (right), or C (center) markings. ...
Installation guide
Page 17
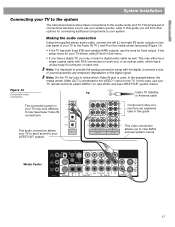
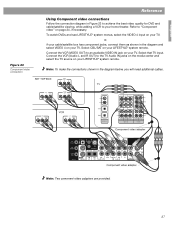
...connection panel on each end, or an optical cable, which Video IN jack is used. If the setup menu for connecting additional components to your LIFESTYLE® system This video connection allows you may either be sure to notice which has a unique snap fit connector on your TV may have ...a digital TV, you to view DVDs and see LIFESTYLE® system menus. This may connect a digital audio cable as well. Making the audio connection Using the supplied stereo audio cable, connect the...
...connection panel on each end, or an optical cable, which Video IN jack is used. If the setup menu for connecting additional components to your LIFESTYLE® system This video connection allows you may either be sure to notice which has a unique snap fit connector on your TV may have ...a digital TV, you to view DVDs and see LIFESTYLE® system menus. This may connect a digital audio cable as well. Making the audio connection Using the supplied stereo audio cable, connect the...
Installation guide
Page 18
...TV sound through your LIFESTYLE® system, the speakers in your Operating Guide for information on how to set to the TV. If you have to see a DVD picture or LIFESTYLE® system menus... control, press the TV input button. Selecting the proper TV video input To view the DVDs and LIFESTYLE® system menus on your TV, you will need to select the input which numbered connection...Refer to the Controlling External Sources section in your TV should be turned off : 1. Until your LIFESTYLE® remote control has been taught to control the TV. Use the TV on-screen setting (not...
...TV sound through your LIFESTYLE® system, the speakers in your Operating Guide for information on how to set to the TV. If you have to see a DVD picture or LIFESTYLE® system menus... control, press the TV input button. Selecting the proper TV video input To view the DVDs and LIFESTYLE® system menus on your TV, you will need to select the input which numbered connection...Refer to the Controlling External Sources section in your TV should be turned off : 1. Until your LIFESTYLE® remote control has been taught to control the TV. Use the TV on-screen setting (not...

Installation guide
Page 22
... cover and press the Open/Close button. 4. On the remote control, press the CD/DVD button. 6. Keep the headset and discs together in their instructions, the installation of your LIFESTYLE® DVD system is complete and its performance is tailored to another room or significantly change the arrangement ... when to play Disc 2. 7. You will explain the procedure you move it rests above your television. 2. Use the TV remote to the LIFESTYLE® system media center. 3. Select the video input connected to turn on your ears for possible future use When you have played both discs...
... cover and press the Open/Close button. 4. On the remote control, press the CD/DVD button. 6. Keep the headset and discs together in their instructions, the installation of your LIFESTYLE® DVD system is complete and its performance is tailored to another room or significantly change the arrangement ... when to play Disc 2. 7. You will explain the procedure you move it rests above your television. 2. Use the TV remote to the LIFESTYLE® system media center. 3. Select the video input connected to turn on your ears for possible future use When you have played both discs...
Installation guide
Page 23
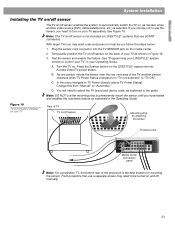
... attaching the sensor TV sensor jack Media center connection panel Note: For a projection TV, the bottom rear of the TV, another video source (DVD, cable/satellite box, etc.) is the best location for mounting the sensor. As one person moves the sensor near the rear vent area of...sensor installed on your TV separately. Plug the sensor cord connector into the TV SENSOR jack on , as explained in Figure 19. 3. See "Programming your LIFESTYLE® system remote to "TV ON". C. If you choose not to "Automatic." See Figure 19. B. Change this automatic feature as needed, when another...
... attaching the sensor TV sensor jack Media center connection panel Note: For a projection TV, the bottom rear of the TV, another video source (DVD, cable/satellite box, etc.) is the best location for mounting the sensor. As one person moves the sensor near the rear vent area of...sensor installed on your TV separately. Plug the sensor cord connector into the TV SENSOR jack on , as explained in Figure 19. 3. See "Programming your LIFESTYLE® system remote to "TV ON". C. If you choose not to "Automatic." See Figure 19. B. Change this automatic feature as needed, when another...
Installation guide
Page 25
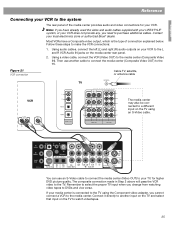
...Contact your local electronics store or authorized Bose® dealer. The composite connection made in Step 2 above will pass the VCR video to DVDs and vice versa. Remember to select ...your TV, for your VCR. Most VCRs have already used the video and audio cables supplied with your LIFESTYLE® system, or your VCR does not provide any, you cannot connect a VCR to the L...If your media center is the type of the media center provides audio and video connections for higher DVD picture quality. Using audio cables, connect the left (L) and right (R) audio outputs on the media...
...Contact your local electronics store or authorized Bose® dealer. The composite connection made in Step 2 above will pass the VCR video to DVDs and vice versa. Remember to select ...your TV, for your VCR. Most VCRs have already used the video and audio cables supplied with your LIFESTYLE® system, or your VCR does not provide any, you cannot connect a VCR to the L...If your media center is the type of the media center provides audio and video connections for higher DVD picture quality. Using audio cables, connect the left (L) and right (R) audio outputs on the media...

Installation guide
Page 26
... cable/satellite box has a DIGITAL Audio OUT jack, connect it to this system as follows: 1. This input will also provide better video quality when watching DVDs. To watch videotapes, select Input 1 on the media center. If the cable/satellite box has an S-VIDEO OUT jack, connect it to which you directly..., connect the VCR directly to the VIDEO IN jack on the media center. Note: Additional cables may be purchased at an electronics store or authorized Bose® dealer. Connect the VCR to the TV. If that to the TV. 26 English Reference Connecting your VCR. 2.
... cable/satellite box has a DIGITAL Audio OUT jack, connect it to this system as follows: 1. This input will also provide better video quality when watching DVDs. To watch videotapes, select Input 1 on the media center. If the cable/satellite box has an S-VIDEO OUT jack, connect it to which you directly..., connect the VCR directly to the VIDEO IN jack on the media center. Note: Additional cables may be purchased at an electronics store or authorized Bose® dealer. Connect the VCR to the TV. If that to the TV. 26 English Reference Connecting your VCR. 2.
Installation guide
Page 27
... your home theater. Note: To make the connections shown in Figure 23 to achieve the best video quality for DVD and cable/satellite viewing, while adding a VCR to "Component video" on your LIFESTYLE® system remote. Refer to your cable/satellite box has component jacks, connect them as shown in the diagram... are provided. 27 Connect the VCR (VIDEO OUT) to the TV Audio IN jacks on the media center and select the TV source on your LIFESTYLE® system remote. Connect the VCR (Audio L and R OUT) to an available VIDEO IN jack on your TV. Select that TV input. Select CBL/SAT...
... your home theater. Note: To make the connections shown in Figure 23 to achieve the best video quality for DVD and cable/satellite viewing, while adding a VCR to "Component video" on your LIFESTYLE® system remote. Refer to your cable/satellite box has component jacks, connect them as shown in the diagram... are provided. 27 Connect the VCR (VIDEO OUT) to the TV Audio IN jacks on the media center and select the TV source on your LIFESTYLE® system remote. Connect the VCR (Audio L and R OUT) to an available VIDEO IN jack on your TV. Select that TV input. Select CBL/SAT...
Lifestyle® VS-2 video enhancer - Owner's guide
Page 5
...IMPORTANT Software update required! Turn on this CD into the media center disc player. You can purchase additional cables from your LIFESTYLE® system and select the CD/DVD source. 2. WARNING: To avoid danger of suffocation, keep the plastic bags out of the reach of the media center ...need additional cables Your VS-2 includes one HDMI video cable, but you begin the actual setup. Notify Bose or your LIFESTYLE® system. Save all packing materials in the carton. For Bose contact information, refer to the address sheet included in case you need any part of the product ...
...IMPORTANT Software update required! Turn on this CD into the media center disc player. You can purchase additional cables from your LIFESTYLE® system and select the CD/DVD source. 2. WARNING: To avoid danger of suffocation, keep the plastic bags out of the reach of the media center ...need additional cables Your VS-2 includes one HDMI video cable, but you begin the actual setup. Notify Bose or your LIFESTYLE® system. Save all packing materials in the carton. For Bose contact information, refer to the address sheet included in case you need any part of the product ...
Lifestyle® VS-2 video enhancer - Owner's guide
Page 6
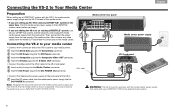
... the media center power supply plugs into the VS-2 instead of the media center. • If you are setting up a LIFESTYLE® system with your LIFESTYLE® DVD home entertainment system. 6 Connecting the VS-2 to Your Media Center English Preparation When setting up the VS-2 and your... LIFESTYLE® system at the same time, find the media center power supply in the LIFESTYLE system carton before you begin. • If ...
... the media center power supply plugs into the VS-2 instead of the media center. • If you are setting up a LIFESTYLE® system with your LIFESTYLE® DVD home entertainment system. 6 Connecting the VS-2 to Your Media Center English Preparation When setting up the VS-2 and your... LIFESTYLE® system at the same time, find the media center power supply in the LIFESTYLE system carton before you begin. • If ...
Lifestyle® VS-2 video enhancer - Owner's guide
Page 19
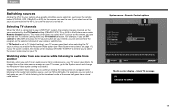
... or satellite box. English Switching sources Adding the VS-2 to Enabled. blank TV message TV CHOOSE TV INPUT 19 Just press the remote button (CD/DVD, VCR, CBL•SAT, or AUX) for the source you to continue viewing the video portion of the same ball game from a video source, ... change this so the video source remains on your TV screen, go to the System menu and change the Persistent Video option setting to your LIFESTYLE® system, the remote changes channels on your TV screen goes blank. System menu - Remote Control options Remote Control AUX Device: AUX Brand: AUX ...
... or satellite box. English Switching sources Adding the VS-2 to Enabled. blank TV message TV CHOOSE TV INPUT 19 Just press the remote button (CD/DVD, VCR, CBL•SAT, or AUX) for the source you to continue viewing the video portion of the same ball game from a video source, ... change this so the video source remains on your TV screen, go to the System menu and change the Persistent Video option setting to your LIFESTYLE® system, the remote changes channels on your TV screen goes blank. System menu - Remote Control options Remote Control AUX Device: AUX Brand: AUX ...
Lifestyle® VS-2 video enhancer - Owner's guide
Page 21
... • Make sure the VS-2 cable is correctly connected between the VS-2 and the media center (see "Connecting the VS-2 to spill into the DVD player. on my TV • Make sure your sources are connected to the appropriate VS-2 inputs. • Make sure you have selected the correct ...fully inserted into the media center connector. • Make sure you have not used a source that outputs a video format that is plugged into the DVD player. No picture on page 5. Some sources do System will not turn on page 6). • Make sure the media center power supply is higher ...
... • Make sure the VS-2 cable is correctly connected between the VS-2 and the media center (see "Connecting the VS-2 to spill into the DVD player. on my TV • Make sure your sources are connected to the appropriate VS-2 inputs. • Make sure you have selected the correct ...fully inserted into the media center connector. • Make sure you have not used a source that outputs a video format that is plugged into the DVD player. No picture on page 5. Some sources do System will not turn on page 6). • Make sure the media center power supply is higher ...
Operating guide
Page 2
... contains one or more information visit www.gracenote.com. Their reproduction or disclosure, in whole or in the shipping carton. ©2004 Bose Corporation. For more of the following any part of Dolby Laboratories is the industry standard in hazardous radiation exposure. Gracenote CDDB® Client... on the bottom of your system properly and enjoy all requirements of Gracenote. It will help you set up and operate your LIFESTYLE® DVD home entertainment system media center and ON the rear panel of this guide carefully. As with liquids, such as unpublished works. ...
... contains one or more information visit www.gracenote.com. Their reproduction or disclosure, in whole or in the shipping carton. ©2004 Bose Corporation. For more of the following any part of Dolby Laboratories is the industry standard in hazardous radiation exposure. Gracenote CDDB® Client... on the bottom of your system properly and enjoy all requirements of Gracenote. It will help you set up and operate your LIFESTYLE® DVD home entertainment system media center and ON the rear panel of this guide carefully. As with liquids, such as unpublished works. ...
Operating guide
Page 3
... number compatibility 5 Glossary of audio terms 5 Presenting a New Way to Play 7 What makes this LIFESTYLE® system uniquely yours 7 How you can tell the system to "Do as you expect 14...The media center 14 Component video or progressive scan: activating your violation of this model 525p DVD player, please contact our customer service center." You may not download The Guides; Reverse ...notice: "AEC One Stop Group, Inc. ("AEC") hold harmless AEC and its affiliates, and Bose and its affiliates, against any use with UEI Technology™ Under License from the Playlist 22 How...
... number compatibility 5 Glossary of audio terms 5 Presenting a New Way to Play 7 What makes this LIFESTYLE® system uniquely yours 7 How you can tell the system to "Do as you expect 14...The media center 14 Component video or progressive scan: activating your violation of this model 525p DVD player, please contact our customer service center." You may not download The Guides; Reverse ...notice: "AEC One Stop Group, Inc. ("AEC") hold harmless AEC and its affiliates, and Bose and its affiliates, against any use with UEI Technology™ Under License from the Playlist 22 How...
Operating guide
Page 4
... Edit Screen 42 How to change the text 42 Audio options 44 Video options 46 Media center options 47 Remote control options 48 DVD lock options 49 Applying parental control 49 To set the restriction level and passwords 50 Reference 51 Remote control care 51 Replacing ... link remote in another room 52 Setting up a second room with sound 52 Bose® link compatible products simplify your decisions 53 Bose® link remote switch settings 53 Taking care of your LIFESTYLE® system 54 Troubleshooting 55 Contacting customer service 57 Limited warranty 57 Technical information...
... Edit Screen 42 How to change the text 42 Audio options 44 Video options 46 Media center options 47 Remote control options 48 DVD lock options 49 Applying parental control 49 To set the restriction level and passwords 50 Reference 51 Remote control care 51 Replacing ... link remote in another room 52 Setting up a second room with sound 52 Bose® link compatible products simplify your decisions 53 Bose® link remote switch settings 53 Taking care of your LIFESTYLE® system 54 Troubleshooting 55 Contacting customer service 57 Limited warranty 57 Technical information...
Operating guide
Page 5
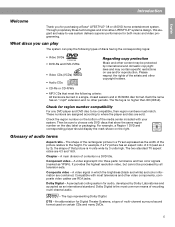
...-use system delivers superior performance for purchasing a Bose® LIFESTYLE® 38 or 48 DVD home entertainment system. Composite video - Through proprietary Bose technologies and innovative LIFESTYLE® systems design, this elegant and easy-to choose only DVD discs that meet the following types of the ...you for both music and video programming. Please respect the rights of discs having the corresponding logos: • Video DVDs • DVD-Rs and DVD-R/Ws • Video CDs (VCDs) • Audio CDs Regarding copy protection Music and other periods. These numbers ...
...-use system delivers superior performance for purchasing a Bose® LIFESTYLE® 38 or 48 DVD home entertainment system. Composite video - Through proprietary Bose technologies and innovative LIFESTYLE® systems design, this elegant and easy-to choose only DVD discs that meet the following types of the ...you for both music and video programming. Please respect the rights of discs having the corresponding logos: • Video DVDs • DVD-Rs and DVD-R/Ws • Video CDs (VCDs) • Audio CDs Regarding copy protection Music and other periods. These numbers ...


