Installation guide
Page 2
... LE RISQUE DE DÉCHARGE ÉLECTRIQUE, NE RETIREZ PAS LE COUVERCLE (OU L'ARRIÈRE). These CAUTION marks are located on your LIFESTYLE® media center and Acoustimass® module enclosures: The lightning flash with arrowhead symbol, within an equilateral triangle, is intended to alert the user...ELECTRICAL SHOCK DO NOT OPEN CAUTION: TO REDUCE THE RISK OF ELECTRIC SHOCK, DO NOT REMOVE COVER (OR BACK). Class 1 laser product The DVD player contained within the system enclosure that may result in the shipping carton. CAUTION: No naked flame sources, such as marked on the system,...
... LE RISQUE DE DÉCHARGE ÉLECTRIQUE, NE RETIREZ PAS LE COUVERCLE (OU L'ARRIÈRE). These CAUTION marks are located on your LIFESTYLE® media center and Acoustimass® module enclosures: The lightning flash with arrowhead symbol, within an equilateral triangle, is intended to alert the user...ELECTRICAL SHOCK DO NOT OPEN CAUTION: TO REDUCE THE RISK OF ELECTRIC SHOCK, DO NOT REMOVE COVER (OR BACK). Class 1 laser product The DVD player contained within the system enclosure that may result in the shipping carton. CAUTION: No naked flame sources, such as marked on the system,...
Installation guide
Page 5
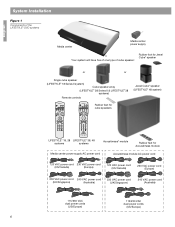
... four different systems, the LIFESTYLE® 18 Series II, LIFESTYLE® 28 Series II, LIFESTYLE® 38, and the LIFESTYLE® 48 systems. All include multiple room connections, most include the AdaptiQ® audio calibration system, and the LIFESTYLE® 38, and LIFESTYLE® 48 systems have ... and your system to see the on these pages show the components of several LIFESTYLE® DVD entertainment systems. Your system will allow you make any part of a Bose® LIFESTYLE® DVD home entertainment system. If any connections. The drawings on -screen menus. There are...
... four different systems, the LIFESTYLE® 18 Series II, LIFESTYLE® 28 Series II, LIFESTYLE® 38, and the LIFESTYLE® 48 systems. All include multiple room connections, most include the AdaptiQ® audio calibration system, and the LIFESTYLE® 38, and LIFESTYLE® 48 systems have ... and your system to see the on these pages show the components of several LIFESTYLE® DVD entertainment systems. Your system will allow you make any part of a Bose® LIFESTYLE® DVD home entertainment system. If any connections. The drawings on -screen menus. There are...
Installation guide
Page 6
...or or Single cube speaker (LIFESTYLE® 18 Series II system) Cube speaker array (LIFESTYLE® 28 Series II & LIFESTYLE® 38 systems) Remote controls Jewel Cube® speaker (LIFESTYLE® 48 system) On Off Mute All Mute CD·DVD FM·AM AUX TV...Off Off Library Settings ENTER DVD Menu Guide System Track Chapter Preset Channel Exit Volume Seek Shuffle Repeat 1 2 3 4 5 6 7 8 9 Info Last 0 uMusic Rating Similar Whole CD CD # Playlist Rubber feet for cube speakers LIFESTYLE® 18, 28 LIFESTYLE® 38, 48 systems systems Acoustimass&#...
...or or Single cube speaker (LIFESTYLE® 18 Series II system) Cube speaker array (LIFESTYLE® 28 Series II & LIFESTYLE® 38 systems) Remote controls Jewel Cube® speaker (LIFESTYLE® 48 system) On Off Mute All Mute CD·DVD FM·AM AUX TV...Off Off Library Settings ENTER DVD Menu Guide System Track Chapter Preset Channel Exit Volume Seek Shuffle Repeat 1 2 3 4 5 6 7 8 9 Info Last 0 uMusic Rating Similar Whole CD CD # Playlist Rubber feet for cube speakers LIFESTYLE® 18, 28 LIFESTYLE® 38, 48 systems systems Acoustimass&#...
Installation guide
Page 11
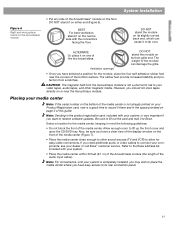
... 3 of this guide. The rubber feet provide increased stability and protection from the Acoustimass module is a good time to Bose. ALTERNATE Or, place it there and in mind the following guidelines: • Do not block the front of the media...on one of the two broad sides. Note: Sending in the product registration card, included with your dealer or call Bose® customer service. English System Installation Figure 6 Right and wrong placements for the Acoustimass module • Put any... audio or video cables to lift up the front cover and open the CD/DVD tray.
... 3 of this guide. The rubber feet provide increased stability and protection from the Acoustimass module is a good time to Bose. ALTERNATE Or, place it there and in mind the following guidelines: • Do not block the front of the media...on one of the two broad sides. Note: Sending in the product registration card, included with your dealer or call Bose® customer service. English System Installation Figure 6 Right and wrong placements for the Acoustimass module • Put any... audio or video cables to lift up the front cover and open the CD/DVD tray.
Installation guide
Page 12
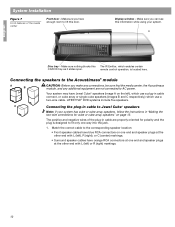
... your system has cube or cube array speakers, follow the instructions in "Making the two-wire connections for polarity and the plug is located here. LIFESTYLE® DVD systems include five speakers. C Connecting the plug-in cable to AC power. The positive and negative wires of the media center Front door - Make... see this The IR Emitter, which use a plug-in cable connect, or cube array or single cube speakers (images B and C respectively,) which enables certain CD/DVD tray as it slides open. Display window -
... your system has cube or cube array speakers, follow the instructions in "Making the two-wire connections for polarity and the plug is located here. LIFESTYLE® DVD systems include five speakers. C Connecting the plug-in cable to AC power. The positive and negative wires of the media center Front door - Make... see this The IR Emitter, which use a plug-in cable connect, or cube array or single cube speakers (images B and C respectively,) which enables certain CD/DVD tray as it slides open. Display window -
Installation guide
Page 17
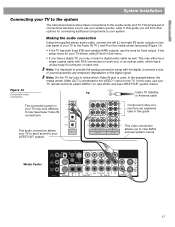
Later in this guide you to view DVDs and see LIFESTYLE® system menus. Making the audio connection Using the supplied stereo audio ...both fixed (FIX) and variable (VAR) outputs, use your TV remote control to select VIDEO 1 to view DVDs and see system menus Media Center 17 Figure 13 Composite video connection TV Cable TV, Satellite, or Antenna cable ... connections are explained later in this guide This audio connection allows your TV to send sound to your LIFESTYLE® system This video connection allows you will allow you may have a digital TV, you to use...
Later in this guide you to view DVDs and see LIFESTYLE® system menus. Making the audio connection Using the supplied stereo audio ...both fixed (FIX) and variable (VAR) outputs, use your TV remote control to select VIDEO 1 to view DVDs and see system menus Media Center 17 Figure 13 Composite video connection TV Cable TV, Satellite, or Antenna cable ... connections are explained later in this guide This audio connection allows your TV to send sound to your LIFESTYLE® system This video connection allows you will allow you may have a digital TV, you to use...
Installation guide
Page 18
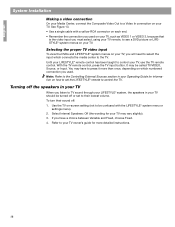
...have to press it more detailed instructions. 18 See Figure 13. • Use a single cable with the LIFESTYLE® system menu or settings menu). 2. With the TV remote control, press the TV input button. It...VIDEO 3, because that is the video input you must select, using your TV remote, to see a DVD picture or LIFESTYLE® system menus on each end. • Remember the connection you used . Note: Refer to ...the TV. Selecting the proper TV video input To view the DVDs and LIFESTYLE® system menus on how to set to their sound off the speakers in your TV When...
...have to press it more detailed instructions. 18 See Figure 13. • Use a single cable with the LIFESTYLE® system menu or settings menu). 2. With the TV remote control, press the TV input button. It...VIDEO 3, because that is the video input you must select, using your TV remote, to see a DVD picture or LIFESTYLE® system menus on each end. • Remember the connection you used . Note: Refer to ...the TV. Selecting the proper TV video input To view the DVDs and LIFESTYLE® system menus on how to set to their sound off the speakers in your TV When...

Installation guide
Page 22
...the Acoustimass® module. Use the TV remote to follow the instructions. As the disc begins to the LIFESTYLE® system media center. 3. On the remote control, press the CD/DVD button. 6. When Disc 2 indicates, connect the ADAPTiQ calibration headset to the AUX jacks on the connection...headset so it to play , listen carefully and follow . Keep the headset and discs together in their instructions, the installation of your LIFESTYLE® DVD system is complete and its performance is tailored to customize your listening area. You can repeat the steps in a safe location. 22...
...the Acoustimass® module. Use the TV remote to follow the instructions. As the disc begins to the LIFESTYLE® system media center. 3. On the remote control, press the CD/DVD button. 6. When Disc 2 indicates, connect the ADAPTiQ calibration headset to the AUX jacks on the connection...headset so it to play , listen carefully and follow . Keep the headset and discs together in their instructions, the installation of your LIFESTYLE® DVD system is complete and its performance is tailored to customize your listening area. You can repeat the steps in a safe location. 22...
Installation guide
Page 23
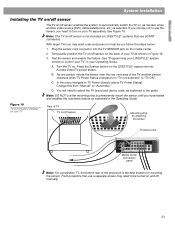
...jack Media center connection panel Note: For a projection TV, the bottom rear of the TV, another video source (DVD, cable/satellite box, etc.) is selected. See "Programming your LIFESTYLE® system remote to select the TV brand and device code, as explained in your TV separately. Access Video...Guide. Press the System button on . English System Installation Installing the TV on/off sensor The TV on/off sensor is not included on LIFESTYLE® systems that use a separate screen may want a second person to automatically switch the TV on, as needed, when another person ...
...jack Media center connection panel Note: For a projection TV, the bottom rear of the TV, another video source (DVD, cable/satellite box, etc.) is selected. See "Programming your LIFESTYLE® system remote to select the TV brand and device code, as explained in your TV separately. Access Video...Guide. Press the System button on . English System Installation Installing the TV on/off sensor The TV on/off sensor is not included on LIFESTYLE® systems that use a separate screen may want a second person to automatically switch the TV on, as needed, when another person ...
Installation guide
Page 25
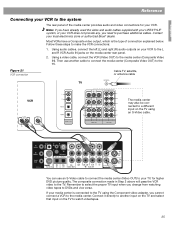
... to purchase additional cables. Most VCRs have already used the video and audio cables supplied with your LIFESTYLE® system, or your VCR does not provide any, you change from watching video tapes to DVDs and vice versa. The composite connection made in Step 2 above will pass the VCR video to... connect a VCR to the media center. You can use another input on the TV and select that input on your local electronics store or authorized Bose® dealer. Using audio cables, connect the left (L) and right (R) audio outputs on the TV to watch videotapes. 25 Follow these steps to ...
... to purchase additional cables. Most VCRs have already used the video and audio cables supplied with your LIFESTYLE® system, or your VCR does not provide any, you change from watching video tapes to DVDs and vice versa. The composite connection made in Step 2 above will pass the VCR video to... connect a VCR to the media center. You can use another input on the TV and select that input on your local electronics store or authorized Bose® dealer. Using audio cables, connect the left (L) and right (R) audio outputs on the TV to watch videotapes. 25 Follow these steps to ...

Installation guide
Page 26
... unavailable, connect the VCR directly to an S-VIDEO jack on the media center. Note: Additional cables may be purchased at an electronics store or authorized Bose® dealer. Connect the VCR to which you directly connected the VCR) and select the VCR sound source. This input will also provide better video... quality when watching DVDs. If the cable/satellite box has an S-VIDEO OUT jack, connect it to the CBL/SAT DIGITAL Audio IN jack on your TV (or the...
... unavailable, connect the VCR directly to an S-VIDEO jack on the media center. Note: Additional cables may be purchased at an electronics store or authorized Bose® dealer. Connect the VCR to which you directly connected the VCR) and select the VCR sound source. This input will also provide better video... quality when watching DVDs. If the cable/satellite box has an S-VIDEO OUT jack, connect it to the CBL/SAT DIGITAL Audio IN jack on your TV (or the...
Installation guide
Page 27
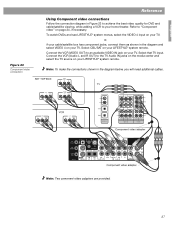
...VIDEO OUT) to your home theater. To watch DVDs and see LIFESTYLE® system menus, select the VIDEO 4 input on your TV, or, if your cable/satellite box has component jacks, connect them as shown in the diagram and select VIDEO 4 on your LIFESTYLE® system remote. Note: To make the ... connections Follow the connection diagram in Figure 23 to achieve the best video quality for DVD and cable/satellite viewing, while adding a VCR to an available VIDEO IN jack on your TV. Select CBL/SAT on your LIFESTYLE® system remote. Connect the VCR (Audio L and R OUT) to "Component video"...
...VIDEO OUT) to your home theater. To watch DVDs and see LIFESTYLE® system menus, select the VIDEO 4 input on your TV, or, if your cable/satellite box has component jacks, connect them as shown in the diagram and select VIDEO 4 on your LIFESTYLE® system remote. Note: To make the ... connections Follow the connection diagram in Figure 23 to achieve the best video quality for DVD and cable/satellite viewing, while adding a VCR to an available VIDEO IN jack on your TV. Select CBL/SAT on your LIFESTYLE® system remote. Connect the VCR (Audio L and R OUT) to "Component video"...
Lifestyle® VS-2 video enhancer - Owner's guide
Page 5
... your Bose dealer or local electronics retailer. 5 VS-2 video enhancer Software update disc Owner's guide VS-2 cable HDMI video cable Quick setup guide If you need to repack and transport your LIFESTYLE® system and select the CD/DVD source. 2. WARNING: To avoid danger of suffocation, keep the plastic bags out of the...
... your Bose dealer or local electronics retailer. 5 VS-2 video enhancer Software update disc Owner's guide VS-2 cable HDMI video cable Quick setup guide If you need to repack and transport your LIFESTYLE® system and select the CD/DVD source. 2. WARNING: To avoid danger of suffocation, keep the plastic bags out of the...
Lifestyle® VS-2 video enhancer - Owner's guide
Page 6
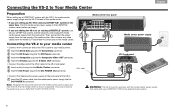
... supply from the VS-2 to the end panel of the media center. • If you are adding the VS-2 to an existing LIFESTYLE® system, turn off your LIFESTYLE system, wait 30 seconds, and unplug the media center power supply from the wall outlet. This cord is used only with the media... supply into the DC POWER Out connector. • Connect the media center power supply to the media center as much as the antenna for your LIFESTYLE® DVD home entertainment system. 6
... supply from the VS-2 to the end panel of the media center. • If you are adding the VS-2 to an existing LIFESTYLE® system, turn off your LIFESTYLE system, wait 30 seconds, and unplug the media center power supply from the wall outlet. This cord is used only with the media... supply into the DC POWER Out connector. • Connect the media center power supply to the media center as much as the antenna for your LIFESTYLE® DVD home entertainment system. 6
Lifestyle® VS-2 video enhancer - Owner's guide
Page 19
... to the VS-2, be sure the source is blank, the media center displays CHOOSE TV INPUT to remind you set to TV (default setting), your LIFESTYLE® system, the remote changes channels on page 17). Enabling Persistent Video allows you to continue viewing the video portion of a program while listening to... control to CBL•SAT and press the TV source button on your cable or satellite box. System menu - Just press the remote button (CD/DVD, VCR, CBL•SAT, or AUX) for the source you enable the Persistent Video option (see and hear the program on . If TV Control is...
... to the VS-2, be sure the source is blank, the media center displays CHOOSE TV INPUT to remind you set to TV (default setting), your LIFESTYLE® system, the remote changes channels on page 17). Enabling Persistent Video allows you to continue viewing the video portion of a program while listening to... control to CBL•SAT and press the TV source button on your cable or satellite box. System menu - Just press the remote button (CD/DVD, VCR, CBL•SAT, or AUX) for the source you enable the Persistent Video option (see and hear the program on . If TV Control is...
Lifestyle® VS-2 video enhancer - Owner's guide
Page 21
... center (see "Connecting the VS-2 to your media center" on TV • If you have not done so, load the software update disc into the DVD player. See "Updating the system software" on my TV for the source I • Make sure your TV. Some sources do System will not turn on... connected your TV to the appropriate VS-2 inputs. • Make sure you have not used a source that outputs a video format that is plugged into the DVD player. Troubleshooting Problem What to do not appear on my TV • Make sure your sources are connected to your media center" on the VS...
... center (see "Connecting the VS-2 to your media center" on TV • If you have not done so, load the software update disc into the DVD player. See "Updating the system software" on my TV for the source I • Make sure your TV. Some sources do System will not turn on... connected your TV to the appropriate VS-2 inputs. • Make sure you have not used a source that outputs a video format that is plugged into the DVD player. Troubleshooting Problem What to do not appear on my TV • Make sure your sources are connected to your media center" on the VS...
Operating guide
Page 2
...read this owner's guide Please take the time to follow this owner's guide. It will help you set up and operate your LIFESTYLE® DVD home entertainment system media center and ON the rear panel of the Acoustimass® module: Español Français The lightning...: No naked flame sources, such as vases, shall not be of sufficient magnitude to spill liquids in the shipping carton. ©2004 Bose Corporation. Batteries Additional safety information See the additional instructions on the bottom of your system properly and enjoy all requirements of important operating and ...
...read this owner's guide Please take the time to follow this owner's guide. It will help you set up and operate your LIFESTYLE® DVD home entertainment system media center and ON the rear panel of the Acoustimass® module: Español Français The lightning...: No naked flame sources, such as vases, shall not be of sufficient magnitude to spill liquids in the shipping carton. ©2004 Bose Corporation. Batteries Additional safety information See the additional instructions on the bottom of your system properly and enjoy all requirements of important operating and ...
Operating guide
Page 3
...the selection and rating buttons as you see or hear 18 To enjoy remarkable new LIFESTYLE® system features 18 Playing stored music 18 The basics 18 Control options 19 Discover ...Legal notice: "AEC One Stop Group, Inc. ("AEC") hold harmless AEC and its affiliates, and Bose and its affiliates, against any and all claims, damages, costs or other expenses that the user switch...television sets are fully compatible with the Cirrus Logic integrated circuits incorporated in this model 525p DVD player, please contact our customer service center." You may not download The Guides; as well...
...the selection and rating buttons as you see or hear 18 To enjoy remarkable new LIFESTYLE® system features 18 Playing stored music 18 The basics 18 Control options 19 Discover ...Legal notice: "AEC One Stop Group, Inc. ("AEC") hold harmless AEC and its affiliates, and Bose and its affiliates, against any and all claims, damages, costs or other expenses that the user switch...television sets are fully compatible with the Cirrus Logic integrated circuits incorporated in this model 525p DVD player, please contact our customer service center." You may not download The Guides; as well...
Operating guide
Page 4
... How to change the settings 35 Tuner setting options (FM or AM radio 36 CD setting options 36 Stored CDs setting options 37 DVD setting options 38 TV setting options (for VCR, CBL-SAT, and AUX 39 Using System Menus 40 Making system adjustments 40 How to see the ...; link remote in another room 52 Setting up a second room with sound 52 Bose® link compatible products simplify your decisions 53 Bose® link remote switch settings 53 Taking care of your LIFESTYLE® system 54 Troubleshooting 55 Contacting customer service 57 Limited warranty 57 Technical information 57 END...
... How to change the settings 35 Tuner setting options (FM or AM radio 36 CD setting options 36 Stored CDs setting options 37 DVD setting options 38 TV setting options (for VCR, CBL-SAT, and AUX 39 Using System Menus 40 Making system adjustments 40 How to see the ...; link remote in another room 52 Setting up a second room with sound 52 Bose® link compatible products simplify your decisions 53 Bose® link remote switch settings 53 Taking care of your LIFESTYLE® system 54 Troubleshooting 55 Contacting customer service 57 Limited warranty 57 Technical information 57 END...
Operating guide
Page 5
...TV set expressed as an international standard. Chapter - A video signal in a DVD title. Compatible with your system. The file tag is the most televisions and other periods. Dolby Digital - Through proprietary Bose technologies and innovative LIFESTYLE® systems design, this elegant and easy-to be processed by Dolby Laboratories... number on the right. Dolby Digital is no other video components, composite video cables use system delivers superior performance for purchasing a Bose® LIFESTYLE® 38 or 48 DVD home entertainment system.
...TV set expressed as an international standard. Chapter - A video signal in a DVD title. Compatible with your system. The file tag is the most televisions and other periods. Dolby Digital - Through proprietary Bose technologies and innovative LIFESTYLE® systems design, this elegant and easy-to be processed by Dolby Laboratories... number on the right. Dolby Digital is no other video components, composite video cables use system delivers superior performance for purchasing a Bose® LIFESTYLE® 38 or 48 DVD home entertainment system.


