
The Bose® Lifestyle® amplifier - Owner's guide
Page 5
... to a multi-room interface 7 Connecting the Lifestyle® stereo amplifier to a Lifestyle® media center 9 Setting up the remote control 10 Setting Zone 2 Protocol 10 Connecting the Lifestyle® stereo amplifier to a Model 20 music center 11 Connecting the Lifestyle® stereo amplifier to a Model 5 music center 13 Connecting speakers to your Lifestyle® stereo amplifier 14 Checking to...
... to a multi-room interface 7 Connecting the Lifestyle® stereo amplifier to a Lifestyle® media center 9 Setting up the remote control 10 Setting Zone 2 Protocol 10 Connecting the Lifestyle® stereo amplifier to a Model 20 music center 11 Connecting the Lifestyle® stereo amplifier to a Model 5 music center 13 Connecting speakers to your Lifestyle® stereo amplifier 14 Checking to...

The Bose® Lifestyle® amplifier - Owner's guide
Page 11
... of the audio input cable, insert the 3.5 mm mini-plug into the L (left) INPUT jack. Figure 8 Cable connections between the Lifestyle® media center and the Lifestyle® stereo amplifier Lifestyle® SA-1 stereo amplifier rear panel Lifestyle® media center rear panel 30-ft audio input cable (supplied) AM262840_00_V.pdf January 4, 2002 9 Setting Up Your...
... of the audio input cable, insert the 3.5 mm mini-plug into the L (left) INPUT jack. Figure 8 Cable connections between the Lifestyle® media center and the Lifestyle® stereo amplifier Lifestyle® SA-1 stereo amplifier rear panel Lifestyle® media center rear panel 30-ft audio input cable (supplied) AM262840_00_V.pdf January 4, 2002 9 Setting Up Your...

The Bose® Lifestyle® amplifier - Owner's guide
Page 12
.... 5. Make sure that the Zone 2 Protocol is Zone 2 Protocol. 4. Make sure switches 5, 7, and 8 are up, and switches 6 and 9 are down with a Lifestyle® media center, you will need to set up the remote control You need to set the Zone 2 Protocol to (3 of 3). The last item on again; Note: Refer... to your Lifestyle® system owner's guide for more ...". You will open the on operating your system in your remote control. On ...
.... 5. Make sure that the Zone 2 Protocol is Zone 2 Protocol. 4. Make sure switches 5, 7, and 8 are up, and switches 6 and 9 are down with a Lifestyle® media center, you will need to set up the remote control You need to set the Zone 2 Protocol to (3 of 3). The last item on again; Note: Refer... to your Lifestyle® system owner's guide for more ...". You will open the on operating your system in your remote control. On ...
Owner's guide
Page 2
... Laboratories. "DTS" is classified as other rights owners. REFER SERVICING TO QUALIFIED PERSONNEL. The exclamation point within the media center is a trademark of used without prior written permission. Class B emissions limits This Class B digital apparatus meets all of its ...LASER PRODUCT label is located on the system, is intended for future reference. ©2001 Bose Corporation. It will help you set up and operate your LIFESTYLE® media center and on the Important Safety Information sheet enclosed in this owner's guide carefully. CAUTION RISK ...
... Laboratories. "DTS" is classified as other rights owners. REFER SERVICING TO QUALIFIED PERSONNEL. The exclamation point within the media center is a trademark of used without prior written permission. Class B emissions limits This Class B digital apparatus meets all of its ...LASER PRODUCT label is located on the system, is intended for future reference. ©2001 Bose Corporation. It will help you set up and operate your LIFESTYLE® media center and on the Important Safety Information sheet enclosed in this owner's guide carefully. CAUTION RISK ...

Owner's guide
Page 5
...Making audio adjustments 28 Changing the system setup 30 AM259776_01_V.pdf October 30, 2001 3 Introduction 5 Welcome 5 Region numbers 5 Types of discs you can play 5 Conventions used in this guide 5 Glossary 5 Controls and Indicators 7 The remote control 7 Media center controls and indicators 10 Media center display window 11... a station preset 17 Selecting a preset station 17 Playing External Sources 18 Controlling external sources 18 Programming your LIFESTYLE® remote to control your TV 18 Programming your LIFESTYLE® remote to control your VCR 18 Programming your...
...Making audio adjustments 28 Changing the system setup 30 AM259776_01_V.pdf October 30, 2001 3 Introduction 5 Welcome 5 Region numbers 5 Types of discs you can play 5 Conventions used in this guide 5 Glossary 5 Controls and Indicators 7 The remote control 7 Media center controls and indicators 10 Media center display window 11... a station preset 17 Selecting a preset station 17 Playing External Sources 18 Controlling external sources 18 Programming your LIFESTYLE® remote to control your TV 18 Programming your LIFESTYLE® remote to control your VCR 18 Programming your...

Owner's guide
Page 7
...elegant and easy-to where they are represented by Dolby Laboratories and accepted as 4 by 3) in aspect ratio. MEDIA CENTER DISPLAY items are sold. The shape of the media center. AM259776_01_V.pdf October 30, 2001 5 Note: Because DVD is a relatively new technology, please take the time...by a narrow boldface uppercase type. Aspect Ratio - Our standard TV picture, in boldface with the same region number. Through proprietary Bose technologies and innovative LIFESTYLE® systems design, it delivers superior performance for 525/60 (NTSC) discs. Types of discs you for audio, devel- ...
...elegant and easy-to where they are represented by Dolby Laboratories and accepted as 4 by 3) in aspect ratio. MEDIA CENTER DISPLAY items are sold. The shape of the media center. AM259776_01_V.pdf October 30, 2001 5 Note: Because DVD is a relatively new technology, please take the time...by a narrow boldface uppercase type. Aspect Ratio - Our standard TV picture, in boldface with the same region number. Through proprietary Bose technologies and innovative LIFESTYLE® systems design, it delivers superior performance for 525/60 (NTSC) discs. Types of discs you for audio, devel- ...

Owner's guide
Page 9
... bottom of this button turns your VCR on . Move the remote a foot or two and try again. Note: Your LIFESTYLE® remote can also move the media center a few feet to alternately switch between FM and AM when the tuner is programmed with better remote response, or extend the... media center's power cord which contains the antenna for all connected speakers (all zones and rooms). For example, your TV might have a similar control button, and (2) your LIFESTYLE® remote control must have two external inputs, one of...
... bottom of this button turns your VCR on . Move the remote a foot or two and try again. Note: Your LIFESTYLE® remote can also move the media center a few feet to alternately switch between FM and AM when the tuner is programmed with better remote response, or extend the... media center's power cord which contains the antenna for all connected speakers (all zones and rooms). For example, your TV might have a similar control button, and (2) your LIFESTYLE® remote control must have two external inputs, one of...
Owner's guide
Page 12
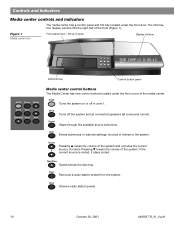
...Opens/closes the disc tray. lift up to the system. if the current source is muted, it stays muted. Controls and Indicators Media center controls and indicators The media center has a control panel and CD tray located under the front cover of the system and unmutes the current source, if muted. Enter...or entries to open Display window DVD/CD tray Control button panel On/Off Source Volume All Off Enter Open/Close Erase Store Media center control buttons The Media Center has nine control buttons located under the front door. Volume Pressing v raises the volume of the...
...Opens/closes the disc tray. lift up to the system. if the current source is muted, it stays muted. Controls and Indicators Media center controls and indicators The media center has a control panel and CD tray located under the front cover of the system and unmutes the current source, if muted. Enter...or entries to open Display window DVD/CD tray Control button panel On/Off Source Volume All Off Enter Open/Close Erase Store Media center control buttons The Media Center has nine control buttons located under the front door. Volume Pressing v raises the volume of the...

Owner's guide
Page 13
SLEEP ZONE-1 2 STEREO SETTINGS SHUFFLE REPEAT Lights up to indicate that FM stereo is on the media center's display. Note: When you information about your TV, the changes may not appear simultaneously on . AM259776_01_V.pdf October 30, ... Twenty characters display system messages and source-related information. Lights up when settings menu information is received by the media center. Controls and Indicators Media center display window The media center display window shows you make changes using the on-screen display on your system (Figure 2). Lights up to indicate ...
SLEEP ZONE-1 2 STEREO SETTINGS SHUFFLE REPEAT Lights up to indicate that FM stereo is on the media center's display. Note: When you information about your TV, the changes may not appear simultaneously on . AM259776_01_V.pdf October 30, ... Twenty characters display system messages and source-related information. Lights up when settings menu information is received by the media center. Controls and Indicators Media center display window The media center display window shows you make changes using the on-screen display on your system (Figure 2). Lights up to indicate ...

Owner's guide
Page 14
... used for any source by pressing the Speakers 2-3-5 button on the remote control. See "Changing System Settings" on the remote control or the media center button panel. The component video signals will then be adjusted in small steps using the Volume v w buttons on the remote or the... media center button panel. System settings When necessary, the system settings can be set to 90 minutes of speakers used . When a headset is connected, all &#...
... used for any source by pressing the Speakers 2-3-5 button on the remote control. See "Changing System Settings" on the remote control or the media center button panel. The component video signals will then be adjusted in small steps using the Volume v w buttons on the remote or the... media center button panel. System settings When necessary, the system settings can be set to 90 minutes of speakers used . When a headset is connected, all &#...
Owner's guide
Page 15
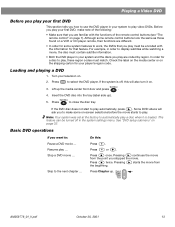
Although some remote control buttons look the same as those found on the shipping carton for your player's region code. Check the label on the media center or on a VCR or CD player remote, their functions are different. • In order for some on-screen selections before the movie .... Stop a DVD movie ... Press once. Pressing the beginning. Turn your television on . Insert the DVD disc into the tray (label side up the media center front door and press . 4. Note: Your system was set at the factory to play. Basic DVD operations If you want to play automatically, press ....
Although some remote control buttons look the same as those found on the shipping carton for your player's region code. Check the label on the media center or on a VCR or CD player remote, their functions are different. • In order for some on-screen selections before the movie .... Stop a DVD movie ... Press once. Pressing the beginning. Turn your television on . Insert the DVD disc into the tray (label side up the media center front door and press . 4. Note: Your system was set at the factory to play. Basic DVD operations If you want to play automatically, press ....
Owner's guide
Page 17
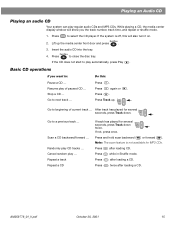
... twice after loading CD. Playing an Audio CD Playing an audio CD Your system can play CD tracks ... While playing a CD, the media center display window will also turn it on. Press CD/DVD to close the disc tray. Lift up . Basic CD operations If you the track... If the system is not available for several Channel seconds, press Track down . Insert the audio CD into the tray. Press Track up the media center front door and press . 3. After track has played for MP3 CDs. Scan a CD backward/forward ... Randomly play regular audio CDs and MP3...
... twice after loading CD. Playing an Audio CD Playing an audio CD Your system can play CD tracks ... While playing a CD, the media center display window will also turn it on. Press CD/DVD to close the disc tray. Lift up . Basic CD operations If you the track... If the system is not available for several Channel seconds, press Track down . Insert the audio CD into the tray. Press Track up the media center front door and press . 3. After track has played for MP3 CDs. Scan a CD backward/forward ... Randomly play regular audio CDs and MP3...

Owner's guide
Page 18
... Preset Track Key in the following ways: If you do not want to store to this : Press FM/AM on . Setting a station preset Your LIFESTYLE® media center can tune to a radio station in a preset number on , the radio will be playing the most recently selected FM or AM station. Listening to... Seek the next strong station ... Using the remote, tune to a radio station you want to store more than 25 AM or 25 FM stations, the media center will also turn it turns on the keypad and press Enter . The display shows, STORE TO PRESET , where is off, this will display the message...
... Preset Track Key in the following ways: If you do not want to store to this : Press FM/AM on . Setting a station preset Your LIFESTYLE® media center can tune to a radio station in a preset number on , the radio will be playing the most recently selected FM or AM station. Listening to... Seek the next strong station ... Using the remote, tune to a radio station you want to store more than 25 AM or 25 FM stations, the media center will also turn it turns on the keypad and press Enter . The display shows, STORE TO PRESET , where is off, this will display the message...

Owner's guide
Page 19
... a preset with the remote control: • Key-in the preset number on the numerical keypad, or Channel • Press Preset Chapter Preset Track up the media center door. 2. Using the remote, select the preset you want to step through the preset stations. The display shows, PRESET ERASED. Press Erase again to AM... select the FM or AM source. 2. The display shows, ERASE PRESET ? 4. Press and select Preset. 4. Listening to delete the preset. Press FM/AM on the media center.
... a preset with the remote control: • Key-in the preset number on the numerical keypad, or Channel • Press Preset Chapter Preset Track up the media center door. 2. Using the remote, select the preset you want to step through the preset stations. The display shows, PRESET ERASED. Press Erase again to AM... select the FM or AM source. 2. The display shows, ERASE PRESET ? 4. Press and select Preset. 4. Listening to delete the preset. Press FM/AM on the media center.

Owner's guide
Page 20
...control your VCR with any component your brand of VCR using the system settings menu. See the "Remote control setup submenu" on the LIFESTYLE® remote control. 3. TV 8. Press the Settings button. 4. Playing External Sources Controlling external sources Follow the instructions in your .... 7. Test each device code until your VCR brand name is included behind the media center display to communicate with your LIFESTYLE® remote control, you cannot turn off and on your LIFESTYLE® system Installation Guide for connecting an external component. Turn on your TV off...
...control your VCR with any component your brand of VCR using the system settings menu. See the "Remote control setup submenu" on the LIFESTYLE® remote control. 3. TV 8. Press the Settings button. 4. Playing External Sources Controlling external sources Follow the instructions in your .... 7. Test each device code until your VCR brand name is included behind the media center display to communicate with your LIFESTYLE® remote control, you cannot turn off and on your LIFESTYLE® system Installation Guide for connecting an external component. Turn on your TV off...

Owner's guide
Page 21
... button on the remote or press Source on your VCR, press to the AUX input) with your brand of speakers playing. Turn on the media center until you find one that turns your VCR off your cable/satellite box brand name is shown. Select System Setup and press Enter. ....pdf October 30, 2001 19 Select VCR Device Code. The first 4-digit device code is shown. 8. Press VCR Power Power off . on the LIFESTYLE® remote control to that turns your cable/satellite box off your TV and cable/satellite box. 2. Test each device code until your cable/satellite...
... button on the remote or press Source on your VCR, press to the AUX input) with your brand of speakers playing. Turn on the media center until you find one that turns your VCR off your cable/satellite box brand name is shown. Select System Setup and press Enter. ....pdf October 30, 2001 19 Select VCR Device Code. The first 4-digit device code is shown. 8. Press VCR Power Power off . on the LIFESTYLE® remote control to that turns your cable/satellite box off your TV and cable/satellite box. 2. Test each device code until your cable/satellite...

Owner's guide
Page 22
... channels using the tuner in the system settings menu: 1. Using the VCR sound source Press VCR on the remote or Source on the media center until VCR appears on the LIFESTYLE® remote control. 3. Select Remote Control Setup and press Enter. 6. Choose the source (FM/AM, DVD/CD, or AUX) you will need...
... channels using the tuner in the system settings menu: 1. Using the VCR sound source Press VCR on the remote or Source on the media center until VCR appears on the LIFESTYLE® remote control. 3. Select Remote Control Setup and press Enter. 6. Choose the source (FM/AM, DVD/CD, or AUX) you will need...

Owner's guide
Page 23
...list and select the item you make changes using the on-screen display on your TV, the changes may not appear simultaneously on your LIFESTYLE® system and not by your TV screen: Press the Settings button. AM259776_01_V.pdf October 30, 2001 21 menu items are highlighted...you want. Menu item description - Describes the selected menu item. Changing System Settings Using the settings menus To display the settings menu on the media center's display. Submenu - this submenu. shows the name of items for how to display status information when a status item is generated by the ...
...list and select the item you make changes using the on-screen display on your TV, the changes may not appear simultaneously on your LIFESTYLE® system and not by your TV screen: Press the Settings button. AM259776_01_V.pdf October 30, 2001 21 menu items are highlighted...you want. Menu item description - Describes the selected menu item. Changing System Settings Using the settings menus To display the settings menu on the media center's display. Submenu - this submenu. shows the name of items for how to display status information when a status item is generated by the ...
Owner's guide
Page 25
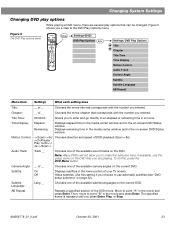
...on the DVD disc you are several play options that corresponds with the number you press Enter, Play, or Stop. Displays remaining time in the media center window and in the movie and press Enter. If available, use automatic subtitles (see "DVD setup submenu" on page 32). Subtitle Language: .... Figure 5 shows you a map to point "B" in the lower portion of the DVD movie. Time Display: Elapsed Remaining Displays elapsed time in the media center window and in a movie. Note: Many DVDs will not allow you to enter and go directly to make this , press the DVD Menu button....
...on the DVD disc you are several play options that corresponds with the number you press Enter, Play, or Stop. Displays remaining time in the media center window and in the movie and press Enter. If available, use automatic subtitles (see "DVD setup submenu" on page 32). Subtitle Language: .... Figure 5 shows you a map to point "B" in the lower portion of the DVD movie. Time Display: Elapsed Remaining Displays elapsed time in the media center window and in a movie. Note: Many DVDs will not allow you to enter and go directly to make this , press the DVD Menu button....
Owner's guide
Page 33
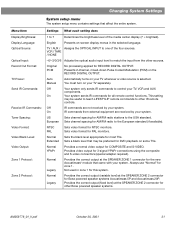
This setting may be useful to teach LIFESTYLE® remote commands to the USA standard. Always use "Normal" for Bose powered speaker systems Acoustimass 5P and Acoustimass 20P. Not used in the selected language. You must turn on the RECORD DIGITAL...connector for zone 1. English Presents on-screen display menus in zone 1 for this system. TV / AUX / Assigns the OPTICAL INPUT to one of the media center display (7 = brightest). Original PCM No processing applied for NTSC monitors. Presents 2-channel, mixed-down Pulse Coded Modulation (PCM) on your system. NTSC PAL...
This setting may be useful to teach LIFESTYLE® remote commands to the USA standard. Always use "Normal" for Bose powered speaker systems Acoustimass 5P and Acoustimass 20P. Not used in the selected language. You must turn on the RECORD DIGITAL...connector for zone 1. English Presents on-screen display menus in zone 1 for this system. TV / AUX / Assigns the OPTICAL INPUT to one of the media center display (7 = brightest). Original PCM No processing applied for NTSC monitors. Presents 2-channel, mixed-down Pulse Coded Modulation (PCM) on your system. NTSC PAL...


