Installation guide
Page 5
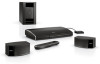
...intelligent integration system. Be sure to save all of your authorized Bose dealer immediately. Notify Bose or your new system are two phases to the setup process: Physical setup phase: Placing the system components and connecting them together. If... any necessary shipping or transporting. English TAB 2 TAB 3 TAB 4 Welcome Thank you for any part appears damaged, do not attempt to use it. These provide the safest means for choosing a Bose® LIFESTYLE® 235...
...intelligent integration system. Be sure to save all of your authorized Bose dealer immediately. Notify Bose or your new system are two phases to the setup process: Physical setup phase: Placing the system components and connecting them together. If... any necessary shipping or transporting. English TAB 2 TAB 3 TAB 4 Welcome Thank you for any part appears damaged, do not attempt to use it. These provide the safest means for choosing a Bose® LIFESTYLE® 235...
Installation guide
Page 6
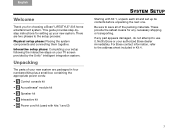
TAB 8 TAB 7 SYSTEM SETUP TAB 6 11 Control console kit What you need for easy access to keep the control console positioned for the following steps: From Kit 1 TAB 5 TAB 4 TAB 3 TAB 2 English 1. Place the control console on a flat, stable surface near your system is completely installed, it may be helpful to its rear connection panel. Control console Power supply Audio input cable From the power cord kit HDMI® Cable Power cord 2 Control console Note: Until your TV.
TAB 8 TAB 7 SYSTEM SETUP TAB 6 11 Control console kit What you need for easy access to keep the control console positioned for the following steps: From Kit 1 TAB 5 TAB 4 TAB 3 TAB 2 English 1. Place the control console on a flat, stable surface near your system is completely installed, it may be helpful to its rear connection panel. Control console Power supply Audio input cable From the power cord kit HDMI® Cable Power cord 2 Control console Note: Until your TV.
Installation guide
Page 7
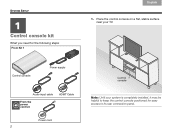
TAB 5 TAB 6 TAB 7 TAB 8 SYSTEM SETUP 3. HDMI OUT Video to an HDMI input on your TV, you are using into an HDMI INPUT connector on your TV. Just disconnect the other end of the HDMI® cable into the connector labeled HDMI OUT Video to TV on the control console. Plug one end of the HDMI cable you can use this connected cable. If an HDMI cable is already connected to TV 3 English TAB 2 TAB 3 TAB 4 2. Plug the other end.
TAB 5 TAB 6 TAB 7 TAB 8 SYSTEM SETUP 3. HDMI OUT Video to an HDMI input on your TV, you are using into an HDMI INPUT connector on your TV. Just disconnect the other end of the HDMI® cable into the connector labeled HDMI OUT Video to TV on the control console. Plug one end of the HDMI cable you can use this connected cable. If an HDMI cable is already connected to TV 3 English TAB 2 TAB 3 TAB 4 2. Plug the other end.

Installation guide
Page 8
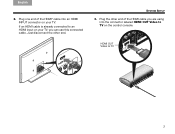
... the floor. TAB 4 TAB 3 TAB 2 English 5. Make sure you push the plug in as far as it while setting up . TAB 8 TAB 7 TAB 6 TAB 5 SYSTEM SETUP 4.
... the floor. TAB 4 TAB 3 TAB 2 English 5. Make sure you push the plug in as far as it while setting up . TAB 8 TAB 7 TAB 6 TAB 5 SYSTEM SETUP 4.

Installation guide
Page 9
Lay the module on the floor at the same end of the room as the TV. Acoustimass module Acoustimass module From the power cord kit Power cord 2. English TAB 2 TAB 3 TAB 4 2 Acoustimass® module kit What you need for the following steps: From Kit 2 TAB 5 TAB 6 TAB 7 TAB 8 SYSTEM SETUP 1. Connector panel 5 Make sure there is a live AC outlet nearby. Place the Acoustimass module on its side and locate the connector panel.
Lay the module on the floor at the same end of the room as the TV. Acoustimass module Acoustimass module From the power cord kit Power cord 2. English TAB 2 TAB 3 TAB 4 2 Acoustimass® module kit What you need for the following steps: From Kit 2 TAB 5 TAB 6 TAB 7 TAB 8 SYSTEM SETUP 1. Connector panel 5 Make sure there is a live AC outlet nearby. Place the Acoustimass module on its side and locate the connector panel.

Installation guide
Page 10
... of the power cord into the AC Power connector on the Acoustimass module. Plug the other end of the module. AC Power 6. TAB 8 TAB 7 SYSTEM SETUP TAB 6 TAB 5 CAUTION: DO NOT stand the Acoustimass® module on the next page. 6 Make sure the flat surface with Kit 3 on its front or...
... of the power cord into the AC Power connector on the Acoustimass module. Plug the other end of the module. AC Power 6. TAB 8 TAB 7 SYSTEM SETUP TAB 6 TAB 5 CAUTION: DO NOT stand the Acoustimass® module on the next page. 6 Make sure the flat surface with Kit 3 on its front or...
Installation guide
Page 11
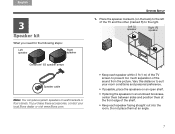
TAB 5 TAB 6 TAB 7 TAB 8 SYSTEM SETUP 1. Do not place them at an angle. 7 Place the speaker marked L (on an open shelf. • If placing the speakers in an enclosed bookcase, center ... conditions and personal preference. • If possible, place the speakers on the back) to the right. Vary this distance to suit your local Bose dealer or visit www.Bose.com. Left (L) speaker Right (R) speaker • Keep each speaker facing straight out into the room. English TAB 2 TAB 3 TAB 4 3 Speaker kit What you...
TAB 5 TAB 6 TAB 7 TAB 8 SYSTEM SETUP 1. Do not place them at an angle. 7 Place the speaker marked L (on an open shelf. • If placing the speakers in an enclosed bookcase, center ... conditions and personal preference. • If possible, place the speakers on the back) to the right. Vary this distance to suit your local Bose dealer or visit www.Bose.com. Left (L) speaker Right (R) speaker • Keep each speaker facing straight out into the room. English TAB 2 TAB 3 TAB 4 3 Speaker kit What you...
Installation guide
Page 12
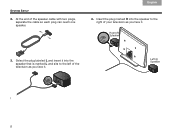
TAB 4 TAB 3 TAB 2 English 4. Insert the plug marked R into the speaker that is marked L and sits to the right of your television as you face it. Select the plug labeled L and insert it . Left (L) Speaker 8 At the end of the television as you face it into the speaker to the left of the speaker cable with two plugs, separate the cable so each plug can reach one speaker. Right (R) Speaker 3. TAB 8 TAB 7 TAB 6 TAB 5 SYSTEM SETUP 2.
TAB 4 TAB 3 TAB 2 English 4. Insert the plug marked R into the speaker that is marked L and sits to the right of your television as you face it. Select the plug labeled L and insert it . Left (L) Speaker 8 At the end of the television as you face it into the speaker to the left of the speaker cable with two plugs, separate the cable so each plug can reach one speaker. Right (R) Speaker 3. TAB 8 TAB 7 TAB 6 TAB 5 SYSTEM SETUP 2.
Installation guide
Page 13
... to the module for long periods of the module. This can use the supplied rubber feet on either side (ALTERNATE). TAB 5 TAB 6 TAB 7 TAB 8 SYSTEM SETUP • When the position is determined, you open Kit 4. Tighten each fastener screw by hand to overheat. 7. Fastener screw 6. The magnetic field surrounding the module...
... to the module for long periods of the module. This can use the supplied rubber feet on either side (ALTERNATE). TAB 5 TAB 6 TAB 7 TAB 8 SYSTEM SETUP • When the position is determined, you open Kit 4. Tighten each fastener screw by hand to overheat. 7. Fastener screw 6. The magnetic field surrounding the module...

Installation guide
Page 14
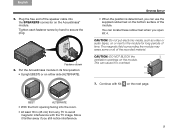
...final positions. • Do not connect any devices to the control console at this time. Slide the battery compartment cover off the back of the setup process using the UnifyTM intelligent integration system. TAB 4 TAB 3 TAB 2 English IMPORTANT! • Before you have set up the control console, ...the Acoustimass® module, and the speakers. Slide the battery cover back into place. 10 TAB 8 TAB 7 SYSTEM SETUP TAB 6 4 Interactive kit What you when to do this. 1. The instructions provided on your TV will tell you need for the following steps:...
...final positions. • Do not connect any devices to the control console at this time. Slide the battery compartment cover off the back of the setup process using the UnifyTM intelligent integration system. TAB 4 TAB 3 TAB 2 English IMPORTANT! • Before you have set up the control console, ...the Acoustimass® module, and the speakers. Slide the battery cover back into place. 10 TAB 8 TAB 7 SYSTEM SETUP TAB 6 4 Interactive kit What you when to do this. 1. The instructions provided on your TV will tell you need for the following steps:...
Installation guide
Page 15
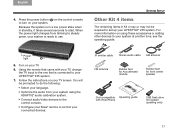
TAB 5 TAB 6 TAB 7 TAB 8 SYSTEM SETUP Other Kit 4 items The remaining items in standby, it takes...® audio calibration system. • Connect audio/video devices to the control console. • Configure your Bose® remote to your TV screen. When the power light changes from your system using these accessories or adding... • Select your language. • Optimize the audio from blinking to your system. Turn on your LIFESTYLE® 235 system. 7. IR emitter cable Stereo audio cable AM antenna FM antenna Rubber feet for Acoustimass® module Rubber...
TAB 5 TAB 6 TAB 7 TAB 8 SYSTEM SETUP Other Kit 4 items The remaining items in standby, it takes...® audio calibration system. • Connect audio/video devices to the control console. • Configure your Bose® remote to your TV screen. When the power light changes from your system using these accessories or adding... • Select your language. • Optimize the audio from blinking to your system. Turn on your LIFESTYLE® 235 system. 7. IR emitter cable Stereo audio cable AM antenna FM antenna Rubber feet for Acoustimass® module Rubber...

Installation guide
Page 16
...glass or highly polished wood. See the address sheet included in the U.S. and other countries. ©2010 Bose Corporation. No part of speaker TAB 4 TAB 3 TAB 2 English If you have setup problems If you experience any problems, see the troubleshooting table in solving problems, contact... Bose® Customer Service. Rubber feet for greater stability. See "Using the Setup Mode" in your system operating guide. iPod and iPhone are...
...glass or highly polished wood. See the address sheet included in the U.S. and other countries. ©2010 Bose Corporation. No part of speaker TAB 4 TAB 3 TAB 2 English If you have setup problems If you experience any problems, see the troubleshooting table in solving problems, contact... Bose® Customer Service. Rubber feet for greater stability. See "Using the Setup Mode" in your system operating guide. iPod and iPhone are...
Owner's guide
Page 7
English TAB 2 TAB 3 TAB 4 TAB 5 TAB 6 TAB 7 TAB 8 LISTENING TO THE RADIO (ON 235, V25, AND V35 SYSTEMS ONLY) 13 Selecting the radio 13 Tuning to a station 13 Storing a preset station 13 Recalling a preset station 13 Deleting a preset station ... button function 14 Button function definitions 14 Changing system options 15 OPTIONS menu 16 REVIEWING YOUR SETUP SELECTIONS 18 Adjusting the system setup 18 Choices in the menu 18 ADDING SOUND TO ANOTHER ROOM 19 Expanding your 235, V35, or V25 system (Not available on T20, T10 systems, or in Japan.) . . 19 Expansion...
English TAB 2 TAB 3 TAB 4 TAB 5 TAB 6 TAB 7 TAB 8 LISTENING TO THE RADIO (ON 235, V25, AND V35 SYSTEMS ONLY) 13 Selecting the radio 13 Tuning to a station 13 Storing a preset station 13 Recalling a preset station 13 Deleting a preset station ... button function 14 Button function definitions 14 Changing system options 15 OPTIONS menu 16 REVIEWING YOUR SETUP SELECTIONS 18 Adjusting the system setup 18 Choices in the menu 18 ADDING SOUND TO ANOTHER ROOM 19 Expanding your 235, V35, or V25 system (Not available on T20, T10 systems, or in Japan.) . . 19 Expansion...
Owner's guide
Page 13
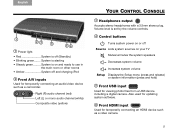
... Accepts stereo headphones with a 3.5mm stereo plug. Volume level is on your TV Mutes/unmutes the system speakers Decreases system volume Increases system volume Setup Displays the Setup menu (press and release) or system information (press and hold) 5 Front USB input Used for temporarily connecting an HDMI device such as a camcorder. Also...
... Accepts stereo headphones with a 3.5mm stereo plug. Volume level is on your TV Mutes/unmutes the system speakers Decreases system volume Increases system volume Setup Displays the Setup menu (press and release) or system information (press and hold) 5 Front USB input Used for temporarily connecting an HDMI device such as a camcorder. Also...

Owner's guide
Page 14
... decide to access the power controls for use the remote that came with your TV screen. Otherwise, use . Setup Pressing the Setup button on the console also starts your system and displays the Setup menu on your system Press the power button on the remote or on the control console. Pressing the remote... the shutdown using the onscreen controls. 6 The system is now ready for connected devices, automatic shutdown will shut down your remote in the Unify™ setup menu, press the TV power button on your TV.
... decide to access the power controls for use the remote that came with your TV screen. Otherwise, use . Setup Pressing the Setup button on the console also starts your system and displays the Setup menu on your system Press the power button on the remote or on the control console. Pressing the remote... the shutdown using the onscreen controls. 6 The system is now ready for connected devices, automatic shutdown will shut down your remote in the Unify™ setup menu, press the TV power button on your TV.
Owner's guide
Page 15
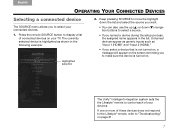
The currently selected device is turned on. The UnifyTM intelligent integration system sets the the Lifestyle® remote to select a source. • If you named a device during the setup process, the assigned name appears in the following example: Highlighted selection 2. Keep pressing SOURCE to move the ...is not turned on, a message will appear on the screen reminding you to display a list of these devices does not respond to the Lifestyle® remote, refer to select your TV. If one or more of connected devices on your connected devices. 1. Press the remote SOURCE...
The currently selected device is turned on. The UnifyTM intelligent integration system sets the the Lifestyle® remote to select a source. • If you named a device during the setup process, the assigned name appears in the following example: Highlighted selection 2. Keep pressing SOURCE to move the ...is not turned on, a message will appear on the screen reminding you to display a list of these devices does not respond to the Lifestyle® remote, refer to select your TV. If one or more of connected devices on your connected devices. 1. Press the remote SOURCE...

Owner's guide
Page 16
...-top box or the tuner built into your TV. 3. Press the remote SOURCE button and select the device that provides your TV to point the Bose® remote at your TV programs. 2. Tune to first select the input for channel numbers using any of the following methods: Enter the channel ... 6 TAB 5 OPERATING YOUR CONNECTED DEVICES Watching TV Your TV may need to operate it. Using the tuner in your TV to the LIFESTYLE® control console, it during the setup process. 1. Press the remote SOURCE button and select TV. 2. Tuning to a TV station You can tune to select a station from the ...
...-top box or the tuner built into your TV. 3. Press the remote SOURCE button and select the device that provides your TV to point the Bose® remote at your TV programs. 2. Tune to first select the input for channel numbers using any of the following methods: Enter the channel ... 6 TAB 5 OPERATING YOUR CONNECTED DEVICES Watching TV Your TV may need to operate it. Using the tuner in your TV to the LIFESTYLE® control console, it during the setup process. 1. Press the remote SOURCE button and select TV. 2. Tuning to a TV station You can tune to select a station from the ...
Owner's guide
Page 17
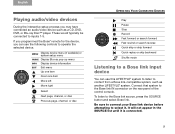
...the following controls to operate the selected device. These would typically be connected to the Bose link source, press the SOURCE button and select Bose link. MENU Display device menu (if available) or system setup menu GUIDE Display Blu-ray pop-up menu INFO Display device information EXIT Exit menu...rewind or search reverse Quick skip or skip forward Quick replay or skip backward Shuffle mode Listening to a Bose link input device You can use this LIFESTYLE® system to listen to content from a Bose link-compatible system, such as a CD, DVD, DVR, or Blu-ray Disc™ player. It...
...the following controls to operate the selected device. These would typically be connected to the Bose link source, press the SOURCE button and select Bose link. MENU Display device menu (if available) or system setup menu GUIDE Display Blu-ray pop-up menu INFO Display device information EXIT Exit menu...rewind or search reverse Quick skip or skip forward Quick replay or skip backward Shuffle mode Listening to a Bose link input device You can use this LIFESTYLE® system to listen to content from a Bose link-compatible system, such as a CD, DVD, DVR, or Blu-ray Disc™ player. It...
Owner's guide
Page 24
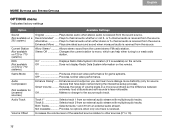
...other sources (0* to mono, which can hear movie dialogs more distinctly (only for source devices that have been named during the interactive setup process). Not Available Provides no change to a weak radio station. Plays simulated surround sound when monaural audio is available) on the remote.... Current Station (Not available on a 235 system.) Original Plays stereo audio when stereo audio is less noticeable. Stereo Off Changes the current station to 10). 16 Track 1 Selects ...
...other sources (0* to mono, which can hear movie dialogs more distinctly (only for source devices that have been named during the interactive setup process). Not Available Provides no change to a weak radio station. Plays simulated surround sound when monaural audio is available) on the remote.... Current Station (Not available on a 235 system.) Original Plays stereo audio when stereo audio is less noticeable. Stereo Off Changes the current station to 10). 16 Track 1 Selects ...
Owner's guide
Page 26
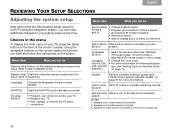
... 5 TAB 4 TAB 3 TAB 2 English REVIEWING YOUR SETUP SELECTIONS Adjusting the system setup After performing the initial system setup using the Unify™ intelligent integration system, you can make additional changes to Another Room" systems.) on page 19. ADAPTiQ® Start the ADAPTiQ audio calibration process. Appears for 235, • For more information). Teach mode...
... 5 TAB 4 TAB 3 TAB 2 English REVIEWING YOUR SETUP SELECTIONS Adjusting the system setup After performing the initial system setup using the Unify™ intelligent integration system, you can make additional changes to Another Room" systems.) on page 19. ADAPTiQ® Start the ADAPTiQ audio calibration process. Appears for 235, • For more information). Teach mode...


