Installation guide
Page 2
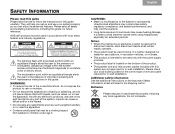
... mains plug or appliance coupler is used only with the power supply provided. • The product label is best to avoid extreme volume when using headphones, especially for extended periods. The exclamation point within the system enclosure that may be of sufficient magnitude to constitute a risk of the product. • The speaker wire and interconnect cables included with any electronic products, use your local building codes...
... mains plug or appliance coupler is used only with the power supply provided. • The product label is best to avoid extreme volume when using headphones, especially for extended periods. The exclamation point within the system enclosure that may be of sufficient magnitude to constitute a risk of the product. • The speaker wire and interconnect cables included with any electronic products, use your local building codes...
Installation guide
Page 5
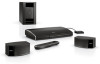
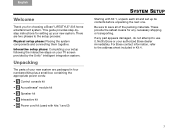
... 8 SYSTEM SETUP Starting with Kit 1, unpack each kit and set up your new system are two phases to save all of your new system. Unpacking The parts of the packing materials. Be sure to the setup process: Physical setup phase: Placing the system components and connecting them together. There are packaged in Kit 4. 1 This guide provides step-bystep instructions for choosing a Bose® LIFESTYLE® 235 home entertainment system...
... 8 SYSTEM SETUP Starting with Kit 1, unpack each kit and set up your new system are two phases to save all of your new system. Unpacking The parts of the packing materials. Be sure to the setup process: Physical setup phase: Placing the system components and connecting them together. There are packaged in Kit 4. 1 This guide provides step-bystep instructions for choosing a Bose® LIFESTYLE® 235 home entertainment system...
Installation guide
Page 15
... YYYSSSTTTEEEMMMSSS Operating guide USB flash drive (for front center speaker Dock compatible with your TV, change the TV input to the one that is connected to start. You will be required to use. Press the power button ( ) on the control console to turn on using the ADAPTiQ® audio calibration system. • Connect audio/video devices to the control console. • Configure your Bose® remote to your system. For more information on your system at another time, see the operating guide...
... YYYSSSTTTEEEMMMSSS Operating guide USB flash drive (for front center speaker Dock compatible with your TV, change the TV input to the one that is connected to start. You will be required to use. Press the power button ( ) on the control console to turn on using the ADAPTiQ® audio calibration system. • Connect audio/video devices to the control console. • Configure your Bose® remote to your system. For more information on your system at another time, see the operating guide...

Installation guide
Page 16
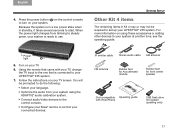
... troubleshooting table in your system setup. HDMI and the HDMI logo are trademarks or registered trademarks of HDMI Licensing LLC in solving problems, contact Bose® Customer Service. If you can attach the included rubber feet to the bottom of the speaker for Acoustimass module Bottom panel Vibration can reactivate the interactive setup mode at any time and correct or change part of your system operating guide. TAB 8 TAB 7 TAB 6 TAB 5 SYSTEM SETUP...
... troubleshooting table in your system setup. HDMI and the HDMI logo are trademarks or registered trademarks of HDMI Licensing LLC in solving problems, contact Bose® Customer Service. If you can attach the included rubber feet to the bottom of the speaker for Acoustimass module Bottom panel Vibration can reactivate the interactive setup mode at any time and correct or change part of your system operating guide. TAB 8 TAB 7 TAB 6 TAB 5 SYSTEM SETUP...
Owner's guide
Page 2
... to spill liquids into any part of used batteries properly, following any naked flame sources, such as the disconnect device, such disconnect device shall remain readily operable. • The product must be used only with the power supply provided. • The product label is located on the bottom of the product. • The speaker wire and interconnect cables included with any electronic products, use outdoors, in recreation vehicles...
... to spill liquids into any part of used batteries properly, following any naked flame sources, such as the disconnect device, such disconnect device shall remain readily operable. • The product must be used only with the power supply provided. • The product label is located on the bottom of the product. • The speaker wire and interconnect cables included with any electronic products, use outdoors, in recreation vehicles...

Owner's guide
Page 3
... used in a residential installation. Serial numbers are designed to provide reasonable protection against harmful interference in accordance with the limits for help. For your records Bose recommends that you record your system model information here, and the serial numbers both here and on your Product Registration card together with the essential requirements and other applicable Directives. System model name and number (on the carton): LIFESTYLE Serial numbers: Control console Acoustimass...
... used in a residential installation. Serial numbers are designed to provide reasonable protection against harmful interference in accordance with the limits for help. For your records Bose recommends that you record your system model information here, and the serial numbers both here and on your Product Registration card together with the essential requirements and other applicable Directives. System model name and number (on the carton): LIFESTYLE Serial numbers: Control console Acoustimass...
Owner's guide
Page 6
... 1 If you need help 1 YOUR REMOTE CONTROL 2 YOUR CONTROL CONSOLE 5 POWER ON/OFF CONTROLS 6 Starting your system 6 Turning on your TV 6 Shutting down your system 6 TAB 4 TAB 3 TAB 2 English OPERATING YOUR CONNECTED DEVICES 7 Selecting a connected device 7 Watching TV 8 Using a set-top box 8 Using the tuner in your TV 8 Tuning to a TV station 8 Playing audio/video devices 9 Listening to a Bose link input device 9 Playing an iPod or iPhone mobile digital device (on 235, V35, and V25 systems only 10 Using the front console inputs 11 Front USB input 11 Front Analog...
... 1 If you need help 1 YOUR REMOTE CONTROL 2 YOUR CONTROL CONSOLE 5 POWER ON/OFF CONTROLS 6 Starting your system 6 Turning on your TV 6 Shutting down your system 6 TAB 4 TAB 3 TAB 2 English OPERATING YOUR CONNECTED DEVICES 7 Selecting a connected device 7 Watching TV 8 Using a set-top box 8 Using the tuner in your TV 8 Tuning to a TV station 8 Playing audio/video devices 9 Listening to a Bose link input device 9 Playing an iPod or iPhone mobile digital device (on 235, V35, and V25 systems only 10 Using the front console inputs 11 Front USB input 11 Front Analog...
Owner's guide
Page 9
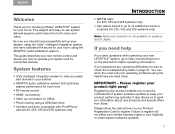
... system, and have questions while operating your new LIFESTYLE® system, go to http://owners.Bose.com on page 21. System features • Unify intelligent integration system to help If you easily add devices to your system • ADAPTiQ audio calibration system that optimizes system performance for your room • RF remote control • HDMI® connectivity • Video up to 14 additional rooms or locations (for your home. Please follow the instructions on systems...
... system, and have questions while operating your new LIFESTYLE® system, go to http://owners.Bose.com on page 21. System features • Unify intelligent integration system to help If you easily add devices to your system • ADAPTiQ audio calibration system that optimizes system performance for your room • RF remote control • HDMI® connectivity • Video up to 14 additional rooms or locations (for your home. Please follow the instructions on systems...
Owner's guide
Page 10
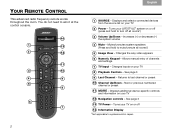
... it at the control console. iPod 3:20 The Beatles 14 1 13 2 12 11 3 10 4 9 5 8 6 7 2 TAB 4 TAB 3 TAB 2 English 1 SOURCE - Changes inputs on or off all rooms*) 5 Image View - Turns your LIFESTYLE® system on your TV 12 Navigation controls - TAB 8 TAB 7 TAB 6 TAB 5 YOUR REMOTE CONTROL This advanced radio frequency remote works throughout the room. Allows manual entry of channels and settings 7 TV Input - Next or previous numbered channel or preset 11 MORE -
... it at the control console. iPod 3:20 The Beatles 14 1 13 2 12 11 3 10 4 9 5 8 6 7 2 TAB 4 TAB 3 TAB 2 English 1 SOURCE - Changes inputs on or off all rooms*) 5 Image View - Turns your LIFESTYLE® system on your TV 12 Navigation controls - TAB 8 TAB 7 TAB 6 TAB 5 YOUR REMOTE CONTROL This advanced radio frequency remote works throughout the room. Allows manual entry of channels and settings 7 TV Input - Next or previous numbered channel or preset 11 MORE -
Owner's guide
Page 11
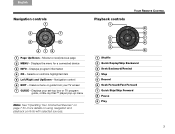
... - Displays your TV screen 7 GUIDE - TAB 5 TAB 6 TAB 7 TAB 8 YOUR REMOTE CONTROL Playback controls 1 9 8 2 7 3 6 4 5 1 Shuffle 2 Quick Replay/Skip Backward 3 Seek Backward/Rewind 4 Stop 5 Record 6 Seek Forward/Fast Forward 7 Quick Skip/Skip Forward 8 Pause 9 Play 3 Navigation control 6 EXIT - Clears a menu or guide from your set-top box or TV program guide, or Blu-ray Disc™ player pop-up menu Note: See "Operating Your Connected Devices" on using navigation and playback controls with selected sources...
... - Displays your TV screen 7 GUIDE - TAB 5 TAB 6 TAB 7 TAB 8 YOUR REMOTE CONTROL Playback controls 1 9 8 2 7 3 6 4 5 1 Shuffle 2 Quick Replay/Skip Backward 3 Seek Backward/Rewind 4 Stop 5 Record 6 Seek Forward/Fast Forward 7 Quick Skip/Skip Forward 8 Pause 9 Play 3 Navigation control 6 EXIT - Clears a menu or guide from your set-top box or TV program guide, or Blu-ray Disc™ player pop-up menu Note: See "Operating Your Connected Devices" on using navigation and playback controls with selected sources...
Owner's guide
Page 13
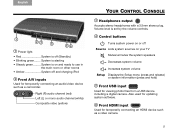
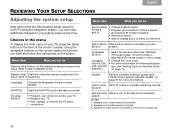
... stereo plug. Volume level is on your TV Mutes/unmutes the system speakers Decreases system volume Increases system volume Setup Displays the Setup menu (press and release) or system information (press and hold) 5 Front USB input Used for temporarily connecting an HDMI device such as a camcorder. System is set by the volume controls. 4 Control buttons Turns system power on or off Source Lists system sources on and ready to use in the main room or other rooms • Amber System off (Standby) • Blinking green........ Also used for updating system software. 6 Front HDMI input Used...
... stereo plug. Volume level is on your TV Mutes/unmutes the system speakers Decreases system volume Increases system volume Setup Displays the Setup menu (press and release) or system information (press and hold) 5 Front USB input Used for temporarily connecting an HDMI device such as a camcorder. System is set by the volume controls. 4 Control buttons Turns system power on or off Source Lists system sources on and ready to use in the main room or other rooms • Amber System off (Standby) • Blinking green........ Also used for updating system software. 6 Front HDMI input Used...
Owner's guide
Page 15
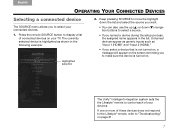
... to control each of connected devices on page 21. 7 The UnifyTM intelligent integration system sets the the Lifestyle® remote to select your connected devices. 1. If one or more of these devices does not respond to the Lifestyle® remote, refer to display a list of your TV. Press the remote SOURCE button to "Troubleshooting" on your devices. English TAB 2 TAB 3 TAB 4 TAB 5 TAB 6 TAB 7 TAB 8 OPERATING YOUR CONNECTED DEVICES Selecting a connected device The SOURCE menu allows...
... to control each of connected devices on page 21. 7 The UnifyTM intelligent integration system sets the the Lifestyle® remote to select your connected devices. 1. If one or more of these devices does not respond to the Lifestyle® remote, refer to display a list of your TV. Press the remote SOURCE button to "Troubleshooting" on your devices. English TAB 2 TAB 3 TAB 4 TAB 5 TAB 6 TAB 7 TAB 8 OPERATING YOUR CONNECTED DEVICES Selecting a connected device The SOURCE menu allows...
Owner's guide
Page 17
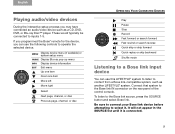
... a CD, DVD, DVR, or Blu-ray Disc™ player. To listen to the Bose link IN connector on the rear panel of the control console. English TAB 2 TAB 3 TAB 4 Playing audio/video devices During the interactive setup process you can use the following controls to operate the selected device. If you programmed the Bose® remote for the device, you may have connected an audio/video device such as another LIFESTYLE® system. It will not appear in the SOURCE list...
... a CD, DVD, DVR, or Blu-ray Disc™ player. To listen to the Bose link IN connector on the rear panel of the control console. English TAB 2 TAB 3 TAB 4 Playing audio/video devices During the interactive setup process you can use the following controls to operate the selected device. If you programmed the Bose® remote for the device, you may have connected an audio/video device such as another LIFESTYLE® system. It will not appear in the SOURCE list...
Owner's guide
Page 24
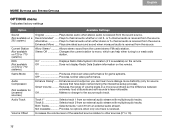
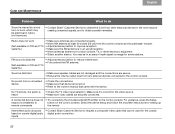
... Volume ......... Both Tracks Selects tracks 1 and 2 from the source. Not Available Provides no change to a weak radio station. Alternative Plays 5-channel audio when either stereo or 5-channel audio is received. Plays simulated surround sound when monaural audio is received from an external audio stream with multiple audio tracks. Enhances sound output so you can help when tuning to the source audio track. Off Does not display Radio Data System information on T20 or T10 systems.) Allow Stereo Allows stereo sound from the sound source...
... Volume ......... Both Tracks Selects tracks 1 and 2 from the source. Not Available Provides no change to a weak radio station. Alternative Plays 5-channel audio when either stereo or 5-channel audio is received. Plays simulated surround sound when monaural audio is received from an external audio stream with multiple audio tracks. Enhances sound output so you can help when tuning to the source audio track. Off Does not display Radio Data System information on T20 or T10 systems.) Allow Stereo Allows stereo sound from the sound source...
Owner's guide
Page 25
... System Bass System Treble A/V Sync Rear Speakers (Not available on the 235 system.) Center Speakers (Not available on the 235 system.) Speakers (Not available on the 235 system.) Volume on the remote). Stereo (2) .........Activates only front left , right, and center speakers. Off Makes no ADAPTiQ calibration) Adjusts the audio delay to synchronize audio with the video. -2 to Normal* to +5 Adjusts the volume level of the front center speakers relative to other speakers (-8 to Normal* to +6). On Sends HDMI® audio to the video source. Changes...
... System Bass System Treble A/V Sync Rear Speakers (Not available on the 235 system.) Center Speakers (Not available on the 235 system.) Speakers (Not available on the 235 system.) Volume on the remote). Stereo (2) .........Activates only front left , right, and center speakers. Off Makes no ADAPTiQ calibration) Adjusts the audio delay to synchronize audio with the video. -2 to Normal* to +5 Adjusts the volume level of the front center speakers relative to other speakers (-8 to Normal* to +6). On Sends HDMI® audio to the video source. Changes...
Owner's guide
Page 26
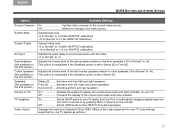
...; Change a device name. (Notes 2 and 3) • Program your (Note 2) system. ADAPTiQ® Start the ADAPTiQ audio calibration process. Menu item What you to Another Room" systems.) on screen display. Homewide • Select the house code mode: Standard (Note 2) (16 house codes, 16 room codes) or Alternative (64 house codes, 4 room codes). (Available • Change the room code. Update Perform a system software update (see "Adding Sound to the last source selected. Appears for each source connected to your remote to control a device and add...
...; Change a device name. (Notes 2 and 3) • Program your (Note 2) system. ADAPTiQ® Start the ADAPTiQ audio calibration process. Menu item What you to Another Room" systems.) on screen display. Homewide • Select the house code mode: Standard (Note 2) (16 house codes, 16 room codes) or Alternative (64 house codes, 4 room codes). (Available • Change the room code. Update Perform a system software update (see "Adding Sound to the last source selected. Appears for each source connected to your remote to control a device and add...
Owner's guide
Page 27
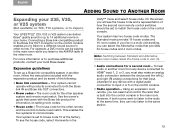
... sound source in the control console. The Standard mode provides 16 house codes and 16 room codes. Expansion guidelines To set to the same station. 19 Using an expansion room remote, you can be set up to purchase additional products, contact your home. See the owner's guide that provides 64 house codes and 4 room codes. However, if both rooms want to listen to HDMI® input 1, 2, or 3, you listen to both the Bose link IN...
... sound source in the control console. The Standard mode provides 16 house codes and 16 room codes. Expansion guidelines To set to the same station. 19 Using an expansion room remote, you can be set up to purchase additional products, contact your home. See the owner's guide that provides 64 house codes and 4 room codes. However, if both rooms want to listen to HDMI® input 1, 2, or 3, you listen to both the Bose link IN...
Owner's guide
Page 29
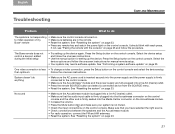
... operation of my Bose® remote • Make sure the control console is turned on. • Make sure batteries are fully plugged into a live AC (mains) outlet. • Make sure that you have selected the right source. • Check connections between the speakers and the Acoustimass module. • For radio operation, connect the FM and AM antennas. • Reset the system. It should blink with the console" on the control console. Press the Setup button...
... operation of my Bose® remote • Make sure the control console is turned on. • Make sure batteries are fully plugged into a live AC (mains) outlet. • Make sure that you have selected the right source. • Check connections between the speakers and the Acoustimass module. • For radio operation, connect the FM and AM antennas. • Reset the system. It should blink with the console" on the control console. Press the Setup button...
Owner's guide
Page 30
...; Make sure video cables are securely connected. For guidance, press the Setup respond consistently to button on T20 and T10 systems.) • Adjust antenna position to reduce interference. • Fully extend the FM antenna. Radio does not work (Not available on T20 and T10 systems.) • Make sure antennas are secure. • Reduce the volume output level from a connected device • Check the connections. • Make sure that device is turned on coaxial digital audio digital audio connection. inputs...
...; Make sure video cables are securely connected. For guidance, press the Setup respond consistently to button on T20 and T10 systems.) • Adjust antenna position to reduce interference. • Fully extend the FM antenna. Radio does not work (Not available on T20 and T10 systems.) • Make sure antennas are secure. • Reduce the volume output level from a connected device • Check the connections. • Make sure that device is turned on coaxial digital audio digital audio connection. inputs...
Owner's guide
Page 31
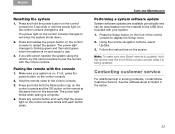
... operate the system using the remote, try the next procedure to display the Setup menu. 2. Press any remote button and verify that the power light on the screen. Using the remote navigation buttons, select Update. 3. Note: To make sure your system is complete. 4. Pairing the remote with the control console. See the address sheet included in solving problems, contact Bose Customer Service. Press the Setup button on the control console changes to the USB drive included with each button...
... operate the system using the remote, try the next procedure to display the Setup menu. 2. Press any remote button and verify that the power light on the screen. Using the remote navigation buttons, select Update. 3. Note: To make sure your system is complete. 4. Pairing the remote with the control console. See the address sheet included in solving problems, contact Bose Customer Service. Press the Setup button on the control console changes to the USB drive included with each button...


