Owner's guide
Page 2
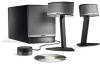
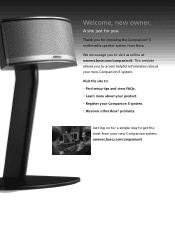
Welcome, new owner. This website allows you for choosing the Companion® 5 multimedia speaker system from your new Companion system. owners.bose.com/companion5 A site just for a simple way to visit us online at owners.bose.com/companion5. We encourage you . Just log on for you to get the most from Bose. Thank you to : • Find setup tips and view FAQs. • Learn more about your Companion 5 system. • Discover other Bose® products. Visit the site to access helpful information about your product. • Register your new Companion 5 system.
Welcome, new owner. This website allows you for choosing the Companion® 5 multimedia speaker system from your new Companion system. owners.bose.com/companion5 A site just for a simple way to visit us online at owners.bose.com/companion5. We encourage you . Just log on for you to get the most from Bose. Thank you to : • Find setup tips and view FAQs. • Learn more about your Companion 5 system. • Discover other Bose® products. Visit the site to access helpful information about your product. • Register your new Companion 5 system.
Owner's guide
Page 3
... part of the system. No part of this work may be of sufficient magnitude to the wide slot of the AC (mains) receptacle. Bose, COMPANION, TrueSpace and Acoustimass are property of their respective owner's. 3 As with liquids, such as lighted candles, should be exposed to avoid extreme...indoors. CAUTION: Long-term exposure to rain or moisture. All other trademarks referenced herein are registered trademarks of Bose Corporation. It will help you set up and operate your speaker system properly. Notes: • Where the mains plug or appliance coupler is intended to alert the user ...
... part of the system. No part of this work may be of sufficient magnitude to the wide slot of the AC (mains) receptacle. Bose, COMPANION, TrueSpace and Acoustimass are property of their respective owner's. 3 As with liquids, such as lighted candles, should be exposed to avoid extreme...indoors. CAUTION: Long-term exposure to rain or moisture. All other trademarks referenced herein are registered trademarks of Bose Corporation. It will help you set up and operate your speaker system properly. Notes: • Where the mains plug or appliance coupler is intended to alert the user ...

Owner's guide
Page 5
... 5 OPERATION 13 CONNECTING OTHER DEVICES 15 CARE AND MAINTENANCE 16 INTRODUCTION 6 Your Companion® 5 multimedia speaker system 6 Setup help 6 SYSTEM SETUP 7 Unpacking 7 For your records 7 Placing your Companion® 5 system 8 Positioning the speakers 8 Positioning the Acoustimass® module 9 Making system connections 10 Windows® ...18 Connecting headphones 18 Connecting an audio device 18 CARE AND MAINTENANCE 19 Cleaning your speaker system 19 Limited warranty 19 Troubleshooting 19 Customer service 20 Product specifications 20 Computer system recommendation 20 5
... 5 OPERATION 13 CONNECTING OTHER DEVICES 15 CARE AND MAINTENANCE 16 INTRODUCTION 6 Your Companion® 5 multimedia speaker system 6 Setup help 6 SYSTEM SETUP 7 Unpacking 7 For your records 7 Placing your Companion® 5 system 8 Positioning the speakers 8 Positioning the Acoustimass® module 9 Making system connections 10 Windows® ...18 Connecting headphones 18 Connecting an audio device 18 CARE AND MAINTENANCE 19 Cleaning your speaker system 19 Limited warranty 19 Troubleshooting 19 Customer service 20 Product specifications 20 Computer system recommendation 20 5
Owner's guide
Page 6
Setup help , please visit http://owners.bose.com/Companion5 for purchasing a Bose® Companion® 5 multimedia speaker system, which delivers the superb acoustic performance needed to your computer. INTRODUCTION Français Español English INTRODUCTION Your Companion® 5 multimedia speaker system Thank you for more information. 6 Using TrueSpace® digital surround signal processing technology, the...
Setup help , please visit http://owners.bose.com/Companion5 for purchasing a Bose® Companion® 5 multimedia speaker system, which delivers the superb acoustic performance needed to your computer. INTRODUCTION Français Español English INTRODUCTION Your Companion® 5 multimedia speaker system Thank you for more information. 6 Using TrueSpace® digital surround signal processing technology, the...
Owner's guide
Page 7
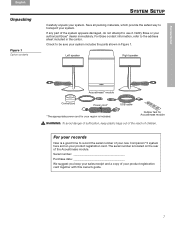
.... For Bose contact information, refer to use it. Left speaker Right speaker Acoustimass® module Control pod Power cord* USB cable *The appropriate power cord for Acoustimass module WARNING: To avoid danger of suffocation, keep your sales receipt and a copy of your authorized Bose® dealer... immediately. SYSTEM SETUP English Español Français SYSTEM SETUP Unpacking Figure 1 Carton contents Carefully unpack your region is included. If any part of your new Companion® 5 system here and on the...
.... For Bose contact information, refer to use it. Left speaker Right speaker Acoustimass® module Control pod Power cord* USB cable *The appropriate power cord for Acoustimass module WARNING: To avoid danger of suffocation, keep your sales receipt and a copy of your authorized Bose® dealer... immediately. SYSTEM SETUP English Español Français SYSTEM SETUP Unpacking Figure 1 Carton contents Carefully unpack your region is included. If any part of your new Companion® 5 system here and on the...
Owner's guide
Page 8
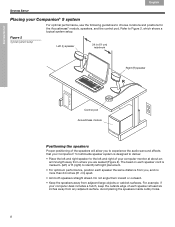
... the audio surround effects that your Companion® 5 multimedia speaker system is marked L (left) or R (right) to choose locations and positions for the Acoustimass® module, speakers, and the control pod. Refer to the left and right of each speaker at about an arm's length away...SYSTEM SETUP Français Español English SYSTEM SETUP Placing your Companion® 5 system For optimal performance, use the following guidelines to identify left/right placement. • For optimum performance, position each speaker the same distance from you, and no more than 24 inches (61...
... the audio surround effects that your Companion® 5 multimedia speaker system is marked L (left) or R (right) to choose locations and positions for the Acoustimass® module, speakers, and the control pod. Refer to the left and right of each speaker at about an arm's length away...SYSTEM SETUP Français Español English SYSTEM SETUP Placing your Companion® 5 system For optimal performance, use the following guidelines to identify left/right placement. • For optimum performance, position each speaker the same distance from you, and no more than 24 inches (61...
Owner's guide
Page 9
... that may block the ventilation openings at least 6 inches (15 cm) away from the computer and computer monitor to be the unseen part of the speaker system. For example, you can reach the USB connection on your computer table or desk. • Put one rubber foot on each corner of the...
... that may block the ventilation openings at least 6 inches (15 cm) away from the computer and computer monitor to be the unseen part of the speaker system. For example, you can reach the USB connection on your computer table or desk. • Put one rubber foot on each corner of the...
Owner's guide
Page 10
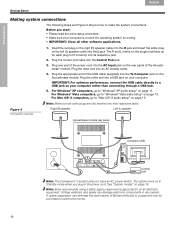
...Note: Make sure all other end into the To Computer jack on the Acoustimass module. Right (R) speaker Left (L) speaker Acoustimass module rear panel Computer USB 1 3 4 2 Control pod Note: The Companion® 5 system does not have an AC power switch. The system turns on page 13. ... into its respective jack. 2. Insert the red plug on the right (R) speaker cable into a USB jack on all electronic equipment. Plug the control pod cable into their respective jacks. Note: Bose recommends using a safety agency-approved surge protector on your computer. Plug the appropriate ...
...Note: Make sure all other end into the To Computer jack on the Acoustimass module. Right (R) speaker Left (L) speaker Acoustimass module rear panel Computer USB 1 3 4 2 Control pod Note: The Companion® 5 system does not have an AC power switch. The system turns on page 13. ... into its respective jack. 2. Insert the red plug on the right (R) speaker cable into a USB jack on all electronic equipment. Plug the control pod cable into their respective jacks. Note: Bose recommends using a safety agency-approved surge protector on your computer. Plug the appropriate ...
Owner's guide
Page 12
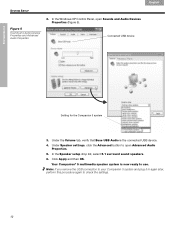
Under the Volume tab, verify that Bose USB Audio is now ready to use. In the Speaker setup drop list, select 5.1 surround sound speakers. 6. Click Apply and then OK. Note: If you remove the USB connection to your Companion 5 system and plug it in again later, perform ...settings. 12 Français Español SYSTEM SETUP Figure 5 Sounds and Audio Devices Properties and Advanced Audio Properties 2. Your Companion® 5 multimedia speaker system is the connected USB device. 4. In the Windows XP Control Panel, open Advanced Audio Properties. 5. Connected USB device English...
Under the Volume tab, verify that Bose USB Audio is now ready to use. In the Speaker setup drop list, select 5.1 surround sound speakers. 6. Click Apply and then OK. Note: If you remove the USB connection to your Companion 5 system and plug it in again later, perform ...settings. 12 Français Español SYSTEM SETUP Figure 5 Sounds and Audio Devices Properties and Advanced Audio Properties 2. Your Companion® 5 multimedia speaker system is the connected USB device. 4. In the Windows XP Control Panel, open Advanced Audio Properties. 5. Connected USB device English...
Owner's guide
Page 14
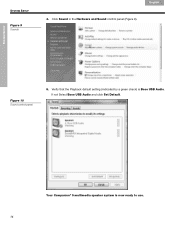
Click Sound in the Hardware and Sound control panel (Figure 9). Your Companion® 5 multimedia speaker system is Bose USB Audio. SYSTEM SETUP SYSTEM SETUP Figure 9 Sounds Français Español English 4. Verify that the Playback default setting (indicated by a green check) is now ready to use. 14 Figure 10 Sound control panel 5. If not Select Bose USB Audio and click Set Default.
Click Sound in the Hardware and Sound control panel (Figure 9). Your Companion® 5 multimedia speaker system is Bose USB Audio. SYSTEM SETUP SYSTEM SETUP Figure 9 Sounds Français Español English 4. Verify that the Playback default setting (indicated by a green check) is now ready to use. 14 Figure 10 Sound control panel 5. If not Select Bose USB Audio and click Set Default.
Owner's guide
Page 15
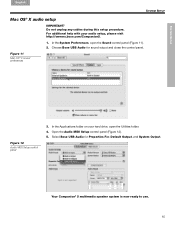
Open the Audio MIDI Setup control panel (Figure 12). 5. Your Companion® 5 multimedia speaker system is now ready to use. 15 SYSTEM SETUP English Español Français SYSTEM SETUP Mac OS® X audio setup IMPORTANT! For ... control panel (Figure 11). 2. In the Applications folder on your audio setup, please visit http://owners.bose.com/Companion5. 1. Figure 11 Mac OS® X sound preferences Figure 12 Audio MIDI Setup control panel 3. Choose Bose USB Audio for Properties For, Default Output, and System Output. In the System Preferences, open the Utilities...
Open the Audio MIDI Setup control panel (Figure 12). 5. Your Companion® 5 multimedia speaker system is now ready to use. 15 SYSTEM SETUP English Español Français SYSTEM SETUP Mac OS® X audio setup IMPORTANT! For ... control panel (Figure 11). 2. In the Applications folder on your audio setup, please visit http://owners.bose.com/Companion5. 1. Figure 11 Mac OS® X sound preferences Figure 12 Audio MIDI Setup control panel 3. Choose Bose USB Audio for Properties For, Default Output, and System Output. In the System Preferences, open the Utilities...
Owner's guide
Page 16
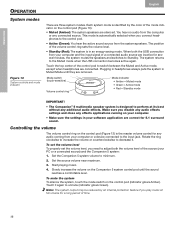
... unmute (indicator glows Green). Start playing music. 4. Slowly increase the volume on the control pod (indicator glows Amber). Set the Companion 5 system volume to the Muted mode when the USB connection becomes active again. Mode switch (touch-sensitive) Volume control ring Mode ...indicator • Amber = Muted mode • Green = Active mode • Red = Standby mode IMPORTANT! • The Companion® 5 multimedia speaker system is automatically selected when you disable any audio effects settings and close any effects applications running on the control pod (Figure 13)...
... unmute (indicator glows Green). Start playing music. 4. Slowly increase the volume on the control pod (indicator glows Amber). Set the Companion 5 system volume to the Muted mode when the USB connection becomes active again. Mode switch (touch-sensitive) Volume control ring Mode ...indicator • Amber = Muted mode • Green = Active mode • Red = Standby mode IMPORTANT! • The Companion® 5 multimedia speaker system is automatically selected when you disable any audio effects settings and close any effects applications running on the control pod (Figure 13)...
Owner's guide
Page 17
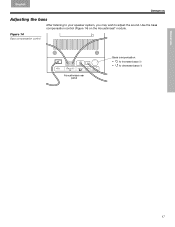
Figure 14 Bass compensation control Acoustimass rear panel Bass compensation: • 3 to increase bass (+) • 4 to adjust the sound. OPERATION English Español Français OPERATION Adjusting the bass After listening to your speaker system, you may wish to decrease bass (-) 17 06.Operation.fm 12/07 Use the bass compensation control (Figure 14) on the Acoustimass® module.
Figure 14 Bass compensation control Acoustimass rear panel Bass compensation: • 3 to increase bass (+) • 4 to adjust the sound. OPERATION English Español Français OPERATION Adjusting the bass After listening to your speaker system, you may wish to decrease bass (-) 17 06.Operation.fm 12/07 Use the bass compensation control (Figure 14) on the Acoustimass® module.
Owner's guide
Page 18
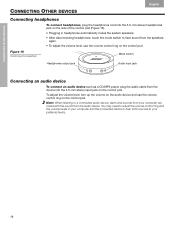
... input jack on the control pod. You may need to adjust the volume control ring and the volume levels in headphones automatically mutes the system speakers. • After disconnecting headphones, touch the mode switch to hear both sources at your computer are mixed with the sound from the audio device... jack on the side of the control pod (Figure 15). • Plugging in your computer and the connected device to hear sound from the speakers again. • To adjust the volume level, use the volume control ring on the control pod. Figure 15 Control pod connectors Mode switch Headphones...
... input jack on the control pod. You may need to adjust the volume control ring and the volume levels in headphones automatically mutes the system speakers. • After disconnecting headphones, touch the mode switch to hear both sources at your computer are mixed with the sound from the audio device... jack on the side of the control pod (Figure 15). • Plugging in your computer and the connected device to hear sound from the speakers again. • To adjust the volume level, use the volume control ring on the control pod. Figure 15 Control pod connectors Mode switch Headphones...

Owner's guide
Page 19
...;ais CARE AND MAINTENANCE Cleaning your speaker system • To clean the surface of your speakers, Acoustimass® module, and control pod, use any sprays near the speakers. Limited warranty The Companion® 5 system is set at http://owners.bose.com/Companion5. Failure to it to...that has a USB 1.0 device connected to do Setup was interrupted by a limited transferable warranty. The entire speaker sys- • Decrease the volume at http://owners.bose.com/register. USB cable and start again. Do not use any solvents, chemicals, or cleaning solutions containing ...
...;ais CARE AND MAINTENANCE Cleaning your speaker system • To clean the surface of your speakers, Acoustimass® module, and control pod, use any sprays near the speakers. Limited warranty The Companion® 5 system is set at http://owners.bose.com/Companion5. Failure to it to...that has a USB 1.0 device connected to do Setup was interrupted by a limited transferable warranty. The entire speaker sys- • Decrease the volume at http://owners.bose.com/register. USB cable and start again. Do not use any solvents, chemicals, or cleaning solutions containing ...
Owner's guide
Page 20
...pops, • This may be caused by connecting the speaker system to your computer 20 Disconnect the Companion® 5 system USB cable from speakers is in solving problems, contact Bose® Customer Service. If the Companion 5 speaker system operates properly, the problem is • Increase ... on your computer monitor. Refer to the address sheet included with the system. Scratch-resistant, satin-finished vinyl Satellite speakers .......... Product specifications Power rating Dimensions Weight Finish USA/Canada 120VAC~ 50/60 Hz 300W International 220VAC-240VAC~ 50/60...
...pops, • This may be caused by connecting the speaker system to your computer 20 Disconnect the Companion® 5 system USB cable from speakers is in solving problems, contact Bose® Customer Service. If the Companion 5 speaker system operates properly, the problem is • Increase ... on your computer monitor. Refer to the address sheet included with the system. Scratch-resistant, satin-finished vinyl Satellite speakers .......... Product specifications Power rating Dimensions Weight Finish USA/Canada 120VAC~ 50/60 Hz 300W International 220VAC-240VAC~ 50/60...


