Owner's guide
Page 2
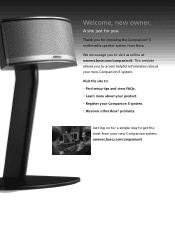
Welcome, new owner. Just log on for a simple way to access helpful information about your product. • Register your new Companion system. This website allows you to get the most from Bose. owners.bose.com/companion5 A site just for choosing the Companion® 5 multimedia speaker system from your Companion 5 system. • Discover other Bose® products. Visit the site to visit us online at owners.bose.com/companion5. We encourage you . Thank you for you to : • Find setup tips and view FAQs. • Learn more about your new Companion 5 system.
Welcome, new owner. Just log on for a simple way to access helpful information about your product. • Register your new Companion system. This website allows you to get the most from Bose. owners.bose.com/companion5 A site just for choosing the Companion® 5 multimedia speaker system from your Companion 5 system. • Discover other Bose® products. Visit the site to visit us online at owners.bose.com/companion5. We encourage you . Thank you for you to : • Find setup tips and view FAQs. • Learn more about your new Companion 5 system.
Owner's guide
Page 3
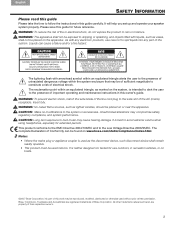
... will help you set up and operate your speaker system properly. The lightning flash with arrowhead symbol within an equilateral triangle alerts the user to spill liquids into any part of uninsulated dangerous voltage within an equilateral triangle, as marked on www.bose.com/static/compliance/index.html. Bose, COMPANION, TrueSpace and Acoustimass are property of important operating and maintenance instructions in this work...
... will help you set up and operate your speaker system properly. The lightning flash with arrowhead symbol within an equilateral triangle alerts the user to spill liquids into any part of uninsulated dangerous voltage within an equilateral triangle, as marked on www.bose.com/static/compliance/index.html. Bose, COMPANION, TrueSpace and Acoustimass are property of important operating and maintenance instructions in this work...
Owner's guide
Page 4
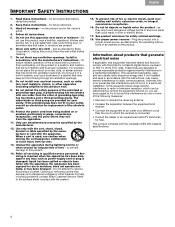
... cleaning. 7. Servicing is used in the owner's guide. 4. Opening or removing covers may block the ventilation openings. For help . Refer to protect it from being walked on a bed, sofa, or similar surface that will not occur in the operating instructions or as radiators, heat registers, stoves, or other . as a bookcase or a cabinet that could result in a residential installation. Use proper power sources...
... cleaning. 7. Servicing is used in the owner's guide. 4. Opening or removing covers may block the ventilation openings. For help . Refer to protect it from being walked on a bed, sofa, or similar surface that will not occur in the operating instructions or as radiators, heat registers, stoves, or other . as a bookcase or a cabinet that could result in a residential installation. Use proper power sources...

Owner's guide
Page 5
... Companion® 5 system 8 Positioning the speakers 8 Positioning the Acoustimass® module 9 Making system connections 10 Windows® XP audio setup 11 Windows® Vista audio setup 13 Mac OS® X audio setup 15 OPERATION 16 System modes 16 Controlling the volume 16 Adjusting the bass 17 CONNECTING OTHER DEVICES 18 Connecting headphones 18 Connecting an audio device 18 CARE AND MAINTENANCE 19 Cleaning your speaker system 19 Limited warranty 19 Troubleshooting 19 Customer service 20 Product specifications...
... Companion® 5 system 8 Positioning the speakers 8 Positioning the Acoustimass® module 9 Making system connections 10 Windows® XP audio setup 11 Windows® Vista audio setup 13 Mac OS® X audio setup 15 OPERATION 16 System modes 16 Controlling the volume 16 Adjusting the bass 17 CONNECTING OTHER DEVICES 18 Connecting headphones 18 Connecting an audio device 18 CARE AND MAINTENANCE 19 Cleaning your speaker system 19 Limited warranty 19 Troubleshooting 19 Customer service 20 Product specifications...
Owner's guide
Page 6
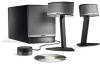
... full audio impact of music, movies, games, and other entertainment sources from your computer. Your system includes: • Two small, easy-to-place speakers on stands and an Acoustimass® module. • A USB cable to connect the system to your computer. • A control pod that allows you to your Companion 5 multimedia speaker system easily connects to control system volume and connect headphones or portable audio players. Using TrueSpace® digital surround...
... full audio impact of music, movies, games, and other entertainment sources from your computer. Your system includes: • Two small, easy-to-place speakers on stands and an Acoustimass® module. • A USB cable to connect the system to your computer. • A control pod that allows you to your Companion 5 multimedia speaker system easily connects to control system volume and connect headphones or portable audio players. Using TrueSpace® digital surround...
Owner's guide
Page 7
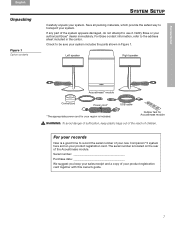
Check to use it. Left speaker Right speaker Acoustimass® module Control pod Power cord* USB cable *The appropriate power cord for Acoustimass module WARNING: To avoid danger of suffocation, keep your product registration card together with this owner's guide. 7 If any part of the system appears damaged, do not attempt to be sure your system includes the parts shown in the carton. The serial number is located on...
Check to use it. Left speaker Right speaker Acoustimass® module Control pod Power cord* USB cable *The appropriate power cord for Acoustimass module WARNING: To avoid danger of suffocation, keep your product registration card together with this owner's guide. 7 If any part of the system appears damaged, do not attempt to be sure your system includes the parts shown in the carton. The serial number is located on...
Owner's guide
Page 8
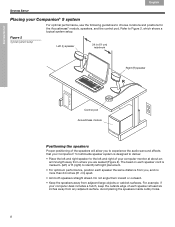
... adjacent surface. Figure 2 Typical system setup Left (L) speaker 24 in (61 cm) maximum Right (R) speaker Control pod Acoustimass module Positioning the speakers Proper positioning of the speakers will allow you to experience the audio surround effects that your Companion® 5 multimedia speaker system is marked L (left) or R (right) to the left /right placement. • For optimum performance, position each speaker at about an arm's length away...
... adjacent surface. Figure 2 Typical system setup Left (L) speaker 24 in (61 cm) maximum Right (R) speaker Control pod Acoustimass module Positioning the speakers Proper positioning of the speakers will allow you to experience the audio surround effects that your Companion® 5 multimedia speaker system is marked L (left) or R (right) to the left /right placement. • For optimum performance, position each speaker at about an arm's length away...
Owner's guide
Page 9
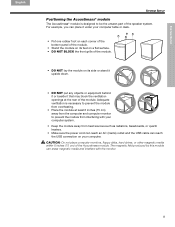
...rear of the speaker system. Adequate ventilation is designed to prevent the module from the computer and computer monitor to be the unseen part of the module. For example, you can erase magnetic media... and interfere with your computer. The magnetic field produced by this module can place it under your computer table or desk. • Put one rubber foot on each corner of the bottom panel... Make sure the power cord can reach an AC (mains) outlet and the USB cable can reach the USB connection ...
...rear of the speaker system. Adequate ventilation is designed to prevent the module from the computer and computer monitor to be the unseen part of the module. For example, you can erase magnetic media... and interfere with your computer. The magnetic field produced by this module can place it under your computer table or desk. • Put one rubber foot on each corner of the bottom panel... Make sure the power cord can reach an AC (mains) outlet and the USB cable can reach the USB connection ...
Owner's guide
Page 10
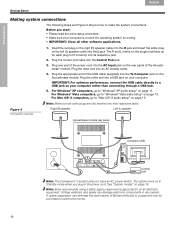
... a USB jack on your computer rather than connecting through a USB hub. 5. IMPORTANT: For optimum performance, connect the USB cable directly to a USB jack on your computer. Note: Make sure all electronic equipment. Right (R) speaker Left (L) speaker Acoustimass module rear panel Computer USB 1 3 4 2 Control pod Note: The Companion® 5 system does not have an AC power switch. Insert the red plug on the right (R) speaker cable into the R jack and insert the white plug on the left (L) speaker cable into the Control Pod jack. 3. Plug the...
... a USB jack on your computer rather than connecting through a USB hub. 5. IMPORTANT: For optimum performance, connect the USB cable directly to a USB jack on your computer. Note: Make sure all electronic equipment. Right (R) speaker Left (L) speaker Acoustimass module rear panel Computer USB 1 3 4 2 Control pod Note: The Companion® 5 system does not have an AC power switch. Insert the red plug on the right (R) speaker cable into the R jack and insert the white plug on the left (L) speaker cable into the Control Pod jack. 3. Plug the...
Owner's guide
Page 11
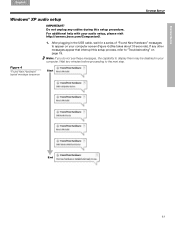
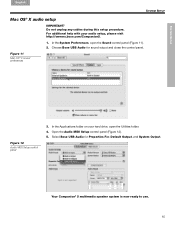
... in the USB cable, wait for a series of "Found New Hardware" messages to "Troubleshooting" on your audio setup, please visit http://owners.bose.com/Companion5. 1. Note: If you do not see these messages, the capability to the next step. Figure 4 "Found New Hardware" typical message sequence Start End 11 After plugging in your computer. If any cables during this setup process, refer...
... in the USB cable, wait for a series of "Found New Hardware" messages to "Troubleshooting" on your audio setup, please visit http://owners.bose.com/Companion5. 1. Note: If you do not see these messages, the capability to the next step. Figure 4 "Found New Hardware" typical message sequence Start End 11 After plugging in your computer. If any cables during this setup process, refer...
Owner's guide
Page 12
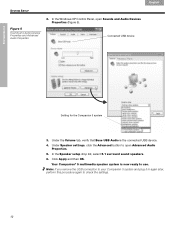
... use. In the Speaker setup drop list, select 5.1 surround sound speakers. 6. Click Apply and then OK. Under Speaker settings, click the Advanced button to check the settings. 12 Note: If you remove the USB connection to your Companion 5 system and plug it in again later, perform this procedure again to open Sounds and Audio Devices Properties (Figure 5). Your Companion® 5 multimedia speaker system is the connected USB device. 4. In the Windows XP Control Panel, open Advanced Audio...
... use. In the Speaker setup drop list, select 5.1 surround sound speakers. 6. Click Apply and then OK. Under Speaker settings, click the Advanced button to check the settings. 12 Note: If you remove the USB connection to your Companion 5 system and plug it in again later, perform this procedure again to open Sounds and Audio Devices Properties (Figure 5). Your Companion® 5 multimedia speaker system is the connected USB device. 4. In the Windows XP Control Panel, open Advanced Audio...
Owner's guide
Page 13
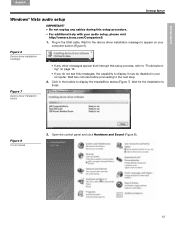
... 7 Device driver installation status • If any cables during this setup procedure. • For additional help with your audio setup, please visit http://owners.bose.com/Companion5. 1. Wait for the installation to finish. Open the control panel and click Hardware and Sound (Figure 8). 13 Click in the bubble to the next step. 2. SYSTEM SETUP English Español Français SYSTEM SETUP Windows® Vista audio setup IMPORTANT...
... 7 Device driver installation status • If any cables during this setup procedure. • For additional help with your audio setup, please visit http://owners.bose.com/Companion5. 1. Wait for the installation to finish. Open the control panel and click Hardware and Sound (Figure 8). 13 Click in the bubble to the next step. 2. SYSTEM SETUP English Español Français SYSTEM SETUP Windows® Vista audio setup IMPORTANT...
Owner's guide
Page 14
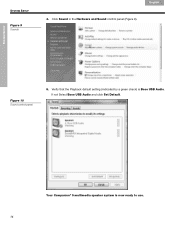
Verify that the Playback default setting (indicated by a green check) is now ready to use. 14 If not Select Bose USB Audio and click Set Default. Figure 10 Sound control panel 5. SYSTEM SETUP SYSTEM SETUP Figure 9 Sounds Français Español English 4. Click Sound in the Hardware and Sound control panel (Figure 9). Your Companion® 5 multimedia speaker system is Bose USB Audio.
Verify that the Playback default setting (indicated by a green check) is now ready to use. 14 If not Select Bose USB Audio and click Set Default. Figure 10 Sound control panel 5. SYSTEM SETUP SYSTEM SETUP Figure 9 Sounds Français Español English 4. Click Sound in the Hardware and Sound control panel (Figure 9). Your Companion® 5 multimedia speaker system is Bose USB Audio.
Owner's guide
Page 15
... the control panel. Your Companion® 5 multimedia speaker system is now ready to use. 15 Choose Bose USB Audio for Properties For, Default Output, and System Output. For additional help with your hard drive, open the Sound control panel (Figure 11). 2. Figure 11 Mac OS® X sound preferences Figure 12 Audio MIDI Setup control panel 3. Do not unplug any cables during this setup procedure. In the Applications folder on your audio setup, please visit http://owners.bose.com...
... the control panel. Your Companion® 5 multimedia speaker system is now ready to use. 15 Choose Bose USB Audio for Properties For, Default Output, and System Output. For additional help with your hard drive, open the Sound control panel (Figure 11). 2. Figure 11 Mac OS® X sound preferences Figure 12 Audio MIDI Setup control panel 3. Do not unplug any cables during this setup procedure. In the Applications folder on your audio setup, please visit http://owners.bose.com...
Owner's guide
Page 16
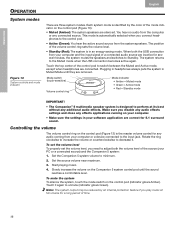
... the system, touch the mode switch on the Companion 5 system control pod until they are silenced. The system returns to minimum. 2. Set the Companion 5 system volume to the Muted mode when the USB connection becomes active again. When both the volume level of time. 16 06.Operation.fm 10/08 Make sure you connect headphones to the control pod. • Active (Green): You hear the active sound source from your computer or...
... the system, touch the mode switch on the Companion 5 system control pod until they are silenced. The system returns to minimum. 2. Set the Companion 5 system volume to the Muted mode when the USB connection becomes active again. When both the volume level of time. 16 06.Operation.fm 10/08 Make sure you connect headphones to the control pod. • Active (Green): You hear the active sound source from your computer or...
Owner's guide
Page 17
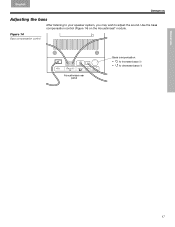
OPERATION English Español Français OPERATION Adjusting the bass After listening to your speaker system, you may wish to decrease bass (-) 17 06.Operation.fm 12/07 Figure 14 Bass compensation control Acoustimass rear panel Bass compensation: • 3 to increase bass (+) • 4 to adjust the sound. Use the bass compensation control (Figure 14) on the Acoustimass® module.
OPERATION English Español Français OPERATION Adjusting the bass After listening to your speaker system, you may wish to decrease bass (-) 17 06.Operation.fm 12/07 Figure 14 Bass compensation control Acoustimass rear panel Bass compensation: • 3 to increase bass (+) • 4 to adjust the sound. Use the bass compensation control (Figure 14) on the Acoustimass® module.
Owner's guide
Page 18
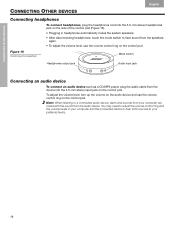
... speakers again. • To adjust the volume level, use the volume control ring on the control pod. Figure 15 Control pod connectors Mode switch Headphones output jack Audio input jack Connecting an audio device To connect an audio device such as a CD/MP3 player, plug the audio cable from the audio device. CONNECTING OTHER DEVICES CONNECTING OTHER DEVICES Français Español English Connecting headphones To connect headphones, plug the headphones cord into the 3.5-mm stereo input jack on the control pod. To adjust the volume level, turn...
... speakers again. • To adjust the volume level, use the volume control ring on the control pod. Figure 15 Control pod connectors Mode switch Headphones output jack Audio input jack Connecting an audio device To connect an audio device such as a CD/MP3 player, plug the audio cable from the audio device. CONNECTING OTHER DEVICES CONNECTING OTHER DEVICES Français Español English Connecting headphones To connect headphones, plug the headphones cord into the 3.5-mm stereo input jack on the control pod. To adjust the volume level, turn...

Owner's guide
Page 19
... use any sprays near the speakers. USB cable and start again. the message, "This USB Remove the USB 1.0 device, or plug the Companion 5 system directly into any audio application running. 19 Limited warranty The Companion® 5 system is Green). • Disconnect headphones. • Restart your digital audio application. Please fill out the information section on the device is turned up. • Make sure the speaker system is in the Active mode (control pod...
... use any sprays near the speakers. USB cable and start again. the message, "This USB Remove the USB 1.0 device, or plug the Companion 5 system directly into any audio application running. 19 Limited warranty The Companion® 5 system is Green). • Disconnect headphones. • Restart your digital audio application. Please fill out the information section on the device is turned up. • Make sure the speaker system is in the Active mode (control pod...
Owner's guide
Page 20
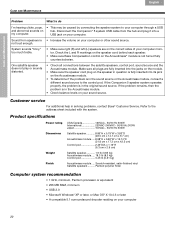
... the speaker cord plug on the speaker in question is fully inserted into a my computer. One satellite speaker does not play or sounds distorted. • Check all plugs are on your computer. Make sure all connections between the satellite speakers, control pod, sound source and the Acoustimass module. Refer to the control pod. USB jack on the correct sides of your computer monitor. not loud enough. If the Companion 5 speaker system operates...
... the speaker cord plug on the speaker in question is fully inserted into a my computer. One satellite speaker does not play or sounds distorted. • Check all plugs are on your computer. Make sure all connections between the satellite speakers, control pod, sound source and the Acoustimass module. Refer to the control pod. USB jack on the correct sides of your computer monitor. not loud enough. If the Companion 5 speaker system operates...

Owner's guide
Page 21
©2009 Bose Corporation, The Mountain, Framingham, MA 01701-9168 USA AM322417 Rev.00
©2009 Bose Corporation, The Mountain, Framingham, MA 01701-9168 USA AM322417 Rev.00


