Owners Guide
Page 5
... www.bose.com/register. 3 Note: Now would be a good time to Find 3 Introduction 4 Your Companion® 3 Multimedia Speaker System 4 System Setup 5 Unpacking 5 Selecting a location for your Companion 3 Multimedia Speaker System 6 Positioning the Acoustimass® module 6 Positioning the satellite speakers 7... system 10 Additional Connections 10 Operation 11 Operating the Companion 3 multimedia speaker system 11 Troubleshooting 12 Troubleshooting 12 Reference 13 Maintaining the Companion® 3 Multimedia Speaker System 13 Cleaning the system 13 Limited Warranty period ...
... www.bose.com/register. 3 Note: Now would be a good time to Find 3 Introduction 4 Your Companion® 3 Multimedia Speaker System 4 System Setup 5 Unpacking 5 Selecting a location for your Companion 3 Multimedia Speaker System 6 Positioning the Acoustimass® module 6 Positioning the satellite speakers 7... system 10 Additional Connections 10 Operation 11 Operating the Companion 3 multimedia speaker system 11 Troubleshooting 12 Troubleshooting 12 Reference 13 Maintaining the Companion® 3 Multimedia Speaker System 13 Cleaning the system 13 Limited Warranty period ...
Owners Guide
Page 6
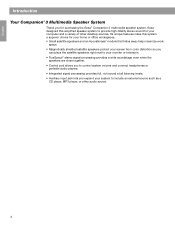
...audio source. 4 space. • Magnetically shielded satellite speakers protect your screen from color distortion so you can place the satellite speakers right next to your monitor or television. • TrueSpace...® stereo signal processing provides a wide soundstage even when the speakers are close together. • Control pod allows you to control system...or office workspaces. • Small satellite speakers and an Acoustimass® module that hides away help maximize work- English Introduction Your Companion® 3 Multimedia Speaker System Thank you expand your system to...
...audio source. 4 space. • Magnetically shielded satellite speakers protect your screen from color distortion so you can place the satellite speakers right next to your monitor or television. • TrueSpace...® stereo signal processing provides a wide soundstage even when the speakers are close together. • Control pod allows you to control system...or office workspaces. • Small satellite speakers and an Acoustimass® module that hides away help maximize work- English Introduction Your Companion® 3 Multimedia Speaker System Thank you expand your system to...
Owners Guide
Page 7
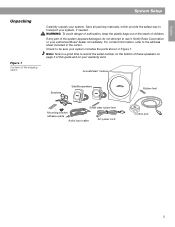
..., refer to use it. English Unpacking Figure 1 Contents of the shipping carton System Setup Carefully unpack your authorized Bose® dealer immediately. Notify Bose Corporation or your system. Acoustimass® module Brackets Satellite speakers Rubber feet Small clear rubber feet Mounting bracket adhesive pads Audio input cable AC power cord Control pod 5 Check... provide the safest way to be sure your warranty card. Note: Now is a good time to record the serial number on the bottom of these speakers on page 3 of children.
..., refer to use it. English Unpacking Figure 1 Contents of the shipping carton System Setup Carefully unpack your authorized Bose® dealer immediately. Notify Bose Corporation or your system. Acoustimass® module Brackets Satellite speakers Rubber feet Small clear rubber feet Mounting bracket adhesive pads Audio input cable AC power cord Control pod 5 Check... provide the safest way to be sure your warranty card. Note: Now is a good time to record the serial number on the bottom of these speakers on page 3 of children.
Owners Guide
Page 8
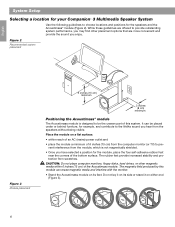
... The rubber feet provide increased stability and protection from the speakers without being visible. The magnetic field produced by this system. English System Setup Selecting a location for your Companion® 3 Multimedia Speaker System Use the following guidelines to be the unseen part of..., floppy disks, hard drives, or other placement options that are more convenient and provide the sound you have selected a position for the speakers and the Acoustimass® module (Figure 2). Do not lay it on either end (Figure 3). 6 Figure 2 Recommended system placement Figure ...
... The rubber feet provide increased stability and protection from the speakers without being visible. The magnetic field produced by this system. English System Setup Selecting a location for your Companion® 3 Multimedia Speaker System Use the following guidelines to be the unseen part of..., floppy disks, hard drives, or other placement options that are more convenient and provide the sound you have selected a position for the speakers and the Acoustimass® module (Figure 2). Do not lay it on either end (Figure 3). 6 Figure 2 Recommended system placement Figure ...
Owners Guide
Page 9
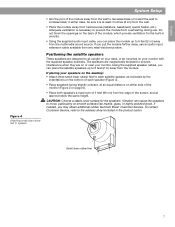
... feet 7 If you may obtain additional rubber feet from Bose® Customer Service. Using the supplied speaker cables, you can place the satellite speakers up to the address sheet included in the product carton. The speakers are designed to sit upright on page 6). • Place both speakers a maximum of 3 feet (90 cm) from the edge...
... feet 7 If you may obtain additional rubber feet from Bose® Customer Service. Using the supplied speaker cables, you can place the satellite speakers up to the address sheet included in the product carton. The speakers are designed to sit upright on page 6). • Place both speakers a maximum of 3 feet (90 cm) from the edge...
Owners Guide
Page 10
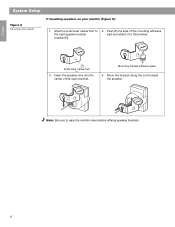
Peel off one side of the open bracket. Insert the speaker wire into the center of the mounting adhesive pad and attach it to wipe the monitor clean before affixing speaker brackets. 8 Note: Be sure to the bracket. Move the bracket along the cord toward the speaker. Attach a small clear rubber foot to the right speaker bracket (marked R). 2. Mounting bracket adhesive pads 4. English System Setup Figure 5 Mounting the bracket If mounting speakers on your monitor (Figure 5): 1. Pad Small clear rubber foot 3.
Peel off one side of the open bracket. Insert the speaker wire into the center of the mounting adhesive pad and attach it to wipe the monitor clean before affixing speaker brackets. 8 Note: Be sure to the bracket. Move the bracket along the cord toward the speaker. Attach a small clear rubber foot to the right speaker bracket (marked R). 2. Mounting bracket adhesive pads 4. English System Setup Figure 5 Mounting the bracket If mounting speakers on your monitor (Figure 5): 1. Pad Small clear rubber foot 3.
Owners Guide
Page 11
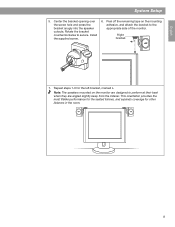
Note: The speakers mounted on the mounting adhesive, and attach the bracket to the appropriate side of the monitor. Right bracket 7. This orientation provides the most lifelike performance ... steps 1-6 for other listeners in the room. 9 English System Setup 5. Center the bracket opening over the screw hole and press the bracket snugly into the speaker cutouts. Install the supplied screw. 6.
Note: The speakers mounted on the mounting adhesive, and attach the bracket to the appropriate side of the monitor. Right bracket 7. This orientation provides the most lifelike performance ... steps 1-6 for other listeners in the room. 9 English System Setup 5. Center the bracket opening over the screw hole and press the bracket snugly into the speaker cutouts. Install the supplied screw. 6.
Owners Guide
Page 12
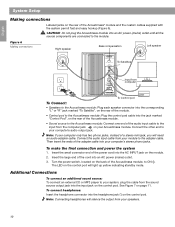
.... See Figure 7 on the rear of the module. • Control pod to the Acoustimass module; Figure 6 Making connections Right speaker Bass compensation Left speaker To Satellites ı ı Input from your computer's stereo phono jacks. Then insert the ends of the power cord into your...output jack into an AC power (mains) outlet until all the source components are connected to the input from the computer jack on your speakers. 10 To connect headphones: Insert the headphone connector into the corresponding "L" or "R" jack marked "To Satellite", on the rear of the...
.... See Figure 7 on the rear of the module. • Control pod to the Acoustimass module; Figure 6 Making connections Right speaker Bass compensation Left speaker To Satellites ı ı Input from your computer's stereo phono jacks. Then insert the ends of the power cord into your...output jack into an AC power (mains) outlet until all the source components are connected to the input from the computer jack on your speakers. 10 To connect headphones: Insert the headphone connector into the corresponding "L" or "R" jack marked "To Satellite", on the rear of the...

Owners Guide
Page 13
... the treble (high frequencies). Turn on and off 1. You may cause it is activated by touching the center portion of any speaker system. English Operation Operating the Companion® 3 multimedia speaker system Turning your sound source. Bare floors and walls and unupholstered furniture reflect the treble and may also adjust the placement of...
... the treble (high frequencies). Turn on and off 1. You may cause it is activated by touching the center portion of any speaker system. English Operation Operating the Companion® 3 multimedia speaker system Turning your sound source. Bare floors and walls and unupholstered furniture reflect the treble and may also adjust the placement of...
Owners Guide
Page 14
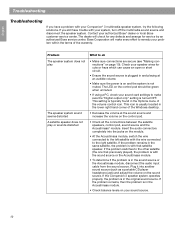
... the Acoustimass module, disconnect the audio input cable from the sound source. Contact your sound source. 12 Check your Companion® 3 multimedia speaker system, try the following solutions. If you have trouble with the wire connected to the right satellite. Problem What to ...source and the Acoustimass® module. This setting is not muted. If the Companion 3 speaker system operates properly, the problem is with your speaker wires for service by an authorized Bose service center. Bose Corporation will check for any defects and arrange for cuts or frays which can ...
... the Acoustimass module, disconnect the audio input cable from the sound source. Contact your sound source. 12 Check your Companion® 3 multimedia speaker system, try the following solutions. If you have trouble with the wire connected to the right satellite. Problem What to ...source and the Acoustimass® module. This setting is not muted. If the Companion 3 speaker system operates properly, the problem is with your speaker wires for service by an authorized Bose service center. Bose Corporation will check for any defects and arrange for cuts or frays which can ...
Owners Guide
Page 15
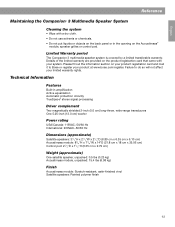
Limited Warranty period The Companion 3 multimedia speaker system is covered by a limited transferable warranty. Technical Information Features Built-in the opening on the Acoustimass® module, speaker grilles or control pod. Details of the limited ...speaker, unpacked: 0.5 lbs (0.23 kg) Acoustimass module, unpacked: 15.4 lbs (6.98 kg) Finish Acoustimass module: Scratch-resistant, satin-finished vinyl Satellite speakers: Painted polymer finish 13 Failure to Bose or register your product at www.bose.com/register. English Reference Maintaining the Companion® 3 Multimedia Speaker...
Limited Warranty period The Companion 3 multimedia speaker system is covered by a limited transferable warranty. Technical Information Features Built-in the opening on the Acoustimass® module, speaker grilles or control pod. Details of the limited ...speaker, unpacked: 0.5 lbs (0.23 kg) Acoustimass module, unpacked: 15.4 lbs (6.98 kg) Finish Acoustimass module: Scratch-resistant, satin-finished vinyl Satellite speakers: Painted polymer finish 13 Failure to Bose or register your product at www.bose.com/register. English Reference Maintaining the Companion® 3 Multimedia Speaker...


